Multi-Tier Architecture vs. Serverless Architecture

Montag, 12 April, 2021

You’ve undoubtedly come across some terms like three-tier application, serverless framework and multi-tier architecture in your knowledge-seeking journey. There’s a lot to keep up with regarding application design. In this post, we’ll briefly compare serverless and multi-tier architectures and look at the benefits of serverless over traditional multi-tier architectures and vice versa.

Before diving into our comparison, let’s look at the unique components of each architecture.

What is Serverless?

The best way to define serverless is to look at where we’ve come from in the last five to ten years —  multi-tier architecture. Historically, when designing software, we plan that software to be run on a particular runtime architecture. Serverless is an approach to software design for client-server applications. It refers to software that runs on a single computer or a group of computers hosting an application that connects to a remote system such as a browser or mobile phone. Business logic is executed on the server systems to respond to that client, whether it’s a phone, browser, etc.

For example, let’s look at your bank’s website. When you connect to their website, you connect to a software application running on a server somewhere. Odds are it’s running on a mini server, and it’s in a complex environment that’s performing the functions of the bank’s website. But for all intents and purposes, it’s a single application. You gain value from that application because you can conduct your online banking transactions. There is logic built into that application that performs various financial transactions; whatever you need is fulfilled by the software running on their servers.

Serverless offers a way to build applications without considering the runtime environment. You don’t need to worry about how the servers are placed into various subnets or what infrastructure software runs on which server. It’s irrelevant. But that hasn’t always been the case, and that’s where we get multi-tier architecture.

What is Multi-Tier?

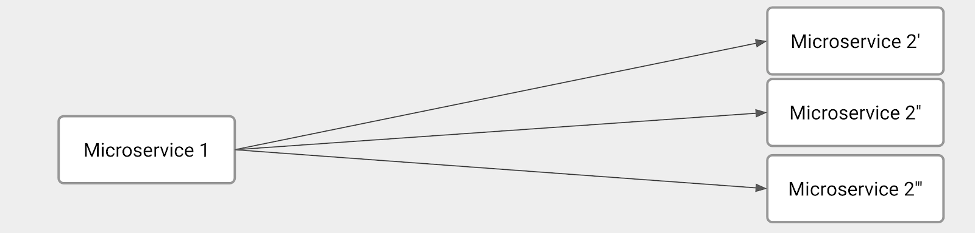
Let’s say you work at a bank and you need to write a software application for an online banking service. You don’t want to think about how the bank will store the data for the various baking transactions. The odds are that it exists in a database somewhere like FaunaDB (a serverless database service). You’re not recreating the bank’s enterprise reporting software. You’re simply looking to leverage that existing data. Traditionally,  we design software as a multi-tier architecture. That is a runtime architecture for client-server applications composed of tiers. So there can be several different tiers depending on how you approach a particular problem, but generally speaking, the most common tiers are presentation, application and data. Let’s explore those.

  • Presentation Tier: This is the actual UI of the application. It uses something like RedwoodJS, React or HTML+CSS to provide the visual layout of the Data. Part of the application handles displaying that information in some shape or form.
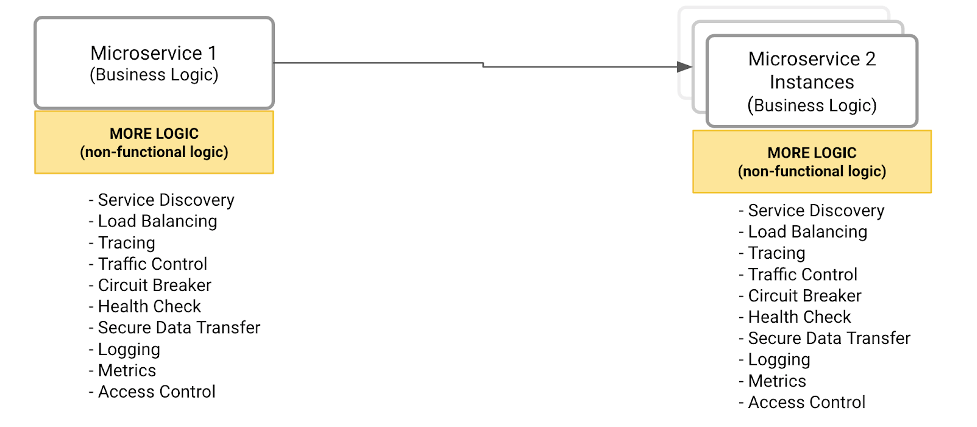
  • Application Tier: This tier passes information to the presentation tier. It processes how we manipulate the data to services. For example, if we need to show a list of banking transactions by date, the application tier handles the date sort and other business logic our application requires.
  • Data Tier: This tier handles getting and storing the data that we are manipulating within our application.

Multi-Tier Application Architecture

I’ve outlined the basics of multi-tier,  a common approach for software development. Understanding where we come from makes it easier to understand the benefits of serverless. Historically, if we were writing software, we’d have to think about database servers, application servers and front-end servers and how they handle different tiers of our application. We’d also have to think about the network paths between those servers and how many servers we need to perform the necessary functions. For example, your application tier may need a substantial number of servers to have the computing power to do the business logic processing. Data tiers also historically have extensive resource needs.

Meanwhile, your front end might not need many servers. These are all considerations in a multi-tier software design approach. With serverless, this is not necessarily the case. Let’s find out why.

Serverless Fundamentals

Before we jump into architecture, let’s familiarize ourselves with several serverless components.

Backend-as-a-service(BAAS)

With the evolution of the public cloud and mobile applications, we’ve seen a different application development approach. Today mobile app developers don’t want to maintain a data center to service their clients. Instead, they’ve designed mobile applications to take advantage of the cloud. Cloud vendors quickly provided a solution to this in the form of a backend as a service. Backend as a service is a cloud service model where server-side logic and state are hosted by cloud providers and used by client applications running via a web or mobile interface. Essentially, this is a series of APIs hosted in the cloud. Let’s say I’m working on a web application and need an authentication mechanism. I can use AUTH0’s cloud-hosted APIs. I don’t need to manage authentication on my servers; AUTH0 handles it for me. At the end of the day, all APIs hosted on the cloud craft a URL, make a rest request to get some data and execute it.BAAS lays the foundation for serverless.

Functions as a service (FaaS)

Functions are just some code that performs a super-specific task, whether it be collecting a user id or formatting some data for output. In the Faas cloud service model, business logic is represented by event triggers, WhileBaaS using APIs from cloud providers, with FaaS, you provide your code, which is executed in the cloud by event-triggered containers that are dynamically allocated and ephemeral. Since our code is event triggered, we don’t have to start the application and wait for a request. The application only exists when it’s triggered; something has to make it spin up. The best part is you have to define what that trigger is. Containers provide the runtime environment for your code. In the true nature of serverless, there aren’t servers; services handling your request only get created when a request comes in that it needs to handle. Faas is also dynamic, so you don’t have to worry about scaling when you get a traffic spike. Cloud providers handle scaling the application up and down. The last thing to keep in mind is that the containers running our code are ephemeral, meaning they will not stick around. When the job is done, so are they.

Serverless Architecture:

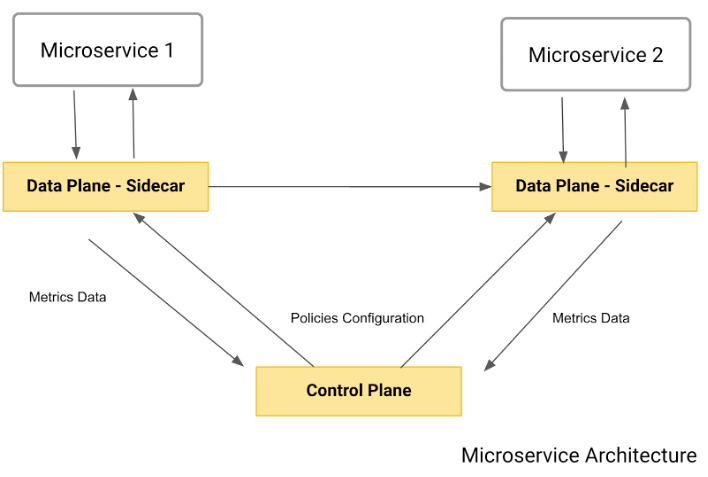
Serverless is a runtime architecture where cloud service providers manage the resources and dynamically allocate infrastructure on demand for a given business logic unit. The key to a serverless application is the application runs on a seemingly ethereal phantom infrastructure that exists yet doesn’t. Serverless uses servers, but the beautiful part is you don’t have to manage or maintain them. You don’t have to configure or set up a VPC, set up complex routing rules, or install regular patches to the system to get high-performance and robust applications. The cloud providers take care of all these details, leaving you to focus on developing your application.

Basic Serverless Architecture

Developing an application with serverless takes a lot of overhead. You pay every time your code is triggered and for the time it runs to the cloud provider.
When creating a serverless application, take appropriate measures to protect it from unwanted high traffic, such as a DDOS (Distributed Denial Of Service) attack that could spin up a lot of copies of your code and increase your bill.
Your application can be a mixture of both BaaS and FaaS hosted on your cloud provider’s infrastructure.

Ultimately, with serverless, you only have to focus on developing and shipping the code. Development is easier, making client-server applications simpler because the cloud service provider does the heavy lifting.

Now that we better understand Multi-Tier and Serverless architectures let’s compare them.

Multi-Tier vs. Serverless

There are several critical areas to consider when comparing serverless architecture with multi-tier architecture.

  • Skill Set
  • Costs
  • Use Case

Each has varying degrees of impact depending on your goals.

Skill Set: 

Serverless:
You need only a development background to be successful with serverless. Your cloud provider will take care of the infrastructure complexity.

Multi-Tier:
To succeed in a multi-tier approach, you need an operational level of support expertise: You’ll configure servers, install operating systems and software, manage firewalls and develop all these things alongside the software. Depending on what you’re trying to achieve, having this skill set could be advantageous.

Costs:

Serverless:
When it comes to cost, there are arguments for both architectures.  Startup costs with serverless are really low because you only pay for every execution of your code.

Multi-Tier:
The opposite is true with multi-tier architecture. You’ll have upfront costs for servers and getting them set up in your data center or cloud. However, you’ll save money if you expect a steady traffic volume and you can leverage that cloud configuration. Because you will do the cloud configuration yourself, the cost may vary depending on your use case.

Use Cases:
Let’s look at how we expect to use the software.

Serverless: Serverless is fantastic for sporadic traffic or seasonal traffic. Perhaps you are looking at a retail website with large monthly sales (with huge traffic). With a traditional data center, your infrastructure is available even when you don’t need it, and that’s a significant spike in overall cost. With serverless, you don’t have to worry about the infrastructure. It will automatically scale.

Multi-Tier: Let’s say you have a consistent traffic pattern. You know exactly what you need. In this case, you might be able to save some money by sticking to the traditional approach of software architecture.

Conclusion

In closing, traditional DevOps culture is converging. We’ve moved from servers to virtual machines to containers. Now we are looking at literally just a few lines of code in a function that we have been shrinking away from maintaining a full-on infrastructure with our software. We have to isolate business logic from the infrastructure with serverless. And that is convenient for development’s sake because you don’t have to worry about taking care of the infrastructure as you develop your software.

Tags: ,,, Category: Community page, Containers Comments closed

Using Hybrid and Multi-Cloud Service Mesh Based Applications for Distributed Deployments

Montag, 21 Dezember, 2020

Join the Master Class: Using Hybrid and Multi-Cloud Service Mesh Based Applications for Highly Distributed Environment Deployments

Service Mesh is an emerging architecture pattern gaining traction today. Along with Kubernetes, Service Mesh can form a powerful platform which addresses the technical requirements that arise in a highly distributed environment typically found on a microservices cluster and/or service infrastructure. A Service Mesh is a dedicated infrastructure layer for facilitating service-to-service communications between microservices.

Service Mesh addresses the communication requirements typical in a microservices-based application, including encrypted tunnels, health checks, circuit breakers, load balancing and traffic permission. Leaving the microservices to address these requirements leads to an expensive and time consuming development process.

In this blog, we’ll provide an overview of the most common microservice communication requirements that the Service Mesh architecture pattern solves.

Microservices Dynamics and Intrinsic Challenges

The problem begins when you realize that microservices implement a considerable amount of code not related to the business logic they were originally assigned. Additionally, it’s possible you have multiple microservices implementing similar capabilities in a non-standardized process. In other words, the microservices development team should focus on business logic and leave the low-level communication capabilities to a specific layer.

Moving forward with our scenario, consider the intrinsic dynamics of microservices. In given time, you may (or most likely will) have multiple instances of a microservice due to several reasons, including:

  • Throughput: depending on the incoming requests, you might have a higher or lower number of instances of a microservice
  • Canary release
  • Blue/green deployment
  • A/B testing

In short, the microservice-to-microservice communication has specific requirements and issues to solve. The illustration below shows this scenario:

Image 01

The illustration depicts several technical challenges. Clearly, one of the main responsibilities of Microservice 1 is to balance the load among all Microservice 2 instances. As such, Microservice 1 has to figure out how many Microservice 2 instances we have at the request moment. In other words, Microservice 1 must implement service discovery and load balancing.

On the other hand, Microservice 2 has to implement some service registration capabilities to tell Microservice 1 when a brand-new instance is available.

In order to have a fully dynamic environment, these other capabilities should be part of the microservices development:

  • Traffic control: a natural evolution of load balancing. We want to specify the number of requests that should go to each of the Microservice 2 instances.
  • Encrypted communication between the Microservices 1 and 2.
  • Circuit breakers and health checks to address and overcome networking problems.

In conclusion, the main problem is that the development team is spending significant resources writing complex code not directly related to business logic expected to be delivered by the microservices.

Potential Solutions

How about externalizing all the non-functional and operational capabilities in an external and standardized component that all microservices can call? For example, the diagram below compiles all capabilities that should not be part of a given microservice. So, after identifying all capabilities, we need to decide where to implement them.

Image 02

Solution #1 – Encapsulating all capabilities in a library

The developers would be responsible for calling functions provided by the library to address the microservice communication requirements.

There are a few drawbacks to this solution:

  • It’s a tightly coupled solution, meaning that the microservices are highly dependent on the library.
  • It’s not an easy model to distribute or upgrade new versions of the library.
  • It doesn’t fit the microservice polyglot principle with different programming languages being applied on different contexts

Solution #2 – Transparent Proxy

Image 03

This solution implements the same collection of capabilities. However, with a very different approach: each microservice has a specific component, playing a proxy role, taking care of its incoming and outcoming traffic. The proxy solves the library drawbacks we described before as follows:

  • The proxy is transparent, meaning the microservice is not aware it is running nearby and implementing all needed capabilities to communicate with other microservices.
  • Since it’s a transparent proxy, the developer doesn’t need to change the code to refer to the proxy. Therefore, upgrading the proxy would be a low-impact process from a microservice development perspective.
  • The proxy can be developed using different technologies and programming languages used by microservice.

The Service Mesh Architectural Pattern

While a transparent proxy approach brings several benefits to the microservice development team and the microservice communication requirements, there are still some missing parts:

  • The proxy is just enforcing policies to implement the communication requirements like load balancing, canary, etc.
  • What is responsible for defining such policies and publishing them across all running proxies?

The solution architecture needs another component. Such components would be used by admins for policy definition and it will be responsible for broadcasting the policies to the proxies.

The following diagram shows the final architecture which is the service mesh pattern:

Image 04

As you can see, the pattern comprehends the two main components we’ve described:

  • The data plane: also known as sidecar, it plays the transparent proxy role. Again, each microservice will have its own data plane intercepting all incoming and outgoing traffic and applying the policies previously described.
  • The control plane: used by the admin to define policies and publish them to the data plane.

Some important things to note:

  • It’s “push-based” architecture. The data plane doesn’t do “callouts” to get the policies: that would be a big network consuming architecture.
  • The data plane usually reports usage metrics to the control plane or a specific infrastructure.

Get Hands-On with Rancher, Kong and Kong Mesh

Kong provides an enterprise-class and comprehensive service connectivity platform that includes an API gateway, a Kubernetes ingress controller and a Service Mesh implementation. The platform allows customers to deploy on multiple environments such as on premises, hybrid, multi-­­­­­­region and multi-cloud.

Let’s implement a Service Mesh with a canary release running on a cloud-agnostic Kubernetes cluster, which could include a Google Kubernetes Engine (GKE) cluster or any other Kubernetes distribution. The Service Mesh will be implemented by Kong Mesh (and protected by Kong for Kubernetes as the Kubernetes ingress controller. Generically speaking, the ingress controller is responsible for defining entry points to your Kubernetes cluster, exposing the microservices deployed inside of it and applying consumption policies to it.

First of all, make sure you have Rancher installed, as well as a Kubernetes cluster running and managed by Rancher. After logging into Rancher, choose the Kubernetes cluster we’re going to work on – in our case “kong-rancher”. Click the Cluster Explorer link. You will be redirected to a page like this:

Image 05

Now, let’s start with the Service Mesh:

  1. Kong Mesh Helm Chart

    Go back to Rancher Cluster Manager home page and choose your cluster again. To add a new catalog, pass your mouse over the “Tools” menu option and click on Catalogs. Click the Add Catalog button and include Kong Mesh’s Helm v3 charts .

    Choose global as the scope and Helm v3 as the Helm version.

    Image 06

    Now click on Apps and Launch to see Kong Mesh available in the Catalog. Notice that Kong, as a Rancher partner, provides Kong for Kubernetes Helm Charts, by default:

    Image 07

  2. Install Kong Mesh

    Click on the top menu option Namespaces and create a “kong-mesh-system” namespace.

    Image 08

    Pass your mouse over the kong-rancher top menu option and click on kong-rancher active cluster.

    Image 09

    Click on Launch kubectl

    Image 10

    Create a file named “license.json” for the Kong Mesh license you received from Kong. The license follows the format:

    {“license”:{“version”:1,“signature”:“6a7c81af4b0a42b380be25c2816a2bb1d761c0f906ae884f93eeca1fd16c8b5107cb6997c958f45d247078ca50a25399a5f87d546e59ea3be28284c3075a9769”,“payload”:{“customer”:“Kong_SE_Demo_H1FY22”,“license_creation_date”:“2020-11-30”,“product_subscription”:“Kong Enterprise Edition”,“support_plan”:“None”,“admin_seats”:“5”,“dataplanes”:“5”,“license_expiration_date”:“2021-06-30”,“license_key”:“XXXXXXXXXXXXX”}}}

    Now, create a Kubernetes generic secret with the following command:

    kubectl create secret generic kong-mesh-license -n kong-mesh-system --from-file=./license.json

    Close the kubectl session, click on Default project and on Apps top menu option. Click on Launch button and choose the kong-mesh Helm charts.

    Image 11

    Click on Use an existing namespace and choose the one we just created. There are several parameters to configure Kong Mesh, but we’re going to keep all the default values. After clicking on Launch , you should see the Kong Mesh application deployed:

    Image 12

    And you can check the installation using Rancher Cluster Explorer again. Click on Pods on the left menu and choose kong-mesh-system namespace:

    Image 13

    You can use kubectl as well like this:

    NAMESPACE          NAME                                                      READY   STATUS    RESTARTS   AGE
    cattle-system      cattle-cluster-agent-785fd5f54d-r7x8r                     1/1     Running   0          75m
    fleet-system       fleet-agent-77c78f9c74-f97tv                              1/1     Running   0          75m
    kong-mesh-system   kuma-control-plane-5b9c6f4598-nvq8q                       1/1     Running   0          16m
    kube-system        event-exporter-gke-666b7ffbf7-n9lfl                       2/2     Running   0          76m
    kube-system        fluentbit-gke-xqsdv                                       2/2     Running   0          76m
    kube-system        gke-metrics-agent-gjrqr                                   1/1     Running   0          76m
    kube-system        konnectivity-agent-4c4hf                                  1/1     Running   0          76m
    kube-system        kube-dns-66d6b7c877-tq877                                 4/4     Running   0          76m
    kube-system        kube-dns-autoscaler-5c78d65cd9-5hcxs                      1/1     Running   0          76m
    kube-system        kube-proxy-gke-c-kpwnf-default-0-be059c1c-49qp            1/1     Running   0          76m
    kube-system        l7-default-backend-5b76b455d-v6dvg                        1/1     Running   0          76m
    kube-system        metrics-server-v0.3.6-547dc87f5f-qntjf                    2/2     Running   0          75m
    kube-system        prometheus-to-sd-fdf9j                                    1/1     Running   0          76m
    kube-system        stackdriver-metadata-agent-cluster-level-68d94db6-64n4r   2/2     Running   1          75m
  3. Microservices deployment

    Our Service Mesh deployment is based on a simple microservice-to-microservice communication scenario. As we’re running a canary release, the called microservice has two versions.

    • “magnanimo”: exposed through Kong for Kubernetes ingress controller.
    • “benigno”: provides a “hello” endpoint where it echoes the current datetime. It has a canary release that sends a slightly different response.

    The figure below illustrates the architecture:

    Image 14

    Create a namespace with the sidecar injection annotation. You can use the Rancher Cluster Manager again: choose your cluster and click on Projects/Namespaces. Click on Add Namespace. Type “kong-mesh-app” for name and include an annotation with a “kuma.io/sidecar-injection” key and “enabled” as its value:

    Image 15

    Again, you can use kubectl as an alternative

    kubectl create namespace kong-mesh-app
    
    kubectl annotate namespace kong-mesh-app kuma.io/sidecar-injection=enabled
    
    Submit the following declaration to deploy Magnanimo injecting the Kong Mesh data plane
    
    cat <<EOF | kubectl apply -f -
    
    apiVersion: apps/v1
    
    kind: Deployment
    
    metadata:
    
    name: magnanimo
    
    namespace: kong-mesh-app
    
    spec:
    
    replicas: 1
    
    selector:
    
    matchLabels:
    
    app: magnanimo
    
    template:
    
    metadata:
    
    labels:
    
    app: magnanimo
    
    spec:
    
    containers:
    
    - name: magnanimo
    
    image: claudioacquaviva/magnanimo
    
    ports:
    
    - containerPort: 4000
    
    ---
    
    apiVersion: v1
    
    kind: Service
    
    metadata:
    
    name: magnanimo
    
    namespace: kong-mesh-app
    
    labels:
    
    app: magnanimo
    
    spec:
    
    type: ClusterIP
    
    ports:
    
    - port: 4000
    
    name: http
    
    selector:
    
    app: magnanimo
    
    EOF

    Check your deployment using Rancher Cluster Manager. Pass the mouse over the kong-rancher menu and click on the Default project to see the current deployments:

    Image 16

    Click on magnanimo to check details of the deployment, including its pods:

    Image 17

    Click on the magnanimo pod to check the containers running inside of it.

    Image 18

    As we can see, the pod has two running containers:

    • magnanimo: where the microservice is actually running
    • kuma-sidecar: injected during deployment time, playing the Kong Mesh data plane role.

    Similarly, deploy Benigno with its own sidecar:

    cat <<EOF | kubectl apply -f -
    
    apiVersion: apps/v1
    
    kind: Deployment
    
    metadata:
    
    name: benigno-v1
    
    namespace: kong-mesh-app
    
    spec:
    
    replicas: 1
    
    selector:
    
    matchLabels:
    
    app: benigno
    
    template:
    
    metadata:
    
    labels:
    
    app: benigno
    
    version: v1
    
    spec:
    
    containers:
    
    - name: benigno
    
    image: claudioacquaviva/benigno
    
    ports:
    
    - containerPort: 5000
    
    ---
    
    apiVersion: v1
    
    kind: Service
    
    metadata:
    
    name: benigno
    
    namespace: kong-mesh-app
    
    labels:
    
    app: benigno
    
    spec:
    
    type: ClusterIP
    
    ports:
    
    - port: 5000
    
    name: http
    
    selector:
    
    app: benigno
    
    EOF
    
    And finally, deploy Benigno canary release. Notice that the canary release will be abstracted by the same Benigno Kubernetes Service created before:
    
    cat <<EOF | kubectl apply -f -
    
    apiVersion: apps/v1
    
    kind: Deployment
    
    metadata:
    
    name: benigno-v2
    
    namespace: kong-mesh-app
    
    spec:
    
    replicas: 1
    
    selector:
    
    matchLabels:
    
    app: benigno
    
    template:
    
    metadata:
    
    labels:
    
    app: benigno
    
    version: v2
    
    spec:
    
    containers:
    
    - name: benigno
    
    image: claudioacquaviva/benigno_rc
    
    ports:
    
    - containerPort: 5000
    
    EOF

    Check the deployments and pods with:

    $ kubectl get pod --all-namespaces
    NAMESPACE          NAME                                                      READY   STATUS    RESTARTS   AGE
    cattle-system      cattle-cluster-agent-785fd5f54d-r7x8r                     1/1     Running   0          75m
    fleet-system       fleet-agent-77c78f9c74-f97tv                              1/1     Running   0          75m
    kong-mesh-app      benigno-v1-fd4567d95-drnxq                                2/2     Running   0          110s
    kong-mesh-app      benigno-v2-b977c867b-lpjpw                                2/2     Running   0          30s
    kong-mesh-app      magnanimo-658b67fb9b-tzsjp                                2/2     Running   0          5m3s
    kong-mesh-system   kuma-control-plane-5b9c6f4598-nvq8q                       1/1     Running   0          16m
    kube-system        event-exporter-gke-666b7ffbf7-n9lfl                       2/2     Running   0          76m
    kube-system        fluentbit-gke-xqsdv                                       2/2     Running   0          76m
    kube-system        gke-metrics-agent-gjrqr                                   1/1     Running   0          76m
    kube-system        konnectivity-agent-4c4hf                                  1/1     Running   0          76m
    kube-system        kube-dns-66d6b7c877-tq877                                 4/4     Running   0          76m
    kube-system        kube-dns-autoscaler-5c78d65cd9-5hcxs                      1/1     Running   0          76m
    kube-system        kube-proxy-gke-c-kpwnf-default-0-be059c1c-49qp            1/1     Running   0          76m
    kube-system        l7-default-backend-5b76b455d-v6dvg                        1/1     Running   0          76m
    kube-system        metrics-server-v0.3.6-547dc87f5f-qntjf                    2/2     Running   0          75m
    kube-system        prometheus-to-sd-fdf9j                                    1/1     Running   0          76m
    kube-system        stackdriver-metadata-agent-cluster-level-68d94db6-64n4r   2/2     Running   1          75m
    
    
    $ kubectl get service --all-namespaces
    NAMESPACE          NAME                   TYPE        CLUSTER-IP    EXTERNAL-IP   PORT(S)                                                AGE
    default            kubernetes             ClusterIP   10.0.16.1     <none>        443/TCP                                                79m
    kong-mesh-app      benigno                ClusterIP   10.0.20.52    <none>        5000/TCP                                               4m6s
    kong-mesh-app      magnanimo              ClusterIP   10.0.30.251   <none>        4000/TCP                                               7m18s
    kong-mesh-system   kuma-control-plane     ClusterIP   10.0.21.228   <none>        5681/TCP,5682/TCP,443/TCP,5676/TCP,5678/TCP,5653/UDP   18m
    kube-system        default-http-backend   NodePort    10.0.19.10    <none>        80:32296/TCP                                           79m
    kube-system        kube-dns               ClusterIP   10.0.16.10    <none>        53/UDP,53/TCP                                          79m
    kube-system        metrics-server         ClusterIP   10.0.20.174   <none>        443/TCP                                                79m

    You can use Kong Mesh console to check the microservices and data planes also. On a terminal run:

    kubectl port-forward service/kuma-control-plane -n kong-mesh-system 5681

    Redirect your browser to http://localhost:5681/gui. Click on Skip to Dashboard and All Data Plane Proxies :

    Image 19

    Start a loop to see the canary release in action. Notice the service has been deployed as ClusterIP type, so you need to expose them directly with “port-forward”. The next step will show how to expose the service with the Ingress Controller.

    On a local terminal run:

    kubectl port-forward service/magnanimo -n kong-mesh-app 4000

    Open another terminal and start the loop. The request is going to port 4000 provided by Magnanimo. The path “/hw2” routes the request to Benigno Service, which has two endpoints behind it related to both Benigno releases:

    while [1]; do curl http://localhost:4000/hw2; echo; done

    You should see a result similar to this:

    Hello World, Benigno: 2020-11-20 12:57:05.811667
    Hello World, Benigno: 2020-11-20 12:57:06.304731
    Hello World, Benigno, Canary Release: 2020-11-20 12:57:06.789208
    Hello World, Benigno: 2020-11-20 12:57:07.269674
    Hello World, Benigno, Canary Release: 2020-11-20 12:57:07.755884
    Hello World, Benigno, Canary Release: 2020-11-20 12:57:08.240453
    Hello World, Benigno: 2020-11-20 12:57:08.728465
    Hello World, Benigno: 2020-11-20 12:57:09.208588
    Hello World, Benigno, Canary Release: 2020-11-20 12:57:09.689478
    Hello World, Benigno, Canary Release: 2020-11-20 12:57:10.179551
    Hello World, Benigno: 2020-11-20 12:57:10.662465
    Hello World, Benigno: 2020-11-20 12:57:11.145237
    Hello World, Benigno, Canary Release: 2020-11-20 12:57:11.618557
    Hello World, Benigno: 2020-11-20 12:57:12.108586
    Hello World, Benigno, Canary Release: 2020-11-20 12:57:12.596296
    Hello World, Benigno, Canary Release: 2020-11-20 12:57:13.093329
    Hello World, Benigno: 2020-11-20 12:57:13.593487
    Hello World, Benigno, Canary Release: 2020-11-20 12:57:14.068870
  4. Controlling the Canary Release

    As we can see, the request to both Benigno microservice releases is uses a round-robin policy. That is, we’re not in control of the canary release consumption. Service Mesh allows us to define when and how we want to expose the canary release to our consumers (in our case, the Magnanimo microservice).

    To define a policy to control the traffic going to both releases, use this following declaration. It says that 90 percent of the traffic should go to the current release, while only 10 percent should be redirected to the canary release.

        cat <<EOF | kubectl apply -f -
        apiVersion: kuma.io/v1alpha1
        kind: TrafficRoute
        mesh: default
        metadata:
        namespace: default
        name: route-1
        spec:
        sources:
        - match:
        kuma.io/service: magnanimo_kong-mesh-app_svc_4000
        destinations:
        - match:
        kuma.io/service: benigno_kong-mesh-app_svc_5000
        conf:
        split:
        - weight: 90
        destination:
        kuma.io/service: benigno_kong-mesh-app_svc_5000
        version: v1
        - weight: 10
        destination:
        kuma.io/service: benigno_kong-mesh-app_svc_5000
        version: v2
        EOF

    After applying the declaration, you should see a result like this:

    Hello World, Benigno: 2020-11-20 13:05:02.553389
    Hello World, Benigno: 2020-11-20 13:05:03.041120
    Hello World, Benigno: 2020-11-20 13:05:03.532701
    Hello World, Benigno: 2020-11-20 13:05:04.021804
    Hello World, Benigno: 2020-11-20 13:05:04.515245
    Hello World, Benigno, Canary Release: 2020-11-20 13:05:05.000644
    Hello World, Benigno: 2020-11-20 13:05:05.482606
    Hello World, Benigno: 2020-11-20 13:05:05.963663
    Hello World, Benigno, Canary Release: 2020-11-20 13:05:06.446599
    Hello World, Benigno: 2020-11-20 13:05:06.926737
    Hello World, Benigno: 2020-11-20 13:05:07.410605
    Hello World, Benigno: 2020-11-20 13:05:07.890827
    Hello World, Benigno: 2020-11-20 13:05:08.374686
    Hello World, Benigno: 2020-11-20 13:05:08.857266
    Hello World, Benigno: 2020-11-20 13:05:09.337360
    Hello World, Benigno: 2020-11-20 13:05:09.816912
    Hello World, Benigno: 2020-11-20 13:05:10.301863
    Hello World, Benigno: 2020-11-20 13:05:10.782395
    Hello World, Benigno: 2020-11-20 13:05:11.262624
    Hello World, Benigno: 2020-11-20 13:05:11.743427
    Hello World, Benigno: 2020-11-20 13:05:12.221174
    Hello World, Benigno: 2020-11-20 13:05:12.705731
    Hello World, Benigno: 2020-11-20 13:05:13.196664
    Hello World, Benigno: 2020-11-20 13:05:13.680319
  5. Install Kong for Kubernetes

    Let’s go back to Rancher to install our Kong for Kubernetes Ingress Controller and control the service mesh exposition. In the Rancher Catalog page, click the Kong icon. Accept the default values and click Launch :

    Image 20

    You should see both applications, Kong and Kong Mesh, deployed:

    Image 21

    Image 22

    Again, check the installation with kubectl:

    $ kubectl get pod --all-namespaces
    NAMESPACE          NAME                                                      READY   STATUS    RESTARTS   AGE
    cattle-system      cattle-cluster-agent-785fd5f54d-r7x8r                     1/1     Running   0          84m
    fleet-system       fleet-agent-77c78f9c74-f97tv                              1/1     Running   0          83m
    kong-mesh-app      benigno-v1-fd4567d95-drnxq                                2/2     Running   0          10m
    kong-mesh-app      benigno-v2-b977c867b-lpjpw                                2/2     Running   0          8m47s
    kong-mesh-app      magnanimo-658b67fb9b-tzsjp                                2/2     Running   0          13m
    kong-mesh-system   kuma-control-plane-5b9c6f4598-nvq8q                       1/1     Running   0          24m
    kong               kong-kong-754cd6947-db2j9                                 2/2     Running   1          72s
    kube-system        event-exporter-gke-666b7ffbf7-n9lfl                       2/2     Running   0          85m
    kube-system        fluentbit-gke-xqsdv                                       2/2     Running   0          84m
    kube-system        gke-metrics-agent-gjrqr                                   1/1     Running   0          84m
    kube-system        konnectivity-agent-4c4hf                                  1/1     Running   0          84m
    kube-system        kube-dns-66d6b7c877-tq877                                 4/4     Running   0          84m
    kube-system        kube-dns-autoscaler-5c78d65cd9-5hcxs                      1/1     Running   0          84m
    kube-system        kube-proxy-gke-c-kpwnf-default-0-be059c1c-49qp            1/1     Running   0          84m
    kube-system        l7-default-backend-5b76b455d-v6dvg                        1/1     Running   0          85m
    kube-system        metrics-server-v0.3.6-547dc87f5f-qntjf                    2/2     Running   0          84m
    kube-system        prometheus-to-sd-fdf9j                                    1/1     Running   0          84m
    kube-system        stackdriver-metadata-agent-cluster-level-68d94db6-64n4r   2/2     Running   1          84m
    
    
    $ kubectl get service --all-namespaces
    NAMESPACE          NAME                   TYPE           CLUSTER-IP    EXTERNAL-IP     PORT(S)                                                AGE
    default            kubernetes             ClusterIP      10.0.16.1     <none>          443/TCP                                                85m
    kong-mesh-app      benigno                ClusterIP      10.0.20.52    <none>          5000/TCP                                               10m
    kong-mesh-app      magnanimo              ClusterIP      10.0.30.251   <none>          4000/TCP                                               13m
    kong-mesh-system   kuma-control-plane     ClusterIP      10.0.21.228   <none>          5681/TCP,5682/TCP,443/TCP,5676/TCP,5678/TCP,5653/UDP   24m
    kong               kong-kong-proxy        LoadBalancer   10.0.26.38    35.222.91.194   80:31867/TCP,443:31039/TCP                             78s
    kube-system        default-http-backend   NodePort       10.0.19.10    <none>          80:32296/TCP                                           85m
    kube-system        kube-dns               ClusterIP      10.0.16.10    <none>          53/UDP,53/TCP                                          85m
    kube-system        metrics-server         ClusterIP      10.0.20.174   <none>          443/TCP                                                85m
  6. Ingress Creation

    With the following declaration, we’re going to expose Magnanimo microservice through an Ingress and its route “/route1”.

        cat <<EOF | kubectl apply -f -
        apiVersion: extensions/v1beta1
        kind: Ingress
        metadata:
        name: route1
        namespace: kong-mesh-app
        annotations:
        konghq.com/strip-path: "true"
        spec:
        rules:
        - http:
        paths:
        - path: /route1
        backend:
        serviceName: magnanimo
        servicePort: 4000
        EOF

    Now the temporary “port-forward” exposure mechanism can be replaced by a formal Ingress. And our loop can start consuming the Ingress with similar results:

    while [1]; do curl http://35.222.91.194/route1/hw2; echo; done

Join the Master Class

Rancher and Kong are excited to present a Master Class that will explore API management combined with universal Service Meshes and how they support hybrid and multi-cloud deployments. By combining Rancher with a service connectivity platform, composed of an API Gateway and a Service Mesh infrastructure, we’ll demonstrate how companies can provision, monitor, manage and protect distributed microservice and deployments across multiple Kubernetes Clusters.

The Master Class will explore some of these questions:

  • Why is the Service Mesh architecture pattern important?
  • Why is implementing Service Mesh in Kubernetes even more important?
  • What can an API gateway and Rancher do for you?

Join the Master Class: Using Hybrid and Multi-Cloud Service Mesh Based Applications for Highly Distributed Environment Deployments

Neue IDC-Studie: Industrial IoT in Deutschland 2021

Dienstag, 8 Dezember, 2020

Trotz – oder gerade wegen – der Covid-19-Krise nimmt das Thema IoT im industriellen Sektor an Fahrt auf: Laut einer aktuellen Studie von IDC planen 59 Prozent der befragten Unternehmen in Deutschland neue IIoT-Projekte innerhalb der nächsten zwölf Monate.

Für die Fertigungsindustrie sind die nächsten Monate noch mit vielen Unwägbarkeiten verbunden. Ein Trend zeichnet sich aber jetzt schon ab: Die Bereitschaft steigt, in neue Technologien für die Digitalisierung und Vernetzung der Produktionsprozesse zu investieren. Das Thema Industrial IoT spielt dabei eine Schlüsselrolle. In einer aktuellen IDC-Umfrage gaben 40 Prozent der befragten Unternehmen aus Deutschland an, dass die Pandemie positiven oder sehr positiven Einfluss auf ihre IIoT-Budgets hat.

Investitionen in innovative IoT-Projekte können sich dabei gleich doppelt auszahlen. Digital vernetzte und intelligent gesteuerte Abläufe helfen, die wertschöpfenden Tätigkeiten auch in der akuten Ausnahmesituation aufrechtzuerhalten. Neben „Business Continuity“ stärkt IIoT daher auch die „Business Resiliency“ – also die Fähigkeit, den Geschäftsbetrieb schneller an veränderte Rahmenbedingungen anzupassen.

Dies spiegelt sich auch in den Zielsetzungen der Unternehmen wider. Kurzfristig geht es in IIoT-Projekten vor allem darum, die Effizienz zu optimieren, Kosten zu sparen und so die Liquidität zu schonen. Mittel- und langfristig sollen datenbasierte Analysen bessere Entscheidungen ermöglichen und – in Verbindung mit Edge Computing und AI/ML – den Grundstein für neue Geschäftsmodelle und Services legen.

Wie die konkreten IIoT-Strategien von Unternehmen in Deutschland aussehen, zeigt die Marktbefragung, die IDC im September und Oktober 2020 durchgeführt hat. 254 Entscheidungsträger aus der Fertigungsindustrie und industrienahen Branchen geben darin Einblicke in die Umsetzungspläne, Herausforderungen und Erfolgsfaktoren ihrer IIoT-Initiativen.

Laden Sie sich die Studie jetzt herunter und erfahren Sie,

  • wie verschiedene Branchen – beispielsweise diskrete und prozessorientierte Fertigung, Handel, Ver- und https://www.suse.com/de-de/lp/idc-iiot-study-germany/Entsorgung sowie Transport, Logistik und Verkehr – schon heute bei der Umsetzung von IIoT-Projekten sind,
  • welchen Einfluss Edge Computing und AI/ML auf IIoT-Initiativen haben,
  • was aus Sicht der befragten Unternehmen die vielversprechendsten Business Cases sind,
  • wo die größten Hindernisse auf dem Weg zum produktiven Einsatz liegen,
  • welche Empfehlungen die Projektverantwortlichen anderen Unternehmen mit auf den Weg geben.

Zum Download der IDC-Studie: Industrial IoT in Deutschland 2021 >

Innovationskraft überall und jederzeit

Dienstag, 1 Dezember, 2020


Stellen Sie sich eine leistungsstarke Technologie vor, die sowohl zukunftsweisend als auch zuverlässig ist. 

Stellen Sie sich beispiellose Agilität vor, mit der Sie die geschäftlichen Herausforderungen von heute bewältigen können, ohne die Freiheit zur Entwicklung Ihrer Strategie von morgen zu gefährden.  

Sie müssen sich dies alles nicht mehr vorstellen. 

Heute, mit dem Abschluss unserer Übernahme von Rancher Labsschaffen wir Raum für Innovationen, überall – vom Rechenzentrum über die Cloud bis zur Edge und darüber hinaus. 

Diese Verbindung führt das Beste aus Kubernetes Management, Linux und Edge Computing zusammen, um die Bedürfnisse aller Kunden zu erfüllen, die ihr Business ausbauen und ihre Mitbewerber überholen möchten. Mit 37.000 aktiven Implementierungen ist Rancher die am weitesten verbreitete Kubernetes Management-Plattform und Rancher wurde in der jüngsten The Forrester Wave™: Multicloud Container Development Platforms, Q3 2020 report als ein führender Anbieter eingestuft.   

SUSE wird zusammen mit Rancher wieder Geschichte schreiben. 1994 hat SUSE mit der Einführung von Unternehmensstandards für Linux Geschäftsinnovation für immer verändert. Und heute bieten wir gemeinsam mit Rancher das branchenweit einzige anpassungsfähige Linux-Betriebssystem, eine interoperable Kubernetes Management-Plattform und innovative Edge Lösungen.  

Für unsere Kunden bedeutet dies beispiellose Entscheidungsfreiheit. 

Mit unserem leistungsstarken und modularen Ansatz für Open Source-Software haben unsere Kunden die Wahl, schnell Innovationen voranzutreiben und entsprechend ihren eigenen Plänen und Prioritäten zu transformieren. Über 80 Prozent der Fortune-50-Unternehmen sind aktive SUSE Kunden, und Firmen wie Elektrobit, Schneider Electric, T-Systems, Office Depot, Carhartt und Lenovo nutzen die Vorteile unseres offenen Innovationsansatzes. 

Wir sind unserem Non-Lock-in-Ansatz verpflichtet, so dass unsere Kunden die Wahl haben, ihre IT-Strategie auf der Grundlage ihrer Geschäftsanforderungen und nicht von vertraglichen Verpflichtungen weiterzuentwickeln. 

Mit unserem unabhängigen Ansatz, der das „Offen“ zurück in die „Open Source“-Software bringt, haben Kunden die Wahl, nur die besten Werkzeuge für ihre jeweiligen Aufgabe einzusetzen, ohne von der proprietäre Lösung eines Herstellers abhängig zu sein.  

Unser Zweck als neu zusammengeschlossenes Unternehmen ist einfach: Wir wollen unsere Kunden zu „Innovationsweltmeistern“ machen. Im Mittelpunkt steht dabei unser unerschütterliches Bekenntnis zur Wahlfreiheit. 


Der heutige Tag ist für uns alle bei SUSE und Rancher ein Moment der Veränderung. Dies ist Tag 1 unseres neuen gemeinsamen Kapitels. Die Möglichkeiten für unsere Kunden sind grenzenlos 

Wenn Sie es sich vorstellen können, können – und werden – wir es auch erreichen. 


Bitte nehmen Sie sich einen Moment Zeit und sehen Sie sich die folgenden Beiträge an: 

– Sheng Liangs Blog der seine neue Rolle als Präsident für Technik & Innovation bei SUSE antritt.  

– Unsere Forbes-Storywas unsere Kunden und Partner über SUSE und Rancher als ein Unternehmen zu sagen haben  

– Kunden-Webinar 

Category: Allgemein Comments (0)

SUSE and Rancher – Enabling our Customers to Innovate Everywhere

Dienstag, 1 Dezember, 2020

In July, I announced SUSE’s intent to acquire Rancher Labs, and now that the acquisition is final, today we embark on a new journey with SUSE. I couldn’t be more excited about our future and what this means for our customers around the world.

Just as Rancher made computing everywhere a possibility for our customers, with SUSE, we will empower our customers to innovate everywhere. Together we will offer our customers possibilities that know no limitations from the data center to the cloud, to the edge and beyond. This is our purpose; this is our mission.

Only our combined company can make this a reality by combining SUSE’s market leadership in powering mission-critical business applications and systems with Rancher’s market-leading Kubernetes management platform. Our independent approach puts the „open“ back into open source software, giving our customers the agility to tackle their innovation challenges today and the freedom to evolve their strategy and solutions for tomorrow.

Since we announced the acquisition, I have been humbled by the countless emails and calls that I have received from our customers, partners, members of the open source community and, of course, our Rancher team members. They remain just as passionate about Rancher and are even more excited about our future with SUSE. Our customers worldwide can expect the same innovation that they have come to love from Rancher, now paired with SUSE’s stability and rock-solid IT infrastructure. This will further strengthen the bond of trust that we have created with our customers.

Here’s how we will bring this vision to life:

Customers

SUSE and Rancher customers can expect their existing investments and product subscriptions to remain in full force and effect according to their terms. Additionally, the delivery of future versions of SUSE’s CaaS Platform will be based on the innovative capabilities provided by Rancher. We will work with CaaS customers to ensure a smooth migration. Going forward, we will double down on our strengths in the areas of security, compliance, governance and broad application certification. A combined SUSE and Rancher provides the only enterprise Kubernetes platform that manages all of the world’s Kubernetes distros, regardless of what underlying Linux distro they use and whether they run in public clouds, private data centers or edge computing environments.

Partners

SUSE One partners will benefit from SUSE’s increased portfolio with Rancher solutions as they will help you close opportunities where your customers want to reimagine the way they manage and scale workloads consistently, monitor the health of their clusters and simplify the deployment and management of container applications.

I invite all Rancher partners to join SUSE’s One Partner Program. You can learn more during this webinar.

Open Source Community

I mentioned it earlier, but SUSE and Rancher remain fully committed to the open source community. We will continue contributing to upstream open source projects. This will not change. Together, as one company, we will continue providing true 100 percent open source solutions to global customers.

Don’t just take my word for it. See what our customers and partners are saying in Forbes.

Our future with SUSE is so bright – this is just the start of an incredible journey.

Join us on December 16 for Innovate Everywhere: How Kubernetes is Reshaping Enterprises. This webinar features Shannon Williams, Co-Founder, President and Chief Revenue Officer, Rancher Labs and Arun Chandrasekaran, Distinguished VP Analyst, Gartner.

Tags: ,,, Category: Rancher Blog Comments closed

Three Reasons Why Hosted Rancher Makes Your Life Easier

Donnerstag, 19 November, 2020

Today’s generation of makers, artists and creatives have reinforced the idea that great things can happen when you roll up your sleeves and try to learn something new and exciting. Kubernetes was like this only a couple of years ago: the mere act of installing the thing was a rewarding challenge. Kelsey Hightower’s Kubernetes the Hard Way became the Maker’s handbook for this artisan craft.

Fast forward to today and installing Kubernetes is no longer a noteworthy event. Its orchestration has become a commodity, and rightly so, as many engineers, software companies and the like swarmed to address this need by building robust tooling. Today’s Maker has far more interesting problems to solve up the stack, and so they expect Kubernetes to be able to summon a cluster on demand whenever they need it. For this reason and others, we created the same solution for Rancher, the multi-cluster Kubernetes management system. If I can create Kubernetes in one click in any cloud provider, why not my Rancher control plane? Enter Hosted Rancher.

Hosted Rancher is a fully managed, cloud-based instance of Rancher server. You don’t need to maintain a separate Kubernetes cluster, install the Rancher application or deal with upgrades. You retain all the control and ownership of your downstream Kubernetes clusters just like the on-prem Rancher experience today. When you combine Hosted Rancher with any of the popular cloud-managed Kubernetes offerings such as GKE, EKS or AKS, you now have an almost zero-touch Kubernetes infrastructure. Hosted Rancher is ideal for organizations that are looking to expedite their time to value by focusing their time on application adoption and empowering developers to use these new tools. After all, if you don’t have any applications using Kubernetes, it won’t matter how well your platform is maintained.

If you haven’t considered Hosted Rancher yet, here are three reasons why it might benefit you and your organization:

Increased Business Continuity

Operating Rancher isn’t rocket science, but it does require some ongoing expertise to safely maintain, back up and especially upgrade without causing downtime. Our core engineering team lives and breathes this stuff (they built Rancher, after all), so why not leverage their talent as a failsafe partnership with your staff?

Reduced Costs

TCO (Total Cost of Ownership) is a bit of a buzzword, but it becomes a reality at the end of the fiscal year when you start looking at actual spend to operate something. When you factor in the cost of cloud or on-premise infrastructure and staff expense to operate these servers and manage the Rancher application, it’s quite likely much more expensive than our Hosted offering.

Increased Adoption

This benefit might be the most subtle, but I guarantee it is the most meaningful. Contrary to popular belief, the mission of Rancher Labs is not just to help people operate Rancher. Our mission is to help people operate and therefore realize the benefits of Kubernetes in their software development lifecycle.

This is the “interesting” part of the problem space for every company out there: “How do I harness the value of Kubernetes for my applications?” The sooner we can get past the table stakes concerns of implementing and operating Kubernetes and Rancher, the sooner we can focus on this most paramount issue of Kubernetes adoption. Hosted Rancher simply removes one hurdle from the racetrack. With support from Rancher’s Customer Success team focusing on user adoption, your teams are able to accelerate their Kubernetes journey quickly without compromising on performance and resource inefficiency.

Image 01

Next Steps

I hope I’ve provided some insight that will help your journey in the Kubernetes and cloud-native world. To learn more about Hosted Rancher, check out our technical guide or contact the Rancher team. Until next time!

Introducing Rancher on NetApp HCI: Hybrid Cloud Multicluster Kubernetes Management with Push-Button Ease

Dienstag, 17 November, 2020

If you’re like me and have been watching the odd purchasing trends due to the pandemic, you probably remember when all the hair clippers were sold out — and then flour and yeast. Most recently, you might have seen this headline: Tupperware profits and shares soar as more people are eating at home during the pandemic. Tupperware is finally having its day. But a Tupperware stacking strategy is probably not why you’re here. Don’t worry, this isn’t your grandma’s container strategy — no Tupperware stacking required. You’re probably here because, like most organizations today, you need to be able to quickly release and update applications when and where you want to.

Today we’re excited to announce a partnership between NetApp and Rancher to bring multicluster Kubernetes management on premises with NetApp® HCI. Now you can deploy Rancher with push-button ease from NetApp HCI’s management plane, the NetApp Hybrid Cloud Control manageability suite.

Why NetApp + Rancher?

It’s no secret that Kubernetes in the enterprise is becoming more mainstream. If your organization hasn’t already moved toward containers, it will soon. But this shift isn’t without growing pains.

IT faces challenges with multiple team-specific Kubernetes deployments, decentralized governance, and lack of consistency among inherited Kubernetes clusters.Now, with Kubernetes adoption on the upswing, IT is expected to do the deployments, which can be time consuming for teams that are unfamiliar with Kubernetes. IT teams are managing their stakeholders’ different technology stack preferences and requirements while focusing on scalability and stability in production.

On the other hand, DevOps teams want the latest modern development tooling. They need to maintain control and flexibility over their clusters on infrastructure that is on demand and hassle free. These teams are all over continuous integration and continuous deployment (CI/CD) and DevOps automation. Their primary concerns are around agility and time to value.

The partnership between NetApp and Rancher addresses the challenges of both IT and the DevOps teams that they support. NetApp HCI delivers solid performance at scale for production environments. Rancher delivers modern cloud-native tooling for DevOps. Together, they create the easiest way for IT to get going with Kubernetes, enabling centralized management of multiple clusters, both new and existing. The combination of the two technologies delivers a true hybrid cloud Kubernetes orchestration layer on a modern DevOps cloud-native platform.

How We Integrated Rancher into NetApp HCI

We integrated Rancher directly into the NetApp HCI UI for a seamless experience. On top of NetApp HCI’s highly scalable, private cloud technology , the management plane where you can go to add a node or upgrade your firmware. We’ve added a button to deploy Rancher directly from Hybrid Cloud Control.

Image 01
Image 02

With push-button ease, you’ll have the Rancher management cluster running on VMware (NetAp HCI is a VMware-based appliance). Your hybrid cloud and multicloud Kubernetes management plane is ready to go.

Feature Applicability Benefit
Deployment from Hybrid Cloud Control Rancher management cluster Fastest way to get IT going with supporting DevOps-ready Kubernetes
Lifecycle management from Hybrid Cloud Control Rancher management cluster Push–button updates for Rancher server and supporting infrastructure
Node template User clusters deployed from Rancher Simplifies creation of user clusters deployed to NetApp HCI
NetApp Trident in Rancher catalog User clusters deployed from Rancher Simplifies persistent volumes from NetApp HCI storage nodes for user clusters

Rancher, as open source, is free to deploy and use, but Rancher enterprise support is available if you need it. Try out Rancher on NetApp HCI at no additional cost; think of it as an indefinite trial period. If you want support later, you can purchase it from NetApp. NetApp provides joint support with Rancher, so you can file support tickets for Rancher directly with NetApp.

A Win-Win for IT Operations and DevOps

With Rancher on NetApp HCI, both IT operations and DevOps teams benefit. Your IT operations teams can centrally provision Kubernetes services while maintaining control and visibility of all clusters, resources, and security. The provisioned services can then be used by your DevOps teams to efficiently build, deploy, and manage full-featured containerized applications. In the end, IT gets what it needs, DevOps gets what it needs, and your organization attains the key benefits of a successful Kubernetes strategy.

Learn More

For more information about NetApp HCI and Rancher, visit Simplify multicluster Kubernetes management with Rancher on NetApp HCI.

Monitor Distributed Microservices with AppDynamics and Rancher

Freitag, 6 November, 2020
Discover what’s new in Rancher 2.5

Kubernetes is increasingly becoming a uniform standard for computing – in Edge, in core and in the cloud. At NTS, we recognize this trend and have been systematically building up competencies for this core technology since 2018. As a technically-oriented business, we regularly validate different Kubernetes platforms and we share the view of many analysts (e.g. Forrester or Gartner and Gartner Hype Cycle Reports) that Rancher Labs ranks among the leading players in this sector. In fact, five of our employees are Rancher certified through Rancher Academy, to maintain a close and sustainable partnership – with the best possible customer support entirely based on the premise “Relax, we care.”

Application Performance Monitoring with AppDynamics

Kubernetes is the ideal platform to create platforms and to operate a modern infrastructure. But often, Kubernetes alone is not sufficient. Understanding the application and its requirements is necessary above all – and that’s where our partnership with Rancher comes in.

The conversion to a container-based landscape carries a risk that can be minimized with comprehensive monitoring, which includes not only the infrastructure, such as vCenter, server, storage or Load Balancer, but also the business process.

To serve this sector, we have developed competencies in the area of Application Performance Monitoring (APM) and partnered with AppDynamics. Once again, we agree with analysts such as Gartner that AppDynamics is a leader in this space. We’ve achieved AppDynamics Pioneer partner status in a short amount of time thanks to our certified engineers.

Why Monitor Kubernetes with AppDynamics?

In distributed environments, it’s easy to lose track of things using containers (they do even need to be microservices). Maintaining an overview is not a simple task, but it is absolutely necessary.

We’re seeing a huge proliferation of containers. Previously there were a few “large rocks” – the virtual machines (VMs). These large rocks are the monoliths from conventional applications. In containerized environments, fundamental topics change as well. In a monolith, “process calls” within an application happen in the same VM, within the same application. With containers, they happen via networks and APIs or Service Meshes.

An optimally instrumented APM is absolutely necessary for the operation of critical applications, which are a direct contributor to the added value of a company and to the business process.

To address this need, NTS created an integration between AppDynamics and Rancher Labs. Our goal for the integration was to maintain an overview as well and to minimize the potential risk for the user/customer. In this blog post, we’ll describe the integration and show you how it works.

Integration Description

AppDynamics supports “full stack” monitoring from the application to the infrastructure. Rancher provides a modern platform for Kubernetes “everywhere” (edge, core, cloud). We have designed a tool to simplify monitoring of Kubernetes clusters and created a Rancher chart that is based on a Helm (a package manager for Kubernetes) that is available to all Rancher users in the App Catalog.

Image 01

Now we’ll show how simple it is to monitor Rancher Kubernetes clusters with AppDynamics.

Prerequisites

  • Rancher management server (Rancher)
  • Kubernetes cluster with version > = 1.13
    • On premises (e.g. based on VMware vSphere)
    • or in the public cloud (e.g. based on Microsoft Azure AKS)
  • AppDynamics controller/account (free trial available)

Deploying AppDynamics Cluster Agents

The AppDynamics cluster agent for Kubernetes is a Docker image that is maintained by AppDynamics. The deployment of the cluster agents is largely simplified and automated by our Rancher chart. Therefore, virtually any number of Kubernetes clusters can be prepared for monitoring with AppDynamics at the touch of a button. This is an essential advantage in case of distributed applications.

We conducted our deployment in an NTS Rancher test environment. To begin, we log into the Rancher Web interface:

Image 02

Next, we choose Apps in in the top navigation bar:

Image 03

Then we click Launch:

Image 04

Now, Rancher shows us the available applications. We choose appdynamics-cluster-agent:

Image 05

Next, we deploy the AppDynamics cluster agent:

Image 06

Next, choose the target Kubernetes cluster – in our case, it’s “netapp-trident.”

Image 07

Then specify the details of the AppDynamics controller:

Image 08

You can also set agent parameters via the Rancher chart.

Image 09

Finally, click Launch

Image 10

and Rancher will install the AppDynamics cluster agent in the target clusters:

Image 11

After a few minutes, we’ll see a successful deployment:

Image 12

Instrumentation of the AppDynamics Cluster Agent

After a few minutes, the deployed cluster agent shows up in the AppDynamics controller. To find it, select AdminAppDynamics AgentsCluster Agents:

Image 13

Now we “instrument” this agent (“to instrument” is the term for monitoring elements in AppD).
Choose your cluster and click Configure:

Image 14

Next, select the namespaces to monitor:

Image 15

And click Ok.

Now we’ve successfully instrumented the cluster agent.

After a few minutes (monitoring cycles), the cluster can be monitored in AppDynamics under ServersCluster:

Image 16

Kubernetes Monitoring with AppDynamics

The following screen shots show the monitoring features of AppDynamics.

Image 17
Dashboard

Image 18
Pods

Image 19
Inventory

Image 20
Events

Conclusion

In this blog post, we’ve described the integration that NTS developed between Rancher and AppDynamics. Both partners have deployed this integration and plans are for it to continue. We’ve shown you how the integration works and described how AppDynamics, which is ideally suited for monitoring Kubernetes clusters, works so well with Rancher, which is great for managing your Kubernetes deployments. NTS offers expertise and know-how in the areas of Kubernetes and monitoring and we’re excited about the potential of these platforms working together to make Kubernetes easier to monitor and manage.

Discover what’s new in Rancher 2.5

Rancher 2.5 Keeps Customers Free from Kubernetes Lock-in

Mittwoch, 21 Oktober, 2020
Discover what’s new in Rancher 2.5

Rancher Labs has launched its much-anticipated Rancher version 2.5 into the cloud-native space, and we at LSD couldn’t be more excited. Before highlighting some of the new features, here is some context as to how we think Rancher is innovating.

Kubernetes has become one of the most important technologies adopted by companies in their quest to modernize. While the container orchestrator, a fundamental piece of the cloud-native journey, has many advantages, it can also be frustratingly complex and challenging to architect, build, manage and maintain. One of the considerations is the deployment architecture, which leads many companies to want to deploy a hybrid cloud solution often due to cost, redundancy and latency reasons. This is often on premises and multi cloud.

All of the cloud providers have created Kubernetes-based solutions — such as EKS on AWS, AKS on Azure and GKE on Google Cloud. Now businesses can adopt Kubernetes at a much faster rate with less effort, compared to their technical teams building Kubernetes internally. This sounds like a great solution — except for perhaps the reasons above: cost, redundancy and latency. Furthermore, we have noticed a trend of no longer being cloud native, but AWS native or Azure native. The tools and capabilities are vastly different from cloud to cloud, and they tend to create their own kind of lock-in.

The cloud has opened so many possibilities, and the ability to add a credit card and within minutes start testing your idea is fantastic. You don’t have to submit a request to IT or wait weeks for simple infrastructure. This has led to the rise of shadow IT, with many organizations bypassing the standards set out to protect the business.

We believe the new Rancher 2.5 release addresses both the needs for standards and security across a hybrid environment while enabling efficiency in just getting the job done.

Rancher has also released K3s, a highly available certified Kubernetes distribution designed for the edge. It supports production workloads in unattended, resource-constrained remote locations or inside IoT appliances.

Enter Rancher 2.5: Manage Kubernetes at Scale

Rancher enables organizations to manage Kubernetes at scale, whether on-premise or in the cloud, through a single pane of glass, providing for a consistent experience regardless of where your operations are happening. It also enables you to import existing Kubernetes clusters and centrally manage. Rancher has taken Kubernetes and beefed it up with the required components to make it a fantastic enterprise-grade container platform. These components include push-button platform upgrades, SDLC pipeline tooling, monitoring and logging, visualizing Kubernetes resources, service mesh, central authorization, RBAC and much more.

As good as that sounds, what is the value in unifying everything under a platform like Rancher? Right off the bat there are three obvious benefits:

  • Consistently deliver a high level of reliability on any infrastructure
  • Improve DevOps efficiency with standardized automation
  • Ensure enforcement of security policies on any infrastructure

Essentially, it means you don’t have to manage each Kubernetes cluster independently. You have a central point of visibility across all clusters and an easier time with security policies across the different platforms.

Get More Value out of Amazon EKS

With the release of Rancher 2.5, enhancements enhanced of the EKS platform support means that you can now derive even more value from your existing EKS clusters, including the following features:

  • Enhanced EKS cluster import, keeping your existing cluster intact. Simply import it and let Rancher start managing your clusters, enabling all the benefits of Rancher.
  • New enhanced configuration of the underlying infrastructure for Rancher 2.5, making it much simpler to manage.
  • New Rancher cluster-level UX explores all available Kubernetes resources
  • From an observability perspective, Rancher 2.5 comes with enhanced support for Prometheus (for monitoring) and Fluentd/Fluentbit (for logging)
  • Istio is a service mesh that lets you connect, secure, control and observe services. It controls the flow of traffic and API calls between services and adds a layer of security through managed authentication and encryption. Rancher now fully supports Istio.
  • A constant risk highlighted with containers is security. Rancher 2.5 now includes CIS Scanning of container images. It also includes an OPA Gatekeeper (open policy agent) to describe and enforce policies. Every organization has policies; some are essential to meet governance and legal requirements, while others help ensure adherence to best practices and institutional conventions. Gatekeeper lets you automate policy enforcement to ensure consistency and allows your developers to operate independently without having to worry about compliance.

Conclusion

In our opinion, Rancher has done a spectacular job with the new additions in 2.5 by addressing critical areas that are important to customers. They have also shown that you absolutely can get the best of both EKS and fully-supported features.

LSD was founded in 2001 and wants to inspire the world by embracing open philosophy and technology, empowering people to be their authentic best selves, all while having fun. Specializing in containers and cloud native, the company aims to digitally accelerate clients through a framework called the LSDTrip. To learn more about the LSDTrip, visit us or email us.

Discover what’s new in Rancher 2.5