Container Registries You Might Have Missed

jeudi, 10 novembre, 2016

Registries are one of the key components that make working with
containers, primarily Docker, so appealing to the masses. A registry
hosts images that are downloaded and run on hosts in a container engine.
A container is simply a running instance of a specific image. Think of
an image as a ready-to-go package, like an MSI on Microsoft Windows or
an RPM on SUSE Linux Enterprise. I won’t go into the details of how
registries work here, but if you want to learn more,this
article
is
a great read. Instead, what I’d like to do in this post is highlight
some of the container registries that currently remain under the radar.
While the big-name registries are already familiar to most people who
work with Docker, there are smaller registries worth considering, too,
when you are deciding where to host your images. Keep reading for a
discussion of these lesser-known container registries.

The Well-Known Registries

First, though, let me identify the big-name registries, so that it’s
clear what I’m comparing the under-the-radar registries to. By all
accounts, currently, the most popular registry is Docker
Hub
. Docker Hub is the center of the known
registry universe. It is the default hosted registry that every Docker
install is configured to reference. Other popular registries include:

The Registries you Might Be Missing

Now, let’s get to the interesting part. Here is an overview of
lesser-known registries.

Amazon EC2 Container Registry (ECR)

ec2You probably already know that Amazon offers a hosted container service called Amazon EC2 Container Service (ECS). But the registry that Amazon provides to complete ECS tends to receive less attention. That registry, called Amazon EC2 Container Registry
(ECR)
, is a hosted Docker container
registry. It integrates with ECS. Introduced in December 2015, it is a
somewhat newer registry option than most of the better-known registries,
explaining why some users may not be familiar with it. ECS is not the
only container registry that is compatible with ECR. ECS supports
external registries, too. However, the main advantage of ECR is that it
is a fully hosted and managed registry, which simplifies deployment and
management. ECR also is as scalable as the rest of the ECS
infrastructure — which means it is very, very scalable. Best Use
Cases:
If you are a heavy user of AWS services, or plan to be, and are
starting to look for a place to host private images, then ECR makes
perfect sense to use. It is also a good choice if you have a large
registry deployment or expect your registry to expand significantly over
time; in that case, you’ll benefit from the virtually unlimited
scalability of ECR.

FlawCheck Private Registry

flawcheck

FlawCheck Private Registry (which was recently
acquired, along with the rest of FlawCheck’s business, by security
vendor Tenable) is a security-focused registry option. It offers
integrated vulnerability scanning and malware detection for container
images. While there is no magic bullet for keeping your container images
free of malicious code, or preventing the insertion of malicious images
into your registry, FlawCheck’s scanning features can help mitigate the
risks. Best Use Case: For security-conscious companies out there, this
is a really great option. I foresee a lot of adoption for this registry
in heavily regulated industries.

GitLab Container Registry

gitlab

GitLab Container Registry, which can run as a hosted or on-premises registry, is GitLab’s solution for hosting container images. It’s built into GitLab and completely compatible with the rest of GitLab’s tools, which means it can integrate directly into your GitLab delivery pipeline. That’s an advantage if your team is seeking to adopt a seamless, DevOps workflow with as few moving
parts as possible. Best Use Case: Some developers will find it
convenient to store their Docker images on the same platform as their
source code. If you use GitLab for your source code, then you’ll likely
find the GitLab Container Registry handy. Otherwise, however, GitLab
Container Registry doesn’t offer any killer features unavailable from
most other registries.

Portus by SUSE

portus

Portus is not technically a registry, but it provides a front-end that replaces the native UI for on-premises deployments of Docker Registry. Portus is designed to add value to Docker Registry by providing extra access control options. These include the ability to configure “Teams” or
registry users, with different access levels established for each Team.
(In many ways, this feature is similar to user groups on Unix-like
systems.) Portus also supports registry namespaces, which make it
possible to configure the types of modifications individual users, as
well as teams of users, can make to different repositories on a granular
basis. Also notable is that Portus provides a user-friendly Web
interface for configuring registry settings and access controls. (A CLI
configuration tool, portusctl, is available as well.) Best Use Case:
If you like Docker Registry but need extra security controls, or have
other reasons to use fine-grained access control, Portus is a strong
solution.

Sonatype Nexus

nexus

Sonatype Nexus, which supports
hosted and on-premises deployments, is a general-purpose repository. It
supports much more than Docker image hosting, but it can be used as a
Docker registry as well. It has been around for much longer than Docker,
and is likely to be familiar to seasoned admins even if they have not
previously worked with container registries. The core Nexus platform is
open source, but a commercial option is available as well. Best Use
Case:
Many companies have had Nexus deployed as a repository for Maven
for years. By simply upgrading to a modern release of the platform,
organizations can add support for hosting Docker images, thereby
creating their own Docker registry without having to train development
or operational staff on a new product. Plus, they can host other types
of artifacts alongside Docker images.

VMware Harbor Registry

harborYou
might not think of VMware as a major player in the Docker ecosystem, but
the company certainly has its toes in the water. Harbor
Registry
is VMware’s answer for
hosting Docker images. This registry is built on the foundation of
Docker Distribution, but it adds security and identity-management
features. It also supports multiple registries on a single host. Best
Use Case:
Because of Harbor’s focus on security and user management,
this option offers some valuable registry features that enterprises
might seek, which are not available from all other registries. It’s a
good choice in the enterprise. It’s worth noting, too, that because
Harbor runs as Docker containers, it is easy to install on any server
that has a Docker environment — and the developers even offer an
offline installer, which could be handy in situations where security
considerations or other factors mean that a connection to the public
Internet is not available.

Conclusion

The main variables between the different registry offerings include what
type of deployment environment they support (hosted, on-premise or
both); how fine-tuned their access control options are; and how much
additional security they provide for container registries. Choosing the
right registry for your needs, of course, will depend on how these
features align with your priorities. But with so many choices, it’s not
difficult to find a registry that delivers the perfect balance for a
given organization’s needs. About the Author: Vince Power is an
Enterprise Architect at Medavie Blue Cross. His focus is on cloud
adoption and technology planning in key areas like core computing
(IaaS), identity and access management, application platforms (PaaS),
and continuous delivery.
You might also be interested in:

Tags: ,,,, Category: Containers Comments closed

Kubernetes, Mesos, and Swarm: Comparing the Rancher Orchestration Engine Options

jeudi, 20 octobre, 2016

A Detailed Overview of Rancher’s Architecture
This newly-updated, in-depth guidebook provides a detailed overview of the features and functionality of the new Rancher: an open-source enterprise Kubernetes platform.

kubernetes_mesos_swarm

Note: You can find an updated comparison of Kubernetes vs. Docker Swarm
in a recent blog post
here.

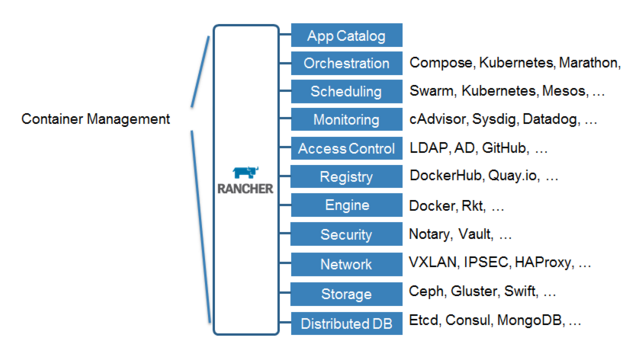
Recent versions of Rancher have added support for several common
orchestration engines in addition to the standard Cattle. The three
newly supported engines, Swarm (soon to be Docker Native Orchestration),
Kubernetes and Mesos are the most widely used orchestration systems in
the Docker community and provide a gradient of usability versus feature
sets. Although Docker is the defacto standard for containerization,
there are no clear winners in the orchestration space. In this article,
we go over the features and characteristics of the three systems and
make recommendations of use cases where they may be suitable.

Docker Native Orchestration is fairly bare bones at the moment but is
getting new features at a rapid clip. Since it is part of the official
Docker system, it will be the default choice for many developers and
hence will have likely have good tooling and community support.
Kubernetes is among the most widely used container orchestration systems
today and has the support of Google. Lastly, Mesos with Mesosphere (or
Marathon, its open source version) takes a much more compartmentalized
approach to service managements where a lot of features are left to
independent plug-ins and applications. This makes it easier to customize
the deployment as individual parts can be swapped out or customized.
However, this also means more tinkering is required to get a working
setup. Kubernetes is more opinionated about how to build clusters and
ships with integrated systems for many common use cases.

Docker Native Orchestration

Basic Architecture

Docker Engine 1.12 shipped with Native Orchestration, which is a
replacement for stand alone Docker Swarm. The Docker native cluster
(Swarm) consists of a set of nodes (Docker Engines/ Daemons) which can
either be managers or workers. Workers run the containers you launch and
managers maintain cluster state. You can have multiple managers for
high-availability, but no more than seven are recommended. The masters
maintain consensus using an internal implementation of the the
RAFT algorithm. As with all consensus
algorithms, having more managers has a performance implication. The fact
that managers maintain consensus internally means that there are no
external dependencies for Docker native orchestration which makes
cluster management much easier.

###

Usability

Docker native uses concepts from single-node Docker and extends them to
the Swarm. If you are up to date on Docker concepts, the learning curve
is fairly gradual. The setup for a swarm is trivial once you have Docker
running on the various nodes you want to add to your swarm: you just
call docker swarm init on one node and docker swarm join on any
other nodes you want to add. You can use the same Docker Compose
templates and the same Docker CLI command set as with standalone Docker.

Feature Set

Docker native orchestration uses the same primitives as Docker Engine
and Docker Compose to support orchestrations. You can still link
services, create volumes and define expose ports. All of these
operations apply on a single node. In addition to these, there are two
new concepts, services and networks.

A docker service is a set of containers that are launched on your nodes
and a certain number of containers are kept running at all times. If one
of the the containers dies it is replaced automatically. There are two
types of services, replicated or global. Replicated services maintain a
specified number of containers across the cluster where as global
services run one instance of a container on each of your swarm nodes. To
create a replicated service use the command shown below.

docker service create          
   –name frontend              
   –replicas 5                 
   -network my-network         
   -p 80:80/tcp nginx:latest.

You can create named overlay networks using docker network
create –driver overlay NETWORK_NAME.
Using the named overlay network
you can create isolated, flat, encrypted virtual networks across your
set of nodes to launch your containers into.

You can use constraints and labels to do some very basic scheduling of
containers. Using constraints you can add an affinity to a service and
it will try to launch containers only on nodes which have the specified
labels.

docker service create                        
   –name frontend                            
   –replicas 5                               
   -network my-network                       
   --constraint engine.labels.cloud==aws     
   --constraint node.role==manager           
   -p 80:80/tcp nginx:latest.

Furthermore, you can use the reserve CPU and reserve memory flags to
define the resources consumed by each container of the service so that
when multiple services are launched on a swarm the containers can be
placed to minimize resource contention.

You can do rudimentary rolling deployments using the command below.
This will update container image for the service but do so 2 containers
at a time with a 10s interval between each set of two. However,
health-checks and automatic rollbacks are not supported.

docker service update        
   –name frontend            
   –replicas 5               
   -network my-network       
   --update-delay 10s        
   --update-parallelism 2    
   -p 80:80/tcp nginx:other-version.

Docker supports persistent external volumes using volume drivers, and
Native orchestration extends these using the mount option to service
create command. Adding the following snippet to the command above will
mount a NFS mount into your container. Note this requires NFS to be
setup on your underlying host external to docker, some of the other
drivers which add support for Amazon EBS volume drivers or Google
container engine volume drivers have the ability to work without host
support. Also this feature is not yet well documented and may require a
bit of testing creating github issues on the docker project to get
working.

    --mount type=volume,src=/path/on/host,volume-driver=local,
    dst=/path/in/container,volume-opt=type=nfs,
    volume-opt=device=192.168.1.1:/your/nfs/path

Kubernetes

Basic Architecture

Conceptually, Kubernetes is somewhat similar to Swarm in that it uses a
manager (master) node with RAFT for consensus. However, that is where
the similarities end. Kubernetes uses an external
etcd cluster for this purpose. In
addition you will need a network layer external to Kubernetes, this can
be an overlay network like flannel, weave etc. With these external tools
in place, you can launch the Kubernetes master components; API Server,
Controller Manager and Scheduler. These normally run as a Kubernetes pod
on the master node. In addition to these you would also need to run the
kubelet and kubeproxy on each node. Worker nodes only run the Kubelet
and Kubeproxy as well as a network layer provider such as flanneld if
needed.

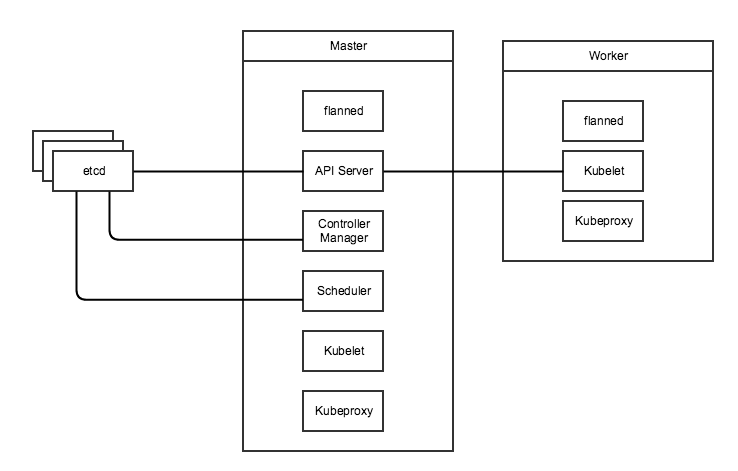
In this setup, the kubelet will control the containers (or pods) on the
given node in conjunction with the Controller manager on the master. The
scheduler on the master takes care of resource allocation and balancing
and will help place containers on the worker node with the most
available resources. The API Controller is where your local kubectl CLI
will issue commands to the cluster. Lastly, the kubeproxy is used to
provide load balancing and high availability for services defined in
Kubernetes.

Usability

Setting up Kubernetes from scratch is a non-trivial endeavor as it
requires setting up etcd, networking plugins, DNS servers and
certificate authorities. Details of setting up Kubernetes from scratch
are available here
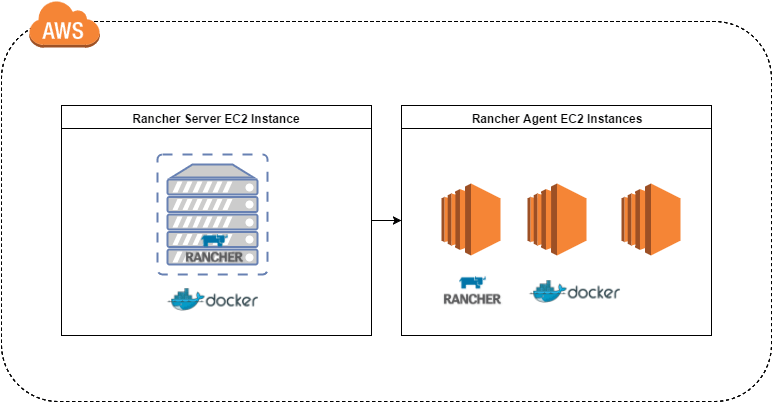
but luckily Rancher does all of this setup for us. We have covered how
to setup a Kubernetes cluster in an earlier
article
.

Beyond initial setup, Kubernetes still has somewhat of a steep learning
curve as it uses its own terminology and concepts. Kubernetes uses
resource types such as Pods, Deployments, Replication Controllers,
Services, Daemon sets and so on to define deployments. These concepts
are not part of the Docker lexicon and hence you will need to get
familiar with them before your start creating your first deployment. In
addition some of the nomenclature conflicts with Docker. For example,
Kubernetes services are not Docker services and are also conceptually
different (Docker services map more closely to Deployments in the
Kubernetes world). Furthermore, you interact with the cluster using
kubectl instead of the docker CLI and you must use Kubernetes
configuration files instead of docker compose files.

The fact that Kubernetes has such a detailed set of concepts independent
of core Docker is not in itself a bad thing. Kubernetes offers a much
richer feature set than core Docker. However, Docker will add more
features to compete with Kubernetes with divergent implementations and
divergent or conflicting concepts. This will almost surely repeat the
CoreOS/rkt situation with large portions of the community working on
similar but competing solutions. Today, Docker Swarm and Kubernetes
target very different use cases (Kubernetes is much more suitable for
large production deployments of service-oriented architectures with
dedicated cluster-management teams) however as Docker Native
Orchestration matures it will move into this space.

Feature Set

The full feature set of Kubernetes is much too large to cover in this
article, but we will go over some basic concepts and some interesting
differentiators. Firstly, Kubernetes uses the concept of Pods as its
basic unit of scaling instead of single containers. Each pod is a set of
containers (set may be size one) which are always launched on the same
node, share the same volumes and are assigned a Virtual IP (VIP) so they
can be addressed in the cluster. A Kubernetes spec file for a single pod
may look like the following.

kind: Pod
metadata:
  name: mywebservice
spec:
  containers:
  - name: web-1-10
    image: nginx:1.10
    ports:
    - containerPort: 80

Next you have deployments; these loosely map to what services are in
Docker Native orchestration. You can scale the deployment much like
services in Docker Native and a deployment will ensure the requite
number of containers is running. It is important to note that
deployments only analogous to replicated service in docker native as
Kubernetes uses the Daemon Set concept to support its equivalent of
globally scheduled services. Deployments also support Health checks
which use HTTP or TCP reachability or custom exec commands to determine
if a container/pod is healthy. Deployments also support rolling
deployments with automatic rollback using the health check to determine
if each pod deployment is successful.

kind: Deployment
metadata:
  name: mywebservice-deployment
spec:
  replicas: 2 # We want two pods for this deployment
  template:
    metadata:
      labels:
        app: mywebservice
    spec:
      containers:
      - name: web-1-10
        image: nginx:1.10
        ports:
        - containerPort: 80

Next you have Kubernetes Services which provide simple load balancing to
a deployment. All pods in a deployment will be registered with a service
as they come and go, and services also abstract away multiple
deployments so that if you want to run rolling deployments you will
register two Kubernetes deployments with the same service, then
gradually add pods to one while reducing pods from the other. You can
even do blue-green deployments where you point the service at a new
Kubernetes deployment in one go. Lastly, services are also useful for
service discovery within your Kubernetes cluster, all services in the
cluster get a VIP and are exposed to all pods in the cluster as docker
link style environment variables as well as through the integrated DNS
server.

In addition to basic services, Kubernetes supports
Jobs, Scheduled
Jobs
, and Pet
Sets
.
Jobs create one or more pods and wait until they terminate. A job makes
sure that the specified number of pods terminate successfully. For
example, you may start a job to start processing business intelligence
data for 1 hour in the last day. You would launch a job with 24 pods for
the previous day and once they are all run to completion the job is
done. A scheduled job as the name suggests is a job that is
automatically run, on a given schedule. In our example, we would
probably make our BI processor a daily scheduled job. Jobs are great for
issuing batch style work loads to your cluster which are not services
that always need to be up but instead tasks that need to run to
completion and then be cleaned up.

Another extension that Kubernetes provides to basic services is Pet
Sets. Pet sets support stateful service workloads that are normally very
difficult to containerize. This includes databases and real-time
connected applications. Pet sets provide stable hostnames for each
“pet” in the set. Pets are indexed; for example, pet5 will be
addressable independently of pet3, and if the 3rd pet container/pod dies
it will be relaunched on a new host with the same index and hostname.

Pet Sets also provide stable storage using persistent
volumes
, i.e
if pet1 dies and is relaunched on another node it will get its volumes
remounted with the original data. Furthermore you can also use NFS or
other network file systems to share volumes between containers, even if
they are launched on different hosts. This addressed one of the most
problematic issues when transitioning from single-host to distributed
docker environments.

Pet sets also provide peer-discovery, with normal services you can
discover other services (through Docker linking etc) however,
discovering other container within a service is not possible. This makes
gossip protocol based services such as Cassandra and Zookeeper very
difficult to launch.

Lastly, Pet Sets provide startup and tear down ordering which is
essential for persistent, scalable services such as Cassandra. Cassandra
relies on a set of seed nodes, and when you scale your service up and
down you must ensure the seed nodes are the first ones to be launched
and the last to be torn down. At the time of writing of this article,
Pet Sets are one of the big differentiators for Kubernetes, as
persistent stateful workloads are almost impossible to run at production
scale on Docker without this support.

Kubernetes also
provides namespaces
to isolate workloads on a cluster, secrets
management
and
auto-scaling
support. All these features an more mean that Kubernetes is also to
support large, diverse workloads in a way that Docker Swarm is just not
ready for at the moment.

Marathon

Basic Architecture

Another common orchestration setup for large scale clusters is to run
Marathon on top of Apache Mesos. Mesos is an open source cluster
management system that supports a diverse arrays of workloads. Mesos is
composed of a Mesos agent running on each host in the cluster which
reports its available resources to the master. There can be one or more
Mesos masters which coordinate using a Zookeeper cluster. At any given
time one of the masters nodes is active using a master election process.
The master can issue tasks to any of the Mesos agents, and will report
on the status of those tasks. Although you can issue tasks through the
API, the normal approach is to use a framework on top of Mesos. Marathon
is one such framework which provides support for running Docker
containers (as well as native Mesos containers).

Usability

Again compared to Swarm, Marathon has a fairly steep learning curve as
it does not share most of the concepts and terminology with Docker.
However, Marathon is not as feature rich, and is thus easier to learn
than Kubernetes. However, the complexity of managing a Marathon
deployment comes from the fact that it is layered on top of Mesos and
hence there are two layers of tools to manage. Furthermore, some of the
more advanced features of Marathon such as load balancing are only
available as additional frameworks that run on top of Marathon. Some
features such as authentication are only available if you run Marathon
on top of DC/OS, which in turns run on top of Mesos – adding yet another
layer of abstraction to the stack.

Feature Set

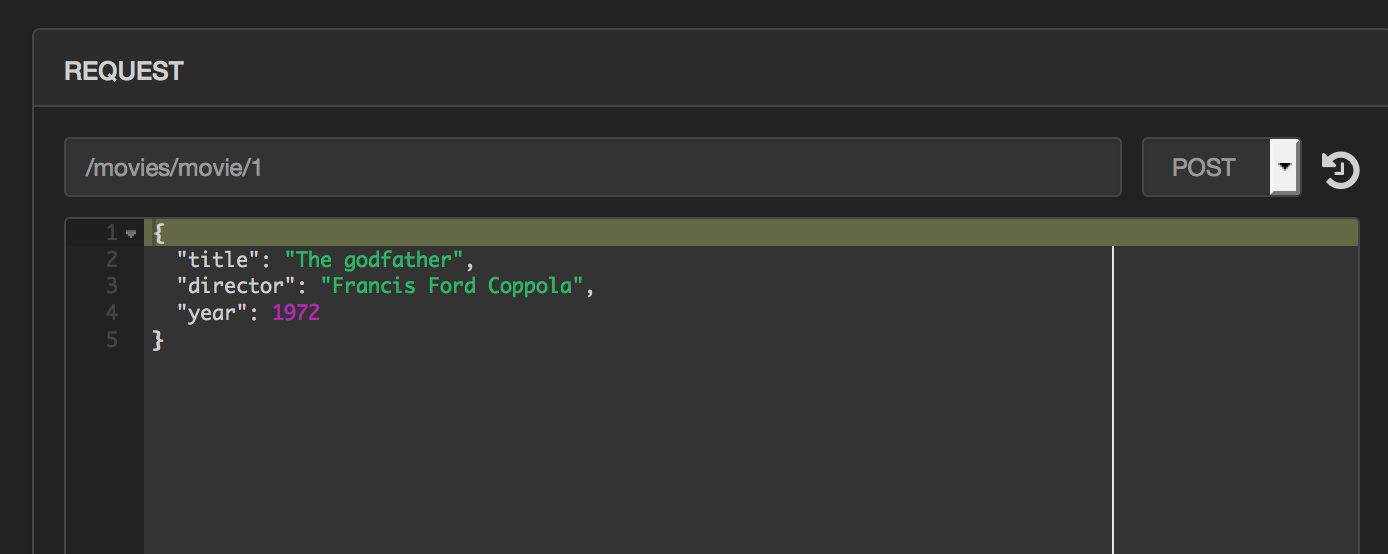
To define services in Marathon, you need to use its internal JSON
format as shown below. A simple definition like the one below will
create a service with two instances each running the nginx container.

{
  "id": "MyService"
  "instances": 2,
  "container": {
    "type": "DOCKER",
    "docker": {
      "network": "BRIDGE",
      "image": "nginx:latest"
    }
  }
}

A slightly more complete version of the above definition is shown below,
we now add port mappings and the health check. In port mapping, we
specify a container port, which is the port exposed by the docker
container. The host port defines which port on the public interface of
the host is mapped to the container port. If you specify 0 for host
port, then a random port is assigned at run-time. Similarly, we may
optionally specify a service port. The service port is used for service
discovery and load balancing as described later in this section. Using
the health check we can now do both rolling (default) and blue-green
deployments
.

{
  "id": "MyService"
  "instances": 2,
  "container": {
    "type": "DOCKER",
    "docker": {
      "network": "BRIDGE",
      "image": "nginx:latest"
      "portMappings": [
        { "containerPort": 8080, "hostPort": 0, "servicePort": 9000, "protocol": "tcp" },
      ]
    }
  },
  "healthChecks": [
    {
      "protocol": "HTTP",
      "portIndex": 0,
      "path": "/",
      "gracePeriodSeconds": 5,
      "intervalSeconds": 20,
      "maxConsecutiveFailures": 3
    }
  ]
}

[[In addition to single services, you can define Marathon Application
Groups, with a nested tree structure of services. The benefit of
defining application in groups is the ability to scale the entire group
together. This can be very useful in microservice stacks where tuning
individual services can be difficult. As of now, the scaling assumes
that all services will scale at the same rate so if you require ‘n’
instances of one service, you will get ‘n’ instances of all services.
] ]

{
  "id": "/product",
  "groups": [
    {
      "id": "/product/database",
      "apps": [
         { "id": "/product/mongo", ... },
         { "id": "/product/mysql", ... }
       ]
    },{
      "id": "/product/service",
      "dependencies": ["/product/database"],
      "apps": [
         { "id": "/product/rails-app", ... },
         { "id": "/product/play-app", ... }
      ]
    }
  ]
}

In addition to being able to define basic services, Marathon can also do
scheduling of containers based on specified constraints as detailed
here,
including specifying that each instance of the service must be on a
different physical host “constraints“: [[“hostname“,
“UNIQUE”]].
You can use the cpus and mem tags to specify the
resource utilization of that container. Each Mesos agent reports its
total resource availability hence the scheduler can place workloads on
hosts in an intelligent fashion.

By default, Mesos relies on the traditional Docker port mapping and
external service discover and load balancing mechanisms. However, recent
beta features add support for DNS based service discovery using Mesos
DNS
or Load balancing using
Marathon LB. Mesos DNS is
an application that runs on top of Mesos and queries the Mesos API for a
list of all running tasks and applications. It then creates DNS records
for nodes running those tasks. All Mesos agents then manually need to be
updated to use Mesos DNS service as its primary DNS server. Mesos DNS
uses the hostname or IP address used to register Mesos agents with the
master; and Port mappings can be queried as SRV records. Since Marathon
DNS works on agent hostnames, and there for the host network ports must
be exposed and hence must not collide. Mesos DNS does provide a way to
refer to individual containers persistently for stateful workloads such
as we would be able to using Kubernetes pet sets. In addition, unlike
Kubernetes VIPs which are addressable on any container in the cluster,
we must manually update /etc/resolve.conf to the set of Mesos DNS
servers and update the configuration if the DNS servers change.
Marathon-lb uses the Marathon Event bus to keep track of all service
launches and tear-downs. It then launches a HAProxy instance on agent
nodes to relay traffic to the requisite service node.

Marathon also has beta support for persistent
volumes
as
well as external persistent
volumes
.
However, both of these features are in a very raw state. Persistent
volumes are only persistent on a single node across container restarts,
volumes are deleted if the application using them is deleted however,
the actual data on disk is not deleted and must be removed manually.
External volumes require DC/OS and currently only allow your service to
scale to single instance.

Final Verdict

Today we have looked at three options for Docker container
orchestration: Docker Native (Swarm), Kubernetes and Mesos/Marathon. It
is difficult to pick a system to recommend because the best system is
highly dependent on your use case, scale and history. Furthermore, all
three systems are under heavy development and some of the features
covered are in beta and may be changed, removed or replaced very soon.

Docker Native gives you the quickest ramp-up with little to no vendor
lock-in beyond dependence on Docker. The dependence on Docker is not a
big issue, since it has become the defacto container standard. Given the
lack of a clear winner in the orchestration wars and the fact that
Docker native is the most flexible approach, it is a good choice for
simple web/stateless applications. However, Docker Native is very bare
bones at the moment and if you need to get complicated, larger-scale
applications to production you need to choose one of Mesos/Marathon or
Kubernetes.

Between Mesos/Marathon and Kubernetes is also not an easy choice as both
have their pros and cons. Kubernetes is certainly the more feature rich
and mature of the two, but it is also a very opinionated piece of
software. We think a lot of those opinions make sense, but Kubernetes
does not have the flexibility of Marathon. This makes sense when you
consider the rich history of non-Docker, non-containerized applications
that can run on Mesos in addition to Marathon (e.g. Hadoop clusters). If
you are doing a green field implementation and either don’t have strong
opinions about how to layout clusters, or your opinions agree with those
of Google, then Kubernetes is a better choice. Conversely, if you have
large, complicated legacy workloads that will gradually shift over to
containers then Mesos/Marathon is the way to go.

Another concern is scale: Kubernetes has been tested to thousands of
nodes, whereas Mesos has been tested to tens of thousands of nodes. If
you are launching clusters with tens of thousands of nodes, you’ll want
to use Mesos for the scalability of the underlying infrastructure – but
note that scaling advanced features such as load balancing to that range
will still be left to you. However, at that scale, few (if any)
off-the-shelf solutions work as advertised without careful tuning and
monkey patching.

Usman is a server and infrastructure engineer, with experience in
building large scale distributed services on top of various cloud
platforms. You can read more of his work at
techtraits.com, or follow him on twitter
@usman_ismailor
on GitHub.

You might also be interested in:

A Detailed Overview of Rancher’s Architecture
This newly-updated, in-depth guidebook provides a detailed overview of the features and functionality of the new Rancher: an open-source enterprise Kubernetes platform.

Rancher Labs Introduces Global Partner Network

mardi, 18 octobre, 2016

Consulting and reseller partner programs expand company’s global reach;
Service provider program helps partners deliver Containers-as-a-Service
and other Rancher-powered offerings
**Cupertino, Calif. – October 18,
2016 – **Rancher Labs, a provider of container
management software, today announced the launch of the Rancher Partner
Network, a comprehensive partner program designed to expand the
company’s global reach, increase enterprise adoption, and provide
partners and customers with tools for success. The program will support
consultancies and systems integrators, as well as resellers and service
providers worldwide, with initial partners from North and South America,
Europe, Asia and Australia. As the only container management platform to
ship with fully supported commercial distributions of Kubernetes, Docker
Swarm and Mesos, Rancher is unique in its ability to enable partners to
deliver container-based solutions using the customer’s choice of
orchestration tool. “Community interest in Rancher’s open and
easy-to-use container management platform has shattered expectations,
with over a million downloads and over ten million Rancher nodes
launched since this year alone,” said Shannon Williams, co-founder and
vice president of sales and marketing at Rancher Labs. “To help us meet
demand within the enterprise, we’re partnering with leading DevOps
consultancies, system integrators and service providers around the
world. We’re excited and humbled by the strong interest we’ve seen from
the partner community, and we’re looking forward to working with our
partners to help make containers a reality for our joint customers.”
The Rancher Partner Network The Rancher Partner Network provides
tools and support to meet the unique needs of each of type of partner.
The Network includes:

  • Consulting partners such as consultancies, system integrators (SIs),
    and agencies focused on helping customers successfully embrace
    digital transformation and rapidly deliver software using modern,
    open processes and technologies.
  • Resellers and OEMs that include Rancher in solutions they deliver to
    customers.
  • Managed services providers (MSPs) and cloud providers offering
    Rancher-based Containers-as-a-Service (CaaS) environments to
    end-users.
  • Application services providers (ASPs) delivering
    Software-as-a-Service (SaaS) and hosted applications on a
    Rancher-powered platform.

Partners benefit from a variety of sales, marketing, product, training
and support programs aimed at helping them ensure customer success while
capturing a greater share of the rapidly growing container marketplace.
Additionally, members of the service provider program can take exclusive
advantage of a unique pricing model specifically designed for and
exclusively available to that community. Prospective partners can learn
more about the program and apply by visiting
www.rancher.com/partners. Customers
can visit the same page to identify Rancher-authorized consultancies,
resellers and service providers in their area. Supporting Quotes “At
Apalia, we have extensive experience delivering software-defined
infrastructure and cloud solutions to a variety of enterprise customers
in France and Switzerland. As those customers began looking to take
advantage of containers, we needed a partner that supported the full
range of infrastructure we deliver, as well as emerging options in the
space. We’re thrilled to be partnering with Rancher to do so.” Pierre
Vacherand, CTO, Apalia
“As a container and cloud
company our clients have diverse levels of expertise and support
workloads utilizing Mesos, Kubernetes and Docker. With Rancher’s
ease-of-use and excellent support for multiple schedulers this
partnership was a natural fit for us.” Steven Borrelli, Founder & CEO,
Asteris
“Our business is delivering
mission-critical infrastructure and software solutions to government and
enterprise customers in Brazil. To do this, we partner with a variety of
IT industry leaders such as Oracle, IBM, Microsoft and Amazon Web
Services. Adding the capabilities of Rancher Labs complements all of
these and allows us, as a service provider, to easily support the
emerging container needs of these customers.” Hélvio Lima, CEO,
BRCloud
“Since 2001, Camptocamp has
established itself as a leading supporter of, and contributor to, open
source software. Our infrastructure solutions team uses open source to
deliver a full range of cloud migration, IT & DevOps automation, and
application deployment solutions to customers in Switzerland, France,
Germany and beyond. Rancher helps us deliver modern, containerized
applications across a wide range of cloud and on-premises
infrastructure, and easily works with the other open source products we
like.” Claude Philipona, Managing Partner,
Camptocamp
“Containers are an important
element of the emerging enterprise execution platform. Rancher’s
Application Catalog allows Data Essential customers to deploy custom
applications as well as big data and analytics software with a single
click, allowing their staff to get more done, more quickly. As one of
Rancher Labs’ first partners in Europe, the relationship has been
invaluable in helping us address this need.” Jonathan Basse, Founder,
Data Essential
“At Industrie IT, we
are committed to helping companies succeed with, and benefit from, top
technologies available today. Containers and DevOps have become a major
part of this, and we’re thrilled to be partnering with Rancher Labs to
enable customers to take advantage of the benefits.” Ameer Deen,
Director of On Demand Platforms, Industrie
IT
“We were quick to recognize the extremely
vibrant community that has formed around Rancher and its products,
having leaned on it for support during an early deployment. Establishing
ourselves as experts through active contributions in the community has
led to a number of opportunities for us in Europe and Asia. We’re
excited to take advantage of new ways to engage with Rancher through
this program.” Girish Shilamkar, Founder and CEO,
InfraCloud
“Nuxeo is a fast-growing company
offering an open source, hyperscale digital asset platform used by
customers like Electronic Arts, TBWA, and the U.S. Navy. Containers are
an important part of our cloud strategy, and we depend on our partner
Rancher to make them easy to use and manage. The Service Provider
program provides a flexible product with an equally flexible pricing
model and support, making it a perfect & future-proofed fit for our
cloud computing efforts.” Eric Barroca, CEO, Nuxeo
“Object Partners has been developing custom software solutions for our
clients since 1996. Our solutions enable our clients to leverage the
latest in language, framework, and cloud technologies to lower costs and
maximize profits. Rancher is helping us to bring the latest in container
technologies to our clients. Its intuitive, comprehensive, and
easy-to-manage platform is enabling our clients to create scalable,
highly available, and continuously deployed platforms for their
applications. Rancher’s new partner program will be a great resource for
us as we continue to grow our DevOps business.” John Engelman, Chief
Software Technologist, Object Partners

“The Persistent ‘Software 4.0’ vision is about helping enterprises in
healthcare, financial services and other industries put the people,
processes and tools in place in order to build software-driven
businesses and manage software-driven projects at speed. The container
technology that Rancher has developed is enabling DevOps teams in
realizing this vision.” Sudhir Kulkarni, President Digital at
Persistent Systems
“Our engineers and
consultants have come to love Rancher’s open source product, leading to
multiple successful customer deployments and happy customers. We’re
excited for the launch of Rancher’s formal partner program and looking
forward to continued success with their team.” Josh Lindenbaum, VP,
Business & Corporate Development, Redapt

“Treeptik is building upon an extensive history of delivering cloud and
Java/JEE-based solutions for European enterprises, helping customers
transform all aspects of the software development process. We were early
to recognize the significance of containers, and our team has been early
pioneers of using Docker, Mesos and Kubernetes. We’re big fans of
Rancher because it makes this easier than any other tool out there, and
we’re excited to be a part of the company’s partner program.” Fabien
Amico, Founder & CTO, Treeptik

Supporting ResourcesIntroducing the Rancher Partner
Network

Partner Network Program page
Partner Network directory
Company Blog
Twitter

About Rancher Labs Rancher Labs builds innovative, open source
container management software for enterprises leveraging containers to
accelerate software development and improve IT operations. With
commercially-supported distributions of Kubernetes, Mesos, and Docker
Swarm, our flagship Rancher platform allows users to manage all aspects
of running containers in development and production environments. For
additional information, please visit
www.rancher.com. Contact Eleni Laughlin
Mindshare PR

Tags: , Category: Rancher Blog Comments closed

5 Keys to Running Workloads Resiliently with Rancher and Docker – Part 1

jeudi, 4 août, 2016
Build a CI/CD Pipeline with Kubernetes and Rancher
Recorded Online Meetup of best practices and tools for building pipelines with containers and kubernetes.

Containers and orchestration frameworks like Rancher will soon allow
every organization to have access to efficient cluster management. This
brave new world frees operations from managing application configuration
and allows development to focus on writing code; containers abstract
complex dependency requirements, which enables ops to deploy immutable
containerized applications and allows devs a consistent runtime for
their code. If the benefits are so clear, then why do companies with
existing infrastructure practices not switch? One of the key issues is
risk. The risk of new unknowns brought by an untested technology, the
risk of inexperience operating a new stack, and the risk of downtime
impacting the brand. Planning for risks and demonstrating that the ops
team can maintain a resilient workload whilst moving into a
containerized world is the key social aspect of a container migration
project. Especially since, when done correctly, Docker and Rancher
provide a solid framework for quickly iterating on infrastructure
improvements, such as [Rancher

catalogs](https://docs.rancher.com/rancher/latest/en/catalog/) for

quickly spinning up popular distributed applications like
ElasticSearch.
In regard to risk management, we will look into identifying the five
keys to running a resilient workload on Rancher and Docker. The topics
that will be covered are as follows:

  • Running Rancher in HA Mode (covered in this post)
  • Using Service Load Balancers in Rancher
  • Setting up Rancher service health checks and monitoring
  • Providing developers with their own Rancher setup
  • Discussing Convoy for data resiliency

I had originally hoped to perform experiments on a Rancher cluster
built on a laptop using Docker Machine with a Rancher
Server
and various
Rancher Agents on Raspberry Pis. Setup instructions
here.
The problem is that most Docker images are made for Intel based CPUs, so
nothing works properly on Pi’s ARM processors. Instead I will directly
use AWS for our experiments with resilient Rancher clusters. With our
initial setup, we have 1 Rancher Server and 1 Agent. Let’s deploy a
simple multiple container application. Rancher HA Experiment Diagram
The above diagram illustrates the setup I am going to use to experiment
with Rancher. I chose AWS because I am familiar with the service, but
you can choose any other provider for setting up Rancher according to
the Quick Start
Guide
.
Rancher Machine Creation
Let’s test our stack with the WordPress
compose

described in the Rancher Quick Start instructions. Rancher HA
So now our application is up and running, the one scenario is what
happens if the Rancher Server malfunctions? Or a network issue occurs?
What happens to our application? Will it still continue serving
requests? WordPress up
For this experiment, I will perform the following and document the
results.

  • Cutting the Internet from Rancher Agent to Rancher Server
  • Stopping the Rancher Server Container
  • Peeking under the hood of the Rancher Server Container

Afterwards we will address each of these issues, and then look at
Rancher HA as a means of addressing these risks.

Cutting the Internet from Rancher Agent to Rancher Server

So let’s go onto AWS and block all access to the Rancher Server from my
Rancher Agents.

  • Block access from Rancher Server to Rancher Agent
  • Note down what happens
  • Kill a few WordPress containers
  • Re-instantiate the connection

Observations:

Firstly, after a few seconds our Rancher hosts end up in a reconnecting
state. Turn off Rancher Server
Browsing to my WordPress URL I can still access all my sites properly.
There is no service outage as the containers are still running on the
remote hosts. The IPSec tunnel between my two agents is still
established, thus allowing my lone WordPress container to still connect
to the DB. Now let’s kill a WordPress container and see what happens.
Since I can’t access my Rancher Agents from the UI, I will be SSHing
into the agent hosts to run Docker commands. (Instructions for SSHing
into Rancher-created hosts can be found
here)
Turning off Rancher Server
The WordPress container does not get restarted. This is troublesome, we
will need our Rancher Server back online. Let’s re-establish the network
connection and see if the Rancher Server notices that one of our
WordPress services is down. After a few moments, our Rancher Server
re-establishes connection with the agents and restarts the WordPress
container. Excellent. So the takeaway here is that Rancher Server can
handle intermittent connection issues and reconnect to the agents and
continue on as usual. Although, for reliable uptime of our containers we
would need multiple instances of Rancher Server on different hosts for
resiliency against networking issues in the data center. Now, what would
happen if the Rancher Server dies? Would we lose all of our ability to
manage our hosts after it comes back? Let’s find out!

Killing the Rancher Server

In this second experiment I will go into the Rancher Server host and
manually terminate the process. Generally a failure will result in the
Docker process restarting due to –restart=always being set. Though
let’s assume that either your host ran out of disk space or otherwise
borked itself.

Observations:

Let’s simulate catastrophic failure, and nuke our Rancher container.
sudo docker stop rancher-server As with the network experiment our
WordPress applications still run on the agents and serve traffic
normally. The Rancher UI and any semblance of control is now gone. We
don’t like this world, so we will start the rancher-server back up.
sudo docker start rancher-server After starting up again, the Rancher
server picks up where it left off. Wow, that is cool, how does this
magic work?

Peeking under the hood of the Rancher Server Container

So how does the Rancher Server operate? Let’s take a brief tour into the
inner working of the Rancher server container to get a sense of what
makes it tick. Taking a look at the Rancher Server Docker build file
found here.
Rancher Server Components

# Dockerfile contents
FROM ...
...
...
CMD ["/usr/bin/s6-svscan", "/service"]

What is s6-svscan? It is a supervisor process that keeps a process
running based on commands found in files in a folder; these key files
are named as Run, Down, and Finish. If we look inside the service
directory we can see that the container will install dependencies and
use s6-svscan to start up 2 services. Rancher Server Components - Service
The Cattle service, which is the core Rancher scheduler, and a MySQL
instance. Inside our container the following services are being run.

PID TTY      STAT   TIME COMMAND
    1 ?        Ss     0:00 /usr/bin/s6-svscan /service
    7 ?        S      0:00 s6-supervise cattle
    8 ?        S      0:00 s6-supervise mysql
    9 ?        Ssl    0:57 java -Xms128m -Xmx1g -XX:+HeapDumpOnOutOfMemoryError -XX:HeapDumpPath=/var/lib/cattle/logs -Dlogback.bootstrap.level=WARN -cp /usr/share/cattle/1792f92ccdd6495127a28e16a685da7
  135 ?        Sl     0:01 websocket-proxy
  141 ?        Sl     0:00 rancher-catalog-service -catalogUrl library=https://github.com/rancher/rancher-catalog.git,community=https://github.com/rancher/community-catalog.git -refreshInterval 300
  142 ?        Sl     0:00 rancher-compose-executor
  143 ?        Sl     0:00 go-machine-service
 1517 ?        Ss     0:00 bash
 1537 ?        R+     0:00 ps x

We see that our Rancher brain is a Java application named Cattle, which
uses a MySQL database embedded within its container to store state. This
is quite convenient, but it would seem that we found the single point of
failure on our quick-start setup. All the state for our cluster lives in
one MySQL instance which no one knows existed. What happens if I nuke
some data files?

Corrupting the MySQL Store

Inside my Rancher server container I executed MySQL commands. There is a
certain rush of adrenaline as you execute commands you know will break
everything.
docker exec -it rancher-server bash $ > mysql mysql> use cattle; mysql> SET FOREIGN_KEY_CHECKS = 0; mysql> truncate service; mysql> truncate network;
Lo and behold, my Rancher service tracking is broken, even when I kill
my WordPress containers they do not come back up, because Rancher no
longer remembers them. Loss of data - 1
Since I also truncated the network setup tables, my WordPress
application no longer knows how to route to its DB. Loss of data - 2
Clearly, to have confidence in running Rancher in production, we need a
way to protect our Rancher Server’s data integrity. This is where
Rancher HA comes in.

Rancher HA Setup Process

The first order of business is we need to secure the cluster data. I
chose AWS RDS for this because it is what I am familiar with — you can
manage your own MySQL or choose another managed provider. We will
proceed assuming we have a trusted MySQL management system with backups
and monitoring. Following the HA setup steps documented in Rancher:
Rancher HA Setup
As per the setup guide, we create an AWS RDS instance to be our data
store. Once we have our database’s public endpoint, the next step is to
dump your current Rancher installation’s data, and export it to the new
database. High Availability Setup
For this I created an RDS instance with a public IP address. For your
first Rancher HA setup I recommend just making the database public, then
secure it later with VPC rules. Since Rancher provides an easy way to
dump the state, you can move it around to a secured database at a later
time. Next we will set up our Rancher Server to use the new database.
Rancher HA Setup - Database
After Rancher detects that it is using an external database, it will
open up 2 more options as part of setting up HA mode. (At this point, we
have already solved our point of failure, but for larger scale
deployments, we need to go bigger to lower risk of failure.) Rancher HA Setup - Config
Oh no, decision! — but no worries, let’s go through each of these
options and their implications. Cluster size, notice how everything
is odd? Behind the scenes, Rancher HA sets up a ZooKeeper Quorum to keep
locks in sync (More on this in the appendix). ZooKeeper
recommends odd numbers because an even number of servers does not
provide additional fault tolerance. Let’s pick 3 hosts to test out the
feature, as it is a middle ground between usefulness and ease of setup.
Host registration URL, well this section is asking us to provide the
Fully Qualified Domain Name (FQDN) of our Rancher HA cluster. The
instructions recommend an external loadbalancer or a DNS record that
round robins between the 3 hosts. Rancher HA Setup - DNS
The examples would be to use a SRV
Record
on your DNS provider
to balance between the 3 hosts; or an ELB on AWS with the 3 Rancher EC2
instances attached; or just a plain old DNS record pointing to 3 hosts.
I choose the DNS record for my HA setup as it is the simplest to setup
and debug. Now anytime I hit https://rancher.example.com my DNS
hosting provider will round robin requests between the 3 Rancher hosts
that I defined above. SSL Certificate is the last item on the list.
If you have your own SSL certificate on your domain then you can use it
here. Otherwise Rancher will provide a self-signed certificate instead.
Once all options are filled, Rancher will update fields in its database
to prepare for HA setup. You will then be prompted to download a
rancher-ha.sh script.

WARNING Be sure to kill the Rancher container you used to generate the
rancher-ha.sh script. It will be using ports that are needed by the
Rancher-HA container that will be spun up by the script.

Next up, copy the rancher-ha.sh script onto each of the participating
instances in the cluster and then execute them on the nodes to setup HA.

Caveat! Docker v1.10.3 is required at the time of writing. Newer
version of Docker is currently unsupported for the rancher-ha.sh
script.

You can provision the correct Docker version on your hosts with the
following commands:

#!/bin/bash
apt-get install -y -q apt-transport-https ca-certificates
apt-key adv --keyserver hkp://p80.pool.sks-keyservers.net:80 --recv-keys 58118E89F3A912897C070ADBF76221572C52609D
echo "deb https://apt.dockerproject.org/repo ubuntu-trusty main" > /etc/apt/sources.list.d/docker.list
apt-get update
apt-get install -y -q docker-engine=1.10.3-0~trusty

# run the command below to show all available versions
# apt-cache showpkg docker-engine

After Docker, we need to make sure that our instances can talk to each
other so make sure the ports listed on the Rancher multi-node requirements
page are open.

Advice! For your first test setup, I recommend opening all ports to
avoid networking-related blockers.

Once you have the correct prerequisites, you can run the rancher-ha.sh
script on each participating host. You will see the following output.

...
ed5d8e75b7be: Pull complete
7ebc9fcbf163: Pull complete
ffe47ea37862: Pull complete
b320962f9dbe: Pull complete
Digest: sha256:aff7c52e52a80188729c860736332ef8c00d028a88ee0eac24c85015cb0e26a7
Status: Downloaded newer image for rancher/server:latest
Started container rancher-ha c41f0fb7c356a242c7fbdd61d196095c358e7ca84b19a66ea33416ef77d98511
Run the below to see the logs

docker logs -f rancher-ha

This is where the rancher-ha.sh script creates additional images that
support the HA feature. Due to the addition of components to the Rancher
Server, it is recommended to run a host with at least 4 GB of memory. A
docker ps of what is running after running the rancher-ha.sh script is
shown here. Rancher HA Setup - Enabled

Common Problems and Solutions

You may see some connection errors, so try to run the script on all 3
hosts first. You should see logs showing members being added to the
Rancher HA Cluster.

time="2016-07-22T04:13:22Z" level=info msg="Cluster changed, index=0, members=[172.30.0.209, 172.30.0.111, ]" component=service
...
time="2016-07-22T04:13:34Z" level=info msg="Cluster changed, index=3, members=[172.30.0.209, 172.30.0.111, 172.30.0.69]" component=service

Sometimes you will see a stream of the following error lines.

time="2016-07-23T14:37:02Z" level=info msg="Waiting for server to be available" component=cert
time="2016-07-23T14:37:02Z" level=info msg="Can not launch agent right now: Server not available at http://172.17.0.1:18080/ping:" component=service

This is the top level symptom of many issues. Here are some other issues
I have identified by going through the GitHub issues list and various
forum posts: Security Group Network issues Sometimes your nodes are
binding on the wrong
IP

so you would want to coerce Rancher to broadcast the correct
IP
.
ZooKeeper not being up It is possible that the ZooKeeper Docker
container is not able to communicate with the other nodes, so you would
want to verify
ZooKeeper

and you should expect to see this sample
output
.
Leftover files in the /var/lib/rancher/state directory from previous
HA attempt
If you ran the rancher-ha.sh multiple times then you may
need to clean up old state
files
.
Broken Rancher HA setup state from multiple reattempts Drop
Database

and try again. There is a previous issue with detailed
steps

to try to surface the issue. Insufficient Resources on the machine
Since Rancher HA runs multiple Java processes on the machine, you will
want to have at least 4 GB of memory. While testing with a t2.micro
instance with 1 GB the instance became inaccessible due to being memory
constrained. Another issue is that your database host needs to support
50 connections per HA node. You will see these messages when you attempt
to spin up additional nodes.

time="2016-07-25T11:01:02Z" level=fatal msg="Failed to create manager" err="Error 1040: Too many connections"

Mismatched rancher/server:version By default the rancher-ha.sh
script pulls in rancher/server:latest, but this kicked me in the back
because during my setup, Rancher pushed out rancher/server:1.1.2 so I
had two hosts running rancher/server:1.1.1, and my third host was
rancher/server:1.1.2. This caused quite a headache, but a good takeaway
is to always specify the version of rancher/server when running the
rancher-ha.sh script on subsequent hosts.
./rancher-ha.sh rancher/server: Docker virtual network bridge was
returning wrong IP
This was the issue I ran into – my HA setup was
trying to check agent health on the wrong Docker interface.
curl localhost:18080/ping > pong curl http://172.17.0.1:18080/ping > curl: (7) Failed to connect to 172.17.0.1 port 18080: Connection refused
The error line is found on
rancher/cluster-manager/service
And the offending error call is found here in
rancher/cluster-manager/docker
What the code is doing is to locate the Docker Bridge and attempt to
ping the :18080 port on the exposed Docker port. Since my Docker bridge
is actually set up on 172.17.42.1 this will always fail. To resolve it I
re-instantiated the host because the multiple Docker installation seemed
to have caused the wrong bridge IP to be fetched. After restarting the
instance and setting the correct Docker bridge, I now see the expected
log lines for HA.

After Setting Up HA

time="2016-07-24T19:51:53Z" level=info msg="Waiting for 3 host(s) to be active" component=cert

Excellent. With one node up and ready, repeat the procedure for the rest
of the hosts. After 3 hosts are up, you should be able to access the
Rancher UI on the URL you specified for step 3 of the setup.

time="2016-07-24T20:00:11Z" level=info msg="[0/10] [zookeeper]: Starting "
time="2016-07-24T20:00:12Z" level=info msg="[1/10] [zookeeper]: Started "
time="2016-07-24T20:00:12Z" level=info msg="[1/10] [tunnel]: Starting "
time="2016-07-24T20:00:13Z" level=info msg="[2/10] [tunnel]: Started "
time="2016-07-24T20:00:13Z" level=info msg="[2/10] [redis]: Starting "
time="2016-07-24T20:00:14Z" level=info msg="[3/10] [redis]: Started "
time="2016-07-24T20:00:14Z" level=info msg="[3/10] [cattle]: Starting "
time="2016-07-24T20:00:15Z" level=info msg="[4/10] [cattle]: Started "
time="2016-07-24T20:00:15Z" level=info msg="[4/10] [go-machine-service]: Starting "
time="2016-07-24T20:00:15Z" level=info msg="[4/10] [websocket-proxy]: Starting "
time="2016-07-24T20:00:15Z" level=info msg="[4/10] [rancher-compose-executor]: Starting "
time="2016-07-24T20:00:15Z" level=info msg="[4/10] [websocket-proxy-ssl]: Starting "
time="2016-07-24T20:00:16Z" level=info msg="[5/10] [websocket-proxy]: Started "
time="2016-07-24T20:00:16Z" level=info msg="[5/10] [load-balancer]: Starting "
time="2016-07-24T20:00:16Z" level=info msg="[6/10] [rancher-compose-executor]: Started "
time="2016-07-24T20:00:16Z" level=info msg="[7/10] [go-machine-service]: Started "
time="2016-07-24T20:00:16Z" level=info msg="[8/10] [websocket-proxy-ssl]: Started "
time="2016-07-24T20:00:16Z" level=info msg="[8/10] [load-balancer-swarm]: Starting "
time="2016-07-24T20:00:17Z" level=info msg="[9/10] [load-balancer-swarm]: Started "
time="2016-07-24T20:00:18Z" level=info msg="[10/10] [load-balancer]: Started "
time="2016-07-24T20:00:18Z" level=info msg="Done launching management stack" component=service
time="2016-07-24T20:00:18Z" level=info msg="You can access the site at https://" component=service

Rancher HA Setup - Enabled
To get around issues regarding the self-signed HTTPS certificate, you
will need to add it to your trusted certificates. After waiting and
fixing up resource constraints on the DB, I then see all 3 hosts up and
running. Rancher HA Setup - Done

Conclusion

Wow, that was a lot more involved than originally thought. This is why
scalable distributed systems is a realm of PhD study. After resolving
all the failure points, I think setting up and getting to know Rancher
HA is a great starting point to touching state-of-the-art distributed
systems. I will eventually script this out into Ansible provisioning to
make provisioning Rancher HA a trivial task. Stay tuned!

Appendix

For any distributed system, there is an explicit way to manage state and
changes. Multiple servers need a process to coordinate between updates.
Rancher’s management process works by keeping state and desired state
in the database; then emitting events to be handled by processing
entities to realize the desired state. When an event is being processed,
there is a lock on it, and it is up to the processing entity to update
the state in the database. In the single server setup, all of the
coordination happens in memory on the host. Once you go to a multi
server setup, the additional components like ZooKeeper and Redis are
needed. Nick Ma is an Infrastructure Engineer who blogs about Rancher
and Open Source. You can visit Nick’s blog,
CodeSheppard.com, to catch up on practical
guides for keeping your services sane and reliable with open-source
solutions.

Build a CI/CD Pipeline with Kubernetes and Rancher
Recorded Online Meetup of best practices and tools for building pipelines with containers and kubernetes.
Tags: ,,,, Category: Non classé Comments closed

Matador Deploy – Making Deployment on Rancher Fun

mardi, 26 juillet, 2016

By Timon Sotiropoulos, software engineer at
SEED. SEED is a leading product development
company that builds design-driven web and mobile applications for
startup founders and enterprise innovators.
Seed
LogoDeployment
days can be quite confronting and scary for new developers. We realized
through onboarding some of our developers and introducing them to the
world of DevOps that the complexity and stress of deployment days could
take a toll on morale and productivity, with everyone always half
dreading a deployment on the upcoming calendar. After learning the no.1
rule of “never deploy on a Friday” the hard way, the team at SEED
decided there had to be a better way than the traditional “pull down
from Git repository and deploy to a server” method. The Road to
Matador
This journey started with a trip down the lane of the hottest
containerisation framework in the business, the flying whale Docker. For
those have haven’t heard of it, Docker essentially allows you to create
a blueprint for your application inside its own contained virtual
machine image. What this means is that you can create a working version
of your app on any server that has Docker installed and be confident
that everything will work as expected. The next link in the chain we
discovered was Rancher, an excellent tool for
automatically connecting and configuring Docker containers. Rancher
allows you to break your application up into multiple, separate
components the same way you would break up a program into different
classes, allowing single responsibility as well as the ability to scale
certain services up and down as required. This process and procedure
became second nature to us, but it was easy to mess things up. It was
easy to accidentally update the wrong Rancher environment and as we
planned on moving to a more continuous development lifecycle, the manual
updating of the Rancher environments had to stop. Our long term plan for
our continuous deployment process is to get to a point where a developer
can push their code to GitHub, build a copy of the Docker container, tag
it with that commit ID, and then push that code to their desired Rancher
environment. All the separate parts work independently, but we are
working towards integrating all of these tools into a fully-fledged
continuous deployment service. The first step is Matador Deploy. Matador
is a tool we have created to handle the creation and building of our
Docker containers and deploying them to the Rancher
environments
. The complication here is
that for each of our projects, we would have two or three separate
environments, one each for Production, Staging and Development. To do
this, we would have to duplicate all of our DevOps configurations and
scripts for each of our environments and then build the application
using a Makefile that set specific variables for each of the Rancher
Compose commands. However, we found that these Makefiles were simply
starting to duplicate themselves across all of our projects and we knew
there had to be a better way.

So what does Matador do?

The first thing we wanted Matador to do was combine the similar parts of
our environments and Docker/Rancher configurations into one file, while
still also allowing us to have the environment-specific parts when
required, such as the environment variables that connected to our
production or staging database. This led to the creation of three files
that Matador requires to run: two generic templates that setup the
basics of the project, and one configuration file that holds all our
environment specific configuration:

  • docker-compose-template.yml: The generic Docker Compose file for
    the application. This file contains all the configuration that
    builds the docker containers that together create your application
    stack, as well as the connections between them.
  • rancher-compose-template.yml: The generic Rancher Compose file
    for the application. This file contains all the configuration that
    is specific to your Rancher environments, such as the scale for each
    of your docker containers or your SSL certificates that have been
    setup for the Rancher environment.
  • config.yml: The config file is the one where you can define your
    environment specific configuration between your production, staging
    and development environments that have been set up on Rancher. Below
    is a short example of how this config file should be structured out:

image_base: seed/example-image
project_name: tester
global:
 web:
  environment:
   - TEST=forall
dev:
 web:
  environment:
   - NODE_ENV=dev
  labels:
   io.rancher.scheduler.affinity:host_label: client=ibackpacker,env=development
staging:
 web:
  environment:
   - NODE_ENV=staging
  labels:
   # io.rancher.scheduler.affinity:host_label: client=alessi,env=staging
   com.alessimutants.pods: version=0.1,branch=dev
prod:
 lb:
  labels:
   io.rancher.scheduler.local: 'false'
  web:
   image: seed/web
   environment:
    - NODE_ENV=prod
   labels:
    io.rancher.scheduler.local: 'false'

Everything defined in the config.yml file will be added to your
docker-compose-template depending on the environment variable that you
pass the application at run time. Matador will take the additional
config provided, then append or overwrite what is in the
docker-compose-template file and write out a new docker-compose file for
you automatically. The same is done with your rancher-compose-template;
although at this point in time there are no configuration options to
alter the template, this will be added in future releases. These output
files are then used as part of the Rancher Compose process to update
your environment on Rancher. They are also saved locally so that you can
review the configuration that Matador has created for you.

So How Do I Use Matador?

We have put together some extremely detailed usage instructions on the
GitHub repository, but the
general gist is pretty straight forward. You will need to download the
latest version of Matador Deploy from the Python Package Index –
PyPI
, as well as Rancher
Compose
, which can be
downloaded from their release page on GitHub. Once that is done, there
are a few required fields that you must supply to the configuration file
to make things work. These are the first two entries in the config.yml:

  • project_name: This field will be the name that your stack receives
    when it is deployed to Rancher. It will also be automatically
    namespaced with the environment that you pass to Matador when you
    deploy. Note, this is not the Rancher environment name, but rather
    the Rancher stack name.
  • image_base: This field is the most important because it provides
    the DockerHub registry that your application will attempt to load
    your docker images from. These also have a naming convention that is
    required for each of your respective environment images as follows:

seed/example-image:latest // Production Image seed/example-image:staging
// Staging Image seed/example-image:dev // Development Image

We do plan to include the building of your Docker images within Matador
itself in future releases, however for now you will need to add these
tags manually when pushing your images to DockerHub. Once your
config.yml, docker-compose-template.yml and rancher-compose-template.yml
have been configured, place them inside a folder called “templates” in
the root of your project directory. Finally, from the root of your
project directory call the following command:

$ matador-deploy –url http://rancher.url.co –key RANCHER_KEY –secret RANCHER_SECRET –env dev

The fields themselves are explained here:

–url: This refers to the rancher url that you are trying to upload
your rancher configuration to. –key: This is the API Key that needs to
be created specifically for the rancher environment that you are trying
to update. –secret: This is the Secret Key of Password that is
provided to you when you create a new API Key for your rancher
environment. –env: This is the environment that you wish to update. It
takes one of the following options are

The benefit of Matador in this instance is that it forces you to provide
the authentication information for your Rancher environment. One of the
issues with Rancher Compose is that it will search your local
environment in your shell for the Rancher environment keys, so if you
are pushing a lot of different stacks to Rancher (for example pushing to
Staging, then to Production), it can be easy to make a mistake and push
the wrong image to the wrong environment. If these fields aren’t
provided to Matador, the process will simply fail. There are also plans
to improve this even further by querying your Rancher server with your
API keys and having Matador actually tell you what environment it is
attempting to update – look for that too in a future release!

Where To From Here?

We have a few ideas of things we want the application to be able to do
as we work our way into building a full continuous deployment tool. A
few basic examples would be: ● Adding Support for building docker images
and pushing them to Docker Hub ● Adding a tagging system that connects
your Docker Hub images to your currently loaded Image on your Rancher
environment ● Add a simplified rollback option, most likely using the
tagging system However, what we really want to know are the features
that you would find most useful. We have open sourced Matador because we
think that it could be really helpful in integrating all these excellent
services together in the future. So please give it a try, and if you
have any ideas either write an issue and we will have a look into it, or
just fork the repository and give it a go. We can’t wait to see what you
come up with.

Tags: Category: Non classé Comments closed

Running Elasticsearch on Rancher

mardi, 31 mai, 2016

Elasticsearch is one of the most popular analytics platform for large
datasets. It is useful for a range of use-cases ranger from log
aggregation, business intelligence as well as machine learning.
Elasticsearch is popular because of its simple REST based API which
makes it trivial to create indices, add data and make complex queries.
However, before you get up and running building your dataset and running
queries you need to setup a elasticsearch cluster, which can be a
somewhat daunting prospect. Today, we look at how Rancher Catalogs make
it trivial to setup a scalable, highly available Elasticsearch cluster.

Assuming you already have a Rancher Cluster up and running, getting
Elasticsearch running on your cluster is a simple matter of browsing to
Catalog in the top menu and searching for Elasticsearch. There are two
versions of the Elasticsearch catalog. We are assuming that you are
using 2.x, the latest stable release version. To launch the stack from
the cluster, select View Details, and in the subsequent screen choose
a Stack Name, Cluster Name and select launch.

Elastic Search
Catalog

The stack should launch the following services;
kopf, client(s),
datanode(s) and master(s). The kopf container provides a web interface
to manage your elasticsearch cluster. Datanodes store the actual
indices. The master node runs cluster management tasks and the client
nodes originate and coordinate your searches and other operations.
Initially, your Elasticsearch cluster will have one container of each
type (master, client and datanodes have two sidekick containers).
However, you can scale out each of those components based on query load
and the size of the indices. Note that you need different physical hosts
for each datanode container to function correctly. Hence, you may have
to register more Rancher compute nodes.

ElasticSearch
Service

Once all your containers are active, you can bring up the kopf interface
by browsing to the host running the kopf container. If you click on the
nodes tab, you will see the various components I mentioned above
listed. As you can see, I have launched a second data node in order to
provide redundant storage for my indices. As we will see shortly, when
creating indices, we can control the number of data shards and copies of
each shards. This will help provide redundancy as well as speedup query
processing.

kopf
nodes

From the menu on the top of kopf, select more and then create index.
In the resulting screen, you will be asked to enter the Index Name,
the Number of Shards and the Number of replicas. The defaults for
these are 5 shards and 1 replica respectively. The number of shards and
replicas to setup for an index is highly dependent on the data set and
query model. The number of shards help spread data onto multiple nodes
and allow parallel processing of queries. Hence, if you only have a
single datanode then you will not see much benefit from multiple shards.
In addition, if you expect the data to grow rapidly you may want to have
more shards so that you can add nodes later and have data move to those.
Another thing to keep in mind is that elastic search recommends a max
heap size of 32 GB and hence, a max shard size should be about that size
so that it can be kept in memory as much as possible.

Replicas, on the other hand, are less related to datasize and more to
redundancy and performance. All queries for your index need to look at
one copy of each shard. If you have multiple copies of the shard, the
data is resilient to one node going down. Furthermore, with multiple
copies, the query load for a given shard is split between multiple
nodes. Having multiple replica only makes sense when you have more than
one data container/node in your cluster, and becomes more important as
you scale larger and larger cluster sizes.

As an example, lets define an index called movies with 2 shards and 2
replicas. Now select the rest tab from the top menu so that we can add
some documents to our index and test some queries. Elasticsearch is
schema free so we can add free form data into our index as long as it is
valid JSON. Update the path field to /movies/movie/1. The format of
the path is /INDEX_NAME/TYPE/ID where movies is the index we just
created, movie is the name we are giving to the type of document we are
about to submit and id is a unique ID for the document within the index.
Note the ID is optional, and if you skip this from the path, a random ID
will be created for your document. Once you have added the path, select
POST as the method, enter your JSON document in the bottom text field
and hit send. This will add the document to the index and send you a
confirmation.

movie index
data

Once you have added a few movies into the index, we can use the same
rest interface in order to search and aggregate data from our index.
Update the path field to /movies/movie/_search. The format of the
path is /INDEX_NAME/TYPE/_search where both INDEX_NAME and TYPE are
optional. If you skip type, your search will apply to all types in the
index, and if you also skip index name, then your search will apply to
all indices.

There are a number of different types of quires that are supported by
ElasticSearch. However, we cover some of the common types here. The
first type of query is the free text query. The query string parameter
allows for fairly complicated queries using the Elasticsearch Query
DS
.
However, we can also enter a simple string to match. This will match the
specified word or words in any field in the documents over which the
query applies.

{
    "query": {
        "query_string": {
            "query": "Apocalypse"
        }
    }
}

For example, the query above will return the result shown below. It
contains details about the time taken to process the query, the shards
that were searched, the total number of results, and then details of
each result.

{
  "took": 139,
  "timed_out": false,
  "_shards": {
    "total": 2,
    "successful": 2,
    "failed": 0
  },
  "hits": {
    "total": 2,
    "max_score": 0.5291085,
    "hits": [{
      "_index": "movies",
      "_type": "movie",
      "_id": "AVSvEC1fG_1bjVtG66mm",
      "_score": 0.5291085,
      "_source": {
        "title": "Apocalypse Now",
        "director": "Francis Ford Coppola",
        "year": 1979,
        "genres": [
          "Drama",
          "War"
        ]
      }
    }
....

In addition to the query text, you can also specify a field or est of
fields to limit your query to searching a subset of the document. For
example, the search below should return the same result as before, but
will have to look at a subset of the document, and should have faster
performance for larger data sets. There are many other operations.

{
  "query": {
    "query_string": {
      "query": "Apocalypse"
      "fields": ["title"]
    }
  }
}

We can wrap the query string in a filtered object and then specify a
filter to apply on the results of the query. This allows us to retain
the free form search over the initial dataset, but then filters the
results for the specific data we are looking for.

{
  "query": {
    "filtered": {
      "query_string": {
        "query": "Apocalypse"
        "fields": ["title"]
      }
      "filter": {
        "term": { "year": 1979 }
      }
    }
  }
}

Lastly, another type of query you may run is an aggregation. This is
useful for computing summary statistics about the data. Two examples of
these types of aggregations are shown below. The first will return a
count of the movies directed by each director. The second will return
the average rating for all the movies in our data set.

{
  "aggs": {
    "group_by_director": {
      "terms": {
        "field": "director"
      }
    }
  }
}

{
  "aggs" : {
    "avg_rating" : { "avg" : { "field" : "rating" } }
  }
}

Elasticsearch is one of the best ways of running analytics over large
unstructured datasets and is used extensively in many domains from
log-aggregation, machine learning to business intelligence. In this
article, we have looked at how simple it is to set up a fully
functioning Elasticsearch cluster on Rancher using the catalog. In
addition, we have taken a quick look at the power of Elasticsearch using
the rest API. Once you have Elasticsearch up and running you can use it
for a host of different use cases with the many available visualization
and aggregation frameworks such as
Kibana for real time
visualization or Pentaho for business
analytics.

Tags: , Category: Non classé Comments closed

Lessons Learned Building a Deployment Pipeline with Docker, Docker-Compose, and Rancher (Part 1)

lundi, 4 avril, 2016

Build a CI/CD Pipeline with Kubernetes and Rancher
Recorded Online Meetup of best practices and tools for building pipelines with containers and kubernetes.

John Patterson (@cantrobot) and Chris
Lunsford run This End Out, an operations and infrastructure services
company. You can find them online at

https://www.thisendout.com *and follow them
on twitter @thisendout. * Update:
All four parts of the series are now live, you can find them here: Part
1: Getting started with CI/CD and
Docker

Part 2: Moving to Compose
blueprints

Part 3: Adding Rancher for
Orchestration
Part
4: Completing the Cycle with Service
Discovery

This post is the first in a series in which we’d like to share the story
of how we implemented a container deployment workflow using Docker,
Docker-Compose and Rancher. Instead of just giving you the polished
retrospective, though, we want to walk you through the evolution of the
pipeline from the beginning, highlighting the pain points and decisions
that were made along the way. Thankfully, there are many great resources
to help you set up a continuous integration and deployment workflow with
Docker. This is not one of them! A simple deployment workflow is
relatively easy to set up. But our own experience has been that building
a deployment system is complicated mostly because the easy parts must be
done alongside the legacy environment, with many dependencies, and while
changing your dev team and ops organization to support the new
processes. Hopefully, our experience of building our pipeline the hard
way will help you with the hard parts of building yours. In this first
post, we’ll go back to the beginning and look at the initial workflow we
developed using just Docker. In future posts, we’ll progress through the
introduction of Docker-compose and eventually Rancher into our workflow.
To set the stage, the following events all took place at a
Software-as-a-Service provider where we worked on a long-term services
engagement. For the purpose of this post, we’ll call the company Acme
Business Company, Inc., or ABC. This project started while ABC was in
the early stages of migrating its mostly-Java micro-services stack from
on-premise bare metal servers to Docker deployments running in Amazon
Web Services (AWS). The goals of the project were not unique: lower lead
times on features and better reliability of deployed services. The plan
to get there was to make software deployment look something like this:
CD Part 1
software-deployment-workflow_edited
The process starts with the code being changed, committed, and pushed to
a git repository. This would notify our CI system to run unit tests,
and if successful, compile the code and store the result as an
artifact. If the previous step was successful, we trigger another job
to build a Docker image with the code artifact and push it to a private
Docker registry. Finally, we trigger a deployment of our new image to
an environment. The necessary ingredients are these:

  • A source code repository. ABC already had its code in private
    GitHub repository.
  • A continuous integration and deployment tool. ABC had a local
    installation of Jenkins already.
  • A private registry. We deployed a Docker registry container, backed
    by S3.
  • An environment with hosts running Docker. ABC had several target
    environments, with each target containing both a staging and
    production deployment.

When viewed this way, the process is deceptively simple. The reality
on the ground, though, is a bit more complicated. Like many other
companies, there was (and still is) an organizational divide between
development and operations. When code is ready for deployment, a ticket
is created with the details of the application and a target
environment. This ticket is assigned to operations and scheduled for
execution during the weekly deployment window. Already, the path to
continuous deployment and delivery is not exactly clear. In the
beginning, the deployment ticket might have looked something like this:

DEPLOY-111:
App: JavaService1, branch "release/1.0.1"
Environment: Production

The deployment process:

  • The deploy engineer for the week goes to Jenkins and clicks “Build
    Now” for the relevant project, passing the branch name as a
    parameter. Out pops a tagged Docker image which is automatically
    pushed into the registry. The engineer selects a Docker host in the
    environment that is not currently active in the load balancer. The
    engineer logs in and pulls the new version from the registry
docker pull registry.abc.net/javaservice1:release-1.0.1
  • Finds the existing container
docker ps
  • Stops the existing container.
docker stop [container_id]
  • Starts a new container with all of the necessary flags to launch the
    container correctly. This can be borrowed from the previous running
    container, the shell history on the host, or it may be documented
    elsewhere.
docker run -d -p 8080:8080 … registry.abc.net/javaservice1:release-1.0.1
  • Pokes the service and does some manual testing to verify that it is
    working.
curl localhost:8080/api/v1/version
  • During the production maintenance window, updates the load-balancer
    to point to the updated host.

  • Once verified, the update is applied to all of the other hosts in
    the environment in case a failover is required.

Admittedly, this deployment process isn’t very impressive, but it’s a
great first step towards continuous deployment. There are plenty of
places to improve, but consider the benefits:

  • The ops engineer has a recipe for deployment and every application
    deploys using the same steps. The parameters for the Docker run
    step have to be looked up for each service, but the general cadence
    is always the same: Docker pull, Docker stop, Docker run. This is
    super simple and makes it hard to forget a step.
  • With a minimum of two hosts in the environment, we have manageable
    blue-green deployments. A production window is simply a cutover in
    the load-balancer configuration with an obvious and quick way to
    rollback. As the deployments become more dynamic, upgrades,
    rollbacks, and backend server discovery get increasingly difficult
    and require more coordination. Since deployments are manual, the
    costs of blue-green are minimal but provide major benefits over
    in-place upgrades.

Alright, on to the pain points:

  • Retyping the same commands. Or, more accurately, hitting up and
    enter at your bash prompt repeatedly. This one is easy: automation
    to the rescue! There are lots of tools available to help you launch
    Docker containers. The most obvious solution for an ops engineer is
    to wrap the repetitive logic in a bash script so you have a single
    entry point. If you call yourself a devops engineer, instead, you
    might reach for Ansible, Puppet, Chef, or SaltStack. Writing the
    scripts or playbooks are easy, but there are a few questions to
    answer: where does the deployment logic live? And how do you keep
    track of the different parameters for each service? That brings us
    to our next point.
  • Even an ops engineer with super-human abilities to avoid typos and
    reason clearly in the middle of the night after a long day at the
    office won’t know that the service is now listening on a different
    port and the Docker port parameter needs to be changed. The crux of
    the issue is that the details of how the application works are
    (hopefully) well-known to developers, and that information needs to
    be transferred to the operations team. Often times, the operations
    logic lives in a separate code repository or no repository at all.
    Keeping the relevant deployment logic in sync with the application
    can be difficult. For this reason, it’s a good practice to just
    commit your deployment logic into the code repo with your
    Dockerfile. If there are situations where this isn’t possible,
    there are ways to make it work (more on this later). The important
    thing is that the details are committed somewhere. Code is better
    than a deploy ticket, but a deploy ticket is still much better than
    in someone’s brain.
  • Visibility. Troubleshooting a container requires logging into
    the host and running commands. In reality, this means logging into
    a number of hosts and running a combination of ‘docker ps’ and
    ‘docker logs –tail=100’. There are many good solutions for
    centralizing logs and, if you have the time, they are definitely
    worth setting up. What we found to generally be lacking, though,
    was the ability to see what containers were running on which hosts.
    This is a problem for developers, who want to know what versions are
    deployed and at what scale. And this is a major problem for
    operations, who need to hunt down containers for upgrades and
    troubleshooting.

Given this state of affairs, we started to implement changes to address
the pain points. The first advancement was to write a bash script
wrapping the common steps for a deployment. A simple wrapper might look
something like this:

!/bin/bash
APPLICATION=$1
VERSION=$2

docker pull "registry.abc.net/${APPLICATION}:${VERSION}"
docker rm -f $APPLICATION
docker run -d --name "${APPLICATION}" "registry.abc.net/${APPLICATION}:${VERSION}"

This works, but only for the simplest of containers: the kind that users
don’t need to connect to. In order to enable host port mapping and
volume mounts, we need to add application-specific logic. Here’s the
brute force solution that was implemented:

APPLICATION=$1
VERSION=$2

case "$APPLICATION" in
java-service-1)
  EXTRA_ARGS="-p 8080:8080";;
java-service-2)
  EXTRA_ARGS="-p 8888:8888 --privileged";;
*)
  EXTRA_ARGS="";;
esac

docker pull "registry.abc.net/${APPLICATION}:${VERSION}"
docker stop $APPLICATION
docker run -d --name "${APPLICATION}" $EXTRA_ARGS "registry.abc.net/${APPLICATION}:${VERSION}"

This script was installed on every Docker host to facilitate
deployments. The ops engineer would login and pass the necessary
parameters and the script would do the rest. Deployment time was
simplified because there was less for the engineer to do. The problem
of encoding the deployment logic didn’t go away, though. We moved it
back in time and turned it into a problem of committing changes to a
common script and distributing those changes to hosts. In general, this
is a great trade. Committing to a repo gives you great benefits like
code review, testing, change history, and repeatability. The less you
have to think about at crucial times, the better. Ideally, the relevant
deployment details for an application would live in the same source repo
as the application itself. There are many reasons why this may not be
the case, not the least of which being that developers may object to
having “ops” stuff in their java repo. This is especially true for
something like a deployment bash script, but also pertains to the
Dockerfile itself. This comes down to a cultural issue and is worth
working through, if at all possible. Although it’s certainly doable to
maintain separate repositories for your deployment code, you’ll have to
spend extra energy making sure that the two stay in sync. But, of
course, this is an article about doing it the hard way. At ABC, the
Dockerfiles started life in a dedicated repository with one folder per
project, and the deploy script lived in its own repo. cd
3
The Dockerfiles repository had a working copy checked out at a
well-known location on the Jenkins host (say,
‘/opt/abc/Dockerfiles’). In order to build the Docker image for an
application, Jenkins would first check for a Dockerfile in a local
folder ‘docker’. If not present, Jenkins would search the Dockerfiles
path, copying over the Dockerfile and accompanying scripts before
running the ‘docker build’. Since the Dockerfiles are always at
master, it’s possible to find yourself in a situation where the
Dockerfile is ahead of (or behind) the application configuration, but in
practice this mostly just works. Here’s an excerpt from the Jenkins
build logic:

if [ -f docker/Dockerfile ]; then
  docker_dir=Docker
elif [ -f /opt/abc/dockerfiles/$APPLICATION/Dockerfile ]; then
  docker_dir=/opt/abc/dockerfiles/$APPLICATION
else
  echo "No docker files. Can’t continue!"
  exit 1
if
docker build -t $APPLICATION:$VERSION $docker_dir

Over time, dockerfiles and supporting scripts were migrated into the
application source repositories. Since Jenkins was already looking in
the local repo first, no changes were required to the build pipeline.
After migrating the first service, the repo layout looked roughly like:
cd
4
One problem we ran into with having a separate repo was getting Jenkins
to trigger a rebuild of the application if either the application source
or packaging logic changed. Since the ‘dockerfiles’ repo contained
code for many projects, we didn’t want to trigger all repos when a
change occurred. The solution: a well-hidden option in the Jenkins Git
plugin
called
Included Regions.
When configured, Jenkins isolates the build trigger to a change in a
specific sub-directory inside the repository. This allows us to keep all
Dockerfiles in a single repository and still be able to trigger specific
builds when a change is made (compared to building all images when a
change is made to a specific directory inside the repo). CD Part
1_2_jenkins-included-regions_edited
Another aspect of the initial workflow was that the deploy engineer
had to force a build of the application image before deployment. This
resulted in extra delays, especially if there was a problem with the
build and the developer needed to be engaged. To reduce this delay, and
pave the way to more continuous deployment, we started building Docker
images on every commit to a well-known branch. This required that every
image have a unique version identifier, which was not always the case if
we relied solely on the official application version string. We ended
up using a combination of official version string, commit count, and
commit sha:

commit_count=$(git rev-list --count HEAD)
commit_short=$(git rev-parse --short HEAD)
version_string="${version}-${commit_count}-${commit_short}"

This resulted in a version string that looks like ‘1.0.1-22-7e56158’.
Before we end our discussion of the Docker file phase of our pipeline,
there are a few parameters that are worth mentioning. Before we
operated a large number of containers in production we had little use
for these, but they have proven helpful in maintaining the uptime of our
Docker cluster.

  • Restart
    Policy

    • A restart policy allows you to specify, per-container, what
      action to take when a container exits. Although this can be used to
      recover from an application panic or keep the container retrying
      while dependencies come online, the big win for Ops is automatic
      recovery after a Docker daemon or host restart. In the long run,
      you’ll want to implement a proper scheduler that can restart failed
      containers on new hosts. Until that day comes, save yourself some
      work and set a restart policy. At this stage in ABC, we defaulted to
      ‘–restart always’, which will cause the container to restart
      indefinitely. Simply having a restart policy will make planned (and
      unplanned) host restarts much less painful.
  • **Resource
    Constraints
    ** –
    With runtime resource constraints, you can set the maximum amount of
    memory or CPU that a container can consume. It won’t save you from
    general over-subscription of a host, but it can keep a lid on memory
    leaks and runaway containers. We started out by applying a generous
    memory limit (e.g. ‘–memory=“8g“‘) to containers that were
    known to have issues with memory growth. Although having a hard
    limit means the application will eventually hit an Out-of-Memory
    situation and panic, the host and other containers keep right on
    humming.

Combining restart policies and resource limits gives you greater cluster
stability while minimizing the impact of the failure and improving time
to recovery. In practice, this type of safeguard gives you the time to
work with the developer on the root cause, instead of being tied up
fighting a growing fire. To summarize, we started with a rudimentary
build pipeline that created tagged Docker images from our source repo.
We went from deploying containers using the Docker CLI to deploying them
using scripts and parameters defined in code. We also looked at how we
organized our deployment code, and highlighted a few Docker parameters
to help Ops keep the services up and running. At this point, we still
had a gap between our build pipelines and deployment steps. The
deployment engineer were bridging that gap by logging into a server to
run the deployment script. Although an improvement from where we
started, there was still room for a more automated approach. All of the
deployment logic was centralized in a single script, which made testing
locally much more difficult when developers need to install the script
and muddle through its complexity. At this point, handling any
environment specific information by way of environment variables
was also contained in our deployment script. Tracking down which
environmental variables were set for a service and adding new ones
was tedious and error-prone. In the next
post
,
we take a look at how we addressed these pain points by deconstructing
the common wrapper script, bringing the deployment logic closer to the
application using Docker Compose.Go to Part
2>>

Please also download your free copy of ”Continuous Integration and
Deployment with Docker and
Rancher
” a detailed
eBook that walks through leveraging containers throughout your CI/CD
process.

Build a CI/CD Pipeline with Kubernetes and Rancher
Recorded Online Meetup of best practices and tools for building pipelines with containers and kubernetes.

Tags: ,, Category: Non classé Comments closed

Announcing Rancher 1.0 GA

mardi, 29 mars, 2016

Rancher 1.0
LogoToday we achieved a
major milestone by shipping Rancher 1.0, our first generally available
release. After more than one and a half years of development, Rancher
has reached the quality and feature completeness for production
deployment. We first unveiled a preview of Rancher to the world at the
November 2014 Amazon Re:invent conference. We followed that with a Beta
release in June 2015. I’d like to congratulate the entire Rancher
development team for this achievement.

As an open source project, Rancher was developed in close collaboration
with the user and developer community. Some of you have been with us
from the very beginning and have seen dramatic enhancements and changes
since our initial preview release. Some of you were even bold enough to
deploy Rancher in mission-critical production environments prior to our
GA release! Rancher simply would not be where it is today without your
feedback, suggestions, and contributions. With your help, Rancher has
now over a million downloads and over 2500 beta program participants.
We can’t thank our community enough and are looking forward to working
with each and every one of you as we continue to improve and shape
Rancher into the best container management platform.

In this blog post I would like to also reflect upon what we have built
by explaining what problems Rancher is designed to solve, how the
community is using Rancher in practice, why users find Rancher to be
uniquely suited for their applications, and how we plan to continue to
develop Rancher post 1.0 GA.

We’ve created a quick demo to introduce the new release.

###

The problem Rancher solves

Rancher is a complete and turn-key container management platform. As
organizations start to deploy Docker containers in production, the
immediate challenge becomes the integration of large collections of
open-source technologies. As illustrated in the following figure,
container management involves solving problems spanning across storage,
networking, monitoring, orchestration, and scheduling.

container
management

Rancher develops, integrates, and distributes all of the technologies
necessary to run containers in production. At Rancher Labs, we integrate
and distribute market-leading container orchestration and scheduling
frameworks such as Docker Swarm and Kubernetes, while developing the
necessary app catalog, enterprise user management, access control,
container networking and storage technologies ourselves. The result is a
complete platform that offers superb developer and operator experience.
With Rancher, organizations no longer need to worry about keeping up
with and integrating a myriad of technologies from the fast-moving
container ecosystem. Instead, they deploy Rancher once and can then
focus on developing the applications that make their business better.

###

How organizations use Rancher

Most organizations today employ or are moving toward an agile software
development pipeline. As users adopt containers, tools like GitHub,
Jenkins, and Docker Hub solve the front-half of that pipeline. Users
deploy Rancher so that they can test, deploy, upgrade, and operate
containerized application on any public cloud or private data center.

Container Devops
Pipeline

###

Why Rancher is unique

We set out to build Rancher because we saw the need for a complete and
turn-key container management platform. The resulting product, Rancher,
has a number of unique qualities:

  • Open source

    . Rancher is 100% open source. We believe leveraging the power of an
    open source community is the best way to build platform software,
    and we are confident that organizations will pay for enterprise
    support and thus help fund our development effort.

  • Easy to use

    . Time and time again, developers have told us they love Rancher’s
    simple and intuitive experience which enables them to focus on
    building applications as opposed to having to build the underlying
    infrastructure software themselves.

  • Enterprise grade

    . Rancher implements enterprise management features such as LDAP and
    AD integration, role based access control, unified infrastructure
    visibility and audit, and a unified application catalog.

  • Infrastructure agnostic

    . Rancher runs on computing resources in the form of Linux servers,
    which are a commodity offered by all clouds and data centers.
    Rancher does not rely on proprietary features supported by one cloud
    provider and not others. Rancher builds a rich set of storage,
    networking, load balancing, DNS, and metadata services that work
    consistently for containers running on any cloud.

  • Support for both Swarm and Kubernetes

    . Modern DevOps practices do not impose the choice of application
    frameworks across the organization. As a result different teams tend
    to choose their own container orchestration and scheduling
    frameworks. Rancher is the only container management platform today
    that can support both Swarm and Kubernetes.

###

What you can expect after 1.0

We are lucky to have passionate users and open source community members.
The community wants us to continue to improve networking and storage
features, implement richer enterprise-grade visibility and control
features, onboard and certify more application catalog entries, and
support additional container orchestration and scheduling frameworks.
You can get a good idea of what users and community members want by
looking at the Rancher Forums

and the list of open
issues

on Rancher’s GitHub page. With 1.0 behind us, you should expect the
feature development velocity to increase. While maintaining a stable
release branch, we will continue to release new features and
capabilities on an aggressive release schedule. Stay tuned!

To see Rancher 1.0 in action, join us this Wednesday at 1:00 pm Eastern
time for an Online Meetup on building your own Containers-as-a-Service
platform with Rancher 1.0. We’ll be joined by the container team at Sony
PlayStation, who will be sharing some of their experiences using
Rancher.

Tags: , Category: Non classé Comments closed

Rancher and Spotinst partner to introduce a new model for utilizing Docker orchestration tools on spot instances

lundi, 16 novembre, 2015

spotinstlogo](https://cdn.rancher.com/wp-content/uploads/2015/11/16025649/spotinstlogo.png)
We
are very excited to announce a new partnership
with Spotinst today to deliver intelligent
management and migration of container workloads running on spot
instances. With this new solution, we have developed a simple, intuitive
way for using spot instances to run any
container workload reliably and for a fraction of the cost of
traditional applications. Since the dawn
of data centers we’ve seen continuous improvements in utilization and
cost efficiency. But like [Jevons’
Paradox]](https://en.wikipedia.org/wiki/Jevons_paradox),
the more efficient we become in consuming
a resource, the more of that resource we consume
. So we always are
seeking the newest, fastest and uber-optimized of everything.

How it works:

Spotinst is a SaaS platform that enables reliable, highly available use
of AWS Spot Instances and Google Preemptible VMs with typical savings of
70-90%.

We’ve worked with the team at Spotinst to integrate with the Rancher API directly. The integration
utlizes Docker “checkpoint and resume” (CRIU project). Based on metrics
and business rules provided by Spotinst, Rancher can freeze any
container and resume it on any other instance, automating the process a
typical DevOps team might implement to manage container
deployment.
rancher-spotinst-1](https://www.suse.com/c/wp-content/uploads/2021/09/rancher_blog_rancher-spotinst-1.png)
For example, if Spotinst identifies that the spot instance a
container is running on, is about to terminate (with a 4 – 7 minute
heads-up), Spotinst will instruct Rancher to pause that container and
relocate it to another relevant instance.
rancher-spotinst-2](https://www.suse.com/c/wp-content/uploads/2021/09/rancher_blog_rancher-spotinst-2.png)

Unprecedented Availability for Online Gaming While pizza servers,
blade racks and eventually virtualization technology paved the way for
modern data centers, today’s cloud computing customer expects
increasingly higher performance and higher availability in everything
from online gaming to genome sequencing. An
awesome example of how Docker is utilizing live migration to deliver
high availability can be seen in this
presentation from
DockerCon earlier this yeaar.

The presenters show how they containerized Quake, had it running on a
DigitalOcean server in Singapore, and then live migrated it to Amsterdam
with the player experiencing practically zero interruption to his game.
Using “checkpoint and resume”, they
didn’t just stop the container, but
took an entire running process with all its memory, file descriptors,
etc. and effortlessly moved it and resumed it halfway around the
world.

How it works?

rancher-spotinst-4](https://www.suse.com/c/wp-content/uploads/2021/09/rancher_blog_rancher-spotinst-4.png)

We’re really excited about the potential of live migrating containers,
and this partnership with Spotinst. By moving workloads to spot
instances, organizations can dramatically reduce the cost of cloud
resources.

To try out the new service, you can sign up for a Spotinst account and directly connect it to your
running Rancher deployment, via your API keys.

To learn more, please request a demonstration from one of our engineers.

Tags: ,,, Category: Non classé Comments closed