Containerization brings several benefits to traditional CI platforms
where builds share hosts: build dependencies can be isolated,
applications can be tested against multiple environments (testing a Java
app against multiple versions of JVM), on-demand build environments can
be created with minimal stickiness to ensure test fidelity, Docker
Compose can be used to quickly bring up environments which mirror
development environments. Lastly, the inherent isolation offered by
Docker Compose-based stacks allow for concurrent builds — a sticking
point for traditional build environments with shared components.
One of the immediate benefits of containerization for CI is that we can
leverage tools such as Rancher to manage distributed build environments
across multiple hosts. In this article, we’re going to launch a
distributed Jenkins cluster with Rancher Compose. This work builds upon
the earlier
work** **by
one of the authors, and further streamlines the process of spinning up
and scaling a Jenkins stack.
Our Jenkins Stack
For our stack, we’re using Docker in Docker (DIND) images for
Jenkins master** and slave **running
on top of Rancher compute nodes launched in Amazon EC2. With DIND, each
Jenkins container runs a Docker daemon within itself. This allows us to
create build pipelines for dockerized applications with Jenkins.
Prerequisites
- [AWS EC2
account]
- [IAM credentials for docker
machine]
- [Rancher
Server v0.32.0+]
- [Docker 1.7.1+]
- [Rancher
Compose]
- [Docker
Compose]
Setting up Rancher
Step 1: Setup an EC2 host for Rancher server
First thing first, we need an EC2 instance to run the Rancher server. We
recommend going with Ubuntu 14.04
AMI for
it’s up-to-date kernel. Make sure[ to configure the security group for
the EC2 instance with access to port 22 (SSH) and 8080 (rancher web
interface):]

[Once the instance starts, the first order of business is
to ][install the
latest version of Docker by following the steps below (for Ubuntu
14.04):]
- [sudo apt-get
update]
- [curl -sSL https://get.docker.com/ | sh (requires sudo
password)]
- [sudo usermod -aG docker
ubuntu]
- [Log out and log back in to the
instance]
At this point you should be able to run docker without sudo.
[To install and run the latest version of Rancher (v0.32.0 at the time
of writing), follow the instructions in the docs.
In a few minutes your Rancher server should be up and ready to serve
requests on port
8080. ][If you
browse to http://YOUR_EC2_PUBLIC_IP:8080/ you will be greeted with a
welcome page and a notice asking you to configure
access. ][This is
an important step to prevent unauthorized access to your Rancher server.
Head over to the settings section and follow the instructions to
configure access
control. ]

[We typically create a separate environment for hosting all developer
facing tools, e.g., Jenkins, Seyren, Graphite etc to isolate them from
the public facing live services. To this end, we’re going to create an
environment called *Tools. *From the environments menu (top left),
select “manage environments” and create a new environment. Since
we’re going to be working in this environment exclusively, let’s go
ahead and make this our default environment by selecting “set as
default login environment” from the environments
menu. ]

The next step is to tell Rancher about our hosts. For this tutorial,
we’ll launch all hosts with Ubuntu 14.04. Alternatively, you can add an
existing host using the custom host** **option
in Rancher. Just make sure that your hosts are running Docker 1.7.1+.
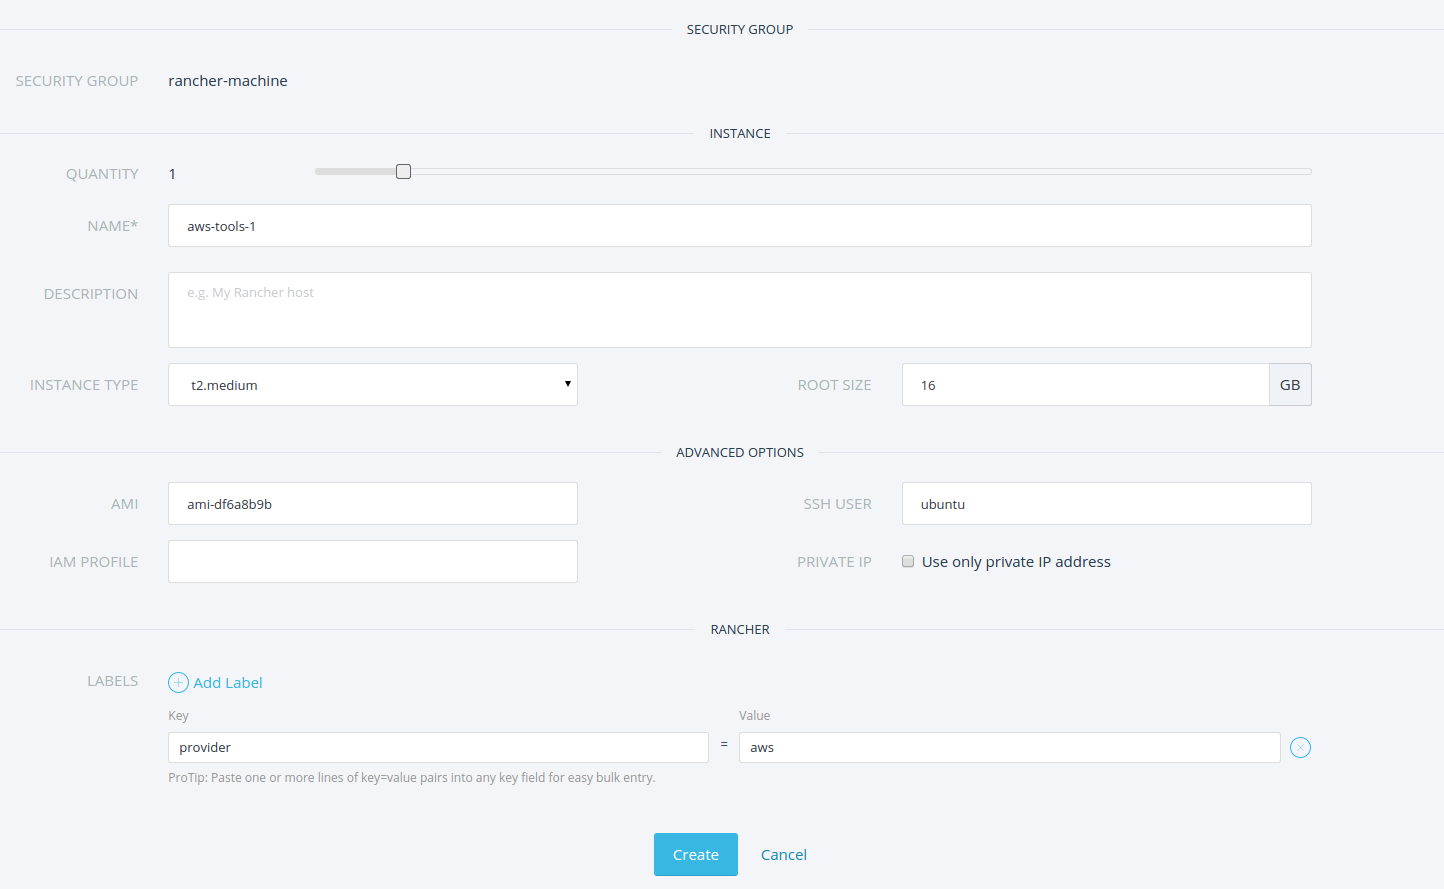
One of the hosts (JENKINS_MASTER_HOST) is going to run Jenkins master
and would need some additional configuration. First, we need to open up
access to port 8080 (default Jenkins port). You can do that by updating
the security group used by that instance fom the AWS console. In our
case, we updated the security group ( “rancher-machine” ) which was
created by rancher. Second, we need to attach an additional EBS-backed
volume to host Jenkins configuration. Make sure that you allocate enough
space for the volume, based on how large your build workspaces tend to
get. In addition, make sure the flag “delete on termination” is
unchecked. That way, the volume can be re-attached to another instance
and backed up easily:
[](https://cdn.rancher.com/wp-content/uploads/2015/08/01132712/launch_ec2_ebs_volume_for_jenkins.png)
Lastly, let’s add a couple of labels for the JENKINS_MASTER_HOST; 1)
add a label called “profile” with the value as “jenkins” and 2) add
a label called “jenkins-master” with the value “true“. We’re going
to use these labels later to schedule master and slave containers on
our hosts.
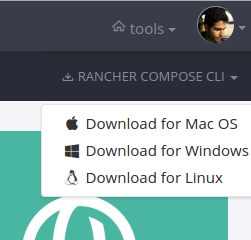
Step 3: Download and install rancher-compose CLI
As a last step, we need to install the rancher-compose CLI on our
development machine. To do that, head over to the applications tab in
Rancher and download the rancher compose CLI for your system. All you
need is to add the path-to-your-rancher-compose-CLI to
your *PATH *environment variable.
With that, our rancher server is ready and we can now launch and manage
containers with it.
Launching Jenkins stack with Rancher
Step 1: Stack configuration
Before we launch the Jenkins stack, we need to create a new Rancher API
key from API & Keys section under settings. Save the API key pair
some place safe as we’re going to need it with rancher-compose. For the
rest of the article, we refer to the API key pair as [RANCHR_API_KEY
and RANCHER_API_KEY_SECRET]. Next, open up a
terminal to fetch the latest version of Docker and Rancher Compose
templates from Github:
git clone https://github.com/rancher/jenkins-rancher.git
cd jenkins-rancher
Before we can use these templates, let’s quickly update the
configuration. First, open up the Docker Compose file and update the
Jenkins username and password to a username and password of your choice.
Let’s call these credentials JENKINS_USER and JENKINS_PASSWORD.
These credentials will be used by the Jenkins slave to talk to master.
Second, update the host tag for slave and master to match the tags you
specified for your rancher compute hosts. Make sure that the
io.rancher.scheduler.affinity:host_label has a value of
“profile=jenkins” for jenkins-slave. Similarly, for
jenkins-master, make sure that the value
for io.rancher.scheduler.affinity:host_label is
“jenkins-master=true“. This will ensure that rancher containers are
only launched on the hosts that you want to limit them to. For example,
we are limiting our Jenkins master to only run on a host with an
attached EBS volume and access to port 8080.
jenkins-slave:
  environment:
    JENKINS_USERNAME: jenkins
    JENKINS_PASSWORD: jenkins
    JENKINS_MASTER: http://jenkins-master:8080
  labels:
    io.rancher.scheduler.affinity:host_label: profile=jenkins
  tty: true
  image: techtraits/jenkins-slave
  links:
  - jenkins-master:jenkins-master
  privileged: true
  volumes:
  - /var/jenkins
  stdin_open: true
jenkins-master:
  restart: 'no'
  labels:
    io.rancher.scheduler.affinity:host_label: jenkins-master=true
  tty: true
  image: techtraits/jenkins-master
  privileged: true
  stdin_open: true
  volume_driver: /var/jenkins_home
jenkins-lb:
  ports:
  - '8080'
  tty: true
  image: rancher/load-balancer-service
  links:
  - jenkins-master:jenkins-master
  stdin_open: true
Step 2: Create the Jenkins stack with Rancher compose
[Now we’re all set to launch the Jenkins stack. Open up a terminal,
navigate to the “jenkins-rancher” directory and type:
]
rancher-compose --url http://RANCHER_HOST:RANCHER_PORT/v1/ --access-key RANCHER_API_KEY --secret-key RANCHER_API_KEY_SECRET --project-name jenkins --verbose create
[The output of the rancher compose command should look something
like:]
[DEBU[0000] Opening compose file:
docker-compose.yml] [ DEBU[0000]
Opening rancher-compose file:
/home/mbsheikh/jenkins-rancher/rancher-compose.yml]
[ DEBU[0000] [0/3] [jenkins-slave]:
Adding] [ DEBU[0000] Found
environment: jenkins(1e9)] [
DEBU[0000] Launching action for
jenkins-master] [ DEBU[0000]
Launching action for jenkins-slave] [
DEBU[0000] Launching action for
jenkins-lb] [ DEBU[0000] Project
[jenkins]: Creating project] [
DEBU[0000] Finding service
jenkins-master] [ DEBU[0000] [0/3]
[jenkins-master]: Creating] [
DEBU[0000] Found service jenkins-master]
[ DEBU[0000] [0/3] [jenkins-master]:
Created] [ DEBU[0000] Finding service
jenkins-slave] [ DEBU[0000] Finding
service jenkins-lb] [ DEBU[0000]
[0/3] [jenkins-slave]: Creating] [
DEBU[0000] Found service jenkins-slave]
[ DEBU[0000] [0/3] [jenkins-slave]:
Created] [ DEBU[0000] Found service
jenkins-lb] [ DEBU[0000] [0/3]
[jenkins-lb]: Created]
Next, verify that we have a new stack with three services:

Before we start the stack, let’s make sure that the services are
properly linked. Go to your stack’s settings and select “View Graph”
which should display the links between various services:

Step 3: Start the Jenkins stack with Rancher compose
To start the stack and all of Jenkins services, we have a couple of
options; 1) select “Start Services” option from Rancher UI, or 2)
invoke rancher-compose CLI with the following command:
rancher-compose --url http://RANCHER_HOST:RANCHER_PORT/v1/ --access-key RANCHER_API_KEY --secret-key RANCHER_API_KEY_SECRET --project-name jenkins --verbose start
Once everything is running, find out the public IP of the host running
“jenkins-lb” from the Rancher UI and browse
to http://HOST_IP_OF_JENKINS_LB:8080/. If everything is configured
correctly, you should see the Jenkins landing page. At this point, both
your Jenkins master and slave(s) should be running; however, if you
check the logs for your Jenkins slave, you would see 404 errors where
the Jenkins slave is unable to connect to the Jenkins master. We need to
configure Jenkins to allow for slave connections.
Configuring and Testing Jenkins
In this section, we’ll go through the steps needed to configure and
secure our Jenkins stack. First, let’s create a Jenkins user with the
same credentials (JENKINS_USER and JENKINS_PASSWORD) that you
specified in your docker compose configuratio[n
file. ]Next, to enable security for Jenkins,
navigate to “manage Jenkins” and select “enable security” from the
security configuration. Make sure to specify 5000 as a fixed port for
“TCP port for JNLP slave agents“. Jenkins slaves communicate with the
master node on this port.

For the Jenkins slave to be able to connect to the master, we first need
to install the Swarm
plugin. The
plugin can be installed from the “manage plugins” section in Jenkins.
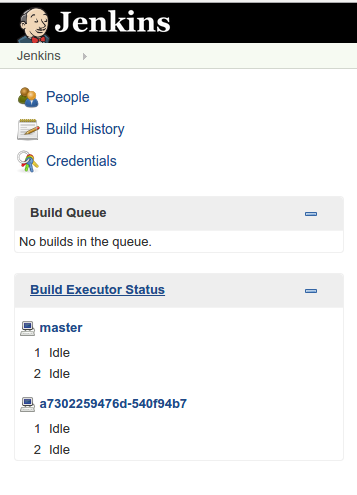
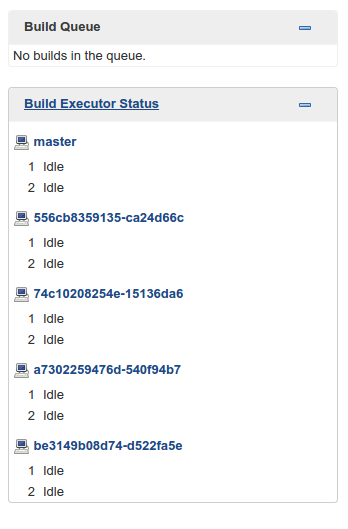
Once you have the swarm plugin installed, your Jenkins slave should show
up in the “Build Executor Status” tab:
Finally, to complete the master-slave configuration, head over to
“manage Jenkins“. You should now see a notice about enabling master
security subsystem. Go ahead and enable the subsystem; it can be used to
control access between master and slaves:

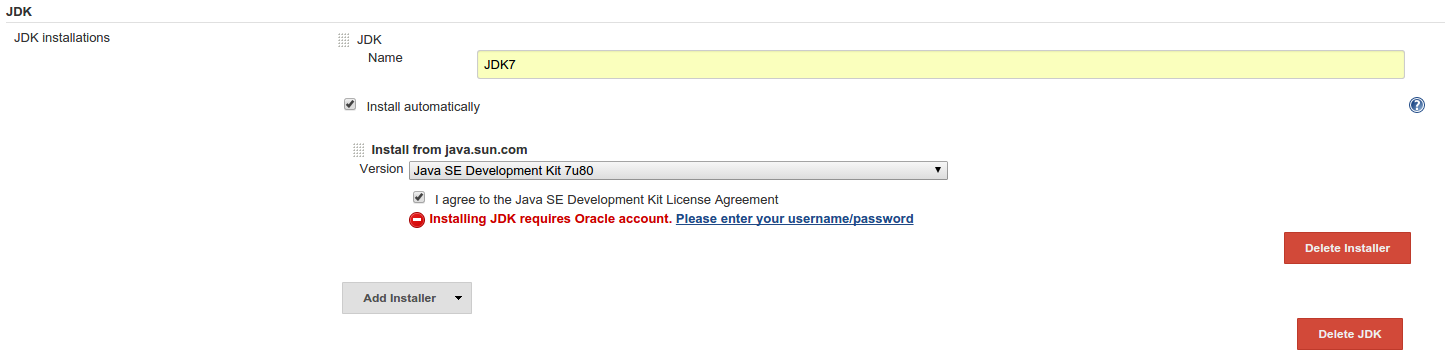
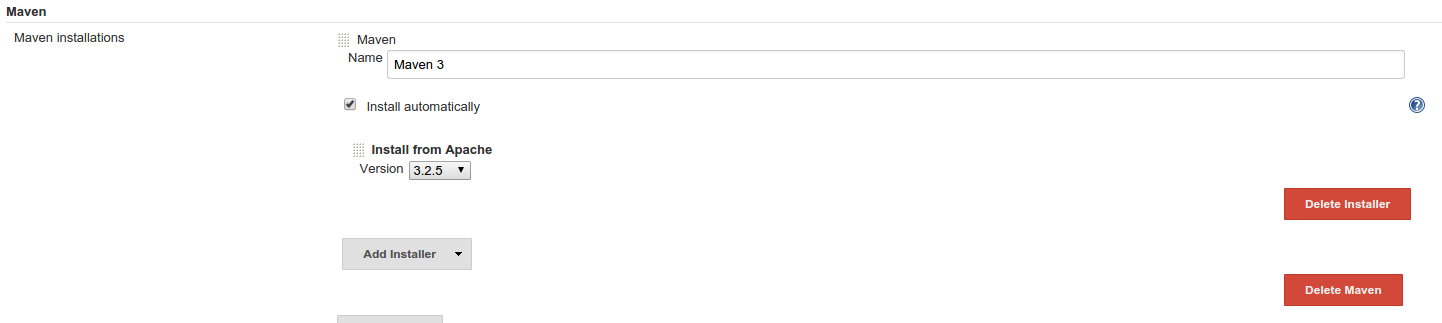
Before moving on, let’s configure Jenkins to work with Git and Java
based projects. To configure git, simply install the git plugin. Then,
select “Configure” from “Manage Jenkins” settings and set up the JDK
and maven installers you want to use for your projects:
[
]
The steps above should be sufficient for building docker or maven based
Java projects. To test our new Jenkins stack, let’s create a docker
based job. Create a new “Freestyle Project” type job named
“docker-test” and add the following build step and select “execute
shell” with the following commands:
docker -v
docker run ubuntu /bin/echo hello world
docker stop $(docker ps -a -q)
docker rm $(docker ps -a -q)
docker rmi $(docker images -q)
Save the job and run. In the console output, you should see the version
of docker running inside your Jenkins container and the output for other
docker commands in our job.
Note: The stop, rm and rmi commands used in the above shell script
stops and cleans up all containers and images. Each Jenkins job should
only touch it’s own containers, and therefore, we recommend deleting
this job after a successful test.
Scaling Jenkins with Rancher
This is an area where Rancher really shines; it makes managing and
scaling Docker containers trivially easy. In this section we’ll show
you how to scale up and scale down the number of Jenkins slaves based on
your needs.
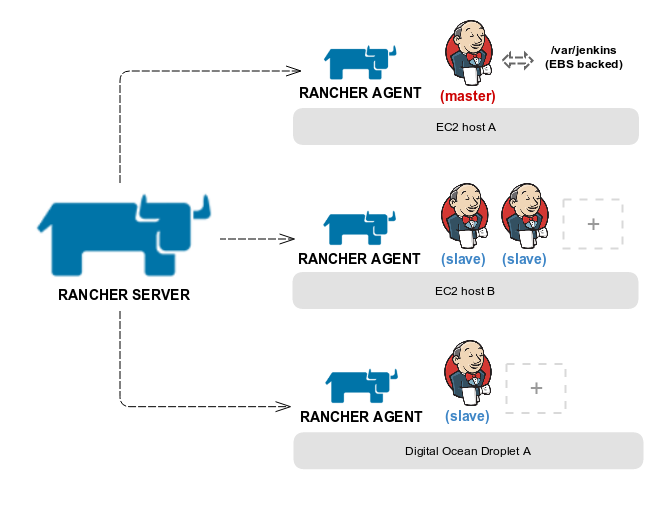
In our initial setup, we only had one EC2 host registered with Rancher
and all three services (Jenkins load balancer, Jenkins master and
Jenkins slave) running on the same host. It looks like:
We’re now going to register another host by following the instructions:

 To launch more
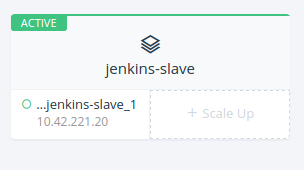
Jenkins slaves, simply click “Scale up” from your “Jenkins” stack in
Rancher. That’s it! Rancher will immediately launch a new Jenkins slave
container. As soon as the slave container starts, it will connect with
Jenkins master and will show up in the list of build hosts:
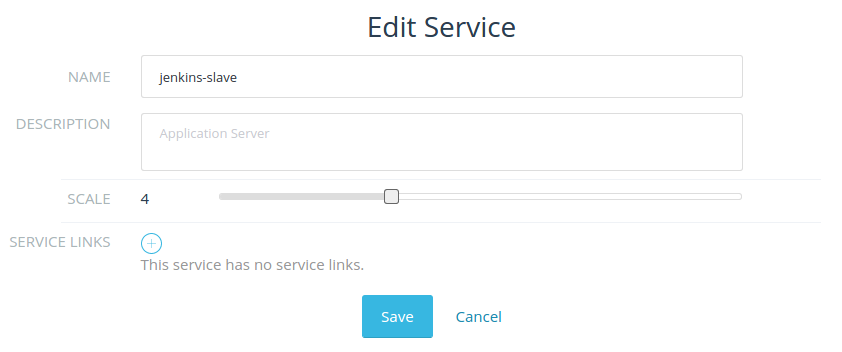
To scale down, select “edit” from jenkins-slave settings and adjust
the number of slaves to your liking:
In a few seconds you’ll see the change reflected in Jenkins list of
available build hosts. Behind the scenes, Rancher uses labels to
schedule containers on hosts. For more details on Rancher’s container
scheduling, we encourage you to check out the documentation.
Conclusion
In this article, we built Jenkins with Docker and Rancher. We deployed
up a multi-node Jenkins platform with Rancher Compose which can be
launched with a couple of commands and scaled as needed. Rancher’s
cross-node networking allows us to seamlessly scale the Jenkins cluster
on multiple nodes and potentially across multiple clouds with just a few
clicks. Another significant aspect of our Jenkins stack is the DIND
containers for Jenkins master and slave, which allows the Jenkins setup
to be readily used for dockerized and non dockerized applications.
In future articles, we’re going to use this Jenkins stack to create
build pipelines and highlight CI best practices for dockerized
applications. To learn more about managing applications through the
upgrade process, please join our next online meetup where we’ll dive
into the details of how to manage deployments and upgrades of
microservices with Docker and Rancher.
Bilal and Usman are server and infrastructure engineers, with
experience in building large scale distributed services on top of
various cloud platforms. You can read more of their work at
techtraits.com, or follow them on twitter
@mbsheikh and
@usman_ismail respectively.
 ](https://cdn.rancher.com/wp-content/uploads/2015/11/16025649/spotinstlogo.png)
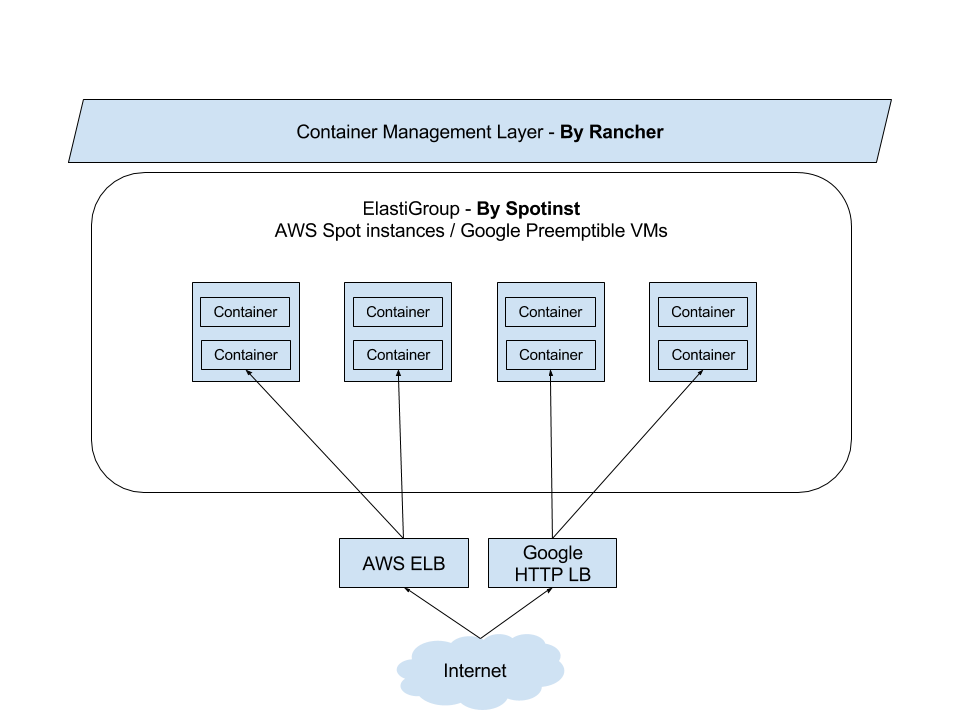 ](https://www.suse.com/c/wp-content/uploads/2021/09/rancher_blog_rancher-spotinst-1.png)
 ](https://www.suse.com/c/wp-content/uploads/2021/09/rancher_blog_rancher-spotinst-2.png)
 ](https://www.suse.com/c/wp-content/uploads/2021/09/rancher_blog_rancher-spotinst-4.png)