Mac meets SUSE Edge: Deploying Linux, K3s & Rancher with EIB
Edge computing, while offering immense potential, presents a unique set of challenges. Whether it is a sensor, a train, a retail store, or a smart factory, connectivity is often intermittent and bandwidth-constrained, making reliable data transfer and remote management difficult. Edge deployments come with a huge scale and are distributed by nature. This complicates management and maintenance extremely difficult and requires remote administration capabilities.
The SUSE Edge team developed Edge Image Builder (EIB) to allow users to create a single, self-bootstraping image containing the OS, Kubernetes, applications and network settings that can deploy to any number of edge nodes. The machine boots up independently, installs RPMs, Kubernetes, SUSE products and end user applications, and becomes ready to serve. The image can be used for low-bandwidth connections and air-gapped scenarios.
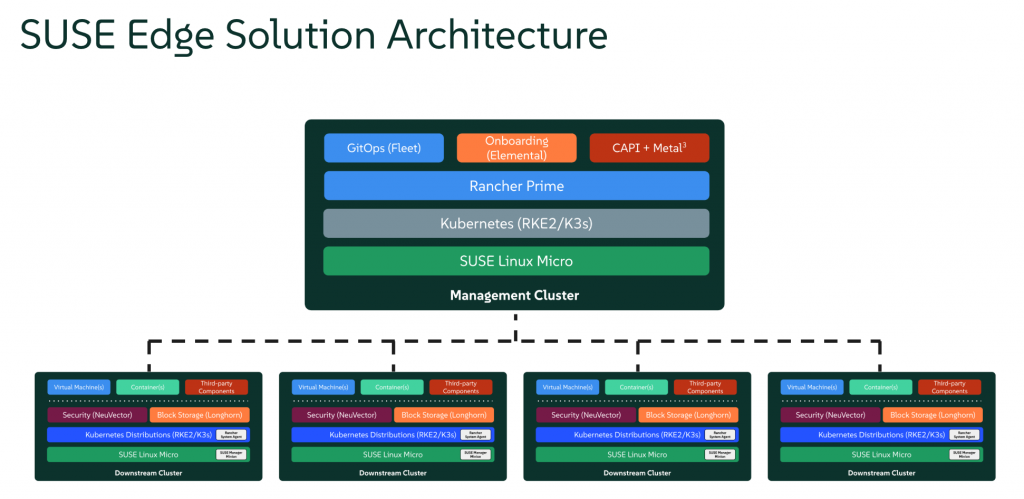
This blog provides a step-by-step guide to deploying a SUSE Edge management cluster using EIB, combining SUSE Linux Micro, K3s, and Rancher Prime. A lightweight, container-optimized OS combined with a resource-efficient Kubernetes distribution, all centrally managed by Rancher Prime, enables scalable and robust containerized application and infrastructure deployments at the edge.
All you need is an Apple Silicon Mac machine. You do not need a separate server to create this management cluster. This is thanks to EIB’s ability to build ARM architecture images. We used a MacBook Pro M3 machine running Sonoma 14.4. If you do not own a Mac, don’t worry, EIB can create images for x86 machines.
Furthermore, our products are open source and this guide can be followed without a SUSE subscription. Note that this guide is intended for learning/development and not for production setups.
Prerequisites
- SUSE Linux Micro 6.0 Arm image (SL-Micro.aarch64-6.0-Base-SelfInstall-GM2.install.iso): You can download from this link. Log in using your SUSE account, or create a new account to download the image. Make sure to choose the 6.0 version and Arm (aarch64).
- Install UTM to run the virtual machines
Building the image using EIB
Edge Image Builder runs as a container, making it very portable but also avoiding an extensive installation. This requires a container runtime, such as podman. Podman can be installed through Homebrew, the package manager on MacOS. Podman on MacOS requires a virtual machine to operate as it needs to run on Linux. We will create one with 6 CPU and 4GB memory, but 10 CPU and 8GB memory is recommended, if you have the capacity.
Pull the most recent release of EIB, version 1.1.0:
brew install podman
podman machine init --cpus 6 --memory 4096
podman machine start
podman pull registry.suse.com/edge/3.2/edge-image-builder:1.1.0
EIB requires an image definition file and a directory in a certain structure. Clone the git directory to download the EIB configuration. We will use the blog-rancher-3node directory.
git clone https://github.com/jiwonhu/eib-lab.git
cd blog-rancher-3node/
EIB_DIR=$(pwd)
mkdir base-images
Create base-images directory and place the SUSE Linux Micro image under this directory. The directory would look like this:

The files and directories are:
- eib-config.yaml: The EIB image definition file.
- custom: EIB has the ability to bundle in custom scripts that will be run during the combustion phase when a node is booted with the built image. 99-alias.sh script declares KUBECONFIG environment variable to run kubectl command on the node. This directory is optional.
- os-files: Files placed in this directory will be automatically copied into the filesystem of the built image. Since SUSE Linux Micro 6.0 disables root user’s SSH access, we placed a etc/ssh/sshd_config file to enable it for convenience. This directory is optional.
- kubernetes: The image definition file includes the k8s configuration. Additional files may be added in this directory to be included in the built image.
- config: This directory contains K3s (or RKE2) cluster configuration files that will be applied to the provisioned Kubernetes cluster. The server.yaml is applied to all control plane nodes, and the agent.yaml file will be applied to all worker nodes.
- helm: EIB can deploy any helm charts if provided. The helm directory contains Helm values.yaml files which enable user-supplied configuration to the chart, and will be applied to the cluster automatically.
- manifests: Contains the Kubernetes manifests that will be applied to the K3s cluster. SUSE Edge uses MetalLB as the load balancer for bare metal machines to ensure high-availability of the control plane out of the box. A multi-node K3s cluster requires an external IP address and as part of the example we will configure (192.168.64.14) in MetalLB. This is required to access the Rancher GUI from your Mac.
- network: Each file has the desired network configuration of a given node. There are 3 files, indicating this image is for a 3-node cluster.
- node1.suse.com.yaml has the MAC address of (v)NIC card of the first machine. If the node has this MAC address, the image will assign 192.168.64.11 IP address to the interface. In this example, node1 uses 192.168.64.11, node2 uses 192.168.64.12 and node3 uses 192.168.64.13. A tool called nm-configurator is used on the nodes to uniquely identify themselves based on the MAC addresses.
Additionally, in kubernetes/helm/values/rancher.yaml file, we assign ‘rancher-192.168.64.14.sslip.io’ hostname (which enables an easy to resolve DNS name) and ‘foobar’ password to the Rancher. Later we will use this hostname and password to access Rancher GUI. Please refrain from using this password in production setup!
# kubernetes/helm/rancher.yaml

hostname: rancher-192.168.64.14.sslip.io
bootstrapPassword: "foobar"
replicas: 1
global.cattle.psp.enabled: "false"
Let’s go through the image definition file (eib-config.yaml).
apiVersion: 1.1
image:
  imageType: iso
  arch: aarch64
  baseImage: SL-Micro.aarch64-6.0-Base-SelfInstall-GM2.install.iso
  outputImageName: rancher-3node-aarch64-6.0.iso
operatingSystem:
  isoConfiguration:
    installDevice: /dev/vda
  users:
  - username: root
    encryptedPassword: "$6$DIL3SYTayoaM13GP$zAfXEofZd154Wuuj.fMqJXKd2p8fieu75zLgta6dWz7rCHsxw0x4CcFjLH3V5Dy4sQKN9/VotNS9E37RYRTeD."
The SUSE Linux Micro operating system is the foundation of the SUSE Edge Suite, and EIB extends the default OS image with user-supplied configuration. EIB can take self-install ISO or RAW file images, depending on the hardware; for example, if you were wanting to provision against an embedded Edge device, it’s more likely that you write a RAW disk image to an SDcard/eMMC rather than boot it from an ISO. In this example, we feed an ISO image as base image and EIB will create an image name ‘rancher-3node-aarch64-6.0.iso’ as the output.
The operatingSystem section enables the operator to select operating system specific configurations, such as kernel command line arguments, timezone settings, users, and proxy servers. As we will spin up virtual machines, we have declared /dev/vda as the target install device (which maps to the VirtIO based device). This could be replaced with any disk device such as /dev/sda, /dev/nvme0, or /dev/disk/by-id/nvme-XXXX if the image is for bare metal machines.
In the user subsection, we instruct EIB to create a root user with the ‘root’ password. It is recommended not to use this password in production environments. Instead, SSH keys can be provided for a root user or new users of the OS.
This example doesn’t include RPM installation for simplicity. However, you can include RPMs by specifying the packages subsection. This requires a valid SUSE Linux Micro subscription code for EIB to build the image.
The Kubernetes definition is as follows.
kubernetes:
  version: v1.31.4+k3s1
  network:
    apiHost: 192.168.64.10.sslip.io
    apiVIP: 192.168.64.10
  nodes:
    - hostname: node1.suse.com
      type: server
      initializer: true
    - hostname: node2.suse.com
      type: agent
    - hostname: node3.suse.com
      type: agent
We instruct EIB to include K3s v1.31.4 in this image. The cluster will use 192.168.64.10 as its Virtual IP for the control plane and 192.168.64.10.sslip.io as the domain address for accessing the Kubernetes API, noting that SSL certificates will be built using this hostname.
Each node will have the hostname of nodeX.suse.com. We indicate node1 should function as the cluster initializer, which is the server node that bootstraps the cluster and allows other nodes to join it via the virtual IP previously defined.
The network and nodes sections are entirely optional if the cluster is single-node. If the edge node does not require Kubernetes, the kubernetes section itself can be skipped from the image definition.
The last part of the image definition is for the applications or Helm charts.
  helm:
    charts:
      - name: cert-manager
        version: 1.14.2
        repositoryName: jetstack
        targetNamespace: cert-manager
        createNamespace: true
        installationNamespace: kube-system
        valuesFile: certmanager.yaml
      - name: rancher
        version: 2.10.1
        repositoryName: rancher-prime
        targetNamespace: cattle-system
        createNamespace: true
        installationNamespace: kube-system
        valuesFile: rancher.yaml
    repositories:
      - name: jetstack
        url: https://charts.jetstack.io
      - name: rancher-prime
        url: https://charts.rancher.com/server-charts/prime
To help address bandwidth restricted environments, EIB automatically downloads the specified charts and their associated images at build time and includes them in the built image. In the example, we install cert-manager and SUSE Rancher Prime v2.10.1. EIB will use certmanager.yaml and rancher.yaml under kubernetes/helm/values directory as inputs to the Helm charts.
Let’s build the image. EIB cannot process .DS_Store hidden file that Mac creates in the directories, so we clean them up beforehand. In our machine, the image build took 7 to 10 minutes. The image will be created in the same folder.
echo $EIB_DIR
find . -name ".DS_Store" -delete
podman run --privileged --rm -it -v $EIB_DIR:/eib  registry.suse.com/edge/3.2/edge-image-builder:1.1.0  build --definition-file eib-config.yaml
Output would look like below:
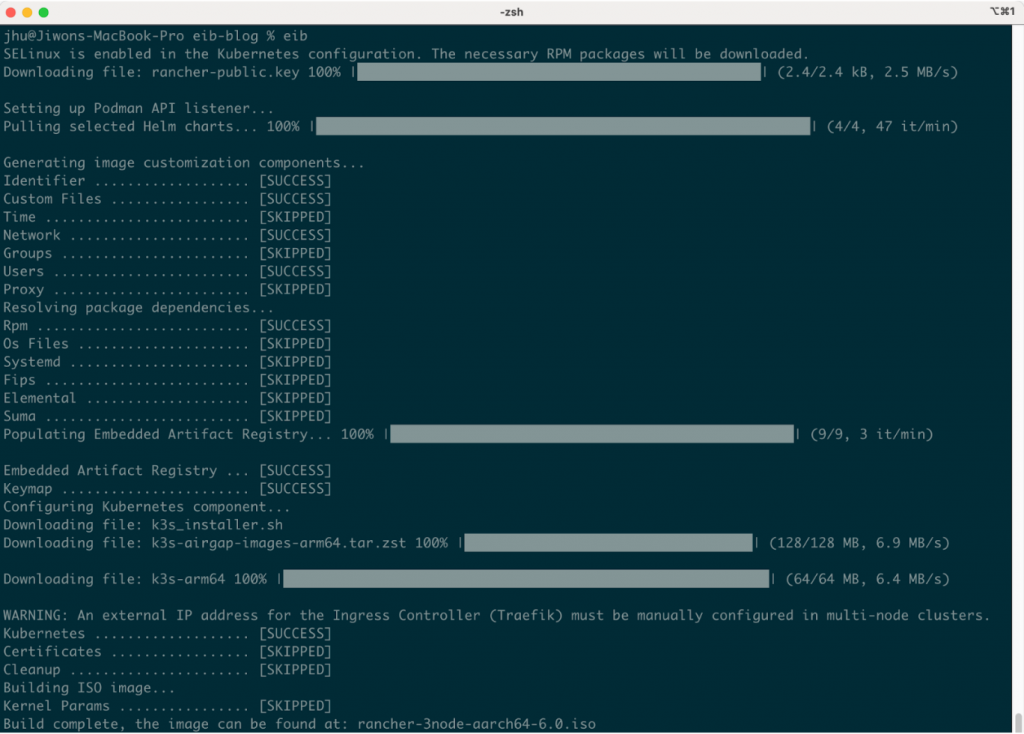
If the image build process fails, it is useful to check the build logs. They are stored in the _build directory where each image build will have its own timestamped subdirectory. Additionally, ensure that any hidden .DS_Store files are deleted if the EIB directory is accessed through Finder application.
$ ls _build/
build-Feb10_12-32-23	cache
$ cd _build/build-Feb10_12-32-23
$ ls -alt
total 1344
-rw-r--r--   1 jhu  staff   35532 Feb 10 20:44 podman-system-service.log
-rw-r--r--   1 jhu  staff    4066 Feb 10 20:44 iso-build.log
-rw-r--r--   1 jhu  staff    2401 Feb 10 20:43 iso-extract.log
This image assumes that your Mac machine uses 192.168.64.0/24 for the virtual network. UTM might have configured a different subnet such as 192.168.200.0/24. We recommend checking this and updating the ip addresses to fit in your subnet.
$ sudo grep -A3 "Shared_Net_Address" /Library/Preferences/SystemConfiguration/com.apple.vmnet.plist
	Shared_Net_Address
	192.168.64.1
	Shared_Net_Mask
	255.255.255.0
If the output of the command above shows a different subnet, you will need to update these files.
- Kubernetes VIP (apiVIP and apiHost) in eib-config.yaml
- Node IPs in network/nodeX.suse.com.yaml
- Ingress IP in kubernetes/manifests/ingress-ippool-l2adv.yaml
- Ingress IP in kubernetes/helm/values/rancher.yaml
Deploy the self-install image
Let’s deploy k3s cluster and Rancher. It’s simple – we create a virtual machine and it will install the OS, K3s, and Rancher automatically and unattended, remembering that the images are expected to self-bootstrap without any user intervention.
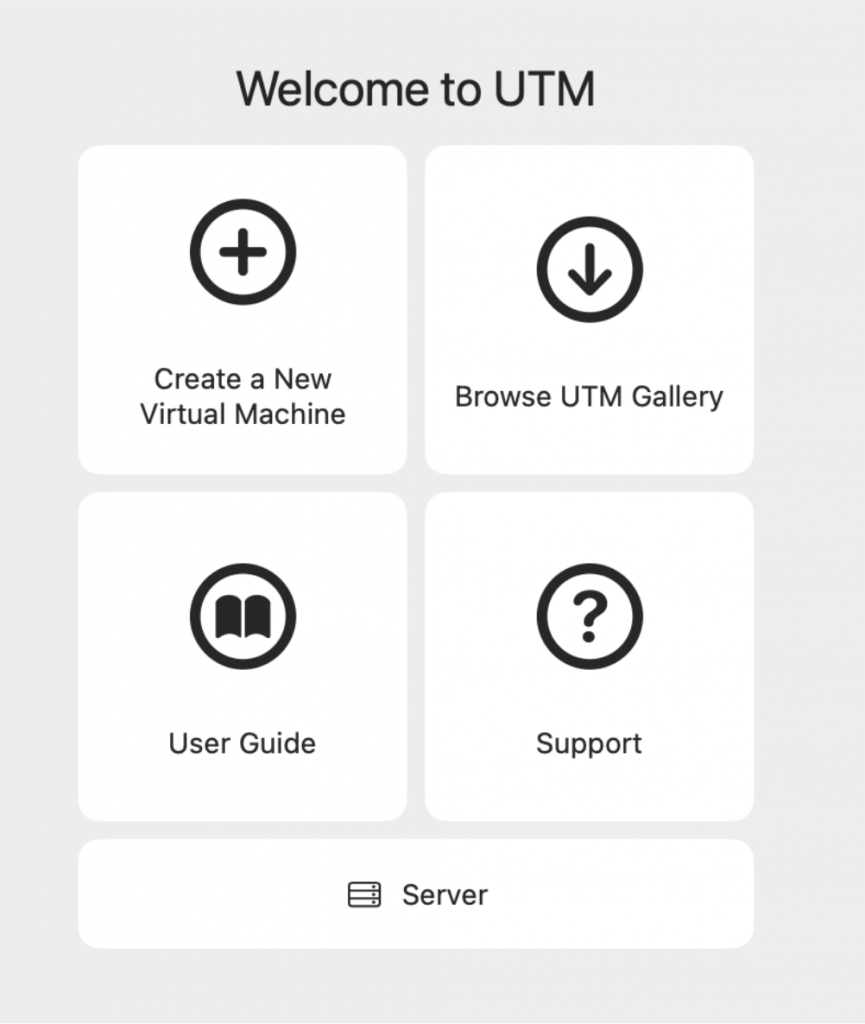
Open the UTM application and create a new virtual machine:
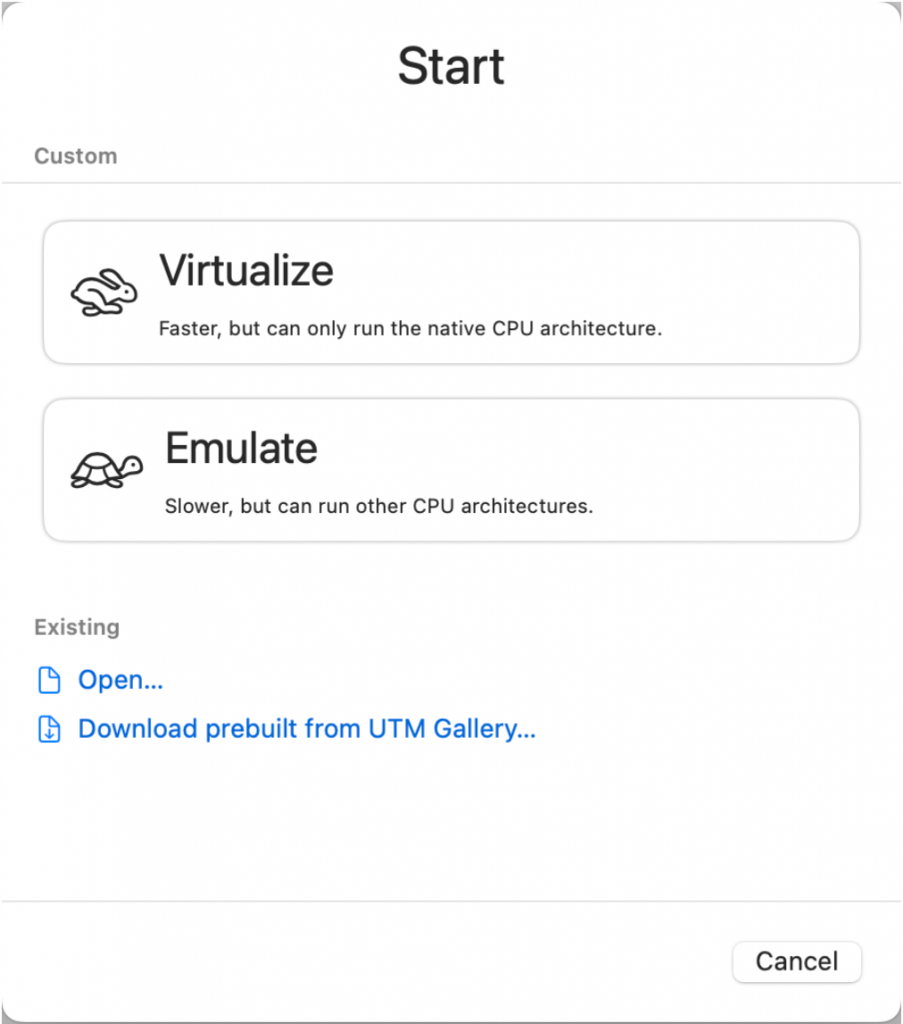
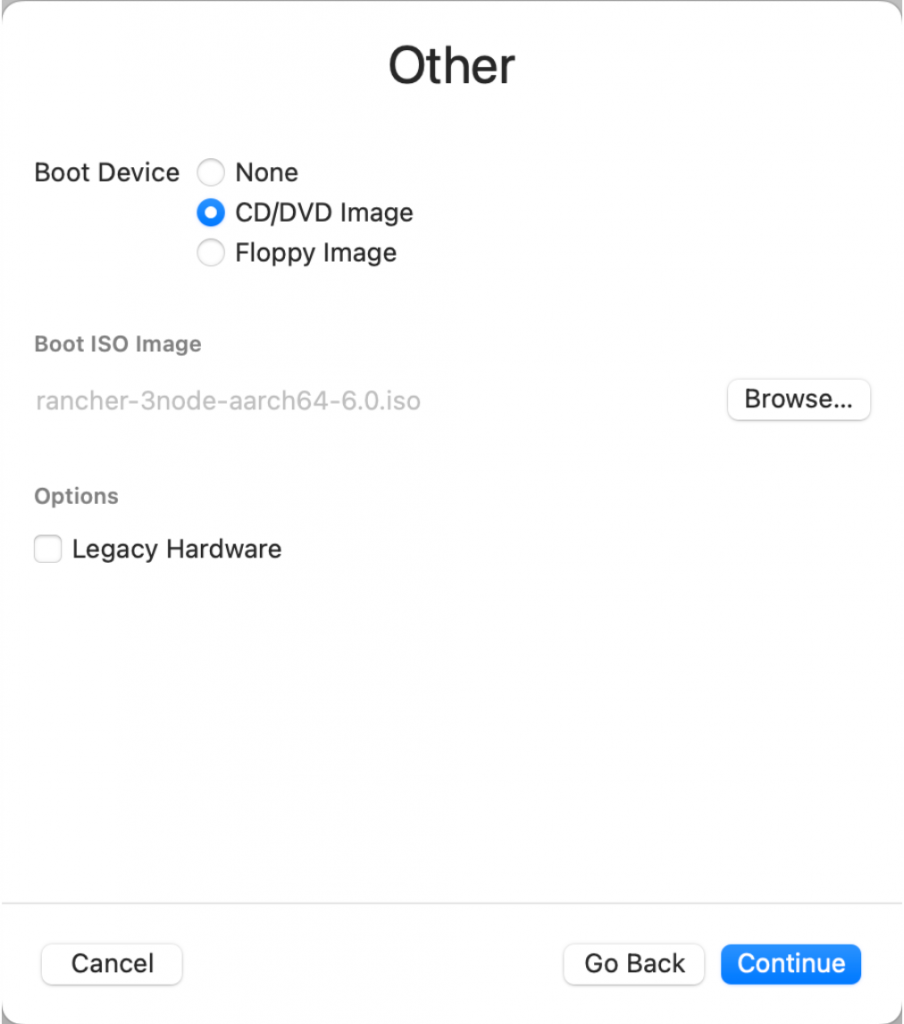
Choose “Virtualize”, then “Other”. Choose “CD/DVD Image” as the boot device and select the image that EIB created.
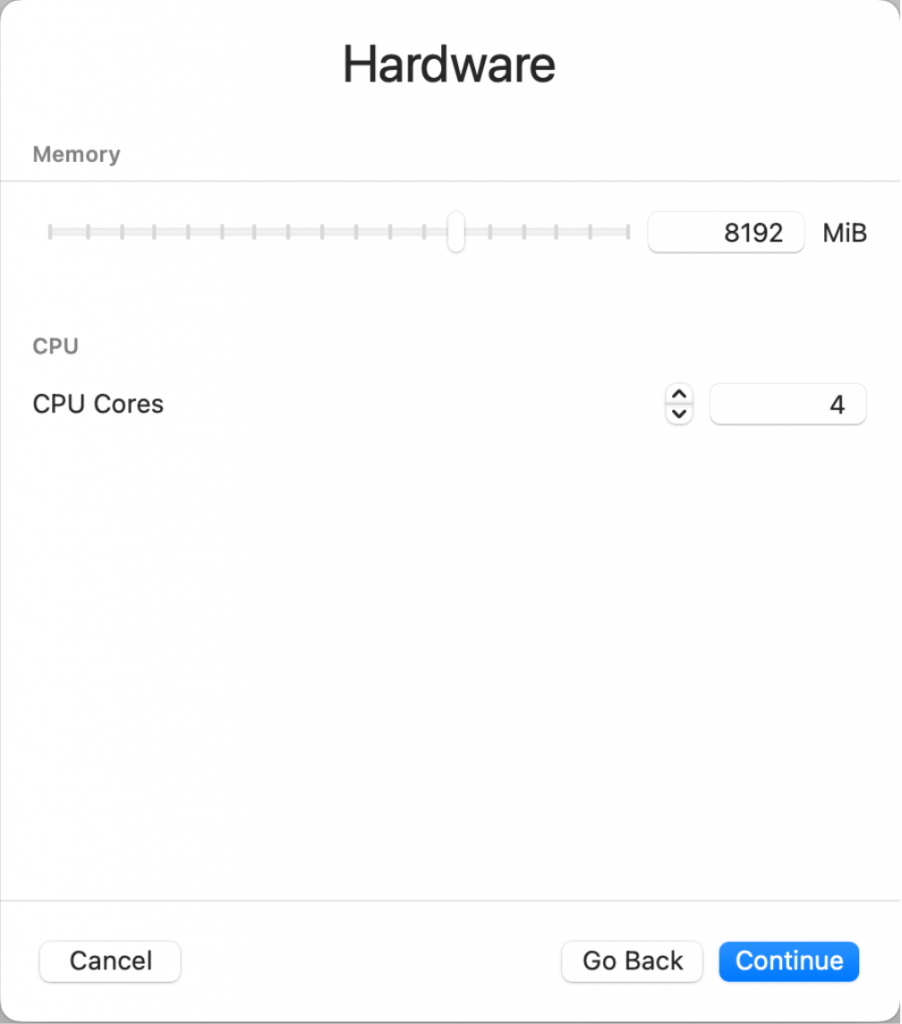
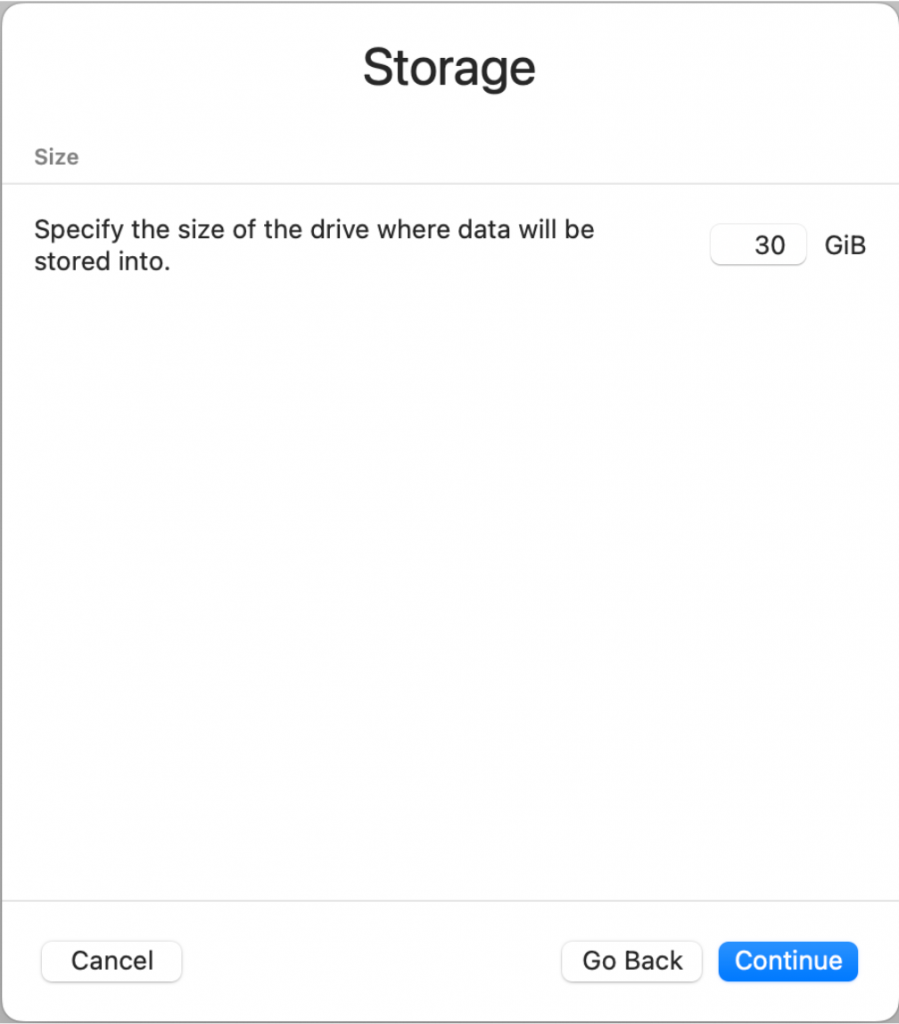
Give the virtual machine 8GB memory and 4 cores. Then assign 30GB for the storage volume:
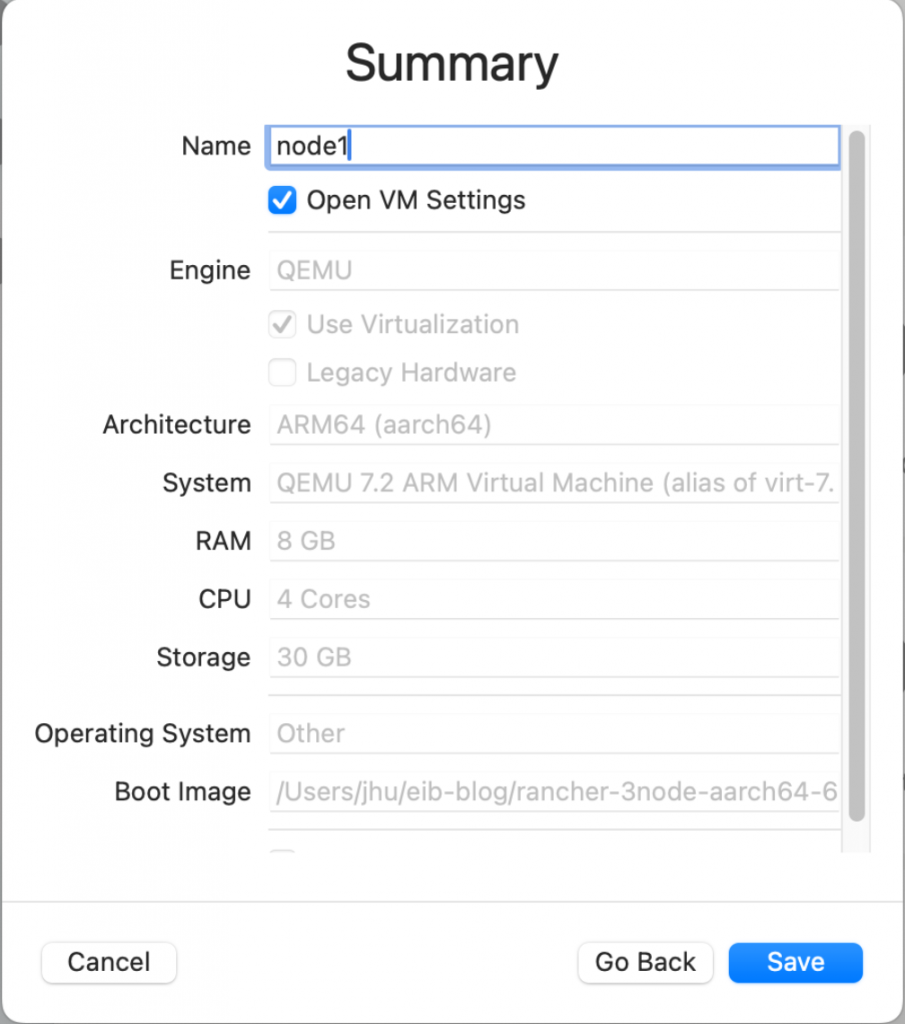
We are almost done. Give a name to the VM such as ‘node1’. Tick ‘Open VM Settings’ checkbox to configure the network then save the VM.
Go to the Network tab, choose ‘Shared Network’ as network mode, and assign the MAC address 34:8A:B1:4B:16:E1. This will match the MAC address that was defined in the network/node1.suse.com.yaml file. This enables the machine to self-identify itself as node1 at boot time, and assign the pre-defined network configuration, adding 192.168.64.11 IP address to its interface. Similarly, the second VM needs to use the MAC address from node2.suse.com.yaml file to get the desired IP address.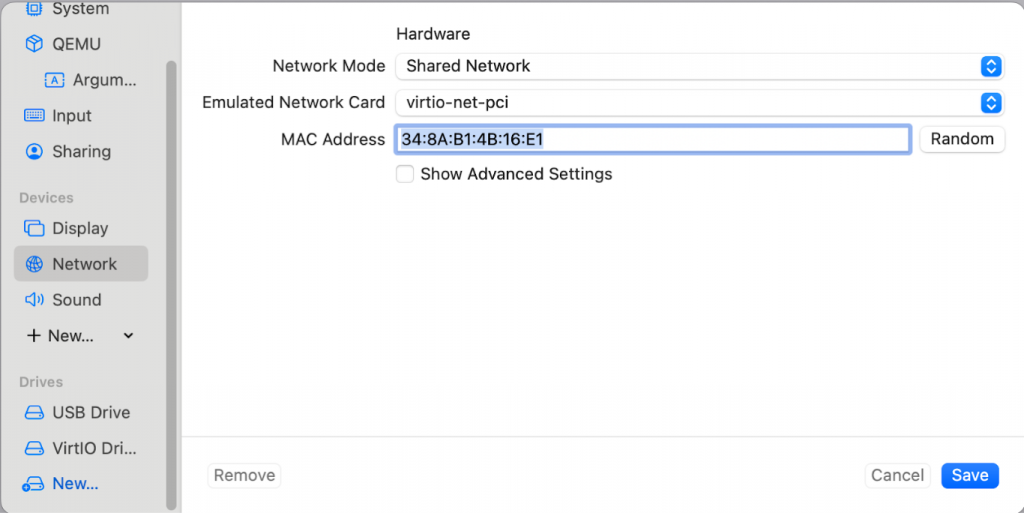
Start the VM. It automatically boots up, configures root user, installs RPMs, and configures the network interface. It then installs K3s and Rancher Prime.
Once the VM is up and running, you can log in as root user and check out the K3s and Rancher pods status.
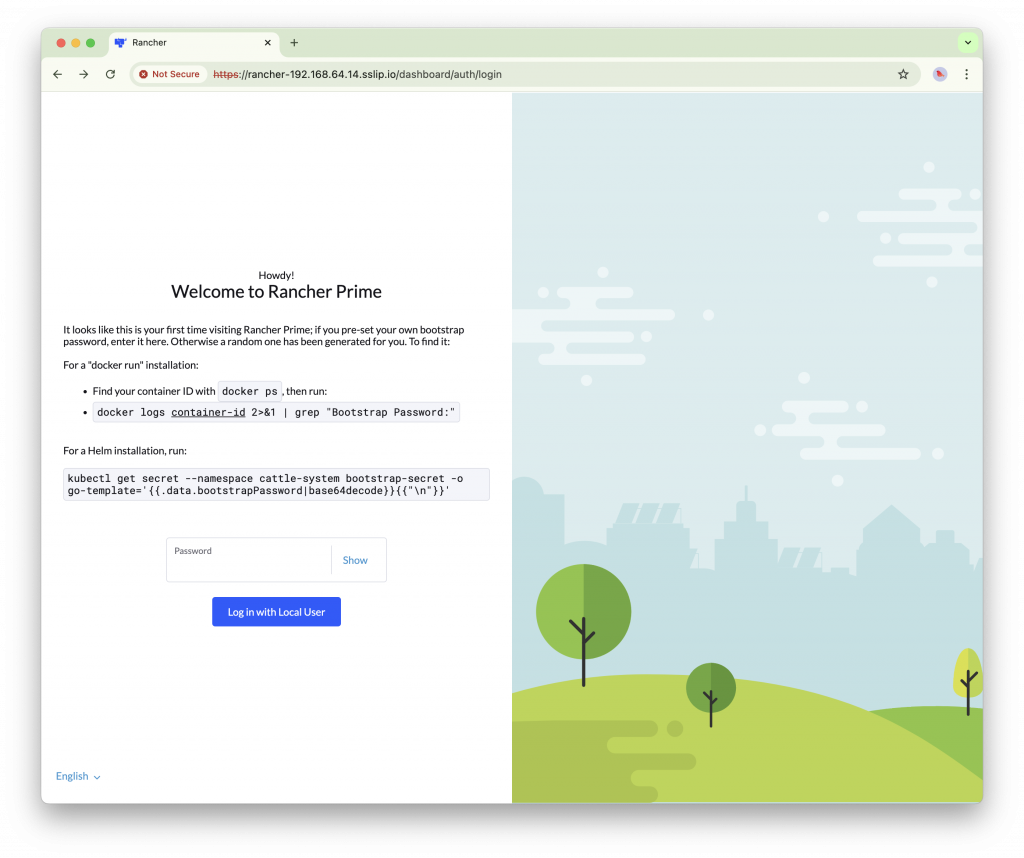
Let’s access Rancher GUI. Open up a web browser and access https://rancher-192.168.64.14.sslip.io/. Enter ‘foobar’ the bootstrap password we assigned earlier, and accept the end user license agreement.
With this we have successfully deployed Rancher Prime and you can see the status of the K3s cluster (‘local’ cluster). This cluster can serve as a management cluster to manage other SUSE Edge K3s/RKE2 clusters. 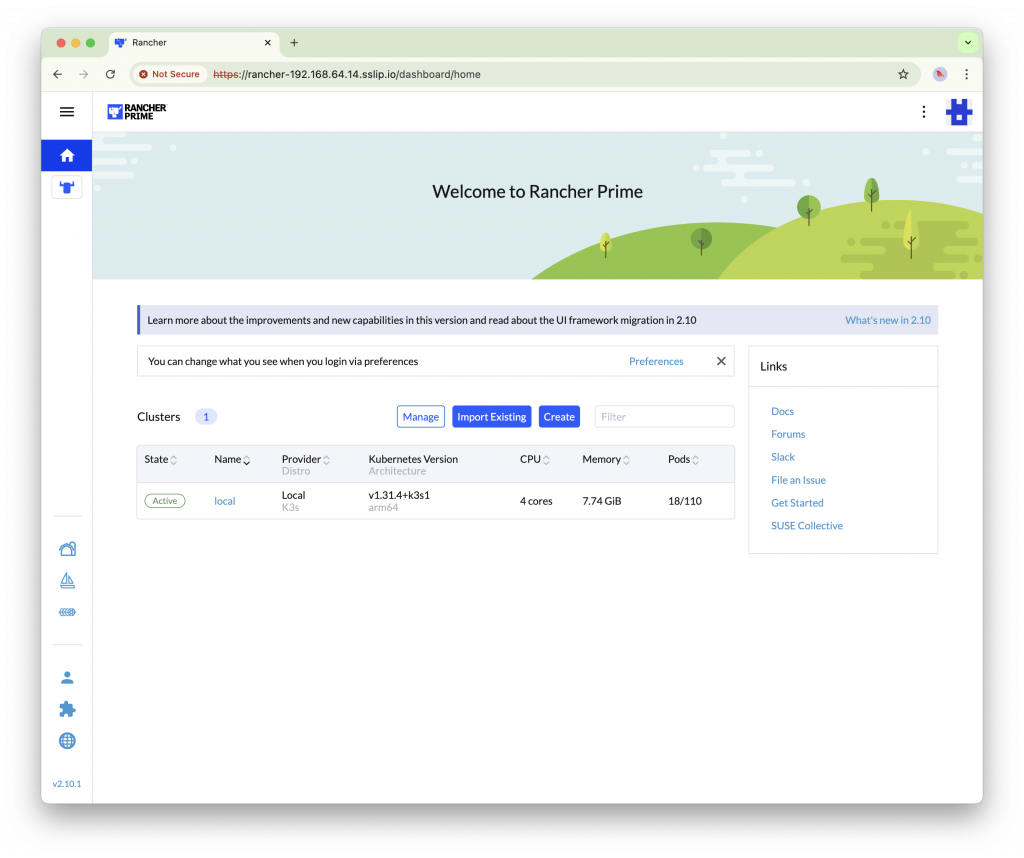
Interested in exploring further?
Although we deployed K3s and Rancher with a single VM, this EIB configuration supports a 3-node cluster. Additional VMs can be deployed to form a multi-node cluster.
The 2nd and 3rd VMs are an exercise to the reader. Make sure to assign the MAC address from the network/nodeX.suse.com.yaml file to the subsequent VMs.
Conclusion
In this blog post, we demonstrated how Edge Image Builder simplifies the deployment of SUSE Linux Micro, K3s, and Rancher Prime on a single Mac, showcasing its ability to create and deploy a complete edge solution with minimal effort. By packaging the OS, Kubernetes, and applications into a self-booting image, EIB enables zero-touch provisioning. This approach enables rapid provisioning of edge clusters, making it an invaluable tool. Furthermore, we hope this walkthrough has let you experience the power of our edge products firsthand, all from the convenience of your Mac. Learn more about SUSE Edge solutions and how they can enhance your edge computing strategy.
This blog post was written by Jiwon Hu, Field Product Manager for Edge, with the contributions from Danial Bekhit, Edge Container Engineer.
Related Articles
Mar 31st, 2025