Getting Hands on with Harvester HCI

Monday, 2 May, 2022

When I left Red Hat to join SUSE as a Technical Marketing Manager at the end of 2021, I heard about Harvester, a new Hyperconverged Infrastructure (HCI) solution with Kubernetes under the hood. When I started looking at it, I immediately saw use cases where Harvester could really help IT operators and DevOps engineers. There are solutions that offer similar capabilities but there’s nothing else on the market like Harvester. In this blog, I’ll give an overview of getting started with Harvester and what you need for a lab implementation.­


First, let me bring you up to speed on Harvester. This HCI solution from SUSE takes advantage of your existing hardware with cutting edge open source technology, and, as always with SUSE, offers flexibility and freedom without locking you in with expensive and complex solutions.

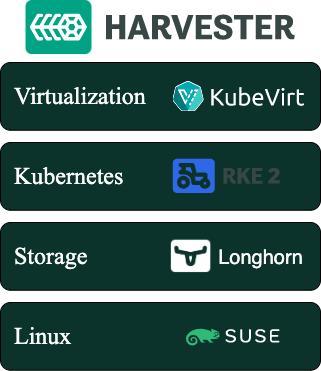
Figure 1 shows, at a glance, what Harvester is and the main technologies that compose it.


Fig. 1 – Harvester stack 


The base of the solution is the Linux operating system. Longhorn provides lightweight and easy-to-use distributed block storage system for Kubernetes — in this case for the VMs running on the cluster. RKE2 provides the Kubernetes layer where KubeVirt runs, providing virtualization capabilities using KVM on Kubernetes. The concept is simple: like in Kubernetes, there are pods running in a cluster. The big difference is that there are VMs inside those pods. 

To learn more about the tech under the hood and technical specs, check out this blog post from Sheng Yang introducing Harvester technical details.

The lab

I set up a home lab based on a Slimbook One node with an AMD Ryzen 7 processor, with 8 cores and 16 threads, 64GB of RAM and 1TB NVMe SSD — this is twice the minimum requirements for Harvester. In case you don’t know Slimbook, it is a brand focused on hardware oriented for Linux and open source software. You’ll need an ethernet connection for Harvester to boot, so if you don’t have a dedicated switch to connect your server, just connect it to the router from your ISV.


Fig. 2 – Slimbook One 


The installation

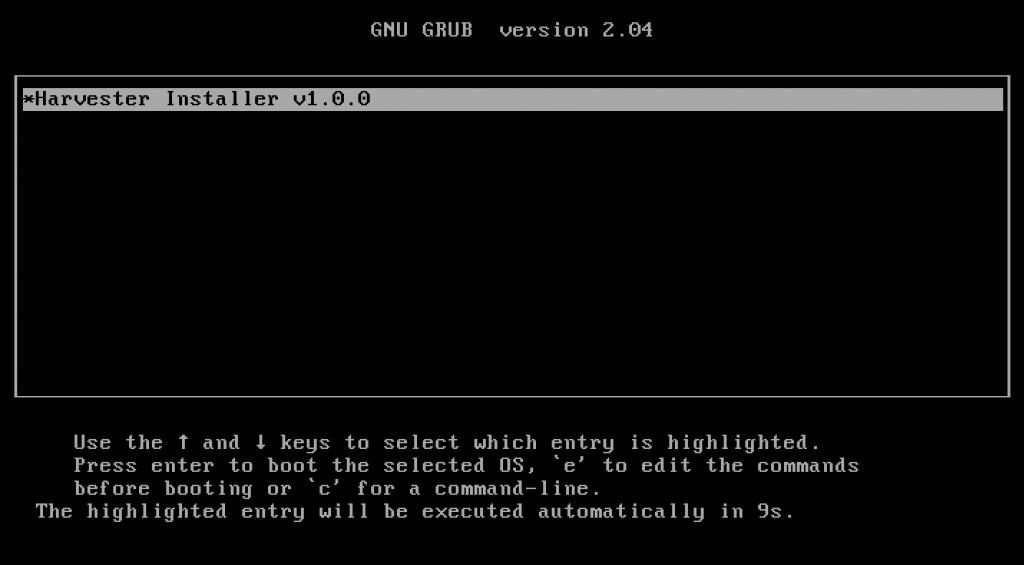
The installation was smooth and easy since Harvester ships as an appliance. Download the ISO image and install it on a USB drive or use PXE for the startup. In this process, you’ll be asked some basic questions to configure Harvester during the installation process. 

Fig. 3 – ISO Install


As part of the initial set up you can create a token that can be used later to add nodes to the cluster. Adding more nodes to the cluster is easy; you just start another node with the appliance and provide the token so the new node can join to the Kubernetes cluster. This is similar for what you do with RKE2 and K3s when adding nodes to a cluster. After you provide all the information for the installation process, you’ll have to wait approximately 10 minutes for Harvester to finish the set up. The Harvester configuration is stored as a yaml file and can be sourced from a URL during the installation to make the installation repeatable and easy to keep on a git repository.


Once the installation is finished, on the screen you’ll see the IP/DNS to connect Harvester and whether Harvester is ready or not. Once ready, you can log into the UI using the IP/DNS. The UI is very similar to Rancher and gives you the possibility to use a secure password in the first login. 


Fig. 4 – Harvester installation finished & ready screen 


The first login and dashboard

When you log in for the first time, you’ll see that it is easy to navigate.  Harvester benefits from a clean UI; it’s easy to use and completely oriented toward virtualization users and operators. Harvester offers the same kind of experience that IT operators would expect of a virtualization platform like oVirt. 


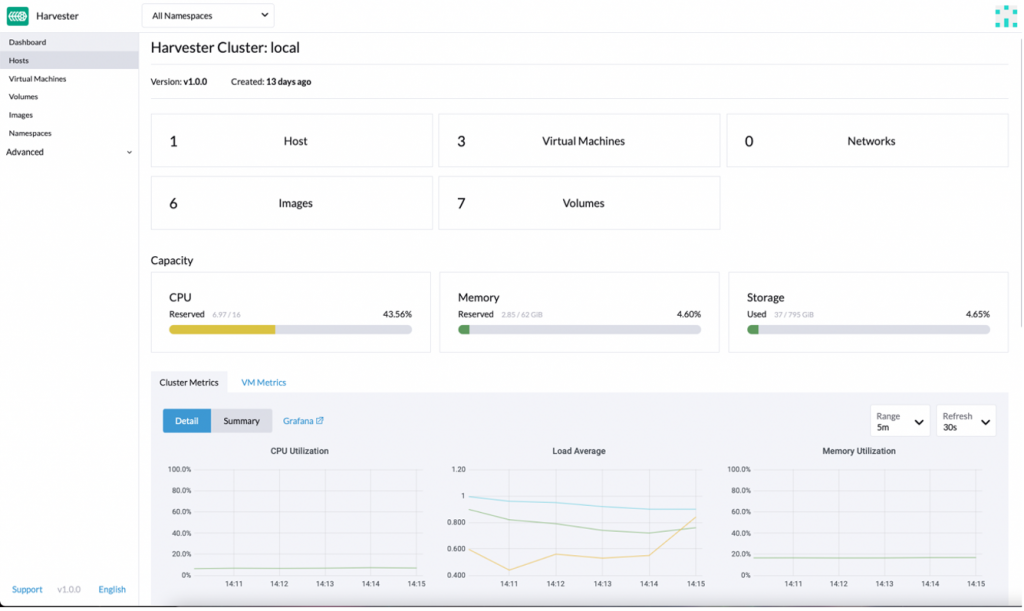
Fig. 5 – Harvester dashboard 


The first thing you’ll find once logged in is the dashboard, which allows you to see all the basic information about your cluster, like hosts, VMs, images, cluster metrics and VM metrics. If you navigate down the dashboard, you’ll find an event manager that shows you all the events segregated by kind of object.


When you dig further into the UI, you´ll find not only the traditional virtualization items but also Kubernetes options, like managing namespaces. When we investigate further, we find some namespaces are already created but we can create more in order to take advantage of Kubernetes isolation. Also, we find a fleet-local namespace which gives us a clue about how Kubernetes objects are managed inside the local cluster. Fleet is a GitOps-based deployment engine created by Rancher to simplify and improve cluster control. In the Rancher UI it’s referred to as ‘Continuous Deployment.’

Creating your first VM

Before creating your first VM you need to upload the image you’ll use to create it.  Harvester can use qcow2, raw and ISO images which can be uploaded from the Images tab using a URL or importing them from your local machine. Before uploading the images, you have the option to select which namespace you want them in, and you can assign labels (yes, Kubernetes labels!) to use them from the Kubernetes cluster. Once you have images uploaded you can create your first VM.

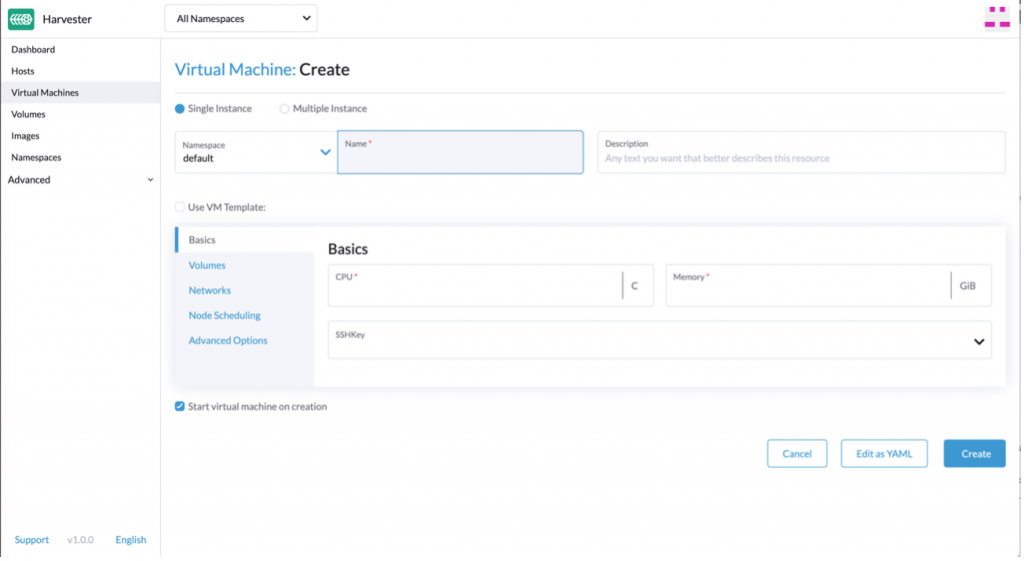
The VM assistant feels like any other virtualization platform out there: you select CPU, RAM, storage, networking options, etc. 


Fig. 6 – VM creation


However, there are some subtle differences. First, you must select a namespace where to deploy the VM, and you have the possibility to see all the VM options as yaml code. This means your VMs can be defined as managed as code and integrated with Fleet. This is a real differentiator from more traditional virtualization platforms. Also, you can select the node where the VM will be running, use the Kubernetes scheduler to place the VM on the best node, apply scheduling rules or select specific nodes that do not support live migration. Finally, there is the option to use containers alongside VMs in the same pod; the container image you select is a sidecar for the VM. This sidecar container is added as a disk from the Harvester UI. Cloud config is supported out of the box to configure the VMs during the first launch as you could expect from solutions like OpenStack or oVirt. 

Conclusion

Finding Kubernetes concepts on a virtualization solution might be a little awkward at the beginning. However, finding things like Grafana, namespace isolation and sidecar containers in combination with a virtualization platform really helps to get the best of both worlds. As far as use cases where Harvester can be of use, it is perfect for the Edge, where it takes advantage of the physical servers you already have in your organization since it doesn’t need a lot of resources to run. Another use case is as an on-prem HCI solution, offering a perfect way to integrate VMs and containers in one platform. The integration with Rancher offers even more capabilities. Rancher provides a unified management layer for hybrid cloud environments, offering central RBAC management for multi-tenancy support; a single pane of glass to manage VMs, containers and clusters; or deploying your Kubernetes clusters in Harvester or on most of the cloud providers in the market. 

We may be in a cloud native world now, but VMs are not going anywhere. Solutions like Harvester ease the integration of both worlds, making your life easier. 

To get started with Harvester, head over to the quick start documentation. 

You can also access this informative on-line session which provides a comprehensive recap of all the essential details needed to evaluate Harvester in your very own local environment:

Join the SUSE & Rancher community to learn more about Harvester and other SUSE open source projects.


Technical Insights of Harvester 1.0

Tuesday, 21 December, 2021

Exactly one year ago, we announced the alpha availability of the project Harvester, an open Source Hypercoverged Infrastructure solution. During this last year, the team has been working hard on developing the project and we brought you the beta release of v0.2.0 and v0.3.0. Throughout the last year, we’ve received many queries from our users and the community, asking when Harvester will be in production.  

Now finally, after a year, we’re excited to present Harvester v1.0, the first general availability release of Harvester!  

Why Harvester?

Harvester is an open source alternative to traditional proprietary hyperconverged infrastructure software. Harvester is built on top of cutting-edge open source technologies, including Kubernetes, KubeVirt and Longhorn.  

Even though Harvester is built on top of Kubernetes, we’ve designed Harvester to be easy to understand, install and operate. Users don’t need to understand anything about Kubernetes to start using Harvester and can experience all the benefits of Kubernetes by using a standalone Harvester cluster.  

If you’re already familiar with Kubernetes and want to have a central place to manage all your Kubernetes and VM workloads, Harvester’s unique value is its integration with Rancher. With Rancher v2.6.3, users can manage all the Harvester clusters, local or remote, by using the new Virtualization Management feature. Also, it’s simple to provision new Kubernetes clusters on top of Harvester using Rancher. Harvester has provided a built-in CSI driver and Cloud Provider to the clusters provisioned by Rancher, which makes Harvester the ideal solution for any users who want to run Kubernetes workloads on top of VMs in the data center.

What does Harvester do?

As an HCI solution, Harvester brings compute, storage and network management together. Here are some highlighted features in the Harvester v1.0 release.  

Environment 

  • Installation 
  • Via ISO 
  • Via PXE 
  • Air Gap environment support 
  • Proxy support 

Compute 

  • VM lifecycle management 
  • Built-in monitoring dashboard 
  • Cloud Config 
  • SSH key injection 
  • Graphic console to VNC and serial port 
  • VM Template 
  • Live migration 
  • Export images from existing VMs 
  • Terraform Provider 

Storage 

  • High performance and efficient block storage 
  • Built-in highly-available image repository 
  • VM backup/restore to S3 
  • Hot plug disks 

Network 

  • Virtual IP for the cluster 
  • Multi-network 
  • VLAN 
  • Custom SSL certificate 

Integration with Rancher 

    • Virtualization Management via Rancher for multiple Harvester clusters 
    • Multi-tenancy support with RBAC 
    • Kubernetes cluster provisioning 
    • Built-in CSI driver 

What is Harvester made of? 

Operating System

Harvester is delivered as an appliance, with the operating system and everything needed to run included, and is designed to be installed on bare metal servers. The operating system is based on the widely used and trusted foundation of Linux kernel development for which SUSE has been known for more than 29 years.  

Kubernetes  

On top of the OS, Harvester uses Rancher Kubernetes Engine 2 (RKE2) to provide the Kubernetes experience. Built by the SUSE Rancher engineering team, RKE2 is a Kubernetes distribution created for enterprises with additional security features. It’s the sibling of the widely popular K3s distribution. By using RKE2, Harvester has a solid foundation of the orchestration layer.  

KubeVirt 

KubeVirt is a CNCF sandbox project that provides virtualization management on top of Kubernetes. KubeVirt was originally created by Red Hat. It’s a virtualization management tool based on KVM, the most popular open source hypervisor. The Harvester team has worked closely with the KubeVirt teams to add features like live migration with hot-plugged disks to KubeVirt to enhance the user experience of Harvester.   

Longhorn 

Longhorn is a CNCF incubation project that provides highly available persistent storage support to Kubernetes. Longhorn was originally created by Rancher Labs and is now maintained by SUSE. It’s one of the most popular cloud native storage solutions out there. There are more than 40,000 nodes running Longhorn worldwide. The Harvester team has also worked closely with the Longhorn project on features like backing image and live migration support. 

Other Cloud Native projects  

Harvester has also used Multus to provide multiple network support for the VMs, Kube-Vip for floating IP to the Harvester cluster as well as load balancing service to the guest cluster.   

Quick Start Harvester

Minimal requirement

  • CPU: x86_64 only. Hardware-assisted virtualization is required. 8-core processor minimum; 16-core or above preferred  
  • Memory: 32 GB minimum, 64 GB or above preferred  
  • Disk Capacity: 120 GB minimum, 500 GB or above preferred  
  • Disk Performance: 5,000+ minimal random IOPS per disk (SSD/NVMe). Management nodes (first 3 nodes) must be fast enough for Etcd.  
  • Network Card: 1 Gbps Ethernet minimum, 10Gbps Ethernet recommended  
  • Network Switch: Trunking of ports required for VLAN support  

Installation 

You can install Harvester via ISO or PXE into your bare metal nodes. Make sure to choose the first node to install as `Create a Harvester cluster`, all the other nodes should be configured as `Join a Harvester cluster`. Read more about ISO Install here or PXE Boot Install for more detail. 

Dashboard

Once you have installed Harvester, you will see the IP address of Dashboard in the bare metal node’s terminal.  

Put the IP into your web browser, then you will get access to the Harvester Dashboard.  

Integration with Rancher 

One of the most exciting features in Harvester is the integration with Rancher. Now you can manage your container and virtualization workload in the same Rancher instance, which gives you a unified experience for all your workloads in the data center. 

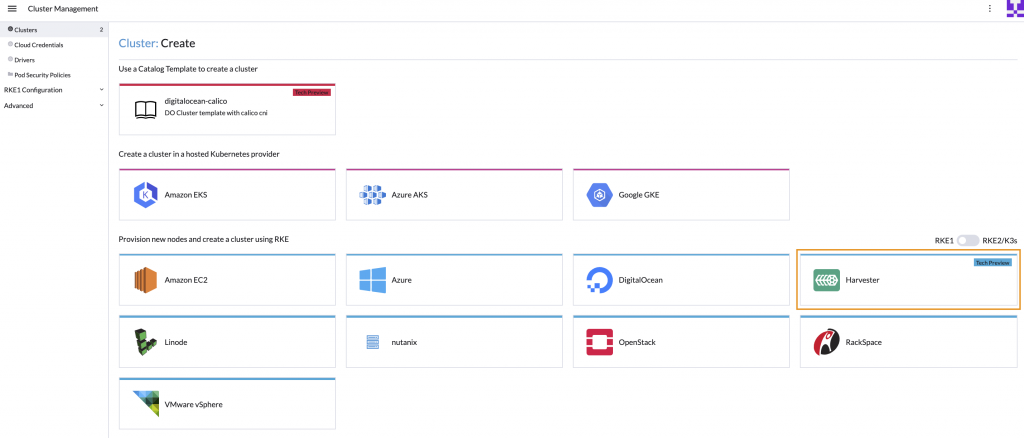
Notice that one Rancher cluster can manage multiple Harvester clusters, though one Harvester cluster can only be imported into one Rancher cluster. You can now access the Harvester UI via the Rancher UI. Also, you can now easily provision new Kubernetes clusters using the managed Harvester cluster. You can learn more about why we chose to integrate Rancher and Harvester here. 

For RKE1 and RKE2 clusters provisioned by Rancher, you can get the load balancer and persistent volume support automatically with the clusters provisioned by Harvester (which we will refer to as guest clusters in the future). For more documentation on the integration please read our docs.

Feedback

Harvester’s product and engineering team are always open to suggestions and feedback. Test out Harvester today and let us know what you think! You can reach us on our Slack channel, or submit a request in GitHub or reach out to us in the SUSE & Rancher Community. You can keep up to date with Harvester via our open source project page where you can access our latest docs. 

Also, join me and the SUSE & Rancher community team on the 19th of January 2022 at 10 am Pacific Time as we host our global community meetup introducing Harvester. You can also find out more about the GA release here. 

Enjoy Harvester! 

Harvester is now production-ready and generally available  

Tuesday, 21 December, 2021

2021 has been a memorable year for the Harvester team. In May, SUSE hosted the first virtual SUSECON, where we announced the beta release of Harvester, alongside a cast of new innovative open source projects from the SUSE Rancher engineering team. In October, for the first time in two years, we were able to meet our industry peers and the community face-to-face at KubeCon North America where we announced Harvester’s plans to integrate with our leading Kubernetes management platform SUSE Rancher.

Today, we’re closing out the year with one more major announcement – that Harvester is now production-ready and generally available for our customers and the open source community! Harvester’s highly anticipated release marks a major milestone for SUSE as it is the first brand new product release since SUSE’s acquisition of Rancher Labs and expands SUSE’s portfolio capabilities into the hyperconverged infrastructure space.

Why did SUSE build an HCI product?

This year, SUSE made a commitment to our customers and the community to help them ‘Choose Open’ and innovate across their business using open source solutions. Harvester plays an integral piece in SUSE’s portfolio as it showcases our commitment in enriching the open source landscape while providing our customers and the community valuable solutions to help them solve their infrastructure challenges.

Harvester is a natural extension to our existing strong background in container management. It takes an open, interoperable approach to hyperconverged infrastructure and addresses common challenges, including managing sprawl, siloing of teams and resource limitations faced by IT operators who need to manage modern environments comprised of both virtualized and containerized workloads.

What’s Harvester?

Harvester is a 100% free-to-use, open source modern hyperconverged infrastructure solution that is built on a foundation of cloud native solutions including Kubernetes, Longhorn and Kubevirt. It has been designed as an enterprise-ready turnkey solution that gives operators a familiar operating experience like other proprietary HCI solutions in the market.

Though built on Kubernetes, it does not require any pre-existing knowledge to operate. Its integration with SUSE Rancher gives users the ability to operate their virtualized and container workloads all within the same platform while also creating an easy, low-risk pathway for organizations looking to adopt cloud native solutions into their infrastructure modernization strategy. Learn more about the technical capabilities of Harvester in this blog by Sheng Yang, Engineering Lead for Harvester.

Image 1. Harvester as part of SUSE Rancher Console

Harvester integrates with SUSE Rancher

With today’s GA, one of the biggest milestones the Harvester engineering team has achieved this year is the integration of Harvester into the SUSE Rancher console.

As organizations look to accelerate their IT modernization journey, complexity rapidly grows as teams adopt multiple different solutions to help them manage their ever-expanding environments.  Organizations now need tools that can help them both confidently scale environments that simultaneously efficiently manages and governs their stack. Harvester and SUSE Rancher together addresses these needs by consolidating the management of operations for virtualized and containerized workloads – all accessible in a single Rancher platform instance.

This means both Harvester and Rancher clusters can be managed side by side within Rancher’s instance, reducing operators’ need to use separate solutions between the two workloads. Users can access the Harvester UI directly from within the Rancher console. In addition, Harvester clusters also have the ability to access the same features available to Rancher clusters, including authentication, role-based access control and cluster provisioning.

Another opportunity with Harvester and Rancher is that organizations who may be early in their modernization journey can use both open source solutions together as a low-risk pathway to adopting cloud native technology across their stack. Both solutions promote innovation by encouraging organizations to build their confidence in integrating modern technology to develop cloud native applications. For extra piece of mind, customers who may need an additional helping hand can have access SUSE’s support subscription available for Harvester.

Harvester’s general availability extends further than its integration with SUSE Rancher and its ability to consolidate VM and container workloads. Learn more from Robert Sirchia, Senior Technical Evangelist at SUSE, as he explores how Harvester’s cloud-native lightweight nature can be applied at the edge and also used as a platform to modernize applications.

Don’t miss the SUSE and Rancher community’s Global Online Meetup introducing Harvester on the 19th of January 2022 and 10am Pacific Time – alternatively find a local Harvester meetup near you. Learn more about Harvester here or get started today.

Harvester: A Modern Infrastructure for a Modern Platform

Tuesday, 21 December, 2021

Cloud platforms are not new — they have been around for a few years. And containers have been around even longer. Together, they have changed the way we think about software. Since the creation of these technologies, we have focused on platforms and apps. And who could blame anyone? Containers and Kubernetes let us do things that were unheard of only a few years ago.

What about the software that runs the infrastructure to support all these advancements? Over the same time, we have seen advancements — some in open source but the most with proprietary solutions. Sure, there is nothing wrong with running open source on top of a proprietary solution. These systems have become very good at what they do: running virtual machines but not container or container platforms, for that matter.

The vast majority of this infrastructure software is proprietary. This means you need two different skill sets to manage each of these — one proprietary, one Kubernetes. This is a lot to put on one team; it’s almost unbearable to put on one individual. What if there was an open infrastructure that used the same concepts and management plane as Kubernetes? We could lower the learning curve by managing our clusters the same way we can manage our host. We trust Kubernetes to manage clusters — why not our hosts?

Harvester: Built on Open Cloud Native Technology

Harvester is a simple, elegant, and light hyperconverged infrastructure (HCI) solution built for running virtual machines and Kubernetes clusters on bare metal servers. With Harvester reaching General Availability, we can now manage our host with the same concepts and management plane as our clusters. Harvester is a modern infrastructure for a modern platform. Completely open source, this solution is built on Kubernetes and incorporates other cloud native solutions, including Longhorn and Kubevirt, and leveraging all of these technologies transparently to deliver a modern hypervisor. This gives Harvester endless possibilities with all the other projects that integrate with Kubernetes.

This means operators and infrastructure engineers can leverage their existing skill sets and will find in Harvester a familiar HCI experience. Harvester easily integrates into cloud native environments, and offers enterprise-grade, turnkey features without costly overhead of the proprietary alternatives — saving both time and money.

A Platform for the Edge

Harvester’s small footprint means it is a great choice for the unique demands of hardware at the edge. Harvester gives operators the ability to deploy and manage VMs and Kubernetes clusters on a single platform. And because it integrates into Rancher, Harvester clusters can be managed centrally using all the great tooling Rancher provides. Edge applications will also benefit from readily available enterprise-grade storage, without costly and specialized storage hardware required. This enables operators to keep compute and storage as close to the user as possible, without sacrificing management and security. Kubernetes is quickly becoming a standard for edge deployments, so an HCI that also speaks this language is beneficial.

Harvester is a great solution for data centers, which come in all shapes and sizes. Harvester’s fully integrated approach means you can use high-density hardware with low-cost local storage. This saves on equipment costs and the amount of rack space required. A Harvester cluster can be as small as three servers, or an entire rack. Yet it can run just as well in branch or small-office server rooms. And all of these locations can be centrally managed through Rancher.

A Platform for Modernizing Applications

Harvester isn’t just a platform for building cloud native applications but one that you can use to take applications from VMs to clusters. It allows operators to run VMs alongside clusters, giving developers the opportunity to start decomposing these monoliths to cloud native applications. With most applications, this takes months and sometimes years. With Harvester, there isn’t a rush. VMs and clusters live side by side with ease. It offers all of this in one platform with one management plane.

As cloud native technologies continue their trajectory as keys to digital transformation, next-gen HCI solutions need to offer functionality and simplicity with the capability to manage containerized and non-containerized workloads, storage and network requirements across any environment.

Conclusion

What’s unique about Harvester? You can use it to manage multiple clusters hosted on VMs or a Kubernetes distribution. It’s 100 percent open source and leverages proven technologies – so why not give it a try to simplify your infrastructure stack?  You’ll get a feature-rich operational experience in a single management platform, with the support of the open-source community behind it. We have seen the evolution of Harvester, from a fledgling open-source project to a full-on enterprise-ready HCI solution.

We hope you take a moment to download and give Harvester a try.

JOIN US at the Harvester Global Online Meetup – January  19 at 10am PT. Our product team will be on hand to answer your questions. Register here.

Harvester Integrates with Rancher: What Does This Mean for You?

Thursday, 21 October, 2021

Thousands of new technology solutions are created each year, all designed to help serve the open source community of developers and engineers who build better applications. In 2014, Rancher was founded as a software solution aiming to help simplify the lives of engineers building applications in the new market of containers.

Today, Rancher is a market-leading, open source solution supported by a rich community helping thousands of global organizations deliver Kubernetes at scale.

Harvester is a new project from the SUSE Rancher team. It is a 100% open source, Hyperconverged Infrastructure (HCI) solution that offers the same expected integrations as traditional commercial solutions while also incorporating beneficial components of Kubernetes. Harvester is built on a foundation of cloud native technology to bridge the gap between traditional HCI and cloud native solutions.

Why Is This Significant? 

Harvester addresses the intersection of traditional HCI frameworks and modern containerization strategies. Developed by SUSE’s team of Rancher engineers, Harvester preserves the core values of Rancher. This includes enriching the open source community by creating Harvester as a 100% open, interoperable, and reliable HCI solution that fits any environment while retaining the traditional functions of HCI solutions. This helps users efficiently manage and operate their virtual machine workloads.

When Harvester is used with Rancher, it provides cloud native users with a holistic platform to manage new cloud native environments, including Kubernetes and containers alongside legacy Virtual Machine (VM) workloads. Rancher and Harvester together can help organizations modernize their IT environment by simplifying the operations and management of workloads across their infrastructure, reducing the amount of operational debt.

What Can We Expect in the Rancher & Harvester Integration?

There are a couple of significant updates in this v0.3.0 of Harvester with Rancher. The integration with Rancher v2.6.1 gives users extended usability across both platforms, including importing and managing multiple Harvester clusters using the Virtualization Management feature in Rancher v2.6.1. In addition, users can also leverage the authentication mechanisms and RBAC control for multi-tenancy support available in Rancher.  

Harvester users can now provision RKE & RKE2 clusters within Rancher v2.6.1 using the built-in Harvester Node Driver. Additionally, Harvester can now provide built-in Load Balancer support and raw cluster persistent storage support to guest Kubernetes clusters.  

Harvester remains on track to hit its general availability v1.0.0 release later this year.

Learn more about the Rancher and Harvester integration here.  

You can also check out additional feature releases in v0.3.0 of Harvester on GitHub or at harvesterhci.io.

How to Manage Harvester 0.3.0 with Rancher 2.6.1 Running in a VM within Harvester

Wednesday, 20 October, 2021

What I liked about the release of Harvester 0.2.0 was the ease of enabling the embedded Rancher server, which allowed you to create Kubernetes clusters in the same Harvester cluster.

With the release of Harvester 0.3.0, this option was removed in favor of installing Rancher 2.6.1 separately and then importing your Harvester cluster into Rancher, where you could manage it. A Harvester node driver is provided with Rancher 2.6.1 to allow you to create Kubernetes clusters in the same Harvester 0.3.0 cluster.

I replicated my Harvester 0.2.0 plus the Rancher server experience using Harvester 0.3.0 and Rancher 2.6.1.

There’s no upgrade path from Harvester 0.2.0 to 0.3.0, so the first step was reinstalling my Intel NUC with Harvester 0.3.0 following the docs at: https://docs.harvesterhci.io/v0.3/install/iso-install/.

Given that my previous Harvester 0.2.0 install included Rancher, I figured I’d install Rancher in a VM running on my newly installed Harvester 0.3.0 node – but which OS would I use? With Rancher being deployed using a single Docker container, I was looking for a small, lightweight OS that included Docker. From past experience, I knew that openSUSE Leap had slimmed down images of its distribution available at https://get.opensuse.org/leap/ – click the alternative downloads link immediately under the initial downloads. Known as Just enough OS (JeOS), these are available for both Leap and Tumbleweed (their rolling release). I opted for Leap, so I created an image using the URL for the OpenStack Cloud image (trust me – the KVM and XEN image hangs on boot).

Knowing that I wanted to be able to access Rancher on the same network my Harvester node was attached to, I also enabled  Advanced | Settings | vlan (VLAN) and created a network using VLAN ID 1 (Advanced | Networks).

The next step is to install Rancher in a VM. While I could do this manually, I prefer automation and wanted to do something I could reliably repeat (something I did a lot while getting this working) and perhaps adapt when installing future versions. When creating a virtual machine, I was intrigued by the user data and network data sections in the advanced options tab, referenced in the docs at https://docs.harvesterhci.io/v0.3/vm/create-vm/, along with some basic examples. I knew from past experience that cloud-init could be used to initialize cloud instances, and with the openSUSE OpenStack Cloud images using cloud-init, I wondered if this could be used here. According to the examples in the cloud-init docs at https://cloudinit.readthedocs.io/en/latest/topics/examples.html, it can!

When creating the Rancher VM, I gave it 1 CPU with a 4-core NUC and Harvester 0.3.0 not supporting over-provisioning (it’s a bug – phew!) – I had to be frugal! Through trial and error, I also found that the minimum memory required for Rancher to work is 3 GB. I chose my openSUSE Leap 15.3 JeOS OpenStack Cloud image on the volumes tab, and on the networks tab, I chose my custom (VLAN 1) network.

The real work is done on the advanced options tab. I already knew JeOS didn’t include Docker, so that would need to be installed before I could launch the Docker container for Rancher. I also knew the keyboard wasn’t set up for me in the UK, so I wanted to fix that too. Plus, I’d like a message to indicate it was ready to use. I came up with the following User Data:

password: changeme
packages:
  - docker
runcmd:
  - localectl set-keymap uk
  - systemctl enable --now docker
  - docker run --name=rancher -d --restart=unless-stopped -p 80:80 -p 443:443 --privileged rancher/rancher:v2.6.1
  - until curl -sk https://127.0.0.1 -o /dev/null; do sleep 30s; done
final_message: Rancher is ready!

Let me go through the above lines:

  • Line 1 sets the password of the default opensuse user – you will be prompted to change this the first time you log in as this user, so don’t set it to anything secret!
  • Lines 2 & 3 install the docker package.
  • Line 4 says we’ll run some commands once it’s booted the first time.
  • Line 5 sets the UK keyboard.
  • Line 6 enables and starts the Docker service.
  • Line 7 pulls and runs the Docker container for Rancher 2.6.1 – this is the same line as the Harvester docs, except I’ve added “–name=rancher” to make it easier when you need to find the Bootstrap Password later.
    NOTE: When you create the VM, this line will be split into two lines with an additional preceding line with “>-” – it will look a bit different, but it’s nothing to worry about!
  • Line 8 is a loop checking for the Rancher server to become available – I test localhost, so it works regardless of the assigned IP address.
  • Line 9 prints out a message saying it’s finished (which happens after the previous loop completes).

An extra couple of lines will be automatically added when you click the create button but don’t click it yet as we’re not done!

This still left a problem with which IP address I use to access Rancher? With devices being assigned random IP addresses via DHCP, how do I control which address is used? Fortunately, the Network Data sections allow us to set a static address (and not have to mess with config files or run custom scripting within the VM):

network:
  version: 1
  config:
    - type: physical
      name: eth0
      subnets:
        - type: static
          address: 192.168.144.190/24
          gateway: 192.168.144.254
    - type: nameserver
      address:
        - 192.168.144.254
      search:
        - example.com

I won’t go through all the lines above but will call out those you need to change for your own network:

  • Line 8 sets the IP address to use with the CIDR netmask (/24 means 255.255.255.0).
  • Line 9 sets the default gateway.
  • Line 12 sets the default DNS nameserver.
  • Line 14 sets the default DNS search domain.

See https://cloudinit.readthedocs.io/en/latest/topics/network-config-format-v1.html# for information on the other lines.

Unless you unticked the start virtual machine on creation, your VM should start booting once you click the Create button. If you open the Web Console in VNC, you’ll be able to keep an eye on the progress of your VM. When you see the message Rancher is ready, you can try accessing Rancher in a web browser at the IP address you specified above. Depending on the web browser you’re using and its configuration, you may see warning messages about the self-signed certificate Rancher is using.

The first time you log in to Rancher, you will be prompted for the random bootstrap password which was generated. To get this, you can SSH as the opensuse user to your Rancher VM, then run:

sudo docker logs rancher 2>&1 | grep "Bootstrap Password:"

Copy the password and paste it into the password field of the Rancher login screen, then click the login with Local User button.

You’re then prompted to set a password for the default admin user. Unless you can remember random strings or use a password manager, I’d set a specific password. You also need to agree to the terms and conditions for using Rancher!

Finally, you’re logged into Rancher, but we’re not entirely done yet as we need to add our Harvester cluster. To do this, click on the hamburger menu and then the Virtualization Management tab. Don’t panic if you see a failed whale error – just try reloading.

Clicking the Import Existing button will give you some registration commands to run on one of your Harvester node(s).

To do this, SSH to your Harvester node as the rancher user and then run the first kubectl command prefixed with sudo. Unless you’ve changed your Harvester installation, you’ll also need to run the curl command, again prefixing the kubectl command with sudo. The webpage should refresh, showing your Harvester cluster’s management page. If you click the Harvester Cluster link or tab, your Harvester cluster should be listed. Clicking on your cluster name should show something familiar!

Finally, we need to activate the Harvester node driver by clicking the hamburger menu and then the Cluster Management tab. Click Drivers, then Node Drivers, find Harvester in the list, and click Activate.

Now we have Harvester 0.3.0 integrated with Rancher 2.6.1, running similarly to Harvester 0.2.0, although sacrificing 1 CPU (which will be less of an issue once the CPU over-provisioning bug is fixed) and 3GB RAM.

Admittedly, running Rancher within a VM in the same Harvester you’re managing through Rancher doesn’t seem like the best plan, and you wouldn’t do it in production, but for the home lab, it’s fine. Just remember not to chop off the branch you’re standing on!

Harvester: Intro and Setup    

Tuesday, 17 August, 2021
I mentioned about a month back that I was using Harvester in my home lab. I didn’t go into much detail, so this post will bring some more depth. We will cover what Harvester does, as well as my hardware, installation, setup and how to deploy your first virtual machine. Let’s get started.

What is Harvester?

Harvester is Rancher’s open source answer to a hyperconverged infrastructure platform. Like most things Rancher is involved with, it is built on Kubernetes using tools like KubeVirt and Longhorn. KubeVirt is an exciting project that leverages KVM and libvirt to run virtual machines inside Kubernetes; this allows you to run both containers and VMs in your cluster. It reduces operational overhead and provides consistency. This combination of tried and tested technologies provides an open source solution in this space.

It is also designed to be used with bare metal, making it an excellent option for a home lab.

Hardware

If you check the hardware requirements, you will notice they focus more on business usage. So far, my personal experience says that you want at least a 4 core/8 thread CPU, 16GB of RAM, and a large SSD, preferably an NVMe drive. Anything less resource-wise doesn’t leave enough capacity for running many containers or VMs. I will install it on an Intel NUC 8i5BEK, which has an Intel Core i5-8259U. As far as RAM, it has 32GB of RAM and a 512GB NVMe drive. It can handle running Harvester without any issues. Of course, this is just my experience; your experience may differ.

Installation

Harvester ships as an ISO, which you can download on the GitHub Releases page. You can pull it quickly using wget.

$ wget https://releases.rancher.com/harvester/v0.2.0/harvester-amd64.iso

Once you have it downloaded, you will need to create a bootable USB. I typically use Balena Etcher since it is cross-platform and intuitive. Once you have a bootable USB, place it in the machine you want to use and boot the drive. This screen should greet you:

Select “New Cluster”:

Select the drive you want to use.

Enter your hostname, select your network interface, and make sure you use automatic DHCP.

You will then be prompted to enter your cluster token. This can be any phrase you want; I recommend using your password manager to generate one.

Set a password to use, and remember that the default user name is rancher.

The following several options are attractive, especially if you want to leverage your SSH keys used in GitHub. Since this is a home lab, I left the SSH keys, proxy and cloud-init setup blank. In an enterprise environment, this would be really useful. Now you will see the final screen before installation. Verify that everything is configured to your desires before proceeding.

If it all looks great, proceed with the installation. It will take a few minutes to complete; when it does, you will need to reboot.

After the reboot, the system will startup, and you will see a screen letting you know the URL for Harvester and the system’s status. Wait until it reports that Harvester is ready before trying to connect.

Great! It is now reporting that it is up and running, so it’s now time to set up Harvester.

Initial Setup

We can navigate to the URL listed once the OS boots. Mine is https://harvest:30443. It uses a self-signed certificate by default, so you will see a warning in your browser. Just click on “advanced” to proceed, and accept it. Set a password for the default admin account.

Now you should see the dashboard and the health of the system.

I like to disable the default account and add my own account for authentication. Probably not necessary for a home lab, but a good habit to get into. First, you need to navigate to it.

Now log out and back in with your new account. Once that’s finished, we can create our first VM.

Deploying Your First VM

Harvester has native support for qcow2 images and can import those from a URL. Let’s grab the URL for openSUSE Leap 15.3 JeOS image.

https://download.opensuse.org/distribution/leap/15.3/appliances/openSUSE-Leap-15.3-JeOS.x86_64-kvm-and-xen.qcow2

The JeOS image for openSUSE is roughly 225MB, which is a perfect size for downloading and creating VMs quickly. Let’s make the image in Harvester.

Create a new image, and add the URL above as the image URL.

You should now see it listed.

Now we can create a VM using that image. Navigate to the VM screen.

Once we’ve made our way to the VM screen, we’ll create a new VM.

When that is complete, the VM will show up in the list. Wait until it has been started, then you can start using it.

Wrapping Up

In this article, I wanted to show you how to set up VMs with Harvester, even starting from scratch! There are plenty of features to explore and plenty more on the roadmap. This project is still early in its life, so now is a great time to jump in and get involved with its direction.

Hyperconverged Infrastructure and Harvester

Monday, 2 August, 2021

Virtual machines (VMs) have transformed infrastructure deployment and management. VMs are so ubiquitous that I can’t think of a single instance where I deployed production code to a bare metal server in my many years as a professional software engineer.

VMs provide secure, isolated environments hosting your choice of operating system while sharing the resources of the underlying server. This allows resources to be allocated more efficiently, reducing the cost of over-provisioned hardware.

Given the power and flexibility provided by VMs, it is common to find many VMs deployed across many servers. However, managing VMs at this scale introduces challenges.

Managing VMs at Scale

Hypervisors provide comprehensive management of the VMs on a single server. The ability to create new VMs, start and stop them, clone them, and back them up are exposed through simple management consoles or command-line interfaces (CLIs).

But what happens when you need to manage two servers instead of one? Suddenly you find yourself having first to gain access to the appropriate server to interact with the hypervisor. You’ll also quickly find that you want to move VMs from one server to another, which means you’ll need to orchestrate a sequence of shutdown, backup, file copy, restore and boot operations.

Routine tasks performed on one server become just that little bit more difficult with two, and quickly become overwhelming with 10, 100 or 1,000 servers.

Clearly, administrators need a better way to manage VMs at scale.

Hyperconverged Infrastructure

This is where Hyperconverged Infrastructure (HCI) comes in. HCI is a marketing term rather than a strict definition. Still, it is typically used to describe a software layer that abstracts the compute, storage and network resources of multiple (often commodity or whitebox) servers to present a unified view of the underlying infrastructure. By building on top of the virtualization functionality included in all major operating systems, HCI allows many systems to be managed as a single, shared resource.

With HCI, administrators no longer need to think in terms of VMs running on individual servers. New hardware can be added and removed as needed. VMs can be provisioned wherever there is appropriate capacity, and operations that span servers, such as moving VMs, are as routine with 2 servers as they are with 100.

Harvester

Harvester, created by Rancher, is open source HCI software built using Kubernetes.

While Kubernetes has become the defacto standard for container orchestration, it may seem like an odd choice as the foundation for managing VMs. However, when you think of Kubernetes as an extensible orchestration platform, this choice makes sense.

Kubernetes provides authentication, authorization, high availability, fault tolerance, CLIs, software development kits (SDKs), application programming interfaces (APIs), declarative state, node management, and flexible resource definitions. All of these features have been battle tested over the years with many large-scale clusters.

More importantly, Kubernetes orchestrates many kinds of resources beyond containers. Thanks to the use of custom resource definitions (CRDs), and custom operators, Kubernetes can describe and provision any kind of resource.

By building on Kubernetes, Harvester takes advantage of a well tested and actively developed platform. With the use of KubeVirt and Longhorn, Harvester extends Kubernetes to allow the management of bare metal servers and VMs.

Harvester is not the first time VM management has been built on top of Kubernetes; Rancher’s own RancherVM is one such example. But these solutions have not been as popular as hoped:

We believe the reason for this lack of popularity is that all efforts to date to manage VMs in container platforms require users to have substantial knowledge of container platforms. Despite Kubernetes becoming an industry standard, knowledge of it is not widespread among VM administrators.

To address this, Harvester does not expose the underlying Kubernetes platform to the end user. Instead, it presents more familiar concepts like VMs, NICs, ISO images and disk volumes. This allows Harvester to take advantage of Kubernetes while giving administrators a more traditional view of their infrastructure.

Managing VMs at Scale

The fusion of Kubernetes and VMs provides the ability to perform common tasks such as VM creation, backups, restores, migrations, SSH-Key injection and more across multiple servers from one centralized administration console.

Consolidating virtualized resources like CPU, memory, network, and storage allows for greater resource utilization and simplified administration, allowing Harvester to satisfy the core premise of HCI.

Conclusion

HCI abstracts the resources exposed by many individual servers to provide administrators with a unified and seamless management interface, providing a single point to perform common tasks like VM provisioning, moving, cloning, and backups.

Harvester is an HCI solution leveraging popular open source projects like Kubernetes, KubeVirt, and Longhorn, but with the explicit goal of not exposing Kubernetes to the end user.

The end result is an HCI solution built on the best open source platforms available while still providing administrators with a familiar view of their infrastructure.

Download Harvester from the project website and learn more from the project documentation.

Meet the Harvester developer team! Join our free Summer is Open session on Harvester: Tuesday, July 27 at 12pm PT and on demand. Get details about the project, watch a demo, ask questions and get a challenge to complete offline.

Announcing Harvester Beta Availability

Friday, 28 May, 2021

It has been five months since we announced project Harvester, open source hyperconverged infrastructure (HCI) software built using Kubernetes. Since then, we’ve received a lot of feedback from the early adopters. This feedback has encouraged us and helped in shaping Harvester’s roadmap. Today, I am excited to announce the Harvester v0.2.0 release, along with the Beta availability of the project!

Let’s take a look at what’s new in Harvester v0.2.0.

Raw Block Device Support

We’ve added the raw block device support in v0.2.0. Since it’s a change that’s mostly under the hood, the updates might not be immediately obvious to end users. Let me explain more in detail:

In Harvester v0.1.0, the image to VM flow worked like this:

  1. Users added a new VM image.

  2. Harvester downloaded the image into the built-in MinIO object store.

  3. Users created a new VM using the image.

  4. Harvester created a new volume, and copied the image from the MinIO object store.

  5. The image was presented to the VM as a block device, but it was stored as a file in the volume created by Harvester.

This approach had a few issues:

  1. Read/write operations to the VM volume needed to be translated into reading/writing the image file, which performed worse compared to reading/writing the raw block device, due to the overhead of the filesystem layer.

  2. If one VM image is used multiple times by different VMs, it was replicated many times in the cluster. This is because each VM had its own copy of the volume, even though the majority of the content was likely the same since they’re coming from the same image.

  3. The dependency on MinIO to store the images resulted in Harvester keeping MinIO highly available and expandable. Those requirements caused an extra burden on the Harvester management plane.

In v0.2.0, we’ve took another approach to tackle the problem, which resulted in a simpler solution that had better performance and less duplicated data:

  1. Instead of an image file on the filesystem, now we’re providing the VM with raw block devices, which allows for better performance for the VM.

  2. We’ve taken advantage of a new feature called Backing Image in the Longhorn v1.1.1, to reduce the unnecessary copies of the VM image. Now the VM image will be served as a read-only layer for all the VMs using it. Longhorn is now responsible for creating another copy-on-write (COW) layer on top of the image for the VMs to use.

  3. Since now Longhorn starts to manage the VM image using the Backing Image feature, the dependency of MinIO can be removed.

Image 02
A comprehensive view of images in Harvester

From the user experience perspective, you may have noticed that importing an image is instantaneous. And starting a VM based on a new image takes a bit longer due to the image downloading process in Longhorn. Later on, any other VMs using the same image will take significantly less time to boot up, compared to the previous v0.1.0 release and the disk IO performance will be better as well.

VM Live Migration Support

In preparation for the future upgrade process, VM live migration is now supported in Harvester v0.2.0.

VM live migration allows a VM to migrate from one node to another, without any downtime. It’s mostly used when you want to perform maintenance work on one of the nodes or want to balance the workload across the nodes.

One thing worth noting is, due to potential IP change of the VM after migration when using the default management network, we highly recommend using the VLAN network instead of the default management network. Otherwise, you might not be able to keep the same IP for the VM after migration to another node.

You can read more about live migration support here.

VM Backup Support

We’ve added VM backup support to Harvester v0.2.0.

The backup support provides a way for you to backup your VM images outside of the cluster.

To use the backup/restore feature, you need an S3 compatible endpoint or NFS server and the destination of the backup will be referred to as the backup target.

You can get more details on how to set up the backup target in Harvester here.

Image 03
Easily manage and operate your virtual machines in Harvester

In the meantime, we’re also working on the snapshot feature for the VMs. In contrast to the backup feature, the snapshot feature will store the image state inside the cluster, providing VMs the ability to revert back to a previous snapshot. Unlike the backup feature, no data will be copied outside the cluster for a snapshot. So it will be a quick way to try something experimental, but not ideal for the purpose of keeping the data safe if the cluster went down.

PXE Boot Installation Support

PXE boot installation is widely used in the data center to automatically populate bare-metal nodes with desired operating systems. We’ve also added the PXE boot installation in Harvester v0.2.0 to help users that have a large number of servers and want a fully automated installation process.

You can find more information regarding how to do the PXE boot installation in Harvester v0.2.0 here.

We’ve also provided a few examples of doing iPXE on public bare-metal cloud providers, including Equinix Metal. More information is available here.

Rancher Integration

Last but not least, Harvester v0.2.0 now ships with a built-in Rancher server for Kubernetes management.

This was one of the most requested features since we announced Harvester v0.1.0, and we’re very excited to deliver the first version of the Rancher integration in the v0.2.0 release.

For v0.2.0, you can use the built-in Rancher server to create Kubernetes clusters on top of your Harvester bare-metal clusters.

To start using the built-in Rancher in Harvester v0.2.0, go to Settings, then set the rancher-enabled option to true. Now you should be able to see a Rancher button on the top right corner of the UI. Clicking the button takes you to the Rancher UI.

Harvester and Rancher share the authentication process, so once you’re logged in to Harvester, you don’t need to redo the login process in Rancher and vice versa.

If you want to create a new Kubernetes cluster using Rancher, you can follow the steps here. A reminder that VLAN networking needs to be enabled for creating Kubernetes clusters on top of the Harvester, since the default management network cannot guarantee a stable IP for the VMs, especially after reboot or migration.

What’s Next?

Now with v0.2.0 behind us, we’re working on the v0.3.0 release, which will be the last feature release before Harvester reaches GA.

We’re working on many things for v0.3.0 release. Here are some highlights:

  • Built-in load balancer
  • Rancher 2.6 integration
  • Replace K3OS with a small footprint OS designed for the container workload
  • Multi-tenant support
  • Multi-disk support
  • VM snapshot support
  • Terraform provider
  • Guest Kubernetes cluster CSI driver
  • Enhanced monitoring

You can get started today and give Harvester v0.2.0 a try via our website.

Let us know what you think via the Rancher User Slack #harvester channel. And start contributing by filing issues and feature requests via our github page.

Enjoy Harvester!