Advanced SAP Functionality Via a Container

Thursday, 4 March, 2021

Christian Holsing, Principal Product Manager, SAP on SUSE coauthored this post.

SAP and SUSE have a long-standing partnership. We’re excited about a recent collaboration: SAP and SUSE have implemented a way to bundle a software development toolkit (SDK) for complex SAP management software inside a containerized image that can be quickly and easily deployed into almost any environment without regard to resource constraints.

SAP’s enterprise resource planning (ERP) software is one of the most ubiquitous products in the large-enterprise environment. SAP created the high-level Advanced Business Application Programming (ABAP) language, which coders use to improve SAP-based applications. ABAP is simple and easy to learn, allowing coders to choose from procedural and object-oriented programming.

As a result, an entire ecosystem of products, services and programming communities (including the ABAP users group) has grown over the years to enhance SAP functionality and allow organizations to customize their operations. For example, the SAP R/3 system is a business software package designed to integrate all areas of a business to provide end-to-end solutions for financials, manufacturing, logistics, distribution and many other areas.

However, integrating any ERP tool or platform is a significant endeavor that requires a lot of setup and configuration time, not to mention heavy computing resources. With an ERP like SAP’s, with maximum flexibility, expandability and third-party integration opportunities, the need to deploy it as part of a major installation effort is almost a foregone conclusion.

At the same time, the emergence of cloud computing as the primary approach to large-scale and far-flung compute requirements, such as those found in our customer base, has fostered the adoption of containerization as a way to allow applications to be deployed reliably and speedily between different compute environments.

Containerization continues to gain popularity with many large enterprises, where thousands of new containers can be deployed every day. Compared with virtual machines, containers are extremely lightweight. Rather than virtualizing all of the hardware resources and running a completely independent operating system within that environment, containers use the host system’s kernel and run as compartmentalized processes within that OS.

In a container, all of the code, configuration settings and dependencies for a program are packed into a single object called an image. It makes for great functionality and easy deployment. But nobody ever thought bundling something as advanced and complex as SAP functionality into a container was possible.

Containerizing ABAP Platform, Developer Edition

So, what did we do? We’ve containerized the SDK (ABAP Platform, Developer Edition) for access through Docker Hub, making it the first official image with ABAP Platform from SAP. The great thing about the new container is that it sidesteps most of the memory requirements that made us think that such an effort was unlikely. Let’s say you are writing an application for SAP S/4HANA. It requires a minimum 128 GB RAM – and recommends 256 GB RAM – and at least 500 GB disk space. If you wanted to learn how to write extensions for SAP HANA, you either had to buy a huge system or you were out of luck. Now, with the Docker image, you can download the ABAP Platform and learn how to extend SAP S/4HANA on a more lightweight system: the image requires just 16 GB RAM and 170 GB disk space.

Creating the ABAP Platform image required downloading the base image containing SUSE Linux Enterprise Server 12 Service Pack 5. Then we pulled the image onto a local machine, created a container from that image and installed ABAP Platform into the container. The final step was to commit the container as a new image and push it to Docker Hub. Now, ABAP developers can pull the image – which includes the SUSE base image — onto their machines for testing, learning or even development purposes.

There were some hurdles along the way – we had to work out licensing terms between our two companies and create a limited user license for the Docker image. But we all agreed that providing an accessible SDK for experimenting was worth the effort.

The APAP user community (ABAPers) doesn’t want to worry about infrastructure. They just want to build useful business applications quickly. So, putting the ABAP Platform on Docker allows coders to see how easy it is to use. The resulting ABAP Platform image allows coders to experiment with its tools, whether on a Linux, Windows or Mac platform. We can’t wait for you to try it out.

What’s in the Image?

The SDK includes:

  • Extended Program Check, which goes beyond looking for syntax errors, undertaking more time-consuming checks, such as validating method calls with regard to called interfaces or finding unused variables
  • Code Inspector, which automates mass testing, provides analysis and tips for improving potentially sub-optimal statements or potential security problems, among other tasks
  • ABAP Test Cockpit, a new ABAP check toolset that allows running static checks and unit tests for ABAP programs
  • A new ABAP Debugger, which is the default tool for SAP NetWeaver 7.0, enables analysis of all types of ABAP programs, with a state-of-the-art user interface and its own set of essential features and tools

We think creating SDK containers makes a lot of sense. By disconnecting the SDK from the actual system, we’re letting coders experiment with these tools. Containerizing it and putting it on Docker Hub and other hubs just makes it faster and easier for developers to get their hands on the tools and start building.

Ready to try it out? Visit Docker Hub.


Closing the Leap Gap

Wednesday, 3 March, 2021

Tim Irnich, Developer Community Architect at SUSE, coauthored this post. 

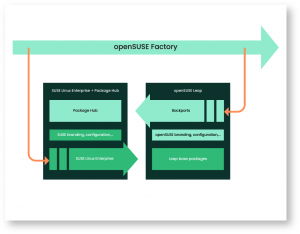
Today the openSUSE project announced the start of the public beta phase for openSUSE Leap 15.3. This release is an important milestone for openSUSE and SUSE, our users and customers: Leap 15.3 is the first release where openSUSE Leap and SUSE Linux Enterprise share the same source code and use the exact same binary packages. Let’s have a look at the following picture to examine what this means in detail.

In most cases, software packages in openSUSE or SUSE Linux Enterprise distributions originate from the openSUSE Factory Project. They are used to produce various distributions such as Tumbleweed, Leap, Kubic – to name a few. Factory is constantly updated with the flow of changes released by the various upstream open source projects. Leap is openSUSE’s stable release series. It feeds from the Factory “code stream” via two different paths. On the one hand, a subset of Factory is the source SUSE uses to create the SUSE Linux Enterprise products. From Leap 15.3 onwards, SUSE also (in addition to the sources) contributes the SUSE Linux Enterprise (SLE) binary packages back to the openSUSE community, where they form the base of openSUSE Leap. The openSUSE community continues to build the other Leap packages, now called “Backports,” from the latest Factory sources. The combination of the SLE binaries, openSUSE Backports, and a thin layer of branding and configuration will make up openSUSE Leap 15.3 and its successors. The openSUSE Backports also populate SUSE Package Hub, which offers SUSE’s customers the same choice of thousands of community-supported packages on top of the baseline SLE product and SUSE’s enterprise-grade support.


We won’t go into details on how this works under the hood in this post. If that’s what you’re looking for, see our blog series on How SUSE Builds its Enterprise Linux Distribution. Today, we will focus on what this change means for you as an end user. In a nutshell, while portability (i.e. the ability to run software built for openSUSE Leap on SLE or vice versa) between SLE and Leap was previously very likely, it is now almost guaranteed. You can migrate from openSUSE Leap to SUSE Linux Enterprise without having to reinstall anything, and this is a big deal. Let’s take a look at a couple of examples.


Why Should I Bother?

Imagine you’re building software to run on SUSE Linux Enterprise. You need to test this as well as you can. You will most likely apply a tiered approach in your test pipeline. Early on, one key question is: does my software build, install, and function properly on my target platform? Testing this in an automated way requires you to spin up a new (probably virtual) machine, install the target OS, build and deploy your software and test it. It is essential to minimize the time all that takes since the number of test iterations per day is the ultimate limit to your feature velocity. Doing this with SLE requires you to register the newly installed OS at every iteration, which is a bit tricky to automate and, more importantly, takes quite some time to complete. Wouldn’t it be great if there was a way to skip the registration step while getting equally meaningful test results? With 15.3, you can simply use openSUSE Leap as an equivalent replacement for SLE 15 SP3 in this stage of your test pipeline. It also removes any limitations on the number of parallel test instances. You can run as many boxes as you like at no cost.

Another example is the typical “cattle” infrastructure developers and engineers depend on to do their work. Quickly spinning up a virtual machine on the developer workstation or in the cloud or building an experimental container has become the bread and butter for all the techies and nerds worldwide. Anything that constrains their ability to do so is a severe limitation to productivity and innovation. This is why free Linux distros are so popular among developers for prototyping and experimentation. However, using one Linux distro for prototyping and another non-compatible one in production sets you up for trouble — you are pushing detection of integration issues to a later time. And we all know that the later a problem is identified, the more costly it is to fix. With Leap 15.3, you get a free Linux distribution that is essentially identical to SUSE’s commercial Enterprise Linux. It’s also available without any constraints as to how many CPUs you can run, how many VMs you can host, how long you can keep things running and other constraints often found with free tiers of enterprise-grade products. Plus, you can migrate your existing server, VM or container over to SUSE Linux Enterprise within minutes if you need to “turn on” enterprise support at a later time.

The bottom line is: openSUSE Leap is a strong alternative for anyone interested in SLE, but for some reason requires a no-cost option or needs to avoid the technical complexity of registration.

What if I Change My Mind?

Yet another benefit of this move is that in-place migration between Leap and SLE is really easy. As a colleague said: “While it was previously comparable to a long coffee, it now resembles an espresso shot.”

The procedure is described in detail here. In a nutshell, the steps are:

  1. Install the migration tools: sudo zypper in yast2-registration rollback-helper
  2. Enable the rollback service: sudo systemctl enable rollback
  3. Register the machine: sudo yast2 registration
  4. Run the actual migration: sudo yast2 migration
  5. Reboot the system: sudo reboot

Easy, right? Let us know if the procedure finished before you were back at your keyboard with your freshly brewed espresso.

Also, thanks to the magic of Btrfs and snapper, you can always roll back to your previous system state. Herein, the rollback helper makes sure that your local system’s state is kept in sync with your registered systems in SCC since you might end up with stale registrations otherwise.

Don’t Forget the Power of Many

The combination of enterprise quality and “The Power of Many” in the openSUSE community brings a couple of additional treats.

A community distribution that is binary compatible with an Enterprise Linux distribution offers unmatched choice. openSUSE Leap not only provides the same quality as SLE. It also combines that with the amazing ecosystem of openSUSE, which offers thousands of additional community-maintained software packages. Previously you had to choose between super rock solid (we do need to stress that Leap was, of course, also very solid already) and large choice of software packages, but no more. You can have both at the same time now.

In addition, SUSE and the openSUSE community have created a way to allow code submits against the SLE code base itself. So, if you, as an openSUSE Leap user, run into a problem that’s rooted in one of the packages inherited from SLE, you can influence both openSUSE Leap as well as SUSE Linux Enterprise at the same time. Think of it as openSUSE users as the most important business partner for SLE.

Sound Too Good to be True?

Combining packages built in two different build pipelines into one distribution is by no means easy. At the beginning, the community faced around 150 packages that needed to be forked and rebuilt from source in the openSUSE build service due to various reasons. In a near-heroic effort, until the time of this writing, the community brought this down to 7 packages that are not binary identical. They behave the same way but have a different checksum than their SLE counterparts. We expect to reduce this further over time; you can find the list of SLE packages rebuilt for Leap here.

How and When Can I Get It?

The code submission deadline (i.e. the point in time where all package repositories are frozen except for bugfixes) for SLE 15 SP3 as well as openSUSE Leap 15.3. was on Feb 17, 2021, at 14:00 UTC. The first beta build has been published on March 3rd. The timeline of events leading up to the official release is described on the openSUSE Roadmap.

If you want to participate in the public beta, visit https://get.opensuse.org/testing, which will be updated with all relevant information.

If you run into problems with the beta, the best place to turn to is the openSUSE Factory mailing, to which you can subscribe here. And, since bug reports are the point of a public beta, you can file them here. There’s a list of typical beta test procedures in case you need some inspiration on how to check if everything works fine. If you need help filing a bug report, check this page or contact us on the openSUSE Forums.

The official release of Leap 15.3 is planned for June 2021. Mark your calendars — we’ll throw a big party (maybe).

Find Your SUSE Training Courses

Tuesday, 23 February, 2021

Your IT role demand a combination of large and deep knowledge of the enterprise software to maintain internal and external customer satisfaction. In other words, your architectural design, deployment, maintenance and/or support shall deliver the service level required by the business. Building and maintaining your technical knowledge will boost your self-confidence and increase your productivity; and that’s critical for your career development. Equally, enterprises that invest in training their IT staff will reap business continuity, increased security, and employee satisfaction.

What is a “SUSE Training Course” ?

First, short description of fundamental terms.

    • SUSE is a global leader in true open source innovation, collaborating with partners, communities, and customers to deliver and support robust open source software solutions.


    • Training is teaching, or developing in oneself or others, any skills and knowledge or fitness that relate to specific useful competencies (Wikipedia).


  • Course (education) is a unit of teaching that typically lasts one academic term, is led by one or more instructors (teachers or professors) and has a fixed roster of students (Wikipedia).

Therefore, a “SUSE Training Course” is a unit of teaching delivered, over one or more days, by a SUSE Certified Instructor, physically or virtually, or through on-demand video on a particular SUSE technology based on open source software. SUSE Training Courses are developed by an experienced team of real-world subject matter experts with input from SUSE engineering, support and consulting teams. This brings together knowledge and best practices from all parts of the SUSE organization in a single place.

What is the content of a “SUSE Training Course” ?

In general, SUSE Training Course(s) for a product covers specific content to master the following actions over four phases of software management:


1) Analysis and Design

2) Deployment and Testing

3) Production

4) Maintenance


The extent to which these actions are covered depends on the specific SUSE Training Course. For example, SUSE Linux Enterprise Server 15 Administration course content covers the majority of “Analysis and Design”, “Deployment and Testing”, and “Production”. On the other side, SUSE Linux Enterprise Server 15 Advanced Administration course content covers deeper insights across all four phases with focus on “Maintenance”.

What information is available about a “SUSE Training Course” ?

Each description of a SUSE Training Course includes the following information.

    1. General course information about delivery method, number of days, and level (Beginner or Intermediate).


    1. Key objectives related to learning and practices.


    1. Target audience for whom the course is designed and will benefit most including related certification exam.


    1. Course outline for each training day. This is a comprehensive agenda structured by day, section, and technology. This Is the heart of the SUSE Training Course enabling participant to understand what will be covered and in what order.


    1. Course prerequisites to ensure the audience knowledge and skills are suitable for the training course.


  1. Course schedule presenting worldwide training schedule for the course with dates, location and the name of the authorized SUSE Training Partner who is delivering the training course.

Find Your SUSE Training Courses

This SUSE Training webpage presents you with all training courses for SUSE products family. Select the product family to find your SUSE Training Courses, examples are:

    • Enterprise Linux / SUSE Linux Enterprise Server (SLES) webpage


    • SAP Solutions / SLES for SAP Applications webpage


    • Business-Critical Computing / High Availability and Live Patching webpage


    • IT Infrastructure Management / SUSE Manager webpage


    • SUSE Rancher / Instructor Led Training (coming soon) *** FYI Rancher Academy offers Self-Paced Certified Rancher Operator: Level 1 webpage


Related to this blog, suggest the VLOG (Episode 1) Emiel Brok talks about why anyone should invest in open source training, skills gaps that need to be closed and the SUSE Training portfolio.

SUSE Joins SAP Endorsed Apps Program

Tuesday, 2 February, 2021

For more than two decades, SUSE and SAP have celebrated a strong partnership and commitment to customer success. Rooted in co-innovation, together, we continue to provide immeasurable value and cutting-edge innovation to our joint customers around the world. As SAP solutions enable customers to drive their digital transformation, SUSE has become a leading and one of the most trusted open source platforms for these solutions. We are proud that we offer the first Linux platform, SUSE Linux Enterprise Server for SAP Applications, that delivers fast, error-free migrations to SAP S/4HANA with fully automated installation, whether on premises or in the cloud. With SAP by our side, SUSE will continue to be at the forefront of powering mission-critical business applications with our true open source innovations.

Today, we welcome a new milestone in our relationship with SAP as we join the SAP Endorsed Apps program.

SUSE’s joining of this invitation-only program reflects how our technology has delivered outstanding value to our customers. We have demonstrated proven results, borne out through stringent testing by SAP, earning SAP’s premium certification. The trust runs deep with more than 85% of SAP HANA running on SUSE Linux Enterprise.

Tom Roberts, senior vice president, Partner Solution Success at SAP, agrees that SAP’s history of success and ongoing co-innovation with SUSE continues to positively impact customers and the market. “Ecosystem innovations are essential to SAP’s vision and delivery of the intelligent enterprise. We applaud SUSE on achieving SAP endorsed app status for its SUSE Linux Enterprise Server for SAP Applications. This application has undergone in-depth testing and measurement against benchmark solutions earning its premium certification. SUSE is a trusted, long-time partner who shares our commitment to customers, and I look forward to our continued partnership.”

This is just the start. In addition to joining the SAP Endorsed Apps program, SUSE and SAP have increased our co-innovation, including work on Kubernetes containers managed by Gardener, an SAP-driven open source project that tackles real-world demands for hyperscale Kubernetes services, whether on-prem, in the cloud, or on the edge. With SUSE’s acquisition of Rancher Labs, a market-leading enterprise Kubernetes management vendor, we are eager to continue our joint innovation in the Kubernetes space.

I am confident that with SUSE participation in the SAP Endorsed Apps program and our continued co-innovation in Kubernetes, SUSE and SAP will continue to deliver extraordinary value to our joint customers on their digital transformation journey for years to come.

How SUSE builds its Enterprise Linux distribution – PART 5

Wednesday, 20 January, 2021

This is the fifth blog of a series that provides insight into SUSE Linux Enterprise product development. You will get a first-hand overview of SUSE, the SLE products, what the engineering team does to tackle the challenges coming from the increasing pace of open source projects, and the new requirements from our customers, partners and business-related constraints.

How SUSE builds its Enterprise Linux distribution:

Whether you are a long-term SUSE customer, a new SUSE customer, a SUSE partner, or just an openSUSE fan or open source enthusiast, we hope you will find these blogs interesting, informative and helpful.

Linux Distributions Type

We have already covered Linux Distribution in a previous blog post, but something we didn’t discuss previously was the different types of Linux Distributions you can find in the wild. Now is the perfect time to explain the different types of Linux Distributions since you know a bit more about what is a Linux Distribution and our SLE Release Management and Schedules; this also perfectly fits with explaining the current relationship between openSUSE and SLE.

So first there is three main types of Linux Distributions defined by their release cycles and thus their targeted audience:

Rolling Release:

  • Bleeding edge
  • Release as soon as possible (CI/CD)
  • Example: openSUSE Tumbleweed, ArchLinux, Manjaro, Gentoo

Regular:

  • Release one to twice a year
  • Updates the entire stack for each release
  • Example: Ubuntu, Fedora, Debian

Long Term Support / Enterprise:

  • Slow cadence (yearly more or less)
  • Few things move between sub-releases, only major release brings “disruptive” changes
  • Example: openSUSE Leap, Ubuntu LTS, SUSE Linux Enterprise Server, SUSE Linux Enterprise Desktop, RHEL, CentOS

This is the basis to understand the various relationship we have with SUSE Linux Enterprise and openSUSE because, as we will see in the next section, openSUSE Tumbleweed, openSUSE Leap and SUSE Linux Enterprise are bonded together.

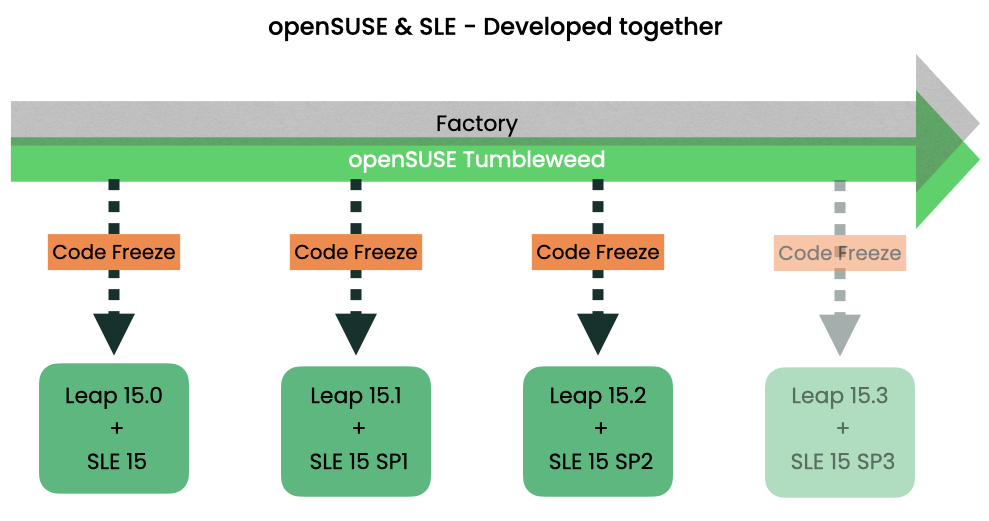
openSUSE & SLE – Developed together

Here is a simple picture describing the relationship between openSUSE & SLE since the release date of Leap 15.0 (May 25, 2018):

The Factory Project is the development code stream all our distributions are based on, it is not a Linux distribution! It is the immediate source for openSUSE Tumbleweed and it eventually ends up in openSUSE Leap and the SUSE Linux Enterprise distributions. Put it simply, Factory is the development repository for openSUSE and SUSE in a CI/CD fashion!

Now you might wonder what’s the deal with the Factory and openSUSE Tumbleweed relationship. Well, it’s pretty simple! Factory is getting a constant flow of codes without any proper Quality Assurance apart from various code reviews (mostly done by bots), so the openSUSE community creates snapshots of Factory tested with openQA. When a snapshot is good, it becomes an update for openSUSE Tumbleweed; hence a rolling release.

Then further down the picture is the relation between openSUSE Tumbleweed, openSUSE Leap and SUSE Linux Enterprise.

Based on our joint schedule, openSUSE Leap and SLE have a predictable release time frame: a release every 12 months and a 6 months support overlap for the former and new release, thus when the time is ready a snapshot of openSUSE Tumbleweed is made and both openSUSE and SLE will use this snapshot to create our next distributions versions.

With this picture, we are not talking about our distribution per se yet, it’s only a pool of packages sources that we will use to build our respective distribution. But before going into how it’s built, note that it’s a simplified view because of course, there is always some back and forth between for instance openSUSE Leap/SLE and openSUSE Tumbleweed; it’s not just a one-way sync because during the development phase of our distributions, bugs are found and of course fixes are submitted back to Factory so openSUSE Tumbleweed also receives fixes from the process. For the sake of simplifying the picture we did not add these contributions as arrows.

Also at SUSE, Open source is in our genes so we have always contributed to openSUSE but, since 2017, our SUSE Release Team had enforce a rule called “Factory First Policy“, which force code submissions for SLE to be pushed to Factory first before it lands in SLE. This is a continuation of the “Upstream First” principle on the distribution level. It reduces maintenance effort and leverages the community.

When a SUSE internal code submission is sent to SLE15, an automated check will ensure similar submission was done to Factory, if not the submission will be automatically rejected and will require the SUSE Release Team to take a closer look and request the code change to be submitted to Factory. With this Factory First Policy, we are making sure that any SLE development is pushed to openSUSE even before it’s accepted in SLE!

How we built openSUSE & SLE so far

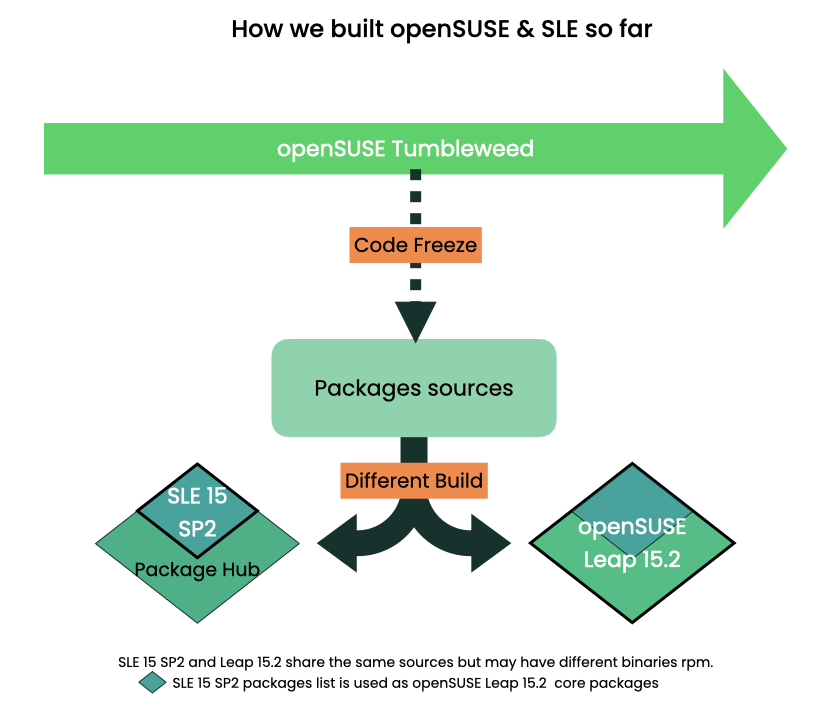
So let’s talk about how we technically built openSUSE & SLE distributions until openSUSE Leap 15.2 and SUSE Linux Enterprise 15 Service Pack 2.

The top of the picture should be familiar to you, and as we said in the last section, we use the same pool of packages sources to build openSUSE Leap and SUSE Linux Enterprise Server.

This is because openSUSE Leap and SLE wanted to

  1. directly share a core set of packages list (blue diamond on top),
  2. have “extra” packages (green “V” shapes) that can be updated more frequently or having different support level,

For openSUSE it’s pretty simple, the bigger diamond (blue one + green V) represents the entire openSUSE Leap distribution with all it’s official packages.

For SUSE Linux Enterprise, our official distributions and packages are only the blue diamond on top! But the rest of the green “V” will be available in Package Hub. Package Hub is our community repository made by our community for SUSE Linux Enterprise Server and Desktop, but of course SUSE does not directly support those packages, it’s community supported.

The important part here is that openSUSE Leap 15.2 and SLE 15 SP2 use the same packages sources and share the same packages lists BUT we didn’t use the same binaries rpm!

openSUSE and SLE in the near future

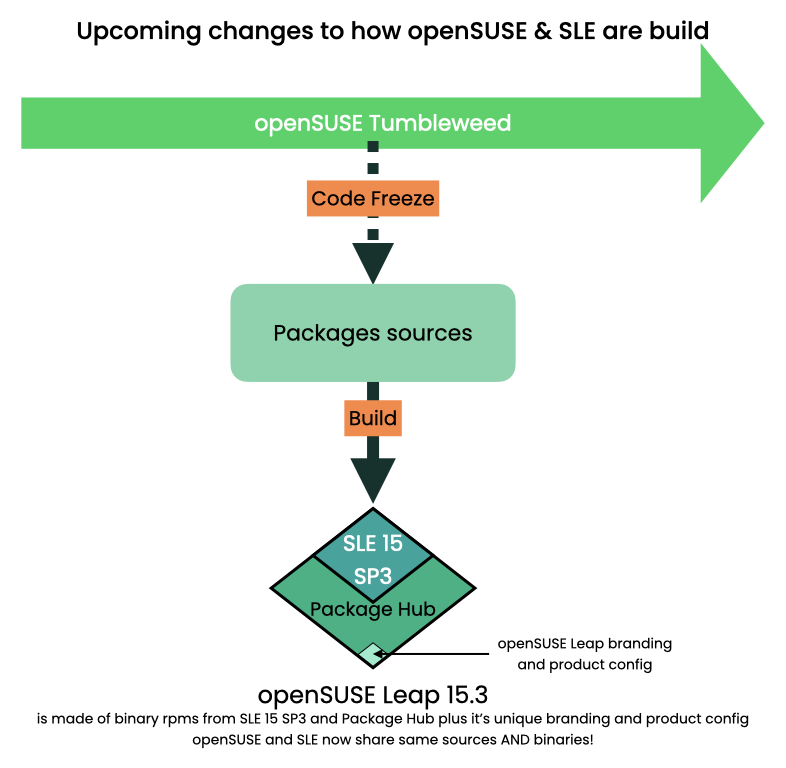
So we just saw the “weirdest chameleon symbiosis” found in nature, but how can we make it better? It’s easy, by simplifying the big picture:

The previous scheme (“How we built openSUSE & SLE so far” ) was used by at least our last 3 releases, but SUSE felt like we could move forward and do more, so we have kickstarted the Closing the Leap Gap proposal to the openSUSE community during the SLE 15 SP2 Development phase. To make a long story short, the proposal was to include pre-built binaries from SLE in addition to the sources we were already providing to increase compatibility and to leverage synergies. For more details on all the aspect of this proposal, we can not emphasis enough reading of the openSUSE FAQ page.

The change to our relations are made because we want a smoother migration path between SLE and openSUSE Leap but also to look for more direct collaboration with the openSUSE community. Therefore SUSE is also making easier for the community to contribute directly to openSUSE and SLE via new dedicated channels. So the community is still able to shape and submit changes to the next distribution version with this new setup.

Please check-out the following links for more information:

The ultimate goal on a project perspective is to make an healthy and self-sufficient ecosystem, and on a distribution level to have a good balance between an environment suitable for production and for innovation.

As you can see, the relationship between openSUSE and SLE is not complicated per se, but it’s true that we have chosen our very own symbiosis that allows to create boundaries between a community rolling release distribution (openSUSE Tumbleweed), a community LTS distribution (openSUSE Leap) and an enterprise distribution (SLE). And with Closing the Leap Gap project, what we want to achieve is to keep improving the efficiency of contribution to and from the community and the enterprise side.

The future looks good.

We share more than code

Last but not least, the openSUSE community and SUSE share way more than just code! But if we stick with the software development area, we have to talk about how openSUSE and SLE are build and test during their bonded development phase.

So next we will talk about some of the underlying processes glueing everything together but also about the great tool we are using: Open Build Service (build) and openQA (test).


Further Readings/Videos:

Using Hybrid and Multi-Cloud Service Mesh Based Applications for Distributed Deployments

Monday, 21 December, 2020

Join the Master Class: Using Hybrid and Multi-Cloud Service Mesh Based Applications for Highly Distributed Environment Deployments

Service Mesh is an emerging architecture pattern gaining traction today. Along with Kubernetes, Service Mesh can form a powerful platform which addresses the technical requirements that arise in a highly distributed environment typically found on a microservices cluster and/or service infrastructure. A Service Mesh is a dedicated infrastructure layer for facilitating service-to-service communications between microservices.

Service Mesh addresses the communication requirements typical in a microservices-based application, including encrypted tunnels, health checks, circuit breakers, load balancing and traffic permission. Leaving the microservices to address these requirements leads to an expensive and time consuming development process.

In this blog, we’ll provide an overview of the most common microservice communication requirements that the Service Mesh architecture pattern solves.

Microservices Dynamics and Intrinsic Challenges

The problem begins when you realize that microservices implement a considerable amount of code not related to the business logic they were originally assigned. Additionally, it’s possible you have multiple microservices implementing similar capabilities in a non-standardized process. In other words, the microservices development team should focus on business logic and leave the low-level communication capabilities to a specific layer.

Moving forward with our scenario, consider the intrinsic dynamics of microservices. In given time, you may (or most likely will) have multiple instances of a microservice due to several reasons, including:

  • Throughput: depending on the incoming requests, you might have a higher or lower number of instances of a microservice
  • Canary release
  • Blue/green deployment
  • A/B testing

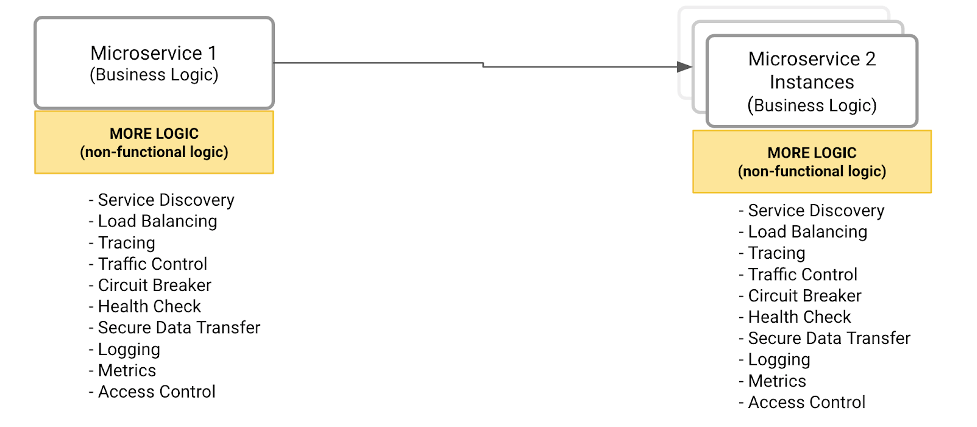
In short, the microservice-to-microservice communication has specific requirements and issues to solve. The illustration below shows this scenario:

Image 01

The illustration depicts several technical challenges. Clearly, one of the main responsibilities of Microservice 1 is to balance the load among all Microservice 2 instances. As such, Microservice 1 has to figure out how many Microservice 2 instances we have at the request moment. In other words, Microservice 1 must implement service discovery and load balancing.

On the other hand, Microservice 2 has to implement some service registration capabilities to tell Microservice 1 when a brand-new instance is available.

In order to have a fully dynamic environment, these other capabilities should be part of the microservices development:

  • Traffic control: a natural evolution of load balancing. We want to specify the number of requests that should go to each of the Microservice 2 instances.
  • Encrypted communication between the Microservices 1 and 2.
  • Circuit breakers and health checks to address and overcome networking problems.

In conclusion, the main problem is that the development team is spending significant resources writing complex code not directly related to business logic expected to be delivered by the microservices.

Potential Solutions

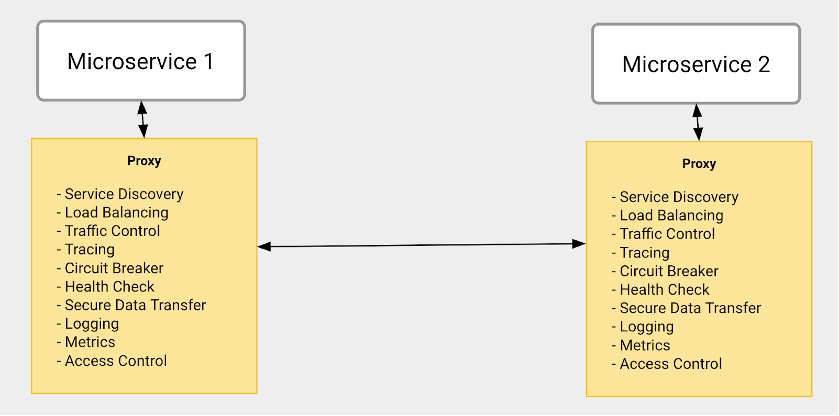
How about externalizing all the non-functional and operational capabilities in an external and standardized component that all microservices can call? For example, the diagram below compiles all capabilities that should not be part of a given microservice. So, after identifying all capabilities, we need to decide where to implement them.

Image 02

Solution #1 – Encapsulating all capabilities in a library

The developers would be responsible for calling functions provided by the library to address the microservice communication requirements.

There are a few drawbacks to this solution:

  • It’s a tightly coupled solution, meaning that the microservices are highly dependent on the library.
  • It’s not an easy model to distribute or upgrade new versions of the library.
  • It doesn’t fit the microservice polyglot principle with different programming languages being applied on different contexts

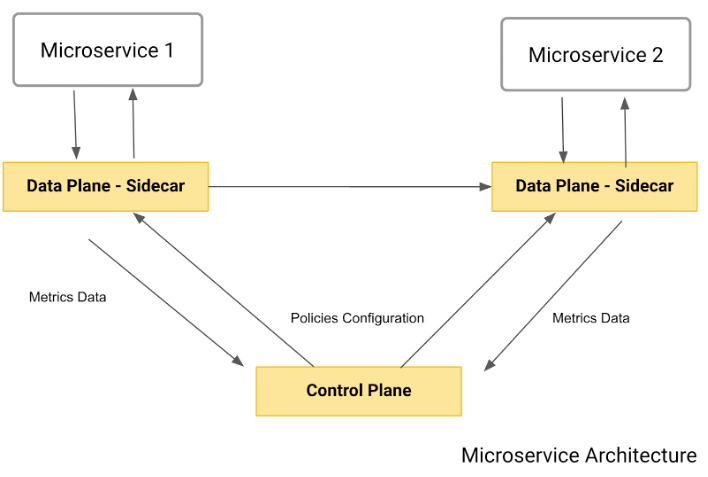
Solution #2 – Transparent Proxy

Image 03

This solution implements the same collection of capabilities. However, with a very different approach: each microservice has a specific component, playing a proxy role, taking care of its incoming and outcoming traffic. The proxy solves the library drawbacks we described before as follows:

  • The proxy is transparent, meaning the microservice is not aware it is running nearby and implementing all needed capabilities to communicate with other microservices.
  • Since it’s a transparent proxy, the developer doesn’t need to change the code to refer to the proxy. Therefore, upgrading the proxy would be a low-impact process from a microservice development perspective.
  • The proxy can be developed using different technologies and programming languages used by microservice.

The Service Mesh Architectural Pattern

While a transparent proxy approach brings several benefits to the microservice development team and the microservice communication requirements, there are still some missing parts:

  • The proxy is just enforcing policies to implement the communication requirements like load balancing, canary, etc.
  • What is responsible for defining such policies and publishing them across all running proxies?

The solution architecture needs another component. Such components would be used by admins for policy definition and it will be responsible for broadcasting the policies to the proxies.

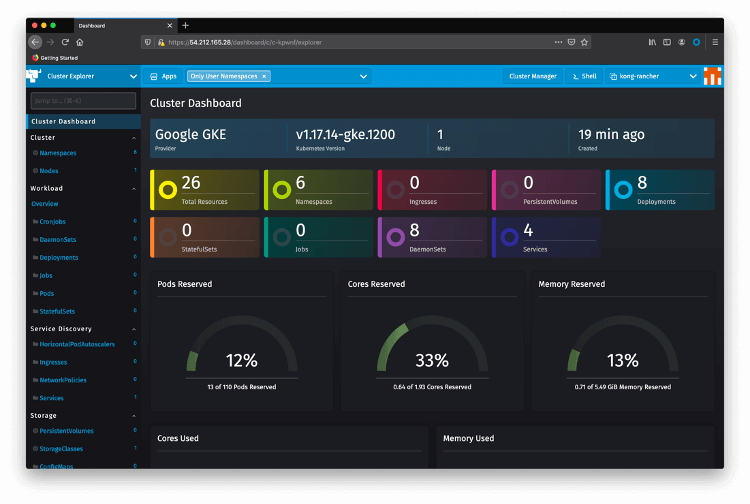
The following diagram shows the final architecture which is the service mesh pattern:

Image 04

As you can see, the pattern comprehends the two main components we’ve described:

  • The data plane: also known as sidecar, it plays the transparent proxy role. Again, each microservice will have its own data plane intercepting all incoming and outgoing traffic and applying the policies previously described.
  • The control plane: used by the admin to define policies and publish them to the data plane.

Some important things to note:

  • It’s “push-based” architecture. The data plane doesn’t do “callouts” to get the policies: that would be a big network consuming architecture.
  • The data plane usually reports usage metrics to the control plane or a specific infrastructure.

Get Hands-On with Rancher, Kong and Kong Mesh

Kong provides an enterprise-class and comprehensive service connectivity platform that includes an API gateway, a Kubernetes ingress controller and a Service Mesh implementation. The platform allows customers to deploy on multiple environments such as on premises, hybrid, multi-­­­­­­region and multi-cloud.

Let’s implement a Service Mesh with a canary release running on a cloud-agnostic Kubernetes cluster, which could include a Google Kubernetes Engine (GKE) cluster or any other Kubernetes distribution. The Service Mesh will be implemented by Kong Mesh (and protected by Kong for Kubernetes as the Kubernetes ingress controller. Generically speaking, the ingress controller is responsible for defining entry points to your Kubernetes cluster, exposing the microservices deployed inside of it and applying consumption policies to it.

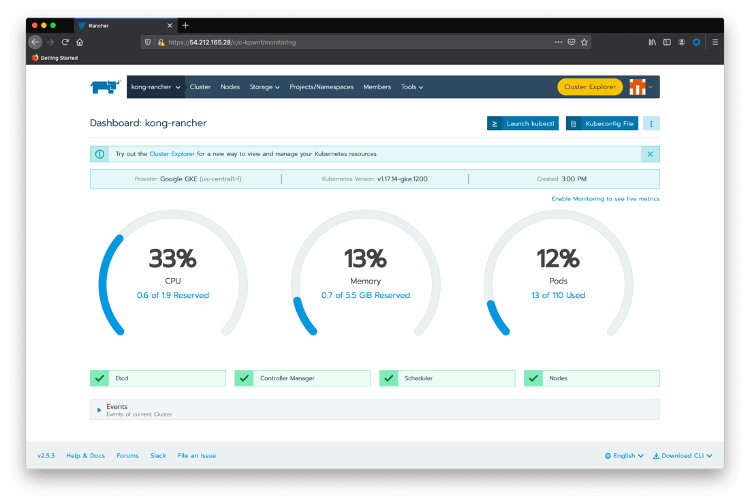
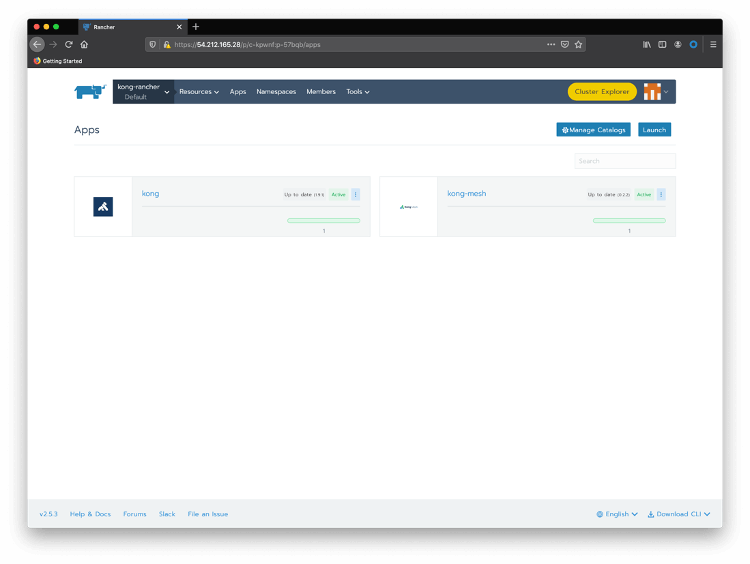
First of all, make sure you have Rancher installed, as well as a Kubernetes cluster running and managed by Rancher. After logging into Rancher, choose the Kubernetes cluster we’re going to work on – in our case “kong-rancher”. Click the Cluster Explorer link. You will be redirected to a page like this:

Image 05

Now, let’s start with the Service Mesh:

  1. Kong Mesh Helm Chart

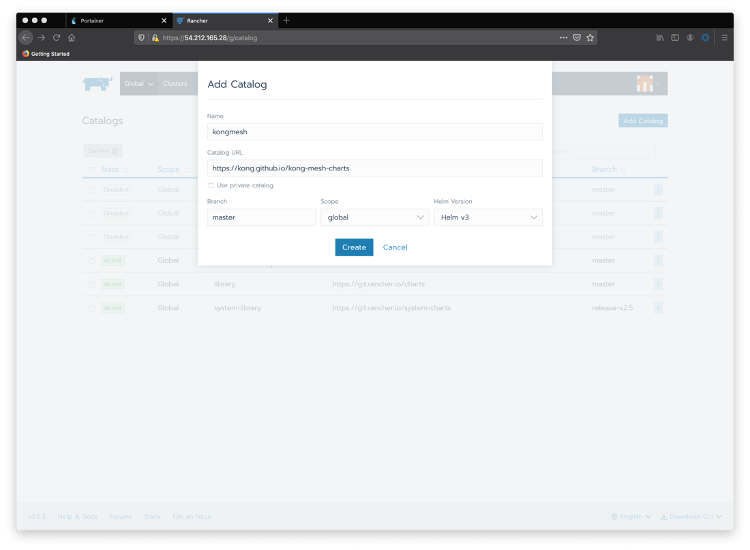
    Go back to Rancher Cluster Manager home page and choose your cluster again. To add a new catalog, pass your mouse over the “Tools” menu option and click on Catalogs. Click the Add Catalog button and include Kong Mesh’s Helm v3 charts .

    Choose global as the scope and Helm v3 as the Helm version.

    Image 06

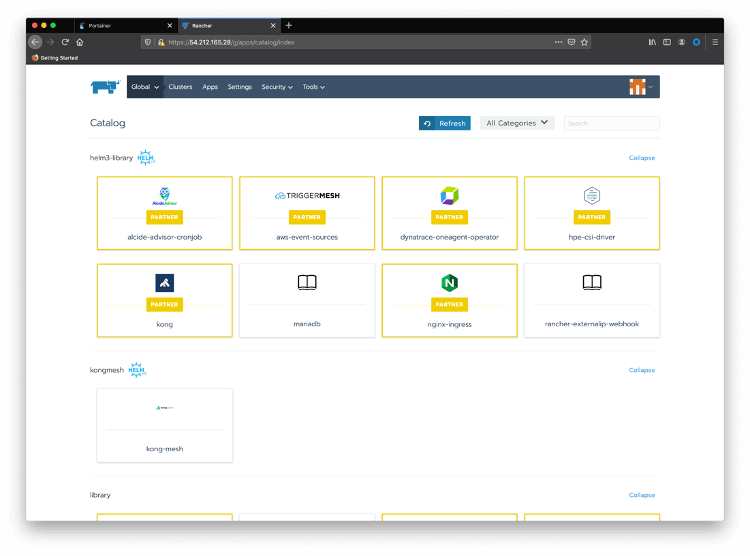
    Now click on Apps and Launch to see Kong Mesh available in the Catalog. Notice that Kong, as a Rancher partner, provides Kong for Kubernetes Helm Charts, by default:

    Image 07

  2. Install Kong Mesh

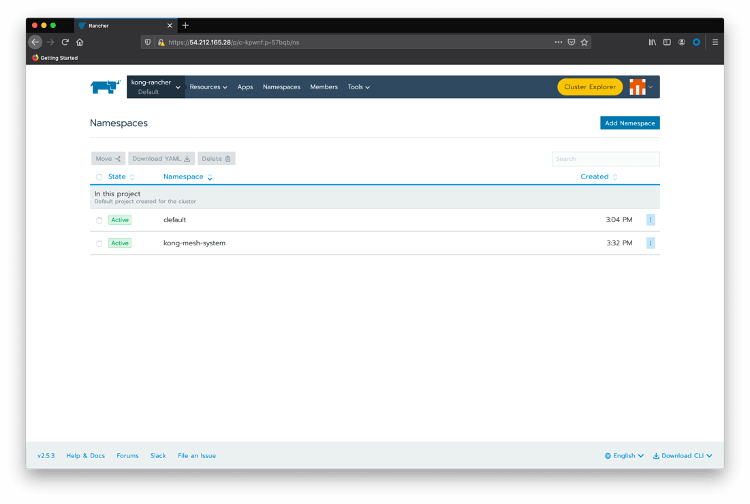
    Click on the top menu option Namespaces and create a “kong-mesh-system” namespace.

    Image 08

    Pass your mouse over the kong-rancher top menu option and click on kong-rancher active cluster.

    Image 09

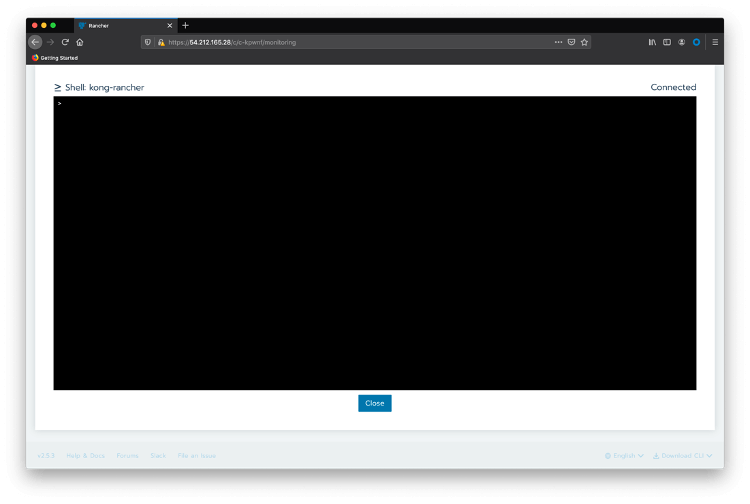
    Click on Launch kubectl

    Image 10

    Create a file named “license.json” for the Kong Mesh license you received from Kong. The license follows the format:

    {“license”:{“version”:1,“signature”:“6a7c81af4b0a42b380be25c2816a2bb1d761c0f906ae884f93eeca1fd16c8b5107cb6997c958f45d247078ca50a25399a5f87d546e59ea3be28284c3075a9769”,“payload”:{“customer”:“Kong_SE_Demo_H1FY22”,“license_creation_date”:“2020-11-30”,“product_subscription”:“Kong Enterprise Edition”,“support_plan”:“None”,“admin_seats”:“5”,“dataplanes”:“5”,“license_expiration_date”:“2021-06-30”,“license_key”:“XXXXXXXXXXXXX”}}}

    Now, create a Kubernetes generic secret with the following command:

    kubectl create secret generic kong-mesh-license -n kong-mesh-system --from-file=./license.json

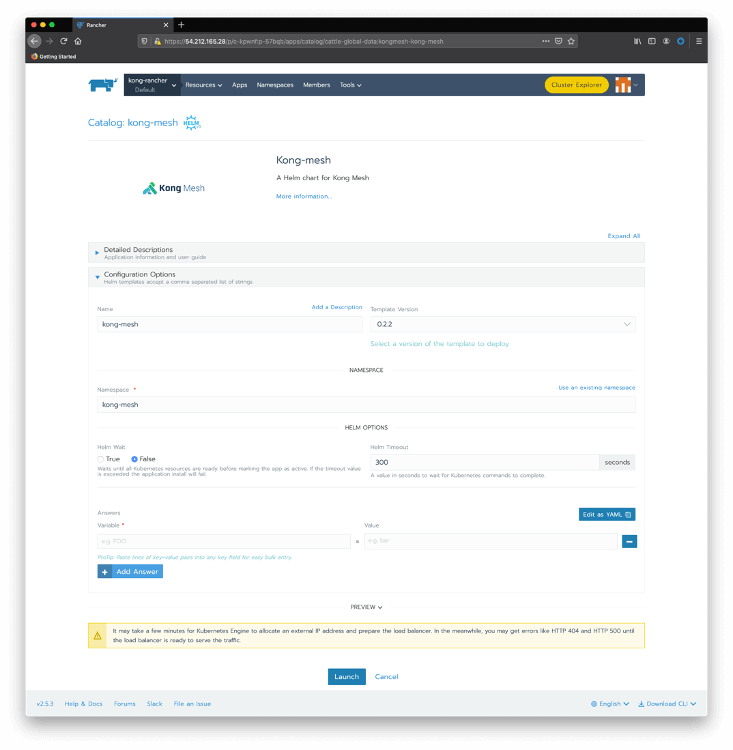
    Close the kubectl session, click on Default project and on Apps top menu option. Click on Launch button and choose the kong-mesh Helm charts.

    Image 11

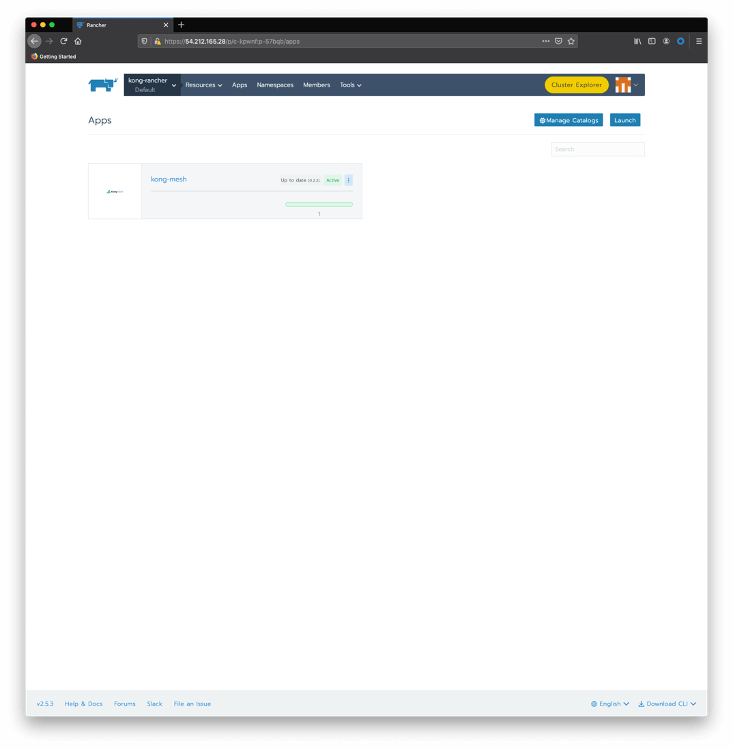
    Click on Use an existing namespace and choose the one we just created. There are several parameters to configure Kong Mesh, but we’re going to keep all the default values. After clicking on Launch , you should see the Kong Mesh application deployed:

    Image 12

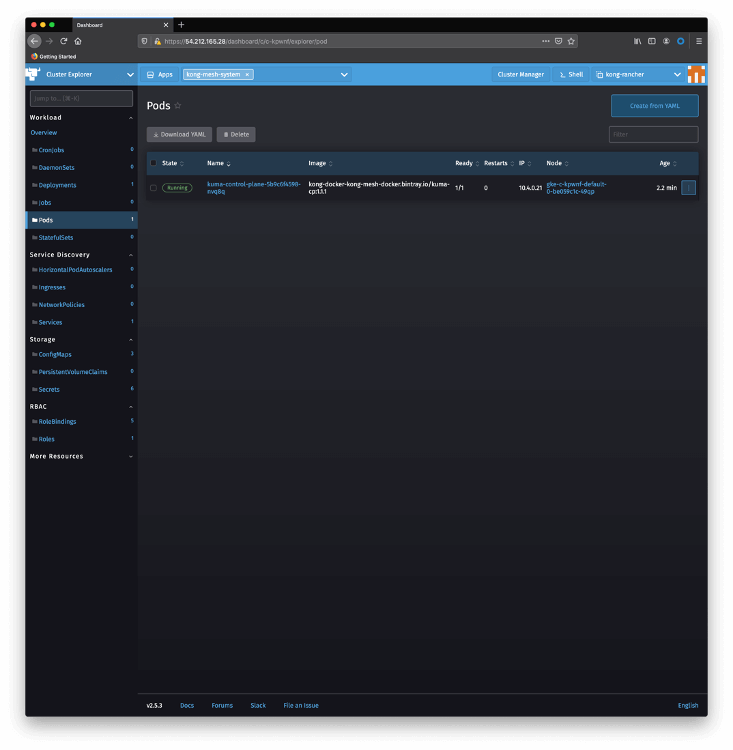
    And you can check the installation using Rancher Cluster Explorer again. Click on Pods on the left menu and choose kong-mesh-system namespace:

    Image 13

    You can use kubectl as well like this:

    NAMESPACE          NAME                                                      READY   STATUS    RESTARTS   AGE
    cattle-system      cattle-cluster-agent-785fd5f54d-r7x8r                     1/1     Running   0          75m
    fleet-system       fleet-agent-77c78f9c74-f97tv                              1/1     Running   0          75m
    kong-mesh-system   kuma-control-plane-5b9c6f4598-nvq8q                       1/1     Running   0          16m
    kube-system        event-exporter-gke-666b7ffbf7-n9lfl                       2/2     Running   0          76m
    kube-system        fluentbit-gke-xqsdv                                       2/2     Running   0          76m
    kube-system        gke-metrics-agent-gjrqr                                   1/1     Running   0          76m
    kube-system        konnectivity-agent-4c4hf                                  1/1     Running   0          76m
    kube-system        kube-dns-66d6b7c877-tq877                                 4/4     Running   0          76m
    kube-system        kube-dns-autoscaler-5c78d65cd9-5hcxs                      1/1     Running   0          76m
    kube-system        kube-proxy-gke-c-kpwnf-default-0-be059c1c-49qp            1/1     Running   0          76m
    kube-system        l7-default-backend-5b76b455d-v6dvg                        1/1     Running   0          76m
    kube-system        metrics-server-v0.3.6-547dc87f5f-qntjf                    2/2     Running   0          75m
    kube-system        prometheus-to-sd-fdf9j                                    1/1     Running   0          76m
    kube-system        stackdriver-metadata-agent-cluster-level-68d94db6-64n4r   2/2     Running   1          75m
  3. Microservices deployment

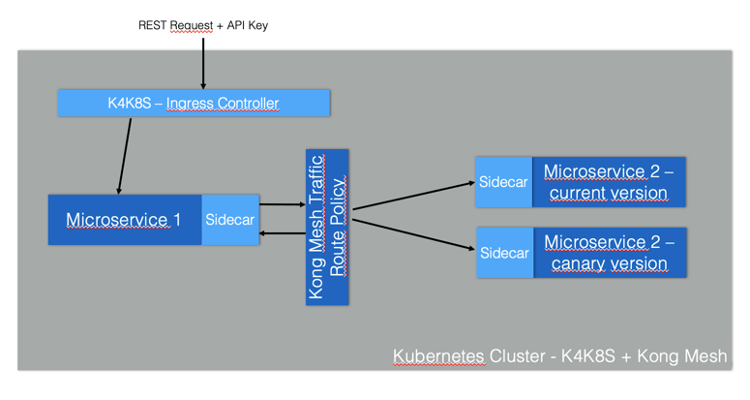
    Our Service Mesh deployment is based on a simple microservice-to-microservice communication scenario. As we’re running a canary release, the called microservice has two versions.

    • “magnanimo”: exposed through Kong for Kubernetes ingress controller.
    • “benigno”: provides a “hello” endpoint where it echoes the current datetime. It has a canary release that sends a slightly different response.

    The figure below illustrates the architecture:

    Image 14

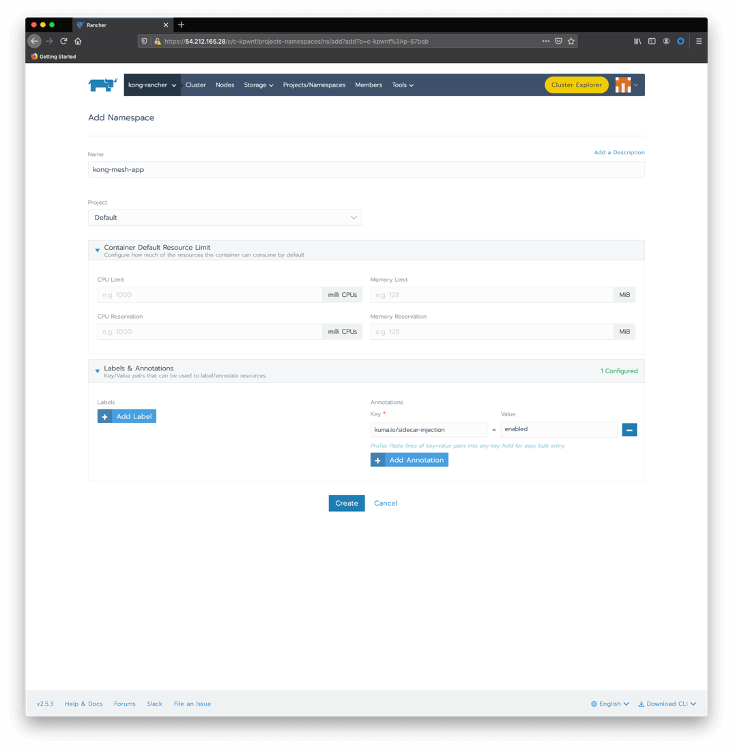
    Create a namespace with the sidecar injection annotation. You can use the Rancher Cluster Manager again: choose your cluster and click on Projects/Namespaces. Click on Add Namespace. Type “kong-mesh-app” for name and include an annotation with a “kuma.io/sidecar-injection” key and “enabled” as its value:

    Image 15

    Again, you can use kubectl as an alternative

    kubectl create namespace kong-mesh-app
    
    kubectl annotate namespace kong-mesh-app kuma.io/sidecar-injection=enabled
    
    Submit the following declaration to deploy Magnanimo injecting the Kong Mesh data plane
    
    cat <<EOF | kubectl apply -f -
    
    apiVersion: apps/v1
    
    kind: Deployment
    
    metadata:
    
    name: magnanimo
    
    namespace: kong-mesh-app
    
    spec:
    
    replicas: 1
    
    selector:
    
    matchLabels:
    
    app: magnanimo
    
    template:
    
    metadata:
    
    labels:
    
    app: magnanimo
    
    spec:
    
    containers:
    
    - name: magnanimo
    
    image: claudioacquaviva/magnanimo
    
    ports:
    
    - containerPort: 4000
    
    ---
    
    apiVersion: v1
    
    kind: Service
    
    metadata:
    
    name: magnanimo
    
    namespace: kong-mesh-app
    
    labels:
    
    app: magnanimo
    
    spec:
    
    type: ClusterIP
    
    ports:
    
    - port: 4000
    
    name: http
    
    selector:
    
    app: magnanimo
    
    EOF

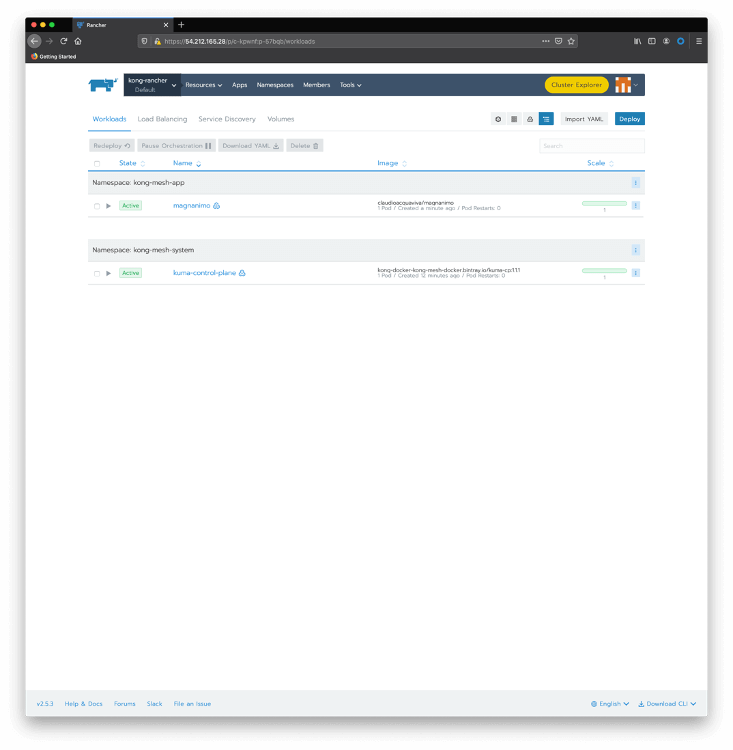
    Check your deployment using Rancher Cluster Manager. Pass the mouse over the kong-rancher menu and click on the Default project to see the current deployments:

    Image 16

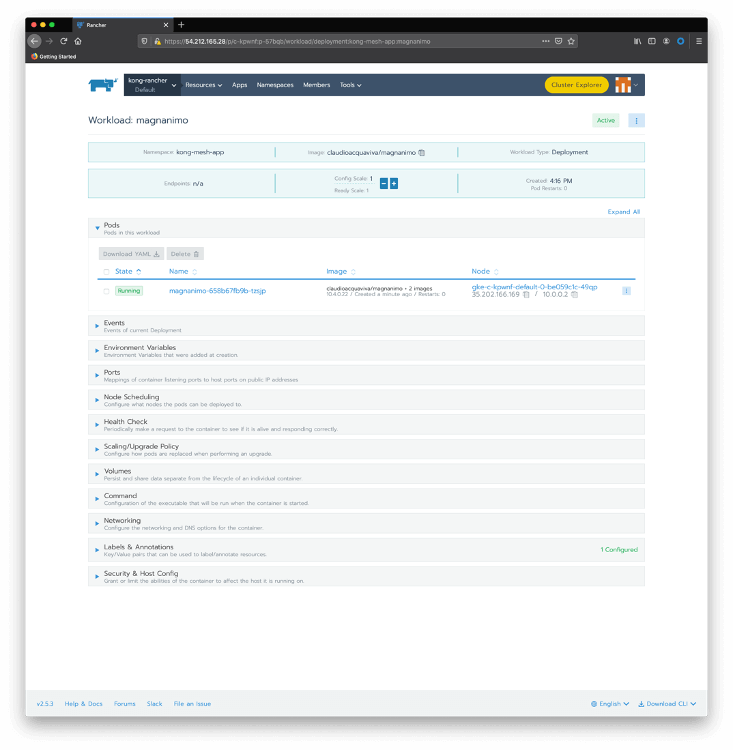
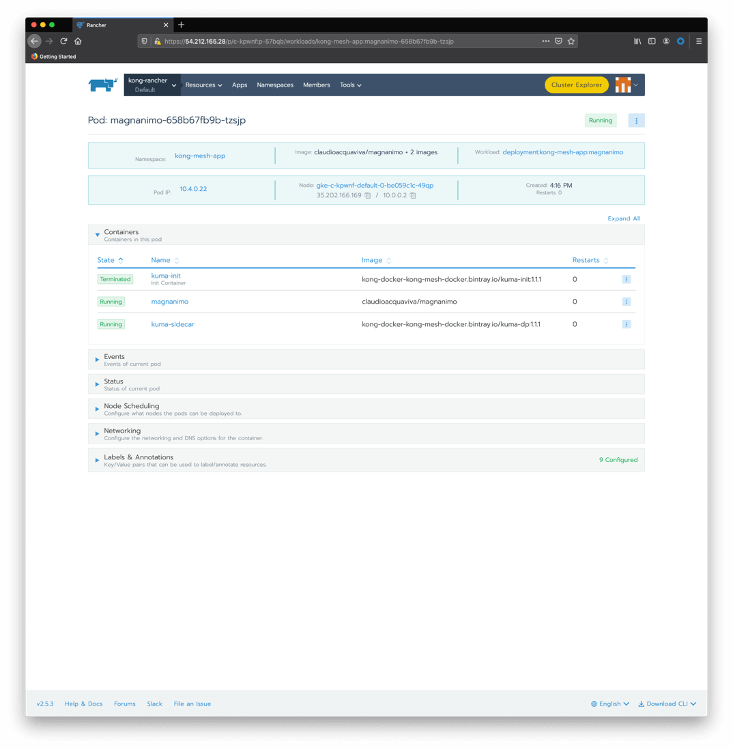
    Click on magnanimo to check details of the deployment, including its pods:

    Image 17

    Click on the magnanimo pod to check the containers running inside of it.

    Image 18

    As we can see, the pod has two running containers:

    • magnanimo: where the microservice is actually running
    • kuma-sidecar: injected during deployment time, playing the Kong Mesh data plane role.

    Similarly, deploy Benigno with its own sidecar:

    cat <<EOF | kubectl apply -f -
    
    apiVersion: apps/v1
    
    kind: Deployment
    
    metadata:
    
    name: benigno-v1
    
    namespace: kong-mesh-app
    
    spec:
    
    replicas: 1
    
    selector:
    
    matchLabels:
    
    app: benigno
    
    template:
    
    metadata:
    
    labels:
    
    app: benigno
    
    version: v1
    
    spec:
    
    containers:
    
    - name: benigno
    
    image: claudioacquaviva/benigno
    
    ports:
    
    - containerPort: 5000
    
    ---
    
    apiVersion: v1
    
    kind: Service
    
    metadata:
    
    name: benigno
    
    namespace: kong-mesh-app
    
    labels:
    
    app: benigno
    
    spec:
    
    type: ClusterIP
    
    ports:
    
    - port: 5000
    
    name: http
    
    selector:
    
    app: benigno
    
    EOF
    
    And finally, deploy Benigno canary release. Notice that the canary release will be abstracted by the same Benigno Kubernetes Service created before:
    
    cat <<EOF | kubectl apply -f -
    
    apiVersion: apps/v1
    
    kind: Deployment
    
    metadata:
    
    name: benigno-v2
    
    namespace: kong-mesh-app
    
    spec:
    
    replicas: 1
    
    selector:
    
    matchLabels:
    
    app: benigno
    
    template:
    
    metadata:
    
    labels:
    
    app: benigno
    
    version: v2
    
    spec:
    
    containers:
    
    - name: benigno
    
    image: claudioacquaviva/benigno_rc
    
    ports:
    
    - containerPort: 5000
    
    EOF

    Check the deployments and pods with:

    $ kubectl get pod --all-namespaces
    NAMESPACE          NAME                                                      READY   STATUS    RESTARTS   AGE
    cattle-system      cattle-cluster-agent-785fd5f54d-r7x8r                     1/1     Running   0          75m
    fleet-system       fleet-agent-77c78f9c74-f97tv                              1/1     Running   0          75m
    kong-mesh-app      benigno-v1-fd4567d95-drnxq                                2/2     Running   0          110s
    kong-mesh-app      benigno-v2-b977c867b-lpjpw                                2/2     Running   0          30s
    kong-mesh-app      magnanimo-658b67fb9b-tzsjp                                2/2     Running   0          5m3s
    kong-mesh-system   kuma-control-plane-5b9c6f4598-nvq8q                       1/1     Running   0          16m
    kube-system        event-exporter-gke-666b7ffbf7-n9lfl                       2/2     Running   0          76m
    kube-system        fluentbit-gke-xqsdv                                       2/2     Running   0          76m
    kube-system        gke-metrics-agent-gjrqr                                   1/1     Running   0          76m
    kube-system        konnectivity-agent-4c4hf                                  1/1     Running   0          76m
    kube-system        kube-dns-66d6b7c877-tq877                                 4/4     Running   0          76m
    kube-system        kube-dns-autoscaler-5c78d65cd9-5hcxs                      1/1     Running   0          76m
    kube-system        kube-proxy-gke-c-kpwnf-default-0-be059c1c-49qp            1/1     Running   0          76m
    kube-system        l7-default-backend-5b76b455d-v6dvg                        1/1     Running   0          76m
    kube-system        metrics-server-v0.3.6-547dc87f5f-qntjf                    2/2     Running   0          75m
    kube-system        prometheus-to-sd-fdf9j                                    1/1     Running   0          76m
    kube-system        stackdriver-metadata-agent-cluster-level-68d94db6-64n4r   2/2     Running   1          75m
    
    
    $ kubectl get service --all-namespaces
    NAMESPACE          NAME                   TYPE        CLUSTER-IP    EXTERNAL-IP   PORT(S)                                                AGE
    default            kubernetes             ClusterIP   10.0.16.1     <none>        443/TCP                                                79m
    kong-mesh-app      benigno                ClusterIP   10.0.20.52    <none>        5000/TCP                                               4m6s
    kong-mesh-app      magnanimo              ClusterIP   10.0.30.251   <none>        4000/TCP                                               7m18s
    kong-mesh-system   kuma-control-plane     ClusterIP   10.0.21.228   <none>        5681/TCP,5682/TCP,443/TCP,5676/TCP,5678/TCP,5653/UDP   18m
    kube-system        default-http-backend   NodePort    10.0.19.10    <none>        80:32296/TCP                                           79m
    kube-system        kube-dns               ClusterIP   10.0.16.10    <none>        53/UDP,53/TCP                                          79m
    kube-system        metrics-server         ClusterIP   10.0.20.174   <none>        443/TCP                                                79m

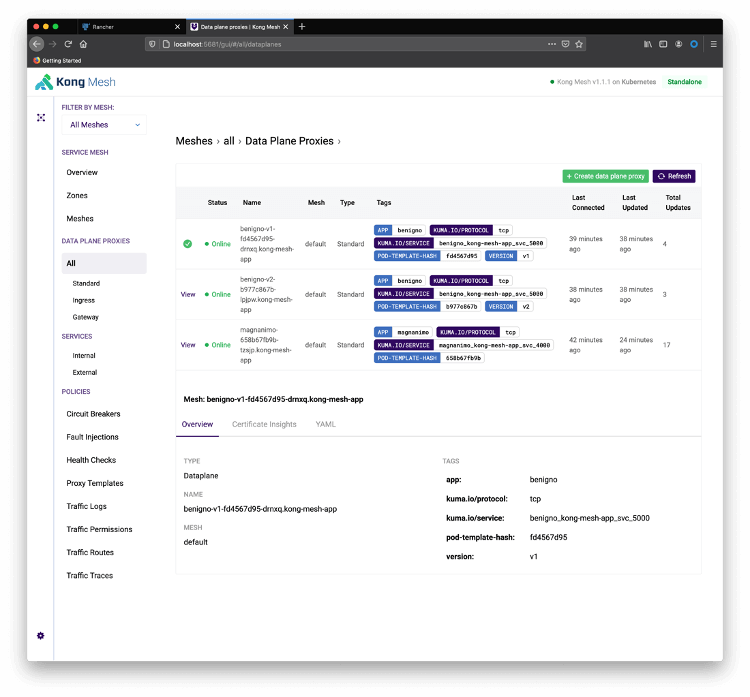
    You can use Kong Mesh console to check the microservices and data planes also. On a terminal run:

    kubectl port-forward service/kuma-control-plane -n kong-mesh-system 5681

    Redirect your browser to http://localhost:5681/gui. Click on Skip to Dashboard and All Data Plane Proxies :

    Image 19

    Start a loop to see the canary release in action. Notice the service has been deployed as ClusterIP type, so you need to expose them directly with “port-forward”. The next step will show how to expose the service with the Ingress Controller.

    On a local terminal run:

    kubectl port-forward service/magnanimo -n kong-mesh-app 4000

    Open another terminal and start the loop. The request is going to port 4000 provided by Magnanimo. The path “/hw2” routes the request to Benigno Service, which has two endpoints behind it related to both Benigno releases:

    while [1]; do curl http://localhost:4000/hw2; echo; done

    You should see a result similar to this:

    Hello World, Benigno: 2020-11-20 12:57:05.811667
    Hello World, Benigno: 2020-11-20 12:57:06.304731
    Hello World, Benigno, Canary Release: 2020-11-20 12:57:06.789208
    Hello World, Benigno: 2020-11-20 12:57:07.269674
    Hello World, Benigno, Canary Release: 2020-11-20 12:57:07.755884
    Hello World, Benigno, Canary Release: 2020-11-20 12:57:08.240453
    Hello World, Benigno: 2020-11-20 12:57:08.728465
    Hello World, Benigno: 2020-11-20 12:57:09.208588
    Hello World, Benigno, Canary Release: 2020-11-20 12:57:09.689478
    Hello World, Benigno, Canary Release: 2020-11-20 12:57:10.179551
    Hello World, Benigno: 2020-11-20 12:57:10.662465
    Hello World, Benigno: 2020-11-20 12:57:11.145237
    Hello World, Benigno, Canary Release: 2020-11-20 12:57:11.618557
    Hello World, Benigno: 2020-11-20 12:57:12.108586
    Hello World, Benigno, Canary Release: 2020-11-20 12:57:12.596296
    Hello World, Benigno, Canary Release: 2020-11-20 12:57:13.093329
    Hello World, Benigno: 2020-11-20 12:57:13.593487
    Hello World, Benigno, Canary Release: 2020-11-20 12:57:14.068870
  4. Controlling the Canary Release

    As we can see, the request to both Benigno microservice releases is uses a round-robin policy. That is, we’re not in control of the canary release consumption. Service Mesh allows us to define when and how we want to expose the canary release to our consumers (in our case, the Magnanimo microservice).

    To define a policy to control the traffic going to both releases, use this following declaration. It says that 90 percent of the traffic should go to the current release, while only 10 percent should be redirected to the canary release.

        cat <<EOF | kubectl apply -f -
        apiVersion: kuma.io/v1alpha1
        kind: TrafficRoute
        mesh: default
        metadata:
        namespace: default
        name: route-1
        spec:
        sources:
        - match:
        kuma.io/service: magnanimo_kong-mesh-app_svc_4000
        destinations:
        - match:
        kuma.io/service: benigno_kong-mesh-app_svc_5000
        conf:
        split:
        - weight: 90
        destination:
        kuma.io/service: benigno_kong-mesh-app_svc_5000
        version: v1
        - weight: 10
        destination:
        kuma.io/service: benigno_kong-mesh-app_svc_5000
        version: v2
        EOF

    After applying the declaration, you should see a result like this:

    Hello World, Benigno: 2020-11-20 13:05:02.553389
    Hello World, Benigno: 2020-11-20 13:05:03.041120
    Hello World, Benigno: 2020-11-20 13:05:03.532701
    Hello World, Benigno: 2020-11-20 13:05:04.021804
    Hello World, Benigno: 2020-11-20 13:05:04.515245
    Hello World, Benigno, Canary Release: 2020-11-20 13:05:05.000644
    Hello World, Benigno: 2020-11-20 13:05:05.482606
    Hello World, Benigno: 2020-11-20 13:05:05.963663
    Hello World, Benigno, Canary Release: 2020-11-20 13:05:06.446599
    Hello World, Benigno: 2020-11-20 13:05:06.926737
    Hello World, Benigno: 2020-11-20 13:05:07.410605
    Hello World, Benigno: 2020-11-20 13:05:07.890827
    Hello World, Benigno: 2020-11-20 13:05:08.374686
    Hello World, Benigno: 2020-11-20 13:05:08.857266
    Hello World, Benigno: 2020-11-20 13:05:09.337360
    Hello World, Benigno: 2020-11-20 13:05:09.816912
    Hello World, Benigno: 2020-11-20 13:05:10.301863
    Hello World, Benigno: 2020-11-20 13:05:10.782395
    Hello World, Benigno: 2020-11-20 13:05:11.262624
    Hello World, Benigno: 2020-11-20 13:05:11.743427
    Hello World, Benigno: 2020-11-20 13:05:12.221174
    Hello World, Benigno: 2020-11-20 13:05:12.705731
    Hello World, Benigno: 2020-11-20 13:05:13.196664
    Hello World, Benigno: 2020-11-20 13:05:13.680319
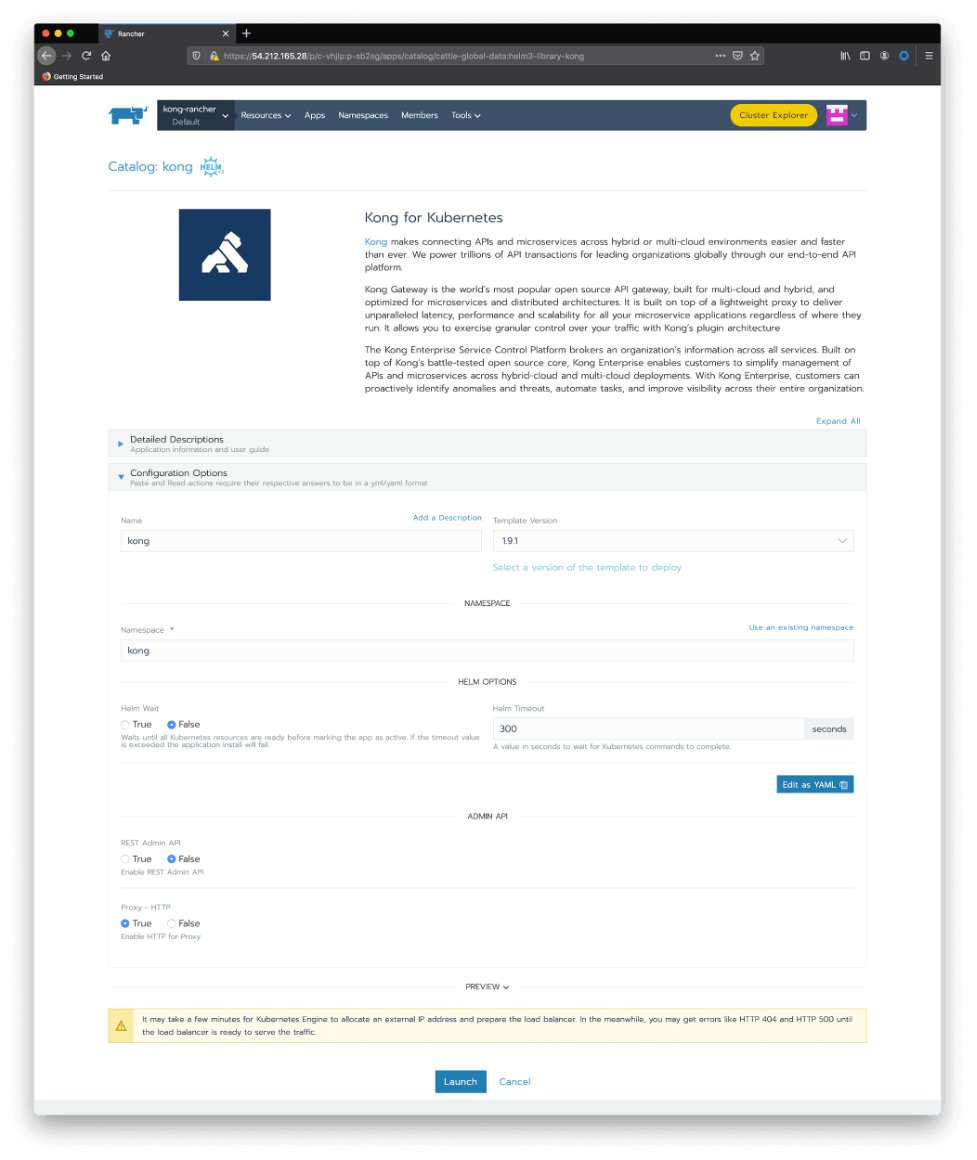
  5. Install Kong for Kubernetes

    Let’s go back to Rancher to install our Kong for Kubernetes Ingress Controller and control the service mesh exposition. In the Rancher Catalog page, click the Kong icon. Accept the default values and click Launch :

    Image 20

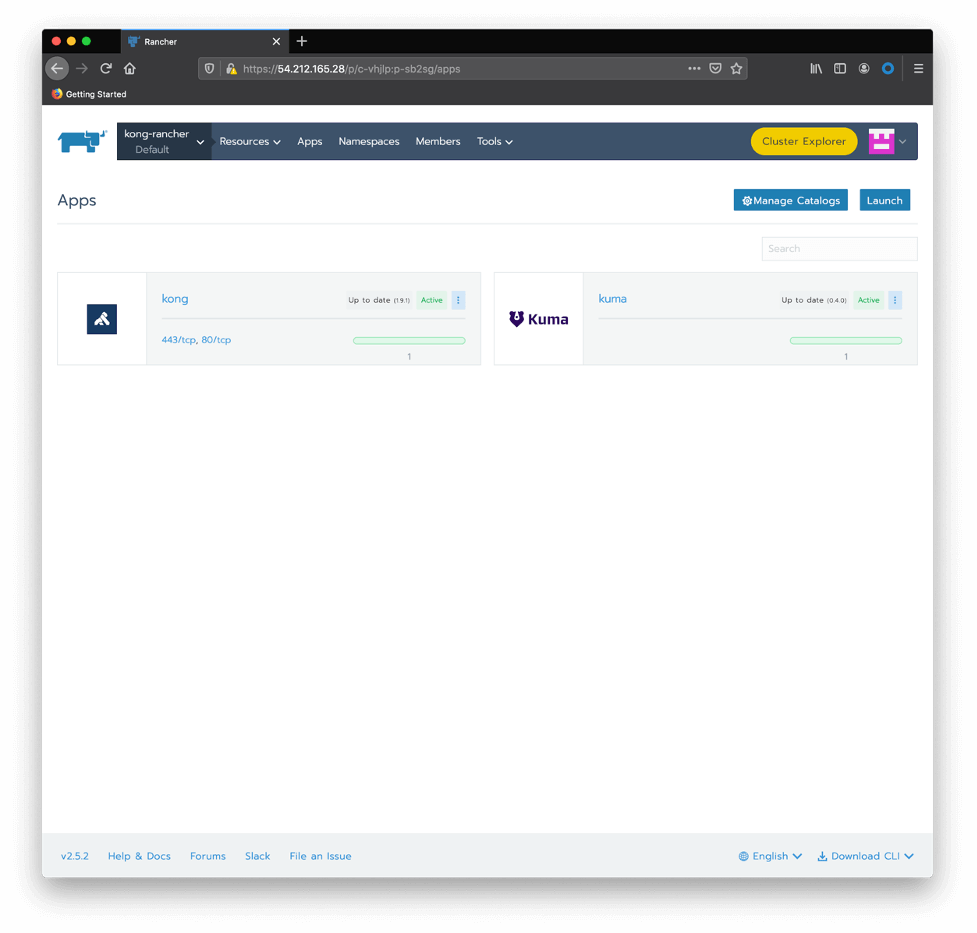
    You should see both applications, Kong and Kong Mesh, deployed:

    Image 21

    Image 22

    Again, check the installation with kubectl:

    $ kubectl get pod --all-namespaces
    NAMESPACE          NAME                                                      READY   STATUS    RESTARTS   AGE
    cattle-system      cattle-cluster-agent-785fd5f54d-r7x8r                     1/1     Running   0          84m
    fleet-system       fleet-agent-77c78f9c74-f97tv                              1/1     Running   0          83m
    kong-mesh-app      benigno-v1-fd4567d95-drnxq                                2/2     Running   0          10m
    kong-mesh-app      benigno-v2-b977c867b-lpjpw                                2/2     Running   0          8m47s
    kong-mesh-app      magnanimo-658b67fb9b-tzsjp                                2/2     Running   0          13m
    kong-mesh-system   kuma-control-plane-5b9c6f4598-nvq8q                       1/1     Running   0          24m
    kong               kong-kong-754cd6947-db2j9                                 2/2     Running   1          72s
    kube-system        event-exporter-gke-666b7ffbf7-n9lfl                       2/2     Running   0          85m
    kube-system        fluentbit-gke-xqsdv                                       2/2     Running   0          84m
    kube-system        gke-metrics-agent-gjrqr                                   1/1     Running   0          84m
    kube-system        konnectivity-agent-4c4hf                                  1/1     Running   0          84m
    kube-system        kube-dns-66d6b7c877-tq877                                 4/4     Running   0          84m
    kube-system        kube-dns-autoscaler-5c78d65cd9-5hcxs                      1/1     Running   0          84m
    kube-system        kube-proxy-gke-c-kpwnf-default-0-be059c1c-49qp            1/1     Running   0          84m
    kube-system        l7-default-backend-5b76b455d-v6dvg                        1/1     Running   0          85m
    kube-system        metrics-server-v0.3.6-547dc87f5f-qntjf                    2/2     Running   0          84m
    kube-system        prometheus-to-sd-fdf9j                                    1/1     Running   0          84m
    kube-system        stackdriver-metadata-agent-cluster-level-68d94db6-64n4r   2/2     Running   1          84m
    
    
    $ kubectl get service --all-namespaces
    NAMESPACE          NAME                   TYPE           CLUSTER-IP    EXTERNAL-IP     PORT(S)                                                AGE
    default            kubernetes             ClusterIP      10.0.16.1     <none>          443/TCP                                                85m
    kong-mesh-app      benigno                ClusterIP      10.0.20.52    <none>          5000/TCP                                               10m
    kong-mesh-app      magnanimo              ClusterIP      10.0.30.251   <none>          4000/TCP                                               13m
    kong-mesh-system   kuma-control-plane     ClusterIP      10.0.21.228   <none>          5681/TCP,5682/TCP,443/TCP,5676/TCP,5678/TCP,5653/UDP   24m
    kong               kong-kong-proxy        LoadBalancer   10.0.26.38    35.222.91.194   80:31867/TCP,443:31039/TCP                             78s
    kube-system        default-http-backend   NodePort       10.0.19.10    <none>          80:32296/TCP                                           85m
    kube-system        kube-dns               ClusterIP      10.0.16.10    <none>          53/UDP,53/TCP                                          85m
    kube-system        metrics-server         ClusterIP      10.0.20.174   <none>          443/TCP                                                85m
  6. Ingress Creation

    With the following declaration, we’re going to expose Magnanimo microservice through an Ingress and its route “/route1”.

        cat <<EOF | kubectl apply -f -
        apiVersion: extensions/v1beta1
        kind: Ingress
        metadata:
        name: route1
        namespace: kong-mesh-app
        annotations:
        konghq.com/strip-path: "true"
        spec:
        rules:
        - http:
        paths:
        - path: /route1
        backend:
        serviceName: magnanimo
        servicePort: 4000
        EOF

    Now the temporary “port-forward” exposure mechanism can be replaced by a formal Ingress. And our loop can start consuming the Ingress with similar results:

    while [1]; do curl http://35.222.91.194/route1/hw2; echo; done

Join the Master Class

Rancher and Kong are excited to present a Master Class that will explore API management combined with universal Service Meshes and how they support hybrid and multi-cloud deployments. By combining Rancher with a service connectivity platform, composed of an API Gateway and a Service Mesh infrastructure, we’ll demonstrate how companies can provision, monitor, manage and protect distributed microservice and deployments across multiple Kubernetes Clusters.

The Master Class will explore some of these questions:

  • Why is the Service Mesh architecture pattern important?
  • Why is implementing Service Mesh in Kubernetes even more important?
  • What can an API gateway and Rancher do for you?

Join the Master Class: Using Hybrid and Multi-Cloud Service Mesh Based Applications for Highly Distributed Environment Deployments

SUSE and Rancher – Enabling our Customers to Innovate Everywhere

Tuesday, 1 December, 2020

In July, I announced SUSE’s intent to acquire Rancher Labs, and now that the acquisition is final, today we embark on a new journey with SUSE. I couldn’t be more excited about our future and what this means for our customers around the world.

Just as Rancher made computing everywhere a possibility for our customers, with SUSE, we will empower our customers to innovate everywhere. Together we will offer our customers possibilities that know no limitations from the data center to the cloud, to the edge and beyond. This is our purpose; this is our mission.

Only our combined company can make this a reality by combining SUSE’s market leadership in powering mission-critical business applications and systems with Rancher’s market-leading Kubernetes management platform. Our independent approach puts the “open” back into open source software, giving our customers the agility to tackle their innovation challenges today and the freedom to evolve their strategy and solutions for tomorrow.

Since we announced the acquisition, I have been humbled by the countless emails and calls that I have received from our customers, partners, members of the open source community and, of course, our Rancher team members. They remain just as passionate about Rancher and are even more excited about our future with SUSE. Our customers worldwide can expect the same innovation that they have come to love from Rancher, now paired with SUSE’s stability and rock-solid IT infrastructure. This will further strengthen the bond of trust that we have created with our customers.

Here’s how we will bring this vision to life:

Customers

SUSE and Rancher customers can expect their existing investments and product subscriptions to remain in full force and effect according to their terms. Additionally, the delivery of future versions of SUSE’s CaaS Platform will be based on the innovative capabilities provided by Rancher. We will work with CaaS customers to ensure a smooth migration. Going forward, we will double down on our strengths in the areas of security, compliance, governance and broad application certification. A combined SUSE and Rancher provides the only enterprise Kubernetes platform that manages all of the world’s Kubernetes distros, regardless of what underlying Linux distro they use and whether they run in public clouds, private data centers or edge computing environments.

Partners

SUSE One partners will benefit from SUSE’s increased portfolio with Rancher solutions as they will help you close opportunities where your customers want to reimagine the way they manage and scale workloads consistently, monitor the health of their clusters and simplify the deployment and management of container applications.

I invite all Rancher partners to join SUSE’s One Partner Program. You can learn more during this webinar.

Open Source Community

I mentioned it earlier, but SUSE and Rancher remain fully committed to the open source community. We will continue contributing to upstream open source projects. This will not change. Together, as one company, we will continue providing true 100 percent open source solutions to global customers.

Don’t just take my word for it. See what our customers and partners are saying in Forbes.

Our future with SUSE is so bright – this is just the start of an incredible journey.

Join us on December 16 for Innovate Everywhere: How Kubernetes is Reshaping Enterprises. This webinar features Shannon Williams, Co-Founder, President and Chief Revenue Officer, Rancher Labs and Arun Chandrasekaran, Distinguished VP Analyst, Gartner.

Tags: ,,, Category: Rancher Blog Comments closed

Three Reasons Why Hosted Rancher Makes Your Life Easier

Thursday, 19 November, 2020

Today’s generation of makers, artists and creatives have reinforced the idea that great things can happen when you roll up your sleeves and try to learn something new and exciting. Kubernetes was like this only a couple of years ago: the mere act of installing the thing was a rewarding challenge. Kelsey Hightower’s Kubernetes the Hard Way became the Maker’s handbook for this artisan craft.

Fast forward to today and installing Kubernetes is no longer a noteworthy event. Its orchestration has become a commodity, and rightly so, as many engineers, software companies and the like swarmed to address this need by building robust tooling. Today’s Maker has far more interesting problems to solve up the stack, and so they expect Kubernetes to be able to summon a cluster on demand whenever they need it. For this reason and others, we created the same solution for Rancher, the multi-cluster Kubernetes management system. If I can create Kubernetes in one click in any cloud provider, why not my Rancher control plane? Enter Hosted Rancher.

Hosted Rancher is a fully managed, cloud-based instance of Rancher server. You don’t need to maintain a separate Kubernetes cluster, install the Rancher application or deal with upgrades. You retain all the control and ownership of your downstream Kubernetes clusters just like the on-prem Rancher experience today. When you combine Hosted Rancher with any of the popular cloud-managed Kubernetes offerings such as GKE, EKS or AKS, you now have an almost zero-touch Kubernetes infrastructure. Hosted Rancher is ideal for organizations that are looking to expedite their time to value by focusing their time on application adoption and empowering developers to use these new tools. After all, if you don’t have any applications using Kubernetes, it won’t matter how well your platform is maintained.

If you haven’t considered Hosted Rancher yet, here are three reasons why it might benefit you and your organization:

Increased Business Continuity

Operating Rancher isn’t rocket science, but it does require some ongoing expertise to safely maintain, back up and especially upgrade without causing downtime. Our core engineering team lives and breathes this stuff (they built Rancher, after all), so why not leverage their talent as a failsafe partnership with your staff?

Reduced Costs

TCO (Total Cost of Ownership) is a bit of a buzzword, but it becomes a reality at the end of the fiscal year when you start looking at actual spend to operate something. When you factor in the cost of cloud or on-premise infrastructure and staff expense to operate these servers and manage the Rancher application, it’s quite likely much more expensive than our Hosted offering.

Increased Adoption

This benefit might be the most subtle, but I guarantee it is the most meaningful. Contrary to popular belief, the mission of Rancher Labs is not just to help people operate Rancher. Our mission is to help people operate and therefore realize the benefits of Kubernetes in their software development lifecycle.

This is the “interesting” part of the problem space for every company out there: “How do I harness the value of Kubernetes for my applications?” The sooner we can get past the table stakes concerns of implementing and operating Kubernetes and Rancher, the sooner we can focus on this most paramount issue of Kubernetes adoption. Hosted Rancher simply removes one hurdle from the racetrack. With support from Rancher’s Customer Success team focusing on user adoption, your teams are able to accelerate their Kubernetes journey quickly without compromising on performance and resource inefficiency.

Image 01

Next Steps

I hope I’ve provided some insight that will help your journey in the Kubernetes and cloud-native world. To learn more about Hosted Rancher, check out our technical guide or contact the Rancher team. Until next time!

Introducing Rancher on NetApp HCI: Hybrid Cloud Multicluster Kubernetes Management with Push-Button Ease

Tuesday, 17 November, 2020

If you’re like me and have been watching the odd purchasing trends due to the pandemic, you probably remember when all the hair clippers were sold out — and then flour and yeast. Most recently, you might have seen this headline: Tupperware profits and shares soar as more people are eating at home during the pandemic. Tupperware is finally having its day. But a Tupperware stacking strategy is probably not why you’re here. Don’t worry, this isn’t your grandma’s container strategy — no Tupperware stacking required. You’re probably here because, like most organizations today, you need to be able to quickly release and update applications when and where you want to.

Today we’re excited to announce a partnership between NetApp and Rancher to bring multicluster Kubernetes management on premises with NetApp® HCI. Now you can deploy Rancher with push-button ease from NetApp HCI’s management plane, the NetApp Hybrid Cloud Control manageability suite.

Why NetApp + Rancher?

It’s no secret that Kubernetes in the enterprise is becoming more mainstream. If your organization hasn’t already moved toward containers, it will soon. But this shift isn’t without growing pains.

IT faces challenges with multiple team-specific Kubernetes deployments, decentralized governance, and lack of consistency among inherited Kubernetes clusters.Now, with Kubernetes adoption on the upswing, IT is expected to do the deployments, which can be time consuming for teams that are unfamiliar with Kubernetes. IT teams are managing their stakeholders’ different technology stack preferences and requirements while focusing on scalability and stability in production.

On the other hand, DevOps teams want the latest modern development tooling. They need to maintain control and flexibility over their clusters on infrastructure that is on demand and hassle free. These teams are all over continuous integration and continuous deployment (CI/CD) and DevOps automation. Their primary concerns are around agility and time to value.

The partnership between NetApp and Rancher addresses the challenges of both IT and the DevOps teams that they support. NetApp HCI delivers solid performance at scale for production environments. Rancher delivers modern cloud-native tooling for DevOps. Together, they create the easiest way for IT to get going with Kubernetes, enabling centralized management of multiple clusters, both new and existing. The combination of the two technologies delivers a true hybrid cloud Kubernetes orchestration layer on a modern DevOps cloud-native platform.

How We Integrated Rancher into NetApp HCI

We integrated Rancher directly into the NetApp HCI UI for a seamless experience. On top of NetApp HCI’s highly scalable, private cloud technology , the management plane where you can go to add a node or upgrade your firmware. We’ve added a button to deploy Rancher directly from Hybrid Cloud Control.

Image 01
Image 02

With push-button ease, you’ll have the Rancher management cluster running on VMware (NetAp HCI is a VMware-based appliance). Your hybrid cloud and multicloud Kubernetes management plane is ready to go.

Feature Applicability Benefit
Deployment from Hybrid Cloud Control Rancher management cluster Fastest way to get IT going with supporting DevOps-ready Kubernetes
Lifecycle management from Hybrid Cloud Control Rancher management cluster Push–button updates for Rancher server and supporting infrastructure
Node template User clusters deployed from Rancher Simplifies creation of user clusters deployed to NetApp HCI
NetApp Trident in Rancher catalog User clusters deployed from Rancher Simplifies persistent volumes from NetApp HCI storage nodes for user clusters

Rancher, as open source, is free to deploy and use, but Rancher enterprise support is available if you need it. Try out Rancher on NetApp HCI at no additional cost; think of it as an indefinite trial period. If you want support later, you can purchase it from NetApp. NetApp provides joint support with Rancher, so you can file support tickets for Rancher directly with NetApp.

A Win-Win for IT Operations and DevOps

With Rancher on NetApp HCI, both IT operations and DevOps teams benefit. Your IT operations teams can centrally provision Kubernetes services while maintaining control and visibility of all clusters, resources, and security. The provisioned services can then be used by your DevOps teams to efficiently build, deploy, and manage full-featured containerized applications. In the end, IT gets what it needs, DevOps gets what it needs, and your organization attains the key benefits of a successful Kubernetes strategy.

Learn More

For more information about NetApp HCI and Rancher, visit Simplify multicluster Kubernetes management with Rancher on NetApp HCI.