SUSE Linux Enterprise for SAP Applications 12 for x86-64 has achieved SAP Certification NW-HA-CLU 7.40

Thursday, 21 September, 2017

Real-time world

Up-time is often taken for granted: It doesn’t become important until  something bad happens. Unplanned downtime: What does it cost your business?

The amount of financial resources lost due to downtime continues to grow exponentially each year. Today, more and more IT services are required to achieve extremely high levels of up time and availability. Such is the case with SAP as NetWeaver users are increasingly looking to maintain HA in order to keep business moving as usual.

This is why we are pleased to announce that SUSE Linux Enterprise for SAP Applications 12 for x86-64 has achieved SAP Certification NW-HA-CLU 7.40. For SAP customers, this means reduced unplanned downtime while ensuring continuous access to mission-critical applications and data.

The communication between sapstartsrv and SUSE HAE

sles4sap_clusterconnector

The new SAP SUSE cluster connector and the SUSE Linux Enterprise HAE are able to provide this service reliable. We have changed the concept of our agent to a more simple model with primitives. The cluster_connector provides more functionalities like start, stop and migrate a SAP instance. Another new feature is the possibility to run checks of the HA setup using either the command line tool sapcontrol or even the SAP management console.

To learn more, take a look at all of the available Certified Solutions for NetWeaver and high availability.

The HA extension by SUSE Linux has already been certified in the SAP Linux Lab Walldorf.
Whitepaper@SUSE

“Must See” SAP at SUSECON (25–29 September 2017, Prague)

Thursday, 21 September, 2017

In today’s business environment, organizations worldwide are striving to become digital businesses. SUSECON 2017 is a great opportunity to learn how the open source approach helps companies in all industries to transform their IT infrastructure, create more agile business processes, and enable growth and innovation.

SAP is proud to be a Cornerstone Sponsor at SUSECON 2017 because SAP shares a similar commitment and focus. This year, SAP will be exhibiting in the SUSECON Developer Lounge. This innovative and exciting area is open all day and will feature developers and other IT professionals showcasing the latest technology. Join SAP in the Developer Lounge to:

  • Learn how to develop your applications in the SAP HANA Express edition and then easily deploy your applications to the Cloud Foundry on SAP Cloud Platform
  • See IoT and Machine Learning in action. This demonstration includes a boxing bag with an embedded Texas Instruments IoT sensor which sends data to an SAP HANA instance in the cloud. You can then see the wealth of opportunities for analysis of the data in HANA, including the application of machine learning.

Don’t miss SAP’S keynote speakers        

  • Martin Fassunge, Chief Product Owner – SAP Cloud Platform Internet of Things
  • Stefan Weitland, Chief Product Owner – SAP Cloud Platform

Key elements of their presentation will include discussions on:

  • SAP Cloud Platform as the agile platform-as-a-service (PaaS) for digital transformation
  • The upcoming Cloud Foundry distribution, Containers,
  • Deployments in the public cloud (e.g. AWS, Azure, Google) and private cloud (customer datacenter).

Join 4 SAP breakout sessions taking place during SUSECON 2017

SPO139925 – Container Orchestration a strategic choice for SAP VORA 2.0 and SAP DATA HUB (Stefan Haertelt, SAP Team lead for Solution Excellence DDM CoE & PreSales EMEA South) – Thursday, Sep 28, 11:45 AM – 12:45 PM – Tyrolka

SPO141261 – SAP Cloud Platform as the enabler for Digital Transformation of Businesses (Lars Mautsch Product Manager, SAP SE and Pavel Penaz Business Development Manager, SAP) – Tuesday, Sep 26, 4:15 PM – 5:15 PM – London

TUT126599 – Understand SAP HANA 1.0 and 2.0, together with the SLES Roadmap (Norbert Hanuska – Presales Specialist, SAP, and Martin Zikmund – Technical Account Manager, SUSE) – Tuesday, Sep 26, 5:30 PM – 6:30 PM – Palmovka

CAS127723 – Scaling C++ Development and Quality Assurance (Matthias Männich – Development Expert, SAP SE) – Thursday, Sep 28, 2:30 PM – 3:30 PM – London

 Visit 18 additional SAP-related breakout sessions

  1. BOV117851 – SUSE on Amazon Web Services
  2. BOV127171 – Continuous Delivery of Micro Applications with Jenkins, Docker and Kubernetes at Apollo-Optik
  3. CAS117855 – Running SAP on AWS: Fitch Ratings Success Story
  4. CAS122700 – SUSE Manager & SUSE Linux Experience
  5. CAS127173 – SAP HANA on Power Systems
  6. FUT128443 – What has SUSE Linux Done for Power and What is to Come
  7. FUT128447 – SUSE Linux Enterprise Server for SAP Applications Roadmap
  8. SPO127196 – How to minimize or completely avoid downtimes in operating SAP (HANA) landscapes. Overview of related topics and methods with emphasis on OS handling.
  9. SPO134363 – Re-think Your Business; Modernize Your SAP Core and Accelerate Your Path to HANA
  10. SPO134400 – Microsoft SAP on Azure
  11. SPO137647 – SLES on IBM Power Systems for SAP HANA – what makes the difference?
  12. SPO138040 – One Touch Deployment of SAP HANA SPO138140 – Huawei & SUSE Joint Innovation for SAP HANA
  13. SPO139825 – Software-defined storage backends for SAP Applications SPO139928 – Achieving availability and resilience with SUSE and DellEMC for SAP HANA Solutions  SPO140247 – Best practices for SLES for SAP on AWS
  14. TUT122382 – SAP HANA on KVM Best Practices
  15. TUT126316 – SAP-as-a-Service on SUSE OpenStack Cloud
  16. TUT127016 – SAP HANA System Replication in SUSE Clusters
  17. TUT127164 – Running SAP HANA Workloads on Microsoft Azure
  18. TUT127205 – Unleash Your Hardware’s Full Potential with Smart System Tuning for SAP Workloads

Please be sure to visit SAP in the Developer Lounge show floor or attend one or more of the SAP breakout sessions to learn more about how SAP’s commitment to openness and the open source community can help your organization.   SAP at SUSECon.

Stay informed on SUSECON @SUSE #SUSECON #SLES4SAP and @SAP #SAPHANA @SAPInMemory.

Migrate to SAP HANA with Protera FlexBridge

Wednesday, 20 September, 2017

Learn Best Practices and Customer Success Stories @SUSECON or Insight Days!

We’re very excited to share that our partners at Protera will be exhibiting at SUSECON’17 and available in booth B32 to discuss how you can migrate to SAP HANA with their proven platform, FlexBridge. Learn about how we’re working together to deliver customer success like those awesome stories from Pacific Drilling and Fitch Ratings – and how they were able to adapt and accelerate their innovation by taking their SAP environment to AWS. Currently – there are a lot of organizations in a similar state of transition.

Many organizations running SAP ® are currently in the planning phases and considering  SAP HANA® or S/4 HANA ® to receive the many business benefits the in-memory database has to offer. However, that journey can be both complex and expensive. That is until now, built from the ground up by incorporating years of migration experience and SAP best practices Protera’s automated FlexBridge platform, simplifies your journey to HANA by significantly reducing the cost and complexity of migration projects of all sizes.

SAP HANA and S/4 HANA Migration Acceleration Platform

Accelerate the success of your SAP HANA migration, with FlexBridge. Using the expert FlexBridge migration process, Protera customers’ have accelerated their SAP HANA migration projects by almost 70% when compared to traditional migration methods. The migration platform has also boasts impressive stats like 45% reduced project timeline, 50% increased data quality, 80% shortened downtime, and 50% reduced project costs.

Protera FlexBridge Methodology

Beyond the hard savings Protera FlexBridge offers IT decision makers the assurance that every step of their HANA Migration project is fully planned based on SAP recommended best practices and SAP validated tool sets to ensure that the entire migration process is fully documented, from initial migration readiness assessment to post-migration acceptance tests. FlexBridge provides a content rich project management console for end-to-end project visibility that helps take the time, cost and risk out of SAP HANA conversions.

One Step Migration

Using smart automation to reduce complexity Protera FlexBridge can perform a HANA conversion in one step including; the DB migration to HANA, the OS migration to Linux, the selective upgrade of SAP Applications to a more recent version, and UNICODE conversion if needed.

Typical Use Cases for Protera FlexBridge

Regardless of an organization’s size and/or industry Protera FlexBridge supports most HANA migration initiatives and situations, from initial migration PoC to complete SAP production environment migrations to HANA.

With Protera FlexBridge organizations accelerate the success of their HANA migration and deployment initiatives through every step of their HANA journeys. Our customers rely on our team to provide expert HANA migration guidance and delivery services.

Ready to get started?

To get started Protera offers a complimentary migration readiness assessment of your existing SAP environment – Protera will provide a detailed assessment report with a comprehensive list of current performance, usage metrics, and recommended migration plan.

Request your FREE custom assessment report – FlexBridge Migration Assessment

Additional Resources: HANA and S/4HANA Migration Automation

Contact Protera: Protera.com | info@protera.com | +1 .877.70. PROTERA (77683)

A big thank you to Kristin, Christian, Patrick and all our friends at Protera – see you at SUSECON!

Learn about best practices and customer success stories when moving SAP to AWS.

Transitioning to SAP S/4HANA? Visit SUSE @ SAP TechEd Booth #305

Wednesday, 20 September, 2017

Your SAP infrastructure is critical to your business operations and a transition to Linux is in your future. Open Source and Linux are key to the SAP strategy. A move to Linux doesn’t have to be complex.

Do you need answers to the following questions?

  • What does it mean for me to move to Linux?
  • How shall my operating environment look like?
  • What are the best high availability and disaster recovery scenarios for my SAP HANA infrastructure?
  • Shall I move to the public or private cloud?

Be sure to stop by the SUSE booth #305  at TechEd Las Vegas to speak with our experts. Get tips and tricks from our technical experts, listen to success stories and connect with SUSE executives on strategies and road-maps.

Attend our session

Win a Hover Camera Passport Drone

Stop by the SUSE booth #305 You’ll also be able to play the Tux Racer Game for a chance to win a HOVER CAMERA PASSPORT DRONE.

Join the SUSE presentation @ our partners’ booth

Tuesday:

  • Lenovo: Question & Answer Session (Tuesday, September 25 | 1:00pm -2:00pm | Lenovo Booth #500)
  • SUSE & HPE: SUSE Live Kernel Patching with HPE Converged Systems for SAP HANA (Tuesday, September 25 | 2:30pm – 3:00pm | Hewlett Packard Enterprise Booth #300)

Wednesday

  • Cisco: Live Patch Discussion (Wednesday, September 26 | 10:30am – 11:00am | Cisco Booth #808)
  • SUSE & HPE: SUSE Live Kernel Patching with HPE Converged Systems for SAP HANA (Wednesday, September 26 | 11:00am -11:30am | Hewlett Packard Enterprise Booth #300)
  • Lenovo: Question & Answer Session (Wednesday, September 26 | 1:00pm -2:00pm | Lenovo Booth #500)

Thursday

  • Lenovo: Question & Answer Session (Thursday, September 27 | 1:00pm -2:00pm | Lenovo Booth #500)

Don’t miss our special events


Equifax Data Breach Analysis – Container Security Implications

Monday, 18 September, 2017

By Gary Duan

The Equifax data breach is one of the largest and costliest customer data leaks in history. Let’s take a closer look at the vulnerabilities and exploits reportedly used. Could the use of containers have helped protect Equifax? We’ll examine how proper security in a container based infrastructure helps to make application security more effective.

The Apache Struts Exploit

Apache Struts is a widely used framework for creating web applications in Java. It was initially believed that the newly-published Struts vulnerability, CVE-2017-9805, was responsible for the Equifax data breach. However, the latest announcement from Equifax indicates that it was vulnerability CVE-2017-5638, which was discovered in March, that allowed the Equifax data breach. Before talking about what security strategies can prevent this type of incident, it’s useful to understand the nature of both vulnerabilities.

The vulnerable code of CVE-2017-9805 resides in the REST plugin of the Struts framework. The plugin fails to validate and deserialize safely the user uploaded data in the HTTP request. This allows attackers to write arbitrary binary code to the web server and execute it remotely.

Once this vulnerability was reported, within days, working exploits had appeared publicly. Here is a snippet of one proof of concept.

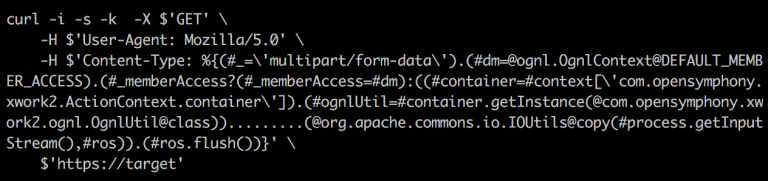
Earlier this year, in March, the vulnerability CVE-2017-5638 was reported in the Jakarta multi-part parser. By injecting a crafted Content-Type HTTP header with a ‘#cmd=’ string, the attacker is also able to execute arbitrary commands on the web server. An attack sample is shown below (for security reasons, only a partial attack vector is shown).

Container Security vs. VM and Physical Server Security

Using an application container provides some extra layers of protections compared to VMs and physical servers. Containers take a very declarative way to build an application image, using a Dockerfile. Container images can be easily scanned before deployment to find known vulnerabilities. If deployed correctly using a microservice architecture, once a patched, updated software version is available for any vulnerability, the vulnerable application(s) can be easily swapped out.

However, containers themselves provide benefits mainly for modern DevOps teams and workflows. Containers don’t provide enhanced security protections at runtime. Consider the attack window before a vulnerability is published, before a patched software version is available, and before an enterprise is able to install or implement the corrective action. In the Equifax data breach this took at least two months, maybe more. Simply switching to containerized applications won’t stop attackers from advancing forward in the exploit ‘kill chain’ and stealing the assets which are valuable to consumers, enterprises, and hackers.

Lateral Movement and Application Segmentation

Once attackers gains access to a web server, they can effectively bypass all security measures at the edge. Attackers can enter the inner communication cycle where the applications are running, whether it’s in a public cloud or private data center. Often, internal networks, where east-west traffic is less monitored, are an open space for attackers to explore. Remember in a similar recent exploit, attackers could use the Dirty Cow linux exploit to gain root access to a server if they could execute arbitrary code remotely.

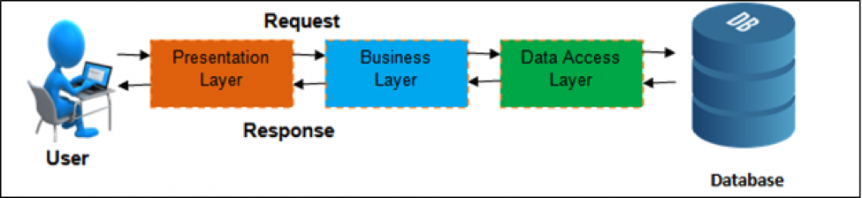
However, after a successful Dirty Cow or Apache Struts vulnerability is successfully exploited, what gets compromised is still just one web server. The diagram above depicts a typical multi-tier architecture. After getting a foothold at the presentation or the business layer attackers have to make lateral moves within the data in order to reach sensitive data stored in the database.

A common lateral move involves scanning internal networks to attempt to make connections to the database. Attackers may also download tools from the Internet to launch further exploits. These activities in the ‘kill chain’ give us an opportunity to identify suspicious activity and prevent malicious code from being spread to other parts of the data center.

For example, a ‘container firewall’ provides application segmentation techniques to create a whitelist of allowed container connections. This policy can enforce that internal applications such as web servers cannot initiate connections to external networks, or to access the database. The whitelist establishes that the web server has to go through the data access layer, and direct connections are strictly prohibited. When these policies are in place and enforced, it will become significantly difficult for the attackers to explore internal networks because any attempt to do so will be immediately detected. With the limited application function, scope and network behavior defined for container microservices it becomes easier to detect suspicious activity.

Deep Packet Inspection (DPI)

According to the Equifax investigation, the initial attacks took place between May and July, at least two months after CVE-2017-5638 had been published in March. Had a set of DPI-enabled pattern match signatures been deployed, the compromise could have been prevented. The attack vectors within all the working exploits use predictable patterns. The malicious HTTP requests either have a malformed header or have an executable shell command embedded in the XML object. However, these indicators are only obvious to people or detection tools that understand how the protocols and applications work. Signatures can be developed based on the attack patterns, but to limit the false positive and false negative alerts, we must resort to DPI (deep packet inspection) techniques.

The text patterns in these attacks, although appearing to be very abnormal, can be present in absolutely legitimate traffic. A DPI capability is able to:

  • Parse the entire HTTP request
  • Mark HTTP protocol units, such as URI, Header and body
  • Normalize the request content and remove evasion attempts
  • Recognize the file and object format in transmission and reconstruct content.

All of this context helps the pattern match algorithms to accurately look for patterns within specific locations.  DPI is a critical capability to determine, in real-time, on a connection by connection basis, whether the packets should be allowed through, blocked, or generate an alert.

With the use of containers and application segmentation, the attack surface of modern applications is greatly reduced. And if DPI is used for container traffic it becomes more difficult for hackers to go undetected for so long like in the Equifax data breach.

About the Author: Gary Duan

Gary is the Co-Founder and CTO of NeuVector. He has over 15 years of experience in networking, security, cloud, and data center software. He was the architect of Fortinet’s award winning DPI product and has managed development teams at Fortinet, Cisco and Altigen. His technology expertise includes IDS/IPS, OpenStack, NSX and orchestration systems. He holds several patents in security and data center technology.

#wherethecoolshithappens – or – Developer Lounge at SUSECON’17 Prague

Thursday, 14 September, 2017

[UPDATE 1]: The number of teams for the Lego Challenge has been reduced from five to three

This year at SUSECON we have a special treat for everyone, besides state of the art breakout sessions, the famous SUSE band, or the well known Demopalooza, among other things. Additionally this year we are going to have a super cool and nerdy Developer Lounge, open all day, packed with even more nerdy stuff and people showcasing where the cool shit happens (leveraging the #wherethecoolshithappens hashtag used frequently by SAP’s CTO Björn Görke)

The Developer Lounge is located right next to the regular SUSECON showfloor exhibition area, where (ATTENTION) you might only find -boring- business stuff. But not with the Developer Lounge, lucky us, where we have arranged the following:

Lego® Technic Challenge

Tue 15:50 – 16:10 & Wed 10:05 – 10:25 & Thu 10:05 – 10:25

Each day you can demonstrate your problem solving skills and transfer them from software development and abstract algorithms to a simple vehicle construction. A total of three teams, each consisting of one or two members, will have to assemble a Lego Technic vehicle without the manual (only using pictures on the packaging box).

The Ultimate Developer Quiz

Wed 12:45 – 13:45

Well, not much to say about this one, a pub quiz style developer quiz. Rules will be read out before the quiz – but beware, we are going to have prizes for places 1-3.

Also, I heard rumors of a scavenger hunt taking place as well – let’s see with what the quiz master will come up with to surprise us 😉

Lego® Excavator & SUSE HA Display

Tue 11:45 – 12:45 & Thu 12:45 – 13:45

We will showcase two huge LEGO excavators controlled by two Raspberry Pies running SUSE Linux Enterprise Server. You will have a chance to play with those excavators using your mobile phone. Part of the showcase is a cluster of another two Raspberry Pi which are in the SUSE High Availability cluster setup and controls the whole showcase. Let’s disconnect the network and see what happens… HA in reality

SUSE Exhibition Kiosks

Partner Exhibition Kiosks

We also have two SUSE partners exhibiting their developer related technologies in the Developer Lounge, namely: SAP and ARM Ltd. I’m hoping to see those partners publishing a blog with more information about their displays.

Developer related mini breakout sessions

From Idea to Article – Writing for Technical Magazines

Tue 19:00 – 19:30

Speaker: Dmitri Popov

Dmitri, also as a Journalist writing for Linux Magazine for many years now, will explain how to write good tech articles for tech magazines (where the latter usually pay for) – because there is a huge difference between writing “normal” documentation, a blog, or a tech article.

Helm – The Kubernetes Package Manager

Wed 14:00 – 14:30

Speaker: Nikhil Manchanda

Helm is a new Kubernetes project which allows users to streamline the installation and management of Kubernetes applications. SUSE’s new Container as a Service Platform will support installing Helm out-of-the-box allowing users to deploy and distribute their applications seamlessly. In this session we will:

  • Provide an overview of the architecture of Helm and how it fits with the architecture of SUSE CaaS Platform
  • Introduce the concept of ‘Helm Charts’ — a high-level mechanism to describe and package pre-configured Kubernetes resources.
  • Show you how you can use Helm Charts to deploy upstream applications as well as package and distribute your own.

Documentation for Open Source Projects – Tools and Processes

Wed 16:45 – 17:15

Speakers: Stefan Knorr, Sven Seeberg

Stefan and Sven are both experienced technical writers and Linux enthusiasts. From their daily work they know that developers – from time to time – also will have to contribute to some kind of documentation. And there are tools you might find useful – e.g. the DocBook Authoring and Publishing Suite, a command line tool for any modern Linux system. Want to hear more? Come to the Developer Lounge theater!

PR for OSS – Do Good Things and Talk about Them

Thu 14:00 – 14:30

Speaker: Markus Feilner

Abstract: Markus as a Journalist would like to explain to developers how they can better promote their own open source projects / contributions

Hybrid Cloud vs. Multi-Cloud vs. Mixed-Cloud: What’s the Difference?

Tuesday, 12 September, 2017

Albert Einstein reportedly said, “if you can’t explain it simply, you don’t understand it well enough.” When it comes to hybrid cloud, it appears many of us would struggle to meet that lofty standard.   According to a recent research study 1, 4 out of 5 IT professionals believe hybrid cloud is misunderstood by customers and the term is often misused by vendors.

So, why all the confusion?

Cloud computing is pretty much omnipresent these days, with most organizations using more than one cloud platform. Many are taking advantage of both private and public clouds to accomplish different tasks. But that’s not a true hybrid model—it should instead be called multi-cloud or mixed-cloud. To clear things up, let’s take a closer look at multi, mixed and hybrid cloud to identify the differences and more importantly why they matter.

What is a multi-cloud or mixed-cloud solution?

According to the 2017 State of the Cloud Survey by RightScale, 85 percent of enterprises have a multi-cloud strategy, in which they use more than a single cloud platform.  58 percent of these organizations are adopting a mixed-cloud approach, where some workloads are run on a private cloud, with a separate, public cloud being used for others. In these multi or mixed cloud deployments, cloud users were running applications in an average of 1.8 public clouds and 2.3 private clouds.2

Why do so many enterprises depend on multi or mixed cloud solutions? Because, as we describe in more detail in “Cloud Computing: Make the Right Choice for Your Organization,” private and public cloud solutions serve different needs. Maybe one team at your business needs to share highly sensitive data and another needs powerful processing for app development or big data projects—those teams might be best served by different types of cloud solutions.

What is a hybrid cloud solution?

If the use of multiple cloud types is called a multi-cloud solution, what is a hybrid cloud? One answer is that hybrid cloud is the future—but let’s first dig into what exactly it is before explaining why we believe it offers the most likely future cloud strategy for enterprises.

A true hybrid cloud involves much more than simply using private and public clouds independently to accomplish separate tasks. Rather, it is a solution that will provide the flexibility to combine private and public clouds as needed to achieve optimal performance, efficiency, and economy across the enterprise.

Hybrid clouds will provide access to mixed private and public cloud resources, ideally controlled through a single management environment. Enterprises that use a hybrid cloud model will be able to use different clouds as needed, even moving a given workload from one cloud to another and having some solutions span multiple clouds.

The reason we think hybrid clouds are the future is that the potential business benefits are immense. Imagine using powerful cloud bursting capabilities to immediately expand or shrink cloud usage to meet shifting workload demands. And then imagine moving workloads dynamically between private and public clouds as your needs and requirements change, using a centralized management solution.

That kind of agility will dramatically lower costs and give businesses with a true hybrid cloud a decided competitive advantage.

Are you ready for hybrid cloud?

Hybrid cloud solutions are expected to grow rapidly over the next 2 years, with many organizations seeing it as their preferred future option for business-critical workloads.   Enterprises can take steps now to make the eventual move to the hybrid cloud as quickly, painlessly, and cost-effectively as possible.

Whether your strategy is a mixed, multi or hybrid cloud, SUSE has you covered.  We’re committed to delivering the enterprise-grade Linux, container and cloud solutions, tools and support to enable your workloads to be run wherever you need them.

Learn more

For more detailed information about hybrid clouds and other enterprise cloud options, download “Cloud Computing: Make the Right Choice for Your Organization.

1Independent market research commissioned by SUSES and conducted by Insight Avenue, August 2017.

RightScale, 2017 State of the Cloud Survey. www.rightscale.com/blog/cloud-industry-insights/cloud-computing-trends-2017-state-cloud-survey

Installing Rancher – From Single Container to High Availability

Thursday, 7 September, 2017

Update: This tutorial was updated for Rancher 2.x in 2019 here

Any time an organization, team or developer adopts a new platform, there
are certain challenges during the setup and configuration process. Often
installations have to be restarted from scratch and workloads are lost.
This leaves adopters apprehensive about moving forward with new
technologies. The cost, risk and effort are too great in the business of
today. With Rancher, we’ve established a clear container installation and upgrade
path so no work is thrown away. Facilitating a smooth upgrade path is
key to mitigating against risk and increasing costs. This guide has two
goals:

  1. Take you through the installation and upgrade process from a
    technical perspective.
  2. Inform you of the different types of installations and their
    purpose.

With that in mind, we’re going to walk through the set-up of Rancher
Server in each of the following scenarios, with each step upgrading from
the previous one:

  • Single Container (non-HA) – installation
  • Single Container (non-HA)- Bind mounted MySQL volume
  • Single Container (non-HA) – External database
  • Full Active/Active HA – (upgrading to this from our previous set up)

A working knowledge of Docker is assumed. For this guide, you’ll need
one or two Linux virtual machines with the Docker engine installed and
an available MySQL database server. All virtual machines need to be able
to talk to each other, so be mindful of any restrictions you have in a
cloud environment (AWS, GCP, Digital Ocean etc.). Detailed
documentation is located
here
.

**Single Container (non-HA) – Installation

Container With a Text Above That Says 'Rancher Server'**

  1. SSH into your Linux virtual machine
  2. Verify your Docker
    installation with docker -v. You should see something resembling Docker
    version 1.12.x
  3. Run sudo docker run -d –restart=unless-stopped -p
    8080:8080 rancher/server
  4. Docker will pull the rancher/server
    container image and run it on port 8080
  5. Run docker ps -a. You should
    see an output similar to this:
    Output After Entering 'Run docker ps-a' Command
    (Note: remember the name or ID of the rancher/server container)
  6. At this point, you should be able to go to http://<server_ip>:8080 in
    your browser and see the Rancher UI.

You should see the Rancher UI with the welcome modal: Rancher UI
welcome Since this is our initial set up, we need to add a host to our Rancher environment:

A Detailed Overview of Rancher’s Architecture


This newly-updated, in-depth guidebook provides a detailed overview of the features and functionality of the new Rancher: an open-source enterprise Kubernetes platform.

Get the eBook

  1. Click ‘Got it!’
  2. Then click ‘Add a Host’. This first time you’ll see
    a Host Registration URL page: Add
host
  3. For this
    article, we’ll just go with whatever IP address we have. Click ‘Save’.
  4. Now, click ‘Add a Host’ again. You’ll see this: Add host cloud
provider 
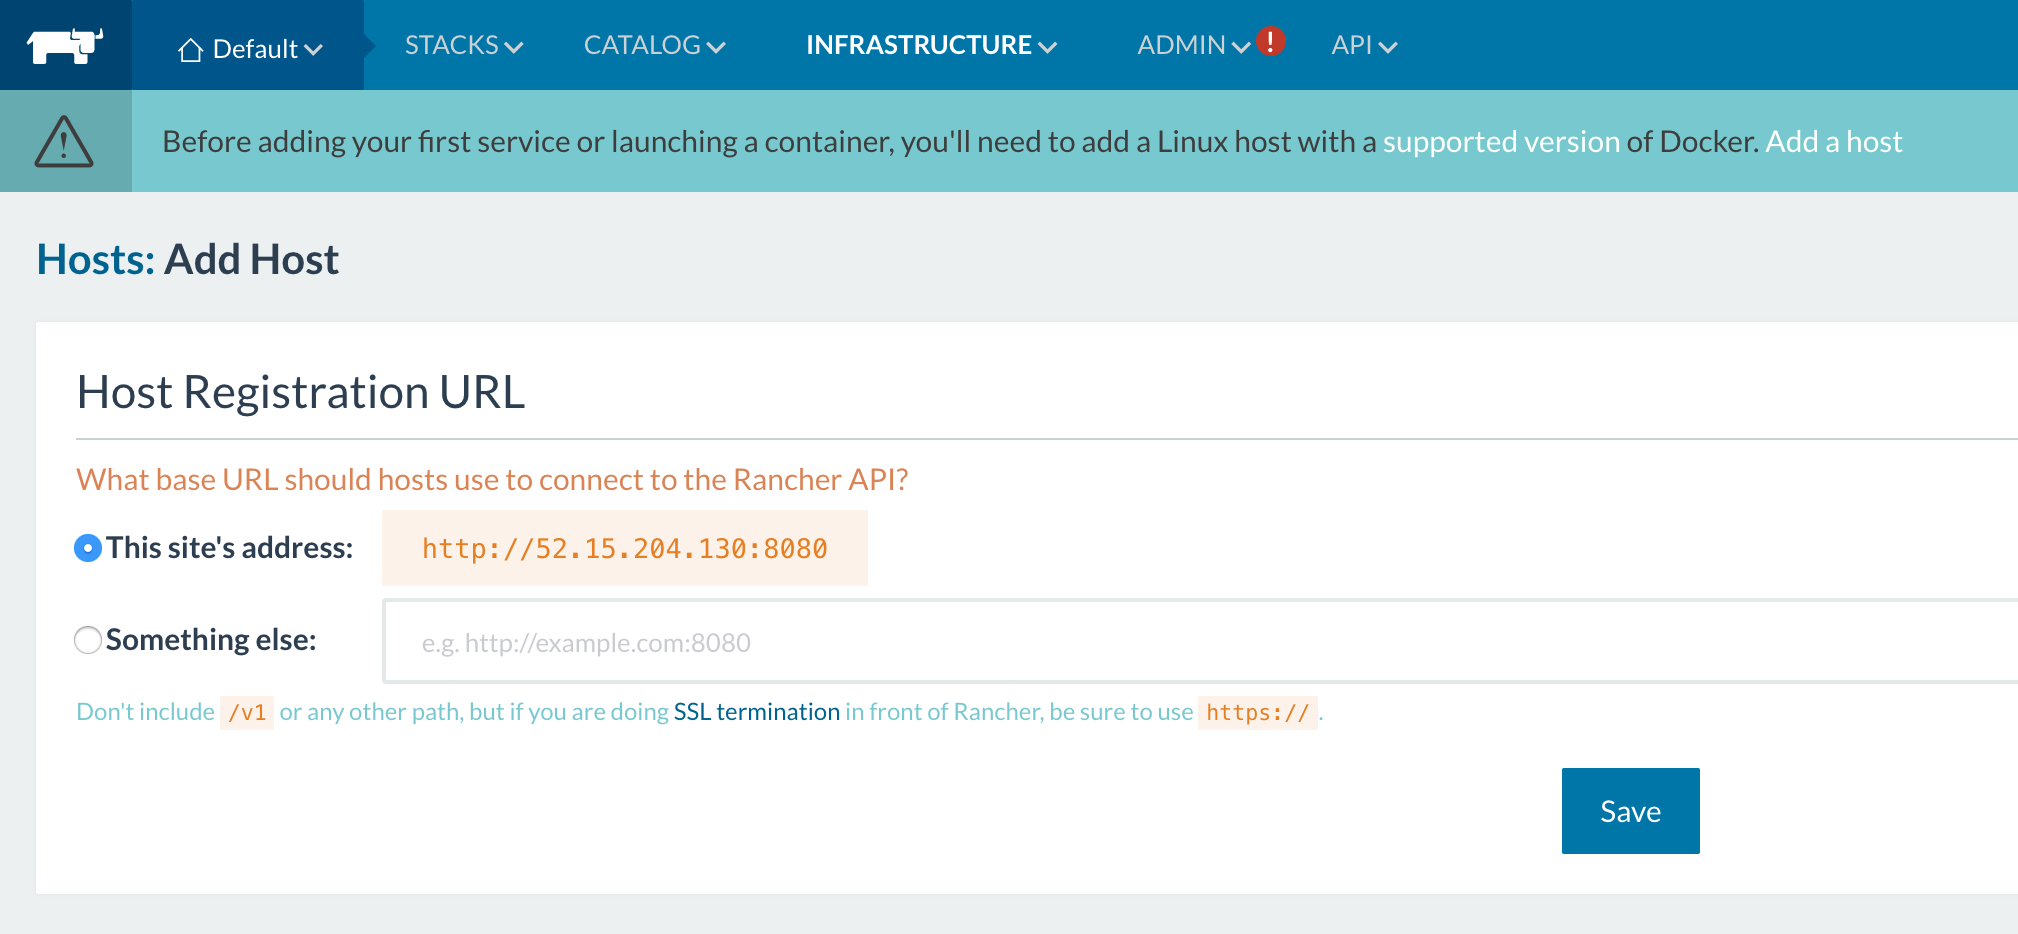
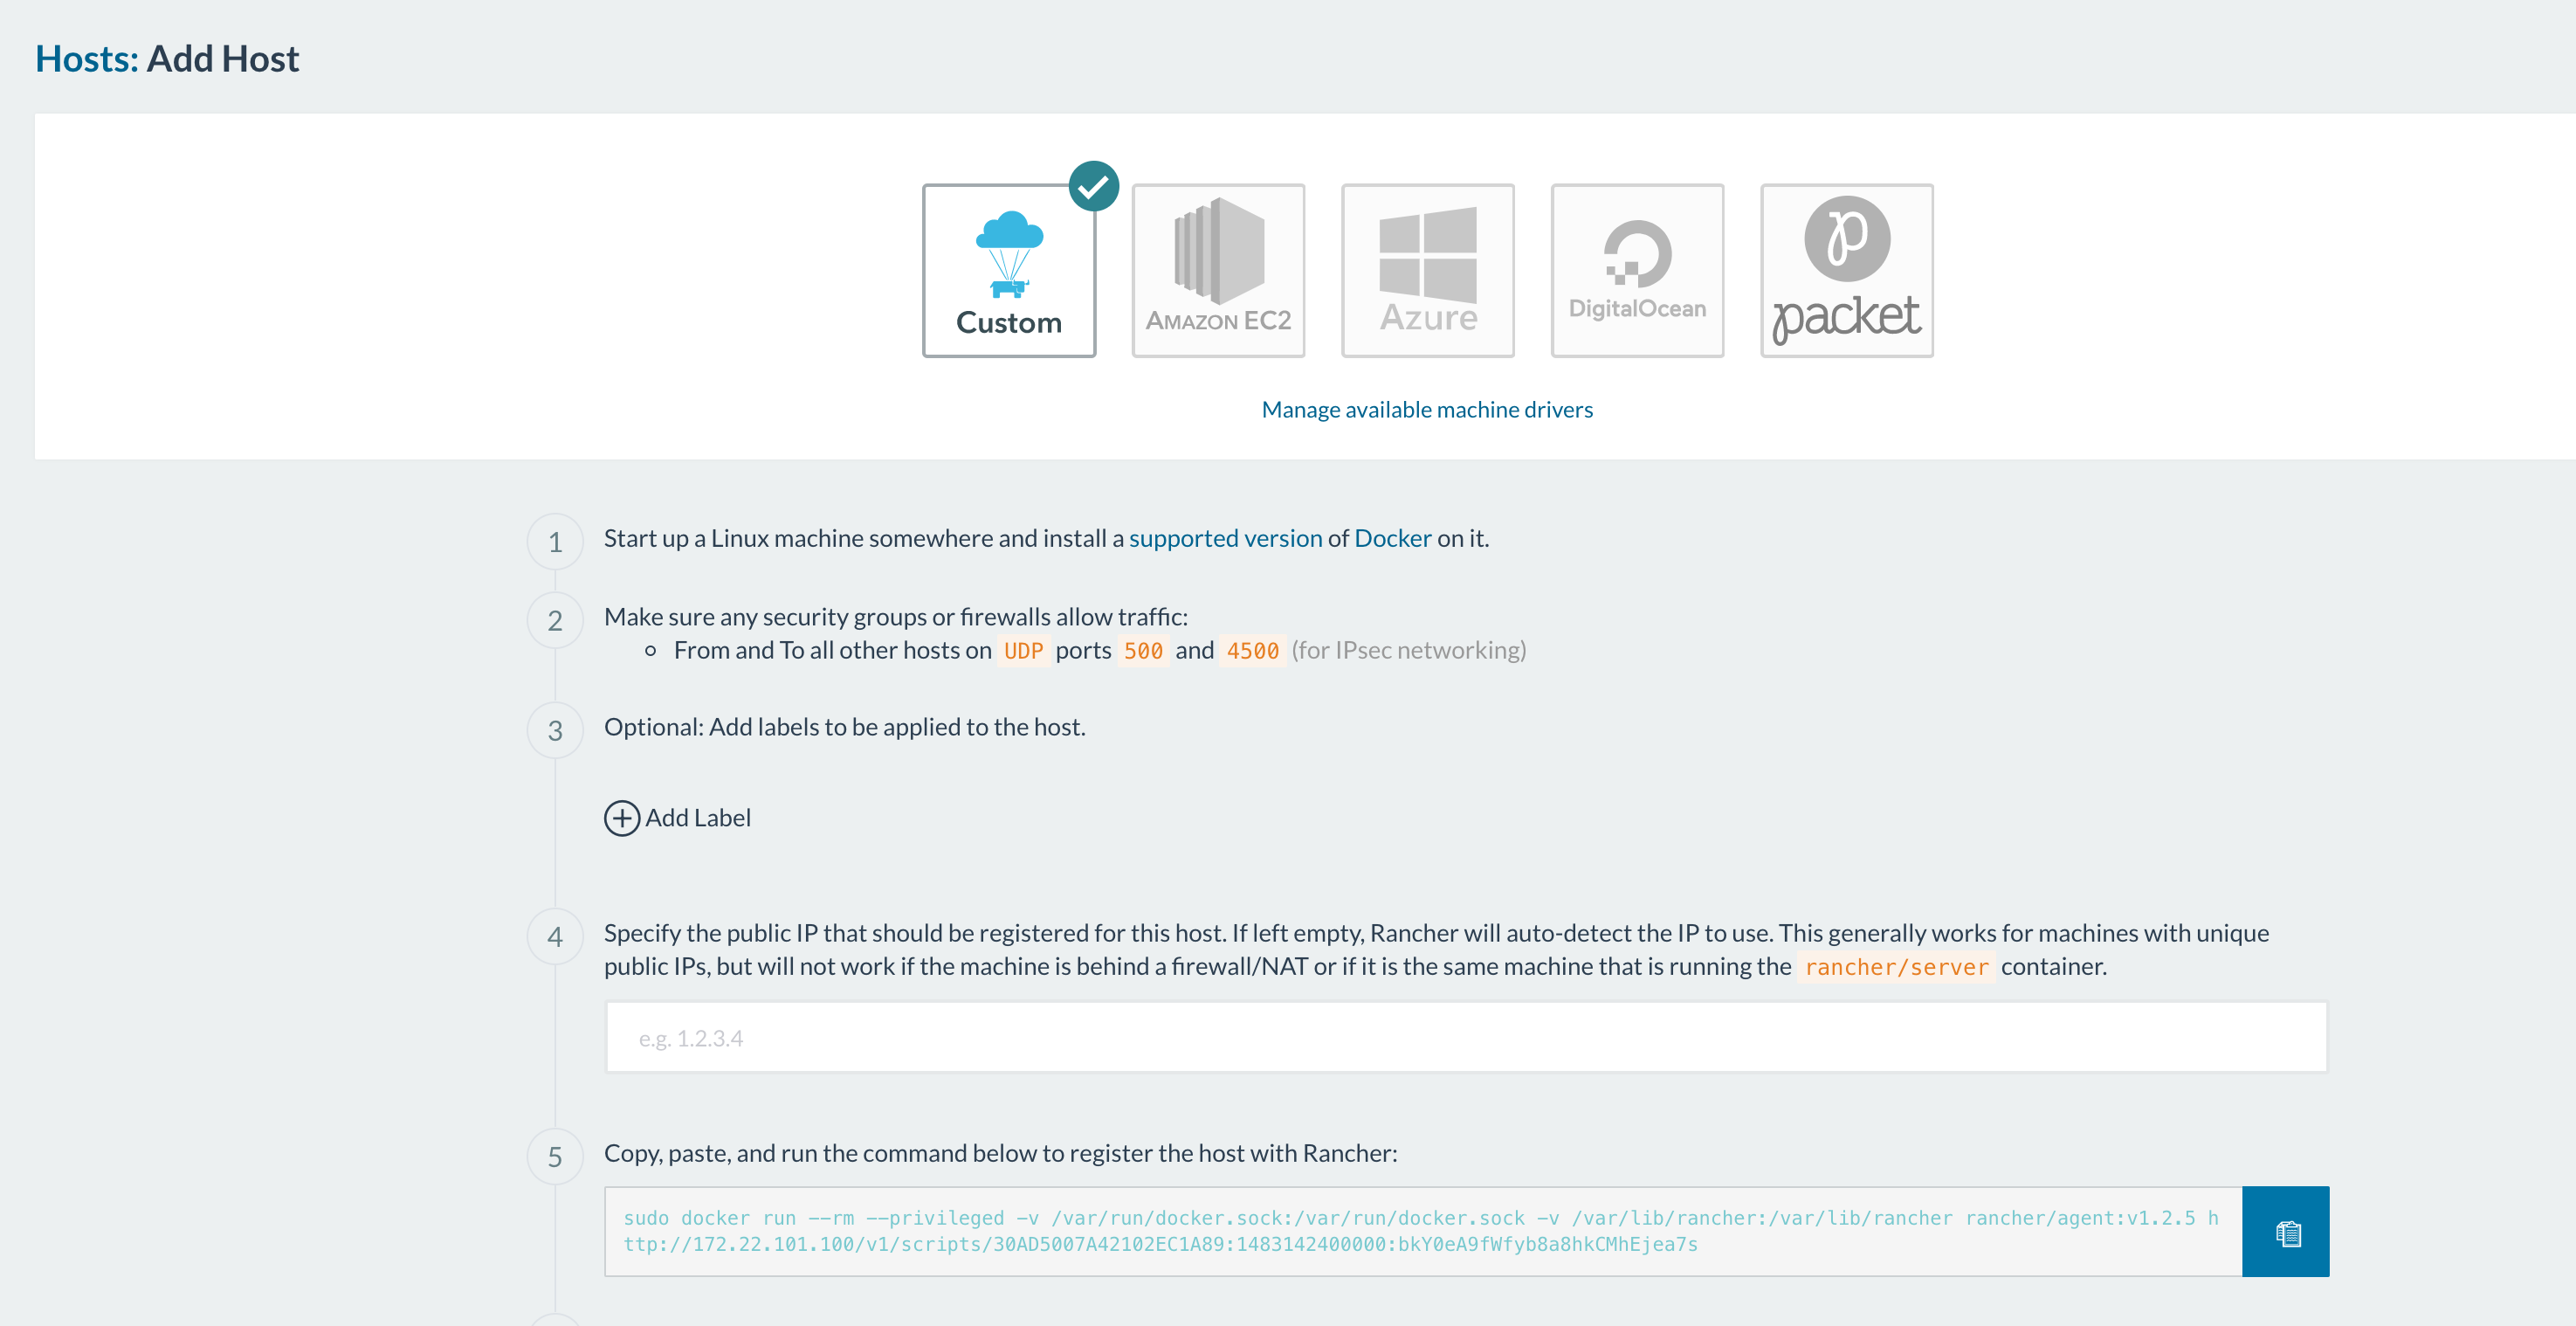
(note: the ports that have to been open for hosts to be able to communicate are 500 and
    4500.) From here you can decide how you want to add your hosts based on
    your infrastructure.
  5. After adding your host(s) you should see something like this:
    Rancher host details

So, what’s going on here? The rancher-agent-bootstrap container runs once to get the rancher-agent up and running then stops (notice the red circle indicating a stopped container). As we can see above, the health check container is starting up. Once all infrastructure containers are up and running on the host you’ll see this:

Host wit infrastructure
container

Here we see all infrastructure containers (health check, scheduler, metadata, network
manager, IPsec, and cni-driver) are all up and running on the host.

Tip:
to view only user containers, uncheck ‘Show System’ in the top right
corner of the Host view. Congratulations! You’ve set up a Rancher
Server in a single container. Rancher is up and running and has a local
MySQL database running inside of the container. You can add items from
the catalog
, deploy
your own containers etc. As long as you don’t delete the rancher/server
container, any changes you make to the environment will be preserved as
we go to our next step.

**Single Container (non-HA) – Bind-mounted volume

**

Now we’re going to take our existing Rancher server and upgrade it to
use a bind-mounted volume for the database. This way, should the
container die when we upgrade to a later version of Rancher, we don’t
lose the data for what we’ve built. In our next steps, we’re going to
stop the rancher-server container, externalize the data to the host,
then start a new instance of the container using the bind-mounted
volume. Detailed documentation is located
here
.

  1. Let’s say our rancher/server container is named fantastic_turtle.
  2. Run docker stop fantastic_turtle.
  3. Run docker cp fantastic_turtle:/var/lib/mysql <path on host> (Any
    path will do but using /opt/docker or something similar is not
    recommended). I use /data as it’s usually empty. This will copy the
    database files out of the container to the file system to /data. The
    export will put your database files at /data/mysql.
  4. Verify the location by running ls -al /data You will see
    a mysql directory within the path.
  5. Run sudo chown -R 102:105 /data. This will allow the mysql user
    within the container to access the files.
  6. Run docker run -d -v /data/mysql:/var/lib/mysql -p 8080:8080
    –restart=unless-stopped rancher/server:stable. Give it about 60
    seconds to start up.
  7. Open the Rancher UI at http://<server_ip>:8080. You should see
    the UI exactly as you left it. You’ll also notice your workloads
    that you were running have continued to run.
  8. Let’s clean up the environment a bit. Run docker ps -a.
  9. You’ll see 2 rancher/server Image containers. One will have a
    status of Exited (0) X minutes ago and one will have a status of Up
    X minutes. Copy the name of the container with exited status.
  10. Run docker rm fantastic_turtle.
  11. Now our docker environment is clean with Rancher server running with
    the new container.

**Single Container (non-HA) – External database

**

As we head toward an HA set up, we need have Rancher server running with
an external database. Currently, if anything happens to our host, we
could lose the data supporting the Rancher workloads. We’re going to
launch our Rancher server with an external database. We don’t want to
disturb our current set up or workloads so we’ll have to export our
data, import into a proper MySQL or MySQL compliant database and restart
our Rancher server that points to our external database with our data in
it.

  1. SSH into our Rancher server host.
  2. Run docker exec -it
    <container name> bash. This will give you a terminal session in
    your rancher/server container.
  3. Run mysql -u root -p.
  4. When prompted
    for a password, press [Enter].
  5. You now have a mysql prompt.
    6.Run show databases. You’ll see this:

    This way we know we have the rancher/server database.
  6. Run exit.
  7. Run mysqldump -u root -p cattle > /var/lib/mysql/rancher-backup.sql
    When prompted for a password hit [Enter].
  8. Exit the container.
    10.Run ls -al /data/mysql. You’ll see your rancher-backup.sql in the
    directory. We’ve exported the database! At this point, we can move the
    data to any MySQL compliant database running in our infrastructure as
    long as our rancher/server host can reach the MySQL database host. Also,
    keep in mind all this while your workloads that you have been running on
    the Rancher server and hosts are fine. Feel free to use them. We haven’t
    stopped the server yet, so of course they’re fine.
  9. Move
    your rancher-backup.sqlto a target host running a MySQL database server.
  10. Open a mysql session with your MySQL database server. Run mysql -u
    <user> -p.
  11. Enter your decided or provided password.
  12. 14. Run CREATE
    DATABASE IF NOT EXISTS cattle COLLATE = ‘utf8_general_ci’ CHARACTER
    SET = ‘utf8’;
  13. Run GRANT ALL ON cattle.* TO ‘cattle’@‘%’
    IDENTIFIED BY ‘cattle’; This creates our cattle user for
    the cattle database using the cattle password. (note: use a strong
    password for production)
  14. Run GRANT ALL ON cattle.* TO
    ‘cattle’@‘localhost’ IDENTIFIED BY ‘cattle’; This will allow us to
    run queries from the MySQL database host.
  15. Find where you put your rancher-backup.sql file on the MySQL database host. From there, run mysql -u cattle -p cattle < rancher-backup.sql This says “hey mysql, using the cattle user import this file into the cattle
    database“. You can also use root if you prefer.
  16. Let’s verify the
    import. Run mysql -u cattle -p to get a mysql session.
  17. Once in, run use cattle; Then show tables; You should see something like this:

Now we’re ready to bring up our Rancher server talking to our external

database.

  1. Log into the host where Rancher server is running.
  2. Run docker ps -a. Again, we see our rancher/server container is
    running:
  3. Let’s stop our rancher/server. Again, our workloads will continue
    to run. Run docker stop <container name>’.
  4. Now let’s bring it up using our external database. Run docker run
    -d –restart=unless-stopped -p 8080:8080 rancher/server –db-host
    <mysql host> –db-port 3306 –db-user cattle –db-pass cattle
    –db-name cattle. Give it about 60+ seconds for
    the rancher/server container to run.
  5. Now open the Rancher UI at http://<server_ip>:8080.

Congrats! You’re now running Rancher server with an external database
and your workloads are preserved.

**Rancher Server – Full Active/Active HA

**

Now it’s time to configure our Rancher server for High Availability.
Running Rancher server in High Availability (HA) is as easy as running
Rancher server using an external database, exposing an additional port,
and adding in an additional argument to the command so that the servers
can find each other.
1. Be sure that port 9345 is open between the
Rancher server host and any other hosts we want to add to the cluster.
Also, be sure port 3306 is open between any Rancher server and the MySQL
server host.
2. Run docker stop <container name>.
3. Run docker run -d
–restart=unless-stopped -p 8080:8080 -p 9345:9345 rancher/server
–db-host <mysql host> –db-port 3306 –db-user cattle –db-pass
cattle –db-name cattle –advertise-address <IP_of_the_Node>
(*note: Cloud provider users should use the internal/private IP
address). Give it 60+ seconds for the container to run. (note: if after
75 seconds you can’t view the Rancher UI, see the troubleshooting
section below)
4. Open the Rancher UI at http://<server_ip>:8080.
You’ll see all your workloads and settings as you left them.
5. Click
on Admin then High Availability. You should see your single host you’ve
added. Let’s add another node to the cluster.
6. On another host, run
the same command but replacing the –advertise-address
<IP_of_the_Node> with the IP address of the new host you’re adding
to the cluster. Give it 60+ seconds. Refresh your Rancher server UI.
7.
Click on Admin then High Availability. You should see both nodes have
been added to your cluster. HA
setup
8. Because we
recommend an odd number of Rancher server nodes, add either 1 or 3 more
nodes to the cluster using the same method. Congrats! You have a Rancher
server cluster configured for High Availability.

Troubleshooting & Tips

During my time walking through these steps myself I ran into a few
issues. Below are some you might run into and how to deal with them.
Issue: Can’t view the Rancher UI after 75 seconds.
1. SSH into the
Rancher server host.
2. Confirm rancher/server is running. Run docker ps
–a. Given an output like this:
Output After Entering 'Run docker ps-a' Command
3. To view logs, run
`docker logs –t tender_bassi` (in this case). If you see something
like this: RANCHER BLOG
3 
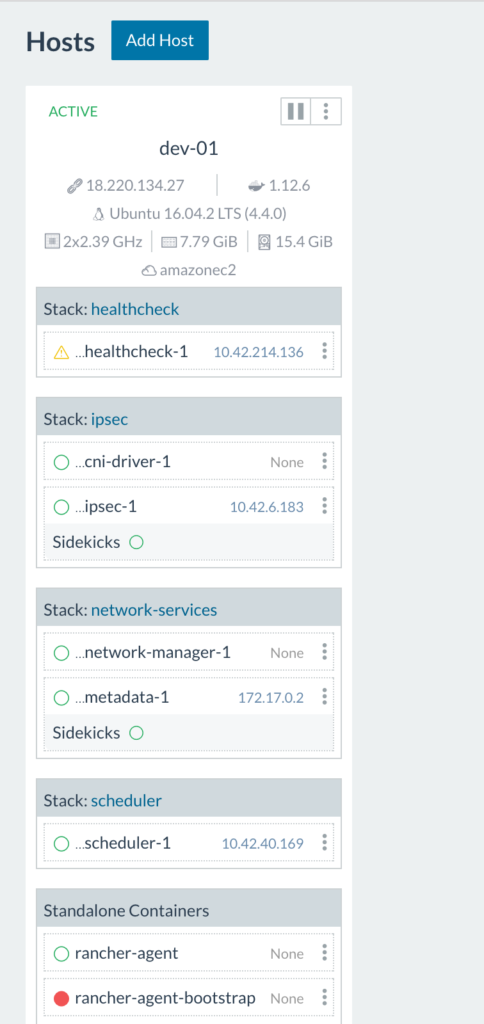
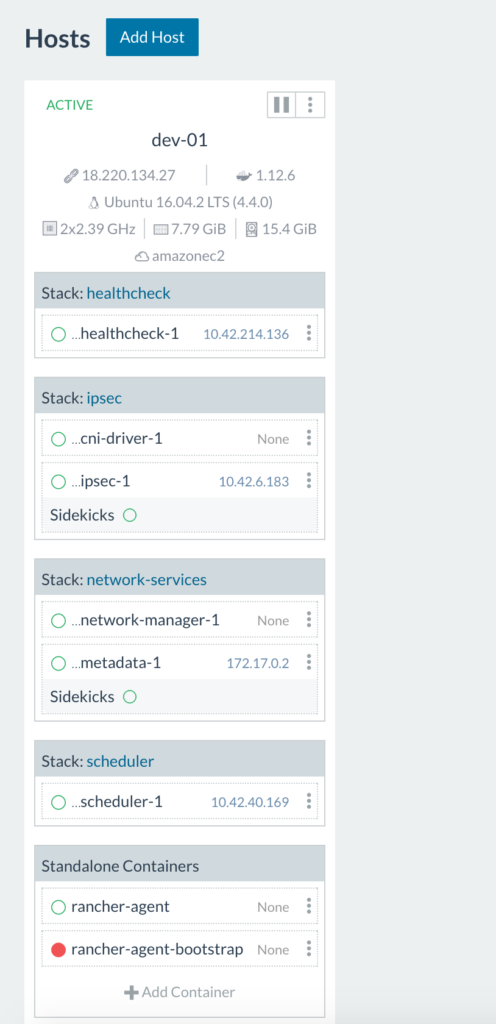
It’s Rancher being unable to reach the database server or authenticate with the credentials we’ve provided it in our start up command. Take a look at networking settings, username and password and access privileges in the MySQL
server.

Tip: While you may be tempted to name your rancher/server
‘—name=rancher-server’ or something like it this is not recommended.
The reason for this is if you need to rollback to your prior container
version after an upgrade step, you’ll have clear distinction between
container versions.

Conclusion

So, what have we done? We’ve installed Rancher server as a single
container. We’ve upgraded the Rancher installation to a high
availability platform instance without impacting running workloads.
We’ve also established guidelines for different types of environments.
We hope this was helpful. Further details on upgrading are available
here https://rancher.com/docs/rancher/v1.6/en/upgrading/.

Tags: Category: Uncategorized Comments closed

Microservices Made Easier Using Istio

Thursday, 24 August, 2017

Expert Training in Kubernetes and Rancher
Join our free online training sessions to learn more about Kubernetes, containers, and Rancher.

Update: This tutorial on Istio was updated for Rancher 2.0 here.

One of the recent open source initiatives that has caught our interest
at Rancher Labs is Istio, the micro-services
development framework. It’s a great technology, combining some of the
latest ideas in distributed services architecture in an easy-to-use
abstraction. Istio does several things for you. Sometimes referred to as
a “service mesh“, it has facilities for API
authentication/authorization, service routing, service discovery,
request monitoring, request rate-limiting, and more. It’s made up of a
few modular components that can be consumed separately or as a whole.
Some of the concepts such as “circuit breakers” are so sensible I
wonder how we ever got by without them.

Circuit breakers
are a solution to the problem where a service fails and incoming
requests cannot be handled. This causes the dependent services making
those calls to exhaust all their connections/resources, either waiting
for connections to timeout or allocating memory/threads to create new
ones. The circuit breaker protects the dependent services by
“tripping” when there are too many failures in a some interval of
time, and then only after some cool-down period, allowing some
connections to retry (effectively testing the waters to see if the
upstream service is ready to handle normal traffic again).

Istio is
built with Kubernetes in mind. Kubernetes is a
great foundation as it’s one of the fastest growing platforms for
running container systems, and has extensive community support as well
as a wide variety of tools. Kubernetes is also built for scale, giving
you a foundation that can grow with your application.

Deploying Istio with Helm

Rancher includes and enterprise Kubernetes distribution makes it easy to
run Istio. First, fire up a Kubernetes environment on Rancher (watch
this
demo
or see our quickstart
guide
for
help). Next, use the helm chart from the Kubernetes Incubator for
deploying Istio to start the framework’s components. You’ll need to
install helm, which you can do by following this
guide
.
Once you have helm installed, you can add the helm chart repo from
Google to your helm client:

helm repo add incubator http://storage.googleapis.com/kubernetes-charts-incubator

Then you can simply run:

helm install -n istio incubator/istio


A view in kube dash of the microservices that makeup Istio
This will deploy a few micro-services that provide the functionality of
Istio. Istio gives you a framework for exchanging messages between
services. The advantage of using it over building your own is you don’t
have to implement as much “boiler-plate” code before actually writing
the business logic of your application. For instance, do you need to
implement auth or ACLs between services? It’s quite possible that your
needs are the same as most other developers trying to do the same, and
Istio offers a well-written solution that just works. Its also has a
community of developers whose focus is to make this one thing work
really well, and as you build your application around this framework, it
will continue to benefit from this innovation with minimal effort on
your part.

Deploying an Istio Application

OK, so lets try this thing out. So far all we have is plumbing. To
actually see it do something you’ll want to deploy an Istio
application. The Istio team have put together a nice sample application
they call ”BookInfo” to
demonstrate how it works. To work with Istio applications we’ll need
two things: the Istio command line client, istioctl, and the Istio
application templates. The istioctl client works in conjunction with
kubectl to deploy Istio applications. In this basic example,
istioctl serves as a preprocessor for kubectl, so we can dynamically
inject information that is particular to our Istio deployment.
Therefore, in many ways, you are working with normal Kubernetes resource
YAML files, just with some hooks where special Istio stuff can be
injected. To make it easier to get started, you can get both istioctl
and the needed application templates from this repo:
https://github.com/wjimenez5271/rancher-istio. Just clone it on your
local machine. This also assumes you have kubectl installed and
configured. If you need help installing that see our
docs.
Now
that you’ve cloned the above repo, “cd” into the directory and run:

kubectl apply -f <(istioctl kube-inject -f samples/apps/bookinfo/bookinfo.yaml)

This deploys the kubernetes resources using kubectl while injecting some
istio specific values. It will deploy new services to K8 that will serve
the “BookInfo” application, but it will leverage the Istio services
we’ve already deployed. Once the BookInfo services finish deploying we
should be able to view the UI of the web app. We’ll need to get the
address first, we can do that by running

kubectl get services istio-ingress -o wide

This should show you the IP address of the istio ingress (under the
EXTERNAL-IP column). We’ll use this IP address to construct the URL to
access the application. For example, my output with my local Rancher
install looks like:
Example output of kubectl get services istio-ingress -o wide
The istio ingress is shared amongst your applications, and routes to the
correct service based on a URI pattern. Our application route is at
/productpage so our request URL would be:

http://$EXTERNAL_IP/productpage

Try loading that in your browser. If everything worked you should see
a page like this:
Sample application “BookInfo“, built on Istio

Built-in metrics system

Now that we’ve got our application working we can check out the built
in metrics system to see how its behaving. As you can see, Istio has
instrumented our transactions automatically just by using their
framework. Its using the Prometheus metrics collection engine, but they
set it up for you out of the box. We can visualize the metrics using
Grafana. Using the helm chart in this article, accessing the endpoint of
the Grafana pod will require setting up a local kubectl port forward
rule:

export POD_NAME=$(kubectl get pods --namespace default -l "component=istio-istio-grafana" -o jsonpath="{.items[0].metadata.name}")

kubectl port-forward $POD_NAME 3000:3000 --namespace default

You can then access Grafana at:
http://127.0.0.1:3000/dashboard/db/istio-dashboard
The Grafana Dashboard with the included Istio template that highlights
useful metrics Have you developed something cool with Istio
on Rancher? If so, we’d love to hear about it. Feel free to drop us a
line on twitter @Rancher_Labs, or
on our user slack.

Expert Training in Kubernetes and Rancher
Join our free online training sessions to learn more about Kubernetes, containers, and Rancher.