OpenStack 6 years on: thriving, expanding and maturing

Monday, 18 July, 2016

OpenStack 6th Anniversary #3This week marks the 6th anniversary for OpenStack cloud software. What began in July 2010 with a first design summit in Austin, Texas, has since grown into the clear leader for open source cloud solutions. Industry analyst 451 Research sees the OpenStack market growing at an impressive 35% CAGR and predicts that revenue will exceed $4bn by 2019. Without doubt, these are exciting times.

With all the hype surrounding the topic, we might sometimes forget that the whole cloud concept is relatively new. But things have moved fast – incredibly fast! With a huge community of innovative and committed developers, OpenStack has quickly gone from the new kid on the block to a mature, business-ready and feature-rich cloud platform.

With a customer driven agenda, OpenStack has rapidly gathered momentum. Market research, sponsored by SUSE, shows that 81% of large companies have already moved to an OpenStack private cloud or plan to at some stage. The most recent OpenStack User Survey reports that 65% of users are now in production or full operational use. Leading global organisations now using OpenStack clouds include eBay, PayPal, AT&T, Walmart, BMW, CERN and many others.

Open source veterans like SUSE saw the potential of OpenStack from the very beginning. As a founding member of the OpenStack Foundation, we’ve seen the community grow to more than 54,000 members and over 600 supporting companies across 182 countries at the last count.

And 6 years on, OpenStack is all grown up. What’s next I hear you ask? OpenStack has a roadmap strongly influenced and driven by customers and users. It has momentum and a future full of interest. Why not put the next OpenStack summit in Barcelona this October on your agenda. Come along and join the community to find out what’s driving OpenStack cloud adoption and how it can give you the improved agility and innovation needed to conquer today’s business challenges.

Struggle of existence

Friday, 8 July, 2016

Today’s businesses are challenged by keeping up with constantly, rapidly changing customer demands and new market trends. This puts severe pressures on the lines of business within an organization and causes difficulty in staying ahead of the competition. In the first place to be constantly outward looking and in the second place to establish a great customer experience. Lastly a seamless internal operation through tight alignment between departments proves to be tough.

In practice you could easily say, that many acknowledge the need for establishing an environment within it can happen is badly needed. At the same time you see, that many organizations are crippled to do so. Intercompany struggles, process adaption, change management, let alone IT needs and much more; all withhold companies of becoming agile and remain or become hugely successful.

Role of cloud

A recent McKinsey study outlines why agility pays. Companies that successfully converge speed and stability are agile and turn out to have a much better organizational health.

An HBR research concludes that cloud adoption it’s not so much about the money, but that business agility is the main driver. It supports the adoption of new technology and simplifies the organizational processes at greater velocity, leading to a stronger competitive positioning.

Look before you leap

In order to fully benefit of the advantages cloud offers, there is a number of points to take into consideration. This will ensure a successfully deployment of such an environment. Want to learn more about what to consider before deploying cloud? Read more here how SUSE can support you. Or visit the website.

Look before you leap

A New AWS Location Launches

Wednesday, 29 June, 2016

Earlier this week Amazon Web Services announced the availability of a new region, one with unique potential for accelerated adoption and growth.

For years Indian technology companies, from start-ups to the enterprise, have been extremely comfortable building applications and services using AWS – this week Amazon announced the availability of a region that brings the cloud closer to them with dedicated data centers in Mumbai.

The launch of the “Asia Pacific (Mumbai) Region” brings the total coverage within APAC to 6 regions and 13 regions globally (read on for the map!) and as mentioned has unique potential for growth. According to a recent article in the Wall Street Journal, many entrepreneurs are returning because the cost of scaling a company is much lower in India. With a growing number of its foreign-based tech talent heading home to start new ventures and a boom of investment in local Indian apps the weather is right for a new data center opening.

“Indian startups and enterprises have been using AWS for many years —  with most Indian technology start-ups building their entire businesses on AWS, and numerous enterprises running mission-critical, core applications on AWS,” said Andy Jassy, AWS CEO, in a press release. “These same 75,000 Indian customers, along with others anxious to start using AWS, have asked for an AWS India Region so they can move their applications that require low latency and data sovereignty.”

Entrepreneur and enterprise alike can look forward to new benefits; notably higher performance potential through reduced latency as well as the ability to architect solutions that must adhere to data sovereignty and storage regulations. User experience and application performance can be enhanced through this closer proximity to cloud infrastructure as well as the ability to leverage three local edge locations (Mumbai, Chennai, and New Delhi) and AWS Direct Connect support.

With a ‘closer cloud’ in India and even easier access to the cost-effective utility approach to infrastructure I expect we’ll see more innovation, faster, from APAC – across not just start-ups but also the small-to-medium business and enterprise sector throughout the region.

Map Current as of 06-2016

Map Current as of 06-2016

On our way to digital transformation

Wednesday, 22 June, 2016

One of many aspects and drivers of digital transformation is the Internet of Things. Cisco claims that in 2020 there will be 3.4 connected devices per human being or 26.3 billion connected devices in total. For many years the Internet of Things has been a hype, but now we are seeing it maturing and with it a plethora of new business models in all industries and applications changing our private behavior. The most innovative applications have the potential to disrupt current business models.

One important step for enterprises to stay abreast of this revolution is to ready their IT infrastructure – as agile or bi-modal IT infrastructure is the basis for digital transformation. IT today is confronted with two key expectations. First, the focus today is not any longer exclusively on stability, optimization and cost reduction – equally important are aspects like agility, flexibility and speed, in the end time-to-market. Secondly, IT is not just a support service of the business, it is expected to create value for the business by enabling faster growth and time-to-market.

Only software-defined infrastructures can manage to solve the seeming contradiction between agility and continuity and will be the backbone of digital transformation.

Read IDC’s recommendation how to tackle this challenge and how SUSE can help. http://ow.ly/Pqpq301rv4L

The Power of 3

Wednesday, 15 June, 2016

The power of three: Software Defined Object, File, and Block on the same system.

Choosing a storage approach for the modern data centre involves quite a few calculations and considerations. If you’re a typical enterprise, you’ve probably virtualised just about every server you can, and that means choosing a solution that will fit in smartly with VMware and HyperV.

You will already have back-up and recovery requirements and data in different formats in different geographies. You will have tiered data, and probably a ‘cold’ store for the stuff that only gets accessed once in a blue moon, but nevertheless the law or company policy says you have to keep. You might well have a hybrid arrangement with some storage in the cloud, and some for critical applications close to home on high performance appliances. You’re most likely going to have both structured and unstructured data, and, as time goes by, more and more and more of it. And, despite the average price of storage coming down, the average spend on it is still going up.

A few years ago, you would have used File or Block storage for everything. File storage is great for the stuff you keep on the LAN – you could think of it almost as just having a shared hard-drive on another computer for old school collaboration and sharing: the kind of data that sits in xlsx spreadsheets of your company P&L and overhead accounts, jointly worked on by a ton of people in finance and business management; everything neatly divided into hierarchical folders with easy sharing and access control. Block is the workhorse of application storage – you’ll find block in pretty much every single enterprise the world over where there are applications back-ended with SQL databases. . . . which is tantamount to everything. Block based storage is mature, and has a larger installed based than File. Block is the leading approach when performance is critical.

Then of course there’s the new kid on the block, Object. Object storage was originally developed by Web 2.0 companies who were the first organisations in the world to really suffer the pain of exponential data growth. They needed an approach which – like opens source software defined storage from SUSE – could be run on commodity hardware to make some very necessary cost savings.  Even if you aren’t using Object in your enterprise, if you’re online at home you are benefiting from it: everyone in the whole world who is online is accessing an Object storage – that’s how you are streaming those 30m+ songs on Spotify, and accessing the gazillions of photos stored by Facebook. It’s amazing for unstructured data (like songs, images and video) and the capacity to have huge amounts of metadata with the data itself allows all kinds of management automation: you can control when data moves from tier one to tier two for example, or even when its deleted. And Object can be distributed across enormous geographies, and theoretically scales infinitely.

So, let’s sum up: the modern enterprise has one hell of a lot of storage platforms using different protocols in different locations on-premise, in the cloud and hybrid. The volume of data is growing constantly, it’s expensive, and there is always pressure to cut costs. That’s why it makes sense to move to software defined, its why – like the web 2.0 companies before you – it makes sense to choose open source, and its why SUSE Enterprise Storage 3.0 supports File (early access), Block and Object – so you can make cost savings on whatever platform or protocol you choose. I think you’ll find its worth investigating.


Running Elasticsearch on Rancher

Tuesday, 31 May, 2016

Elasticsearch is one of the most popular analytics platform for large
datasets. It is useful for a range of use-cases ranger from log
aggregation, business intelligence as well as machine learning.
Elasticsearch is popular because of its simple REST based API which
makes it trivial to create indices, add data and make complex queries.
However, before you get up and running building your dataset and running
queries you need to setup a elasticsearch cluster, which can be a
somewhat daunting prospect. Today, we look at how Rancher Catalogs make
it trivial to setup a scalable, highly available Elasticsearch cluster.

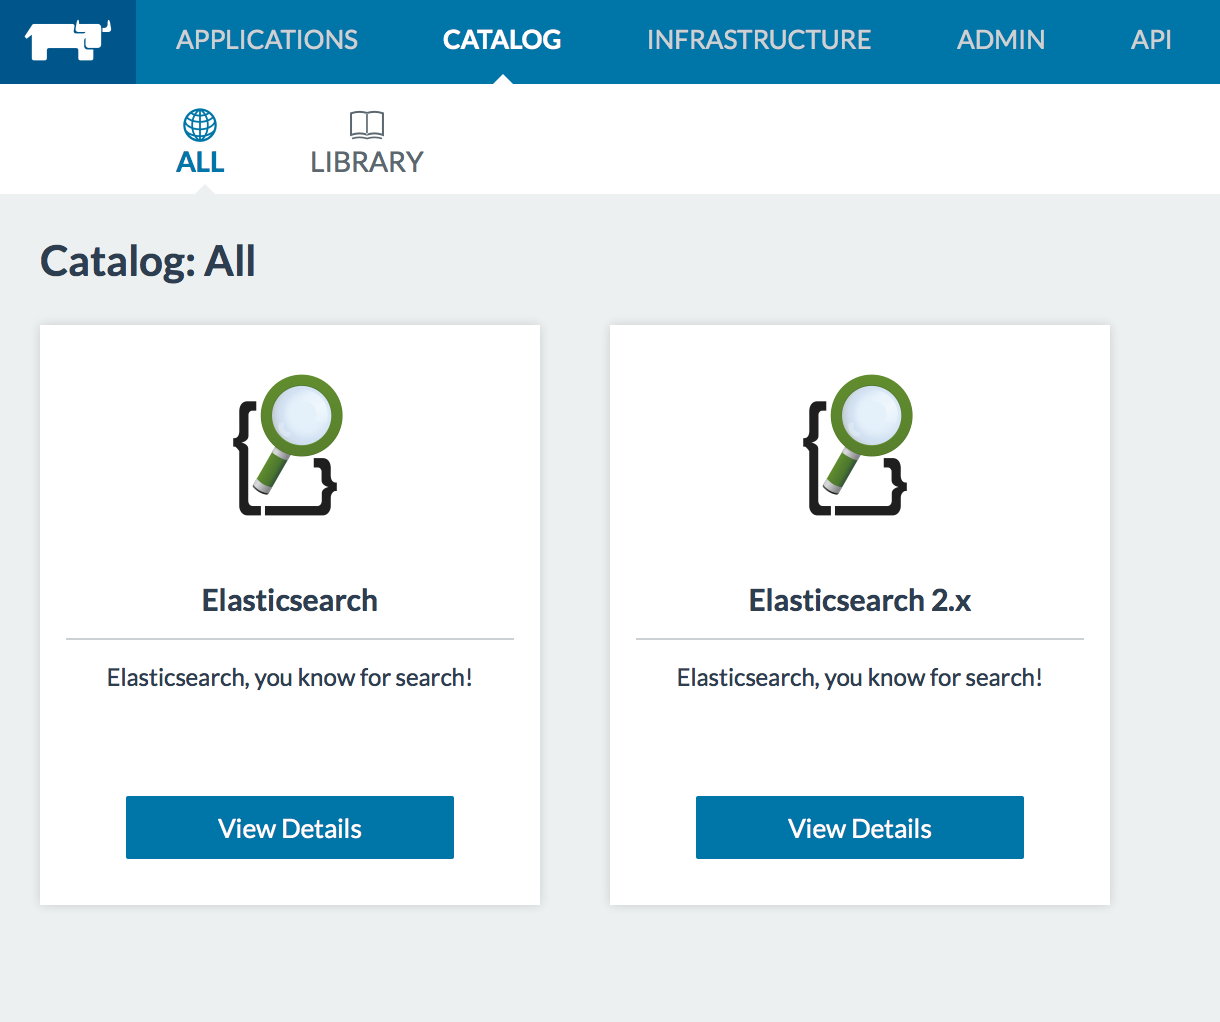
Assuming you already have a Rancher Cluster up and running, getting
Elasticsearch running on your cluster is a simple matter of browsing to
Catalog in the top menu and searching for Elasticsearch. There are two
versions of the Elasticsearch catalog. We are assuming that you are
using 2.x, the latest stable release version. To launch the stack from
the cluster, select View Details, and in the subsequent screen choose
a Stack Name, Cluster Name and select launch.

Elastic Search
Catalog

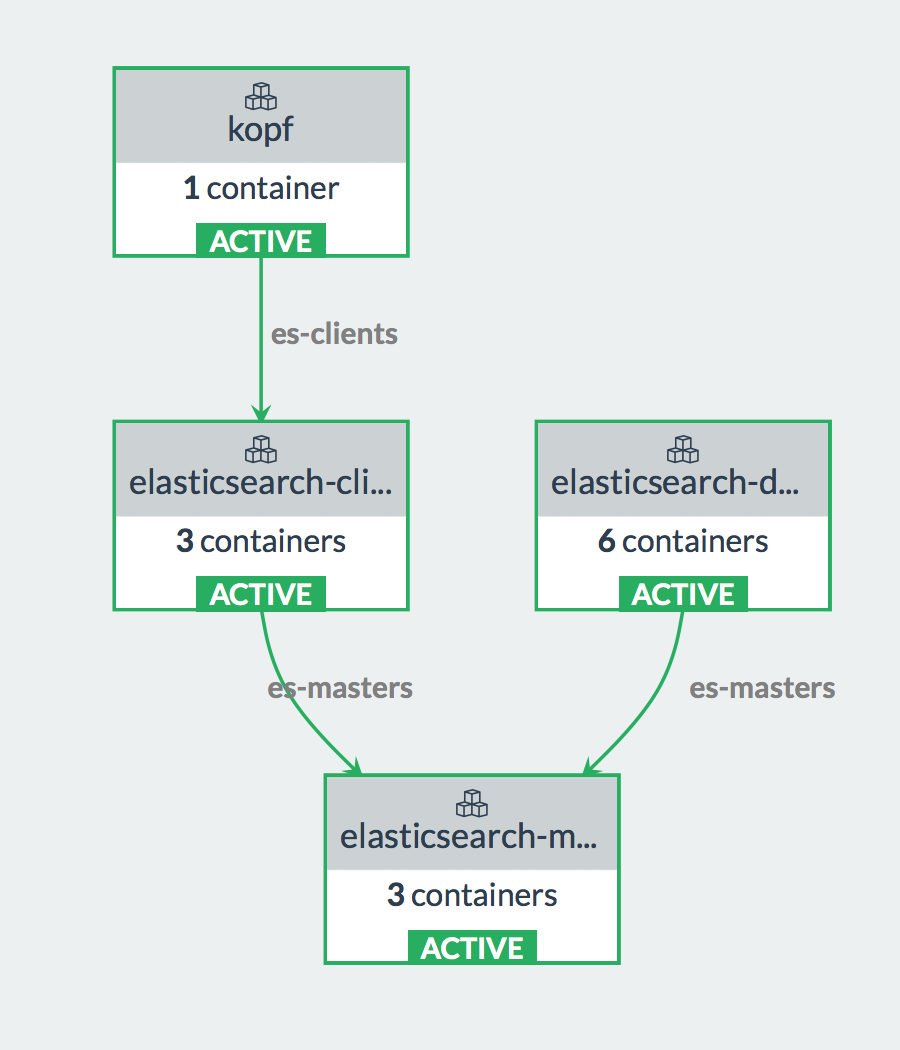
The stack should launch the following services;
kopf, client(s),
datanode(s) and master(s). The kopf container provides a web interface
to manage your elasticsearch cluster. Datanodes store the actual
indices. The master node runs cluster management tasks and the client
nodes originate and coordinate your searches and other operations.
Initially, your Elasticsearch cluster will have one container of each
type (master, client and datanodes have two sidekick containers).
However, you can scale out each of those components based on query load
and the size of the indices. Note that you need different physical hosts
for each datanode container to function correctly. Hence, you may have
to register more Rancher compute nodes.

ElasticSearch
Service

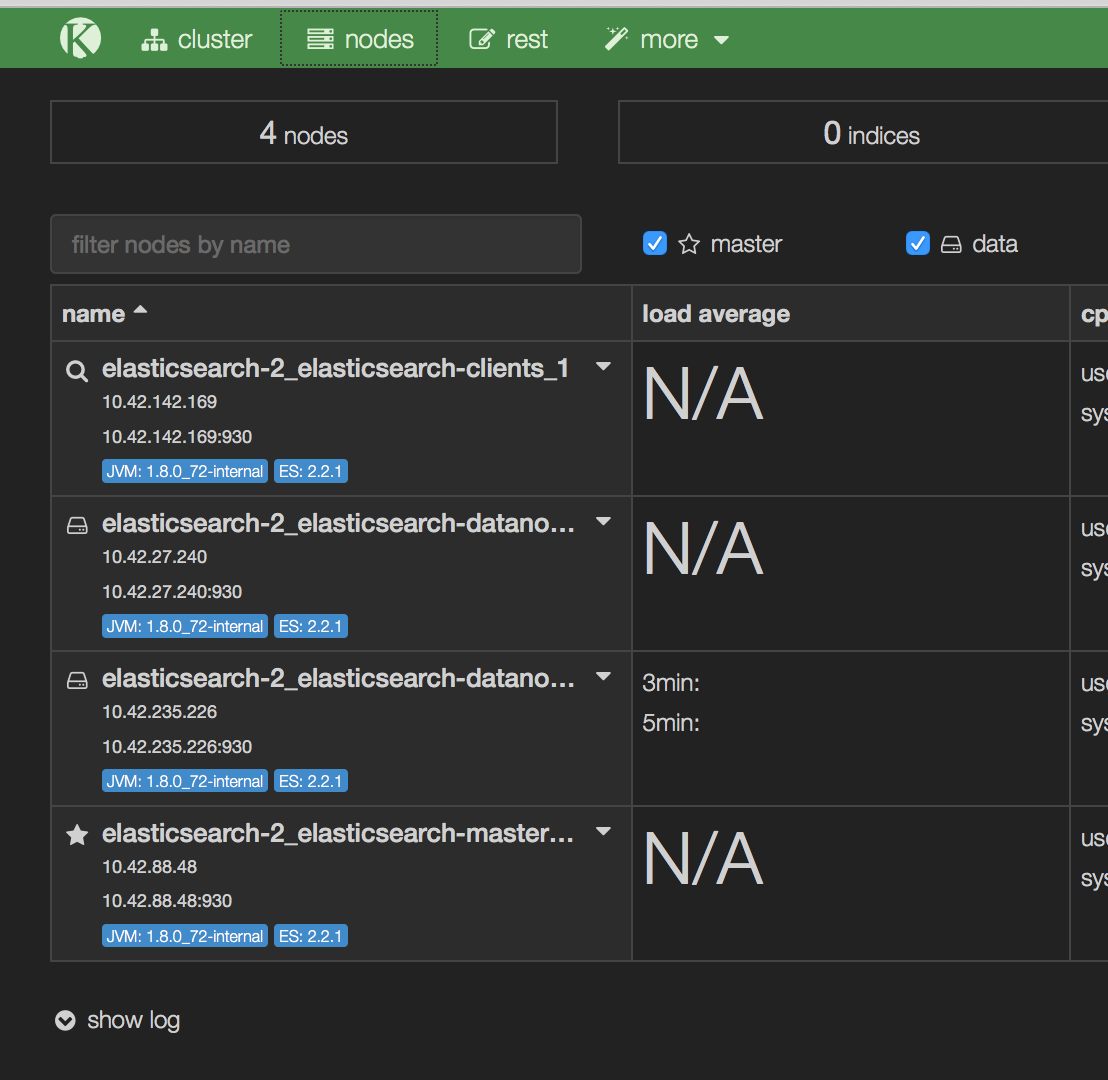
Once all your containers are active, you can bring up the kopf interface
by browsing to the host running the kopf container. If you click on the
nodes tab, you will see the various components I mentioned above
listed. As you can see, I have launched a second data node in order to
provide redundant storage for my indices. As we will see shortly, when
creating indices, we can control the number of data shards and copies of
each shards. This will help provide redundancy as well as speedup query
processing.

kopf
nodes

From the menu on the top of kopf, select more and then create index.
In the resulting screen, you will be asked to enter the Index Name,
the Number of Shards and the Number of replicas. The defaults for
these are 5 shards and 1 replica respectively. The number of shards and
replicas to setup for an index is highly dependent on the data set and
query model. The number of shards help spread data onto multiple nodes
and allow parallel processing of queries. Hence, if you only have a
single datanode then you will not see much benefit from multiple shards.
In addition, if you expect the data to grow rapidly you may want to have
more shards so that you can add nodes later and have data move to those.
Another thing to keep in mind is that elastic search recommends a max
heap size of 32 GB and hence, a max shard size should be about that size
so that it can be kept in memory as much as possible.

Replicas, on the other hand, are less related to datasize and more to
redundancy and performance. All queries for your index need to look at
one copy of each shard. If you have multiple copies of the shard, the
data is resilient to one node going down. Furthermore, with multiple
copies, the query load for a given shard is split between multiple
nodes. Having multiple replica only makes sense when you have more than
one data container/node in your cluster, and becomes more important as
you scale larger and larger cluster sizes.

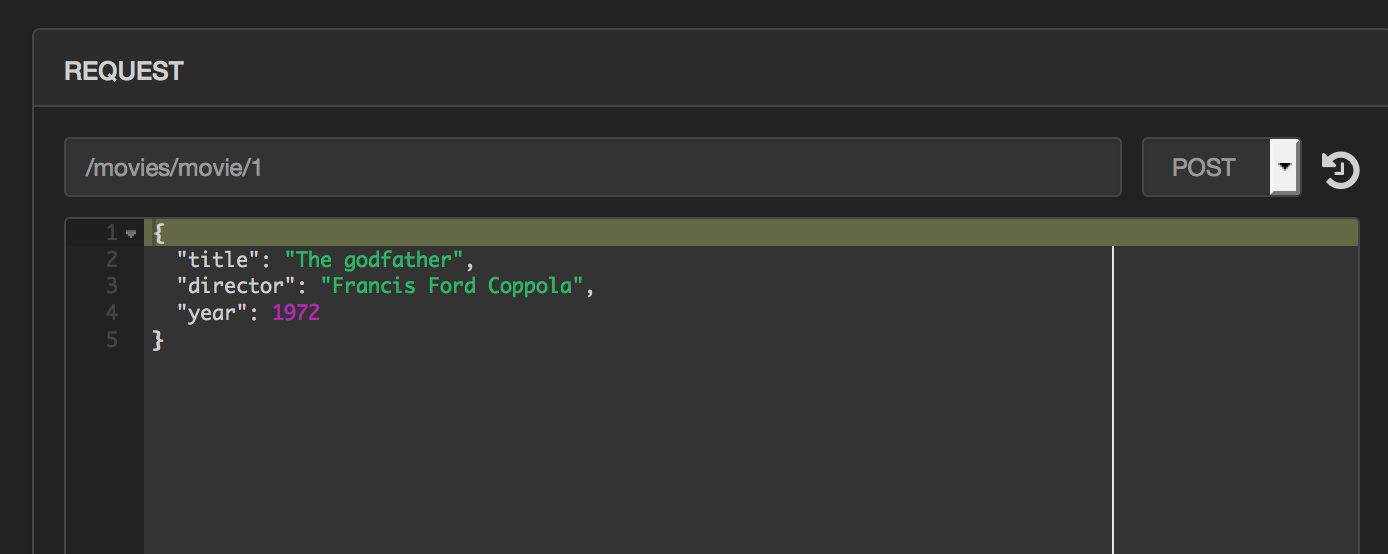
As an example, lets define an index called movies with 2 shards and 2
replicas. Now select the rest tab from the top menu so that we can add
some documents to our index and test some queries. Elasticsearch is
schema free so we can add free form data into our index as long as it is
valid JSON. Update the path field to /movies/movie/1. The format of
the path is /INDEX_NAME/TYPE/ID where movies is the index we just
created, movie is the name we are giving to the type of document we are
about to submit and id is a unique ID for the document within the index.
Note the ID is optional, and if you skip this from the path, a random ID
will be created for your document. Once you have added the path, select
POST as the method, enter your JSON document in the bottom text field
and hit send. This will add the document to the index and send you a
confirmation.

movie index
data

Once you have added a few movies into the index, we can use the same
rest interface in order to search and aggregate data from our index.
Update the path field to /movies/movie/_search. The format of the
path is /INDEX_NAME/TYPE/_search where both INDEX_NAME and TYPE are
optional. If you skip type, your search will apply to all types in the
index, and if you also skip index name, then your search will apply to
all indices.

There are a number of different types of quires that are supported by
ElasticSearch. However, we cover some of the common types here. The
first type of query is the free text query. The query string parameter
allows for fairly complicated queries using the Elasticsearch Query
DS
.
However, we can also enter a simple string to match. This will match the
specified word or words in any field in the documents over which the
query applies.

{
    "query": {
        "query_string": {
            "query": "Apocalypse"
        }
    }
}

For example, the query above will return the result shown below. It
contains details about the time taken to process the query, the shards
that were searched, the total number of results, and then details of
each result.

{
  "took": 139,
  "timed_out": false,
  "_shards": {
    "total": 2,
    "successful": 2,
    "failed": 0
  },
  "hits": {
    "total": 2,
    "max_score": 0.5291085,
    "hits": [{
      "_index": "movies",
      "_type": "movie",
      "_id": "AVSvEC1fG_1bjVtG66mm",
      "_score": 0.5291085,
      "_source": {
        "title": "Apocalypse Now",
        "director": "Francis Ford Coppola",
        "year": 1979,
        "genres": [
          "Drama",
          "War"
        ]
      }
    }
....

In addition to the query text, you can also specify a field or est of
fields to limit your query to searching a subset of the document. For
example, the search below should return the same result as before, but
will have to look at a subset of the document, and should have faster
performance for larger data sets. There are many other operations.

{
  "query": {
    "query_string": {
      "query": "Apocalypse"
      "fields": ["title"]
    }
  }
}

We can wrap the query string in a filtered object and then specify a
filter to apply on the results of the query. This allows us to retain
the free form search over the initial dataset, but then filters the
results for the specific data we are looking for.

{
  "query": {
    "filtered": {
      "query_string": {
        "query": "Apocalypse"
        "fields": ["title"]
      }
      "filter": {
        "term": { "year": 1979 }
      }
    }
  }
}

Lastly, another type of query you may run is an aggregation. This is
useful for computing summary statistics about the data. Two examples of
these types of aggregations are shown below. The first will return a
count of the movies directed by each director. The second will return
the average rating for all the movies in our data set.

{
  "aggs": {
    "group_by_director": {
      "terms": {
        "field": "director"
      }
    }
  }
}

{
  "aggs" : {
    "avg_rating" : { "avg" : { "field" : "rating" } }
  }
}

Elasticsearch is one of the best ways of running analytics over large
unstructured datasets and is used extensively in many domains from
log-aggregation, machine learning to business intelligence. In this
article, we have looked at how simple it is to set up a fully
functioning Elasticsearch cluster on Rancher using the catalog. In
addition, we have taken a quick look at the power of Elasticsearch using
the rest API. Once you have Elasticsearch up and running you can use it
for a host of different use cases with the many available visualization
and aggregation frameworks such as
Kibana for real time
visualization or Pentaho for business
analytics.

Tags: , Category: Uncategorized Comments closed

SUSE and SAP highlights from SAPPHIRE NOW

Wednesday, 18 May, 2016

This has been a rather exciting week in the world of SUSE and SAP. With SAP’s annual SAPPHIRE NOW conference in full swing, accompanied by oodles of announcements, now seems like a good time for a quick re-cap on all of the SUSE & SAP goodness.

sles4sap

SUSE Linux Enterprise Server for SAP now available on AWS

No minimum fees; Only pay for the compute hours you use. And, of course you can bring-your-own-subscription for SLES for SAP with you to Amazon Web Services as well.

SAP HANA powered by SLES coming to Azure

That’s right. You’ll soon be able to run SAP HANA, with SUSE Linux Enterprise Server, on Microsoft Azure.

Live Patching comes to SAP HANA

Live Linux Kernel Patching, a critical component of avoiding planned downtime, has arrived for SAP HANA through SUSE Linux Enterprise Server for SAP.

SUSE Connect unveiled

SUSE’s new service to help you quickly find software and services that support SAP solutions has been launched. We call it SUSE Connect.


Lessons Learned Building a Deployment Pipeline with Docker, Docker-Compose, and Rancher (Part 1)

Monday, 4 April, 2016

Build a CI/CD Pipeline with Kubernetes and Rancher
Recorded Online Meetup of best practices and tools for building pipelines with containers and kubernetes.

John Patterson (@cantrobot) and Chris
Lunsford run This End Out, an operations and infrastructure services
company. You can find them online at

https://www.thisendout.com *and follow them
on twitter @thisendout. * Update:
All four parts of the series are now live, you can find them here: Part
1: Getting started with CI/CD and
Docker

Part 2: Moving to Compose
blueprints

Part 3: Adding Rancher for
Orchestration
Part
4: Completing the Cycle with Service
Discovery

This post is the first in a series in which we’d like to share the story
of how we implemented a container deployment workflow using Docker,
Docker-Compose and Rancher. Instead of just giving you the polished
retrospective, though, we want to walk you through the evolution of the
pipeline from the beginning, highlighting the pain points and decisions
that were made along the way. Thankfully, there are many great resources
to help you set up a continuous integration and deployment workflow with
Docker. This is not one of them! A simple deployment workflow is
relatively easy to set up. But our own experience has been that building
a deployment system is complicated mostly because the easy parts must be
done alongside the legacy environment, with many dependencies, and while
changing your dev team and ops organization to support the new
processes. Hopefully, our experience of building our pipeline the hard
way will help you with the hard parts of building yours. In this first
post, we’ll go back to the beginning and look at the initial workflow we
developed using just Docker. In future posts, we’ll progress through the
introduction of Docker-compose and eventually Rancher into our workflow.
To set the stage, the following events all took place at a
Software-as-a-Service provider where we worked on a long-term services
engagement. For the purpose of this post, we’ll call the company Acme
Business Company, Inc., or ABC. This project started while ABC was in
the early stages of migrating its mostly-Java micro-services stack from
on-premise bare metal servers to Docker deployments running in Amazon
Web Services (AWS). The goals of the project were not unique: lower lead
times on features and better reliability of deployed services. The plan
to get there was to make software deployment look something like this:
CD Part 1
software-deployment-workflow_edited
The process starts with the code being changed, committed, and pushed to
a git repository. This would notify our CI system to run unit tests,
and if successful, compile the code and store the result as an
artifact. If the previous step was successful, we trigger another job
to build a Docker image with the code artifact and push it to a private
Docker registry. Finally, we trigger a deployment of our new image to
an environment. The necessary ingredients are these:

  • A source code repository. ABC already had its code in private
    GitHub repository.
  • A continuous integration and deployment tool. ABC had a local
    installation of Jenkins already.
  • A private registry. We deployed a Docker registry container, backed
    by S3.
  • An environment with hosts running Docker. ABC had several target
    environments, with each target containing both a staging and
    production deployment.

When viewed this way, the process is deceptively simple. The reality
on the ground, though, is a bit more complicated. Like many other
companies, there was (and still is) an organizational divide between
development and operations. When code is ready for deployment, a ticket
is created with the details of the application and a target
environment. This ticket is assigned to operations and scheduled for
execution during the weekly deployment window. Already, the path to
continuous deployment and delivery is not exactly clear. In the
beginning, the deployment ticket might have looked something like this:

DEPLOY-111:
App: JavaService1, branch "release/1.0.1"
Environment: Production

The deployment process:

  • The deploy engineer for the week goes to Jenkins and clicks “Build
    Now” for the relevant project, passing the branch name as a
    parameter. Out pops a tagged Docker image which is automatically
    pushed into the registry. The engineer selects a Docker host in the
    environment that is not currently active in the load balancer. The
    engineer logs in and pulls the new version from the registry
docker pull registry.abc.net/javaservice1:release-1.0.1
  • Finds the existing container
docker ps
  • Stops the existing container.
docker stop [container_id]
  • Starts a new container with all of the necessary flags to launch the
    container correctly. This can be borrowed from the previous running
    container, the shell history on the host, or it may be documented
    elsewhere.
docker run -d -p 8080:8080 … registry.abc.net/javaservice1:release-1.0.1
  • Pokes the service and does some manual testing to verify that it is
    working.
curl localhost:8080/api/v1/version
  • During the production maintenance window, updates the load-balancer
    to point to the updated host.

  • Once verified, the update is applied to all of the other hosts in
    the environment in case a failover is required.

Admittedly, this deployment process isn’t very impressive, but it’s a
great first step towards continuous deployment. There are plenty of
places to improve, but consider the benefits:

  • The ops engineer has a recipe for deployment and every application
    deploys using the same steps. The parameters for the Docker run
    step have to be looked up for each service, but the general cadence
    is always the same: Docker pull, Docker stop, Docker run. This is
    super simple and makes it hard to forget a step.
  • With a minimum of two hosts in the environment, we have manageable
    blue-green deployments. A production window is simply a cutover in
    the load-balancer configuration with an obvious and quick way to
    rollback. As the deployments become more dynamic, upgrades,
    rollbacks, and backend server discovery get increasingly difficult
    and require more coordination. Since deployments are manual, the
    costs of blue-green are minimal but provide major benefits over
    in-place upgrades.

Alright, on to the pain points:

  • Retyping the same commands. Or, more accurately, hitting up and
    enter at your bash prompt repeatedly. This one is easy: automation
    to the rescue! There are lots of tools available to help you launch
    Docker containers. The most obvious solution for an ops engineer is
    to wrap the repetitive logic in a bash script so you have a single
    entry point. If you call yourself a devops engineer, instead, you
    might reach for Ansible, Puppet, Chef, or SaltStack. Writing the
    scripts or playbooks are easy, but there are a few questions to
    answer: where does the deployment logic live? And how do you keep
    track of the different parameters for each service? That brings us
    to our next point.
  • Even an ops engineer with super-human abilities to avoid typos and
    reason clearly in the middle of the night after a long day at the
    office won’t know that the service is now listening on a different
    port and the Docker port parameter needs to be changed. The crux of
    the issue is that the details of how the application works are
    (hopefully) well-known to developers, and that information needs to
    be transferred to the operations team. Often times, the operations
    logic lives in a separate code repository or no repository at all.
    Keeping the relevant deployment logic in sync with the application
    can be difficult. For this reason, it’s a good practice to just
    commit your deployment logic into the code repo with your
    Dockerfile. If there are situations where this isn’t possible,
    there are ways to make it work (more on this later). The important
    thing is that the details are committed somewhere. Code is better
    than a deploy ticket, but a deploy ticket is still much better than
    in someone’s brain.
  • Visibility. Troubleshooting a container requires logging into
    the host and running commands. In reality, this means logging into
    a number of hosts and running a combination of ‘docker ps’ and
    ‘docker logs –tail=100’. There are many good solutions for
    centralizing logs and, if you have the time, they are definitely
    worth setting up. What we found to generally be lacking, though,
    was the ability to see what containers were running on which hosts.
    This is a problem for developers, who want to know what versions are
    deployed and at what scale. And this is a major problem for
    operations, who need to hunt down containers for upgrades and
    troubleshooting.

Given this state of affairs, we started to implement changes to address
the pain points. The first advancement was to write a bash script
wrapping the common steps for a deployment. A simple wrapper might look
something like this:

!/bin/bash
APPLICATION=$1
VERSION=$2

docker pull "registry.abc.net/${APPLICATION}:${VERSION}"
docker rm -f $APPLICATION
docker run -d --name "${APPLICATION}" "registry.abc.net/${APPLICATION}:${VERSION}"

This works, but only for the simplest of containers: the kind that users
don’t need to connect to. In order to enable host port mapping and
volume mounts, we need to add application-specific logic. Here’s the
brute force solution that was implemented:

APPLICATION=$1
VERSION=$2

case "$APPLICATION" in
java-service-1)
  EXTRA_ARGS="-p 8080:8080";;
java-service-2)
  EXTRA_ARGS="-p 8888:8888 --privileged";;
*)
  EXTRA_ARGS="";;
esac

docker pull "registry.abc.net/${APPLICATION}:${VERSION}"
docker stop $APPLICATION
docker run -d --name "${APPLICATION}" $EXTRA_ARGS "registry.abc.net/${APPLICATION}:${VERSION}"

This script was installed on every Docker host to facilitate
deployments. The ops engineer would login and pass the necessary
parameters and the script would do the rest. Deployment time was
simplified because there was less for the engineer to do. The problem
of encoding the deployment logic didn’t go away, though. We moved it
back in time and turned it into a problem of committing changes to a
common script and distributing those changes to hosts. In general, this
is a great trade. Committing to a repo gives you great benefits like
code review, testing, change history, and repeatability. The less you
have to think about at crucial times, the better. Ideally, the relevant
deployment details for an application would live in the same source repo
as the application itself. There are many reasons why this may not be
the case, not the least of which being that developers may object to
having “ops” stuff in their java repo. This is especially true for
something like a deployment bash script, but also pertains to the
Dockerfile itself. This comes down to a cultural issue and is worth
working through, if at all possible. Although it’s certainly doable to
maintain separate repositories for your deployment code, you’ll have to
spend extra energy making sure that the two stay in sync. But, of
course, this is an article about doing it the hard way. At ABC, the
Dockerfiles started life in a dedicated repository with one folder per
project, and the deploy script lived in its own repo. cd
3
The Dockerfiles repository had a working copy checked out at a
well-known location on the Jenkins host (say,
‘/opt/abc/Dockerfiles’). In order to build the Docker image for an
application, Jenkins would first check for a Dockerfile in a local
folder ‘docker’. If not present, Jenkins would search the Dockerfiles
path, copying over the Dockerfile and accompanying scripts before
running the ‘docker build’. Since the Dockerfiles are always at
master, it’s possible to find yourself in a situation where the
Dockerfile is ahead of (or behind) the application configuration, but in
practice this mostly just works. Here’s an excerpt from the Jenkins
build logic:

if [ -f docker/Dockerfile ]; then
  docker_dir=Docker
elif [ -f /opt/abc/dockerfiles/$APPLICATION/Dockerfile ]; then
  docker_dir=/opt/abc/dockerfiles/$APPLICATION
else
  echo "No docker files. Can’t continue!"
  exit 1
if
docker build -t $APPLICATION:$VERSION $docker_dir

Over time, dockerfiles and supporting scripts were migrated into the
application source repositories. Since Jenkins was already looking in
the local repo first, no changes were required to the build pipeline.
After migrating the first service, the repo layout looked roughly like:
cd
4
One problem we ran into with having a separate repo was getting Jenkins
to trigger a rebuild of the application if either the application source
or packaging logic changed. Since the ‘dockerfiles’ repo contained
code for many projects, we didn’t want to trigger all repos when a
change occurred. The solution: a well-hidden option in the Jenkins Git
plugin
called
Included Regions.
When configured, Jenkins isolates the build trigger to a change in a
specific sub-directory inside the repository. This allows us to keep all
Dockerfiles in a single repository and still be able to trigger specific
builds when a change is made (compared to building all images when a
change is made to a specific directory inside the repo). CD Part
1_2_jenkins-included-regions_edited
Another aspect of the initial workflow was that the deploy engineer
had to force a build of the application image before deployment. This
resulted in extra delays, especially if there was a problem with the
build and the developer needed to be engaged. To reduce this delay, and
pave the way to more continuous deployment, we started building Docker
images on every commit to a well-known branch. This required that every
image have a unique version identifier, which was not always the case if
we relied solely on the official application version string. We ended
up using a combination of official version string, commit count, and
commit sha:

commit_count=$(git rev-list --count HEAD)
commit_short=$(git rev-parse --short HEAD)
version_string="${version}-${commit_count}-${commit_short}"

This resulted in a version string that looks like ‘1.0.1-22-7e56158’.
Before we end our discussion of the Docker file phase of our pipeline,
there are a few parameters that are worth mentioning. Before we
operated a large number of containers in production we had little use
for these, but they have proven helpful in maintaining the uptime of our
Docker cluster.

  • Restart
    Policy

    • A restart policy allows you to specify, per-container, what
      action to take when a container exits. Although this can be used to
      recover from an application panic or keep the container retrying
      while dependencies come online, the big win for Ops is automatic
      recovery after a Docker daemon or host restart. In the long run,
      you’ll want to implement a proper scheduler that can restart failed
      containers on new hosts. Until that day comes, save yourself some
      work and set a restart policy. At this stage in ABC, we defaulted to
      ‘–restart always’, which will cause the container to restart
      indefinitely. Simply having a restart policy will make planned (and
      unplanned) host restarts much less painful.
  • **Resource
    Constraints
    ** –
    With runtime resource constraints, you can set the maximum amount of
    memory or CPU that a container can consume. It won’t save you from
    general over-subscription of a host, but it can keep a lid on memory
    leaks and runaway containers. We started out by applying a generous
    memory limit (e.g. ‘–memory=“8g“‘) to containers that were
    known to have issues with memory growth. Although having a hard
    limit means the application will eventually hit an Out-of-Memory
    situation and panic, the host and other containers keep right on
    humming.

Combining restart policies and resource limits gives you greater cluster
stability while minimizing the impact of the failure and improving time
to recovery. In practice, this type of safeguard gives you the time to
work with the developer on the root cause, instead of being tied up
fighting a growing fire. To summarize, we started with a rudimentary
build pipeline that created tagged Docker images from our source repo.
We went from deploying containers using the Docker CLI to deploying them
using scripts and parameters defined in code. We also looked at how we
organized our deployment code, and highlighted a few Docker parameters
to help Ops keep the services up and running. At this point, we still
had a gap between our build pipelines and deployment steps. The
deployment engineer were bridging that gap by logging into a server to
run the deployment script. Although an improvement from where we
started, there was still room for a more automated approach. All of the
deployment logic was centralized in a single script, which made testing
locally much more difficult when developers need to install the script
and muddle through its complexity. At this point, handling any
environment specific information by way of environment variables
was also contained in our deployment script. Tracking down which
environmental variables were set for a service and adding new ones
was tedious and error-prone. In the next
post
,
we take a look at how we addressed these pain points by deconstructing
the common wrapper script, bringing the deployment logic closer to the
application using Docker Compose.Go to Part
2>>

Please also download your free copy of ”Continuous Integration and
Deployment with Docker and
Rancher
” a detailed
eBook that walks through leveraging containers throughout your CI/CD
process.

Build a CI/CD Pipeline with Kubernetes and Rancher
Recorded Online Meetup of best practices and tools for building pipelines with containers and kubernetes.

Tags: ,, Category: Uncategorized Comments closed

Announcing Rancher 1.0 GA

Tuesday, 29 March, 2016

Rancher 1.0
LogoToday we achieved a
major milestone by shipping Rancher 1.0, our first generally available
release. After more than one and a half years of development, Rancher
has reached the quality and feature completeness for production
deployment. We first unveiled a preview of Rancher to the world at the
November 2014 Amazon Re:invent conference. We followed that with a Beta
release in June 2015. I’d like to congratulate the entire Rancher
development team for this achievement.

As an open source project, Rancher was developed in close collaboration
with the user and developer community. Some of you have been with us
from the very beginning and have seen dramatic enhancements and changes
since our initial preview release. Some of you were even bold enough to
deploy Rancher in mission-critical production environments prior to our
GA release! Rancher simply would not be where it is today without your
feedback, suggestions, and contributions. With your help, Rancher has
now over a million downloads and over 2500 beta program participants.
We can’t thank our community enough and are looking forward to working
with each and every one of you as we continue to improve and shape
Rancher into the best container management platform.

In this blog post I would like to also reflect upon what we have built
by explaining what problems Rancher is designed to solve, how the
community is using Rancher in practice, why users find Rancher to be
uniquely suited for their applications, and how we plan to continue to
develop Rancher post 1.0 GA.

We’ve created a quick demo to introduce the new release.

###

The problem Rancher solves

Rancher is a complete and turn-key container management platform. As
organizations start to deploy Docker containers in production, the
immediate challenge becomes the integration of large collections of
open-source technologies. As illustrated in the following figure,
container management involves solving problems spanning across storage,
networking, monitoring, orchestration, and scheduling.

container
management

Rancher develops, integrates, and distributes all of the technologies
necessary to run containers in production. At Rancher Labs, we integrate
and distribute market-leading container orchestration and scheduling
frameworks such as Docker Swarm and Kubernetes, while developing the
necessary app catalog, enterprise user management, access control,
container networking and storage technologies ourselves. The result is a
complete platform that offers superb developer and operator experience.
With Rancher, organizations no longer need to worry about keeping up
with and integrating a myriad of technologies from the fast-moving
container ecosystem. Instead, they deploy Rancher once and can then
focus on developing the applications that make their business better.

###

How organizations use Rancher

Most organizations today employ or are moving toward an agile software
development pipeline. As users adopt containers, tools like GitHub,
Jenkins, and Docker Hub solve the front-half of that pipeline. Users
deploy Rancher so that they can test, deploy, upgrade, and operate
containerized application on any public cloud or private data center.

Container Devops
Pipeline

###

Why Rancher is unique

We set out to build Rancher because we saw the need for a complete and
turn-key container management platform. The resulting product, Rancher,
has a number of unique qualities:

  • Open source

    . Rancher is 100% open source. We believe leveraging the power of an
    open source community is the best way to build platform software,
    and we are confident that organizations will pay for enterprise
    support and thus help fund our development effort.

  • Easy to use

    . Time and time again, developers have told us they love Rancher’s
    simple and intuitive experience which enables them to focus on
    building applications as opposed to having to build the underlying
    infrastructure software themselves.

  • Enterprise grade

    . Rancher implements enterprise management features such as LDAP and
    AD integration, role based access control, unified infrastructure
    visibility and audit, and a unified application catalog.

  • Infrastructure agnostic

    . Rancher runs on computing resources in the form of Linux servers,
    which are a commodity offered by all clouds and data centers.
    Rancher does not rely on proprietary features supported by one cloud
    provider and not others. Rancher builds a rich set of storage,
    networking, load balancing, DNS, and metadata services that work
    consistently for containers running on any cloud.

  • Support for both Swarm and Kubernetes

    . Modern DevOps practices do not impose the choice of application
    frameworks across the organization. As a result different teams tend
    to choose their own container orchestration and scheduling
    frameworks. Rancher is the only container management platform today
    that can support both Swarm and Kubernetes.

###

What you can expect after 1.0

We are lucky to have passionate users and open source community members.
The community wants us to continue to improve networking and storage
features, implement richer enterprise-grade visibility and control
features, onboard and certify more application catalog entries, and
support additional container orchestration and scheduling frameworks.
You can get a good idea of what users and community members want by
looking at the Rancher Forums

and the list of open
issues

on Rancher’s GitHub page. With 1.0 behind us, you should expect the
feature development velocity to increase. While maintaining a stable
release branch, we will continue to release new features and
capabilities on an aggressive release schedule. Stay tuned!

To see Rancher 1.0 in action, join us this Wednesday at 1:00 pm Eastern
time for an Online Meetup on building your own Containers-as-a-Service
platform with Rancher 1.0. We’ll be joined by the container team at Sony
PlayStation, who will be sharing some of their experiences using
Rancher.

Tags: , Category: Uncategorized Comments closed