SUSE OpenStack Cloud 6? It´s a Breeze With Our Documentation!

Wednesday, 9 March, 2016

Last week on Thursday SUSE announced the general availability of SUSE OpenStack Cloud 6. This version is based on the OpenStack release Liberty. It provides the latest enterprise-ready technology for building Infrastructure-as-a-Service private clouds with less stress on your IT staff and resources. SUSE OpenStack Cloud 6 not only delivers high availability enhancements and non-disruptive upgrades for future releases, but also provides now Docker and IBM z Systems mainframe support to make it easier to move business-critical applications and data to the cloud.

In addition, new OpenStack training and certification from SUSE will help grow the OpenStack skills base and support the growth of OpenStack solutions in the market. SUSE is introducing the SUSE Certified Administrator-OpenStack (SCA-OpenStack) certification along with a new training course on deploying and administering SUSE OpenStack Cloud to complement SUSE’s existing SUSE OpenStack Cloud training. First sessions of the new course will be held at the upcoming OpenStack Summit in Austin, Texas.

At least just as important, my colleagues Frank Sundermeyer and Tanja Roth did a phenomenal job providing, in time for the launch, all fundamental documentation – and even more than that – to make sure you can start right away with your own implementation of SUSE OpenStack Cloud 6.

Documentation is an essential part of any product, and this especially holds true for software. Of course, if you are a hardcore techie, if you have enough time, if your boss is not breathing down your neck, you could just sit down and check out everything yourself. However, in business in general,  you don’t have time because time is money. And you want to do – no, you must do – the right thing. But do you always know what the right thing is?

The SUSE OpenStack Cloud Documentation helps you to perform the right tasks at the right time. No matter if you are the cloud operator, the administrator, or the actual user of the SUSE OpenStack Cloud environment in your organization, for every task you’ll find the right guide:

  • The Deployment Guide addresses the operator. It helps you with the installation and deployment of SUSE OpenStack Cloud. It gives an introduction to the SUSE OpenStack Cloud architecture, lists the requirements and describes how to set up, deploy, and maintain the individual components from bare-metal, to the operating system, to the OpenStack components. What’s more, it also contains information about troubleshooting, support and a glossary listing the most important terms and concepts for SUSE OpenStack Cloud.

Blog SOC deployment

  • The Admin User Guide, as the name indicates, targets the system administrator, who maintains and secures an OpenStack cloud installation to serve end users’ needs. It guides you through the management of projects and users, images, flavors, quotas and networks. You also learn how to migrate instances. To complete your admin tasks, you can either use the graphical web interface (based on OpenStack Dashboard, code name Horizon) or the OpenStack command line clients.

Blog SOC admin


  • The End User Guide describes how to manage images, instances, networks and volumes, and track usage. As an OpenStack cloud end user, you can provision your own resources within the limits set by cloud administrator. Again, you can use either the graphical web interface or the OpenStack command line clients.

Blog SOC end

Besides the three main guides, the documentation team also provides the “Supplement to Admin User Guide and End User Guide“. This contains additional information for admin users and end users that is specific to SUSE OpenStack Cloud. And if you want to quickly find more detailed information about new features, package versions or changes from SUSE OpenStack Cloud 5 to SUSE OpenStack Cloud 6, just have a look at the Release Notes.

Best of all, you get the SUSE documentation in many different formats. You can choose between HTML, single page HTML, PDF or even ePub: kudos to all workaholics who opt for a vespertine reading at your couches! Now enjoy YOUR reading, no matter where you are and which format you prefer. And if you have any feedback or comment, don’t hesitate to send it directly to doc-team@suse.com.

SAP HANA on vSphere? VMware recommends SLES.

Wednesday, 2 March, 2016

Google Trends for "software-defined"

VMware recommends deploying SAP HANA on SUSE Linux Enterprise Server for SAP Applications in their best practices guide for SAP HANA on vSphere. Let’s take a quick step back and talk about what’s driving this.

The “software-defined” movement has taken over IT. In a software defined data center (SDDC), all the infrastructure is virtualized and delivered “as-a-service.”  In this hyper-competitive environment where businesses are striving to offer more services and respond faster, while at the same time reduce capital and operational expenses, the SDDC is the foundation of cloud services, which enables increased automation and flexibility, which leads to better business agility at a lower cost. Open source software is leading this evolution toward more agile service delivery and SUSE offers compute and storage solutions along with the tools to help you build an internal infrastructure that can quickly provision resources based on the unique requirements of each application. For customers invested in VMware, they can achieve similar results with vSphere and the vRealize suite of tools.

Now back to SAP. SAP software is ubiquitous in these data centers, managing business operations and customer relations. In today’s digital world, massive amounts of information are available to help businesses engage better with their customers and solve tough business challenges. SAP HANA is really good at processing massive real time data using in-memory computing, where all the data is stored in the memory and there is no time wasted in loading the data from hard-disk to RAM. Everything is in-memory all the time, which gives the CPUs quick access to data for processing. That means companies can gain new insights from advanced analytics and build intelligent applications that provide deeper insight at unprecedented speed.

So, why are VMware customers deploying SAP HANA on vSphere?  For the same reasons they’re virtualizing the rest of their IT infrastructure: SAP HANA on vSphere improves availability and business continuity, allows rapid and consistent provisioning, unifies management with the rest of the virtual data center, and enables greater utilization of existing resources and infrastructure, all while maintaining acceptable performance.

And now, with Dynamic Tiering, SAP HANA is not confined by the size of available memory since the SAP HANA warm data can be stored on disk in a columnar format and accessed transparently by applications. Thus, the 1TB virtual machine maximum in vSphere 5.5 is an artificial barrier, and SAP HANA multi-terabyte size databases can be easily virtualized with vSphere 5.5 using Dynamic Tiering, Near-Line Storage and other memory management techniques SAP has introduced to the SAP HANA platform to optimize and reduce HANA’s in-memory footprint.

SUSE, VMware and SAP are tied closely together by alliance partnerships that span over a decade. SUSE Linux Enterprise Server is the OS that VMware relies on for its vApp soft appliances, and SUSE Linux Enterprise Server for SAP is the number one OS for SAP deployments on Linux. So it’s no surprise that SLES for SAP is the operating system recommended by VMware in their best practices guide for SAP HANA on vSphere.

Click here to get a quick overview on SAP HANA on vSphere using SUSE Linux Enterprise Server for SAP.


Building Your Home Lab

Friday, 22 January, 2016

lab_picOk, I admit it, I am a geek.  I have enough hardware in my home lab to run a fairly good sized business if I so desired.  I thought others might appreciate having some of the information and ideas on how to build a lab on the cheap (or relatively so).

First, we’ll start with a quick inventory of what populates my lab:

  • 2 Dell DCS6005 systems
    • 3 nodes per chassis
    • Each node with dual hex core opertons and 48GB of RAM
    • Supermicro RSC-R1U-E16R riser
    • Mellanox MHQH29B-XTR IB card
  • 4 HP SE316M1 servers
    • 1 Xeon L5640
    • 12 GB RAM
    • Replaced P400 RAID with P410
    • Mellanox MHQH29B-XTR IB card
  • 2 Minnowboard Max units with Flotsam (mSATA) expansion Lure
  • 1 RaspberryPi 2
  • 1 RaspberryPi 1
  • 1 Dell T110
  • 1 Extreme Networks Summit 400-48ti
  • 1 Raritan Dominion KX2-32
  • 1 Mellanox IS5030 IB switch
  • 1 Used 24u cabinet
  • 2 8 outlet Rack Mount Strip PDU
  • Various cable management gear
  • Lots of Cat 5e cables purchased online
  • 1 Kill-a-watt


IBpicFirst thing everyone always says is “WOW, that’s a lot of gear, what do you do with it all?”  That’s the easy part to answer.  I use this hardware to test and validate various configurations and to serve as the playground I need for testing ideas around cloud, software defined storage, systems management, etc.  Having all the hardware also keeps me sharp on the skills I have learned over the years involving hardware maintenance, design and cable management (which I need to spend a little more time on right now).  Most recently, this hardware has been used in doing a lot of testing for our SUSE Enterprise Storage product.  I have enough hardware to either have 2 clusters with a couple of clients, a larger cluster with some extra defined node roles, etc.

Next question I always get is about cost.  I source almost all of the equipment via ebay.  There are a number of liquidation companies that buy out leased or depreciated hardware and sell it cheap.

Let me provide a basic idea of what each component cost me.

  • Dell DCS6005 servers ~$500 each, these were the most expensive, but I bought them about 3 years ago.
  • HP SE316M1 server – ~$125 each
  • Extreme Networks switch ~$100
  • Raritan KX2-32 with CIM (Computer Interface Modules) ~ $250
  • Mellanox IS5030 and HBAs ~$300
  • PDU ~$50 each

You’ll notice I don’t mention the drives in the units.  This is because I am in the slow process of replacing them all with consumer SSD drives.  This helps lower the power use and heat production quite dramatically.  For the DCS6005 units, I have to convert the 2.5″ drives into a 3.5″ carrier with hot-swap capability.  For this, I really like the ICY Dock MB882SP-1S-2B, they run about $10 – $15 each if you catch a good deal on them.  For the drives, I have been picking up Kingston 120GB SSDNow V300 units.  You can find them for less than $50 and occasionally less if you are watching the deals quite carefully.

Let’s talk networking for a moment.  I don’t list my home router in the inventory, but it is an ASUS RT-AC66R unit.  I’ve used both the stock firmware and DD-WRT on this router and been quite happy with the ability to handle the throughput and advanced network configurations I need.

I chose Extreme Networks hardware for the enterprise class switch (if buying today, I would be buying an x450) for a few reasons:

  1. I’m very familiar with it from a previous job
  2. The same top-down CLI works for all the Extreme switches
  3. L3 routing capability
  4. Inexpensive
  5. Can be stacked
  6. 10Gb uplink ports

My recommendation is to buy what is right for your budget and what you are familiar with.  I don’t recommend necessarily buying the cheapest as buying something you are likely to encounter, even if an older version, builds your skill set for the real world.  I do usually suggest at least 24 ports with a preference towards 48 though.  If you look at the configuration I have there are about 30 network ports that are utilized when everything is cabled up.  Crazy, right?

Why the Infiniband hardware?  That’s because nobody I know really wants to spend huge amounts to enable 10Gb ethernet for their home lab.  The least expensive switch I can find today is an 8 port that costs just shy of $900.  Then add a few hundred each for each network card and you get well into the thousands pretty quick.  Contrast this with $50 or less for each dual port 40Gb/s IB card and a few hundred (if you catch the right deal) for an IB switch.  The IB hardware will run IP over IB and allow you to build a very high speed, low latency, private network that way.  Some of the IB switches will even bridge to a regular ethernet network.

I’ll probably blog another time about some specifics of the network configuration.  I have multiple subnets being routed at various places and a little guide may be helpful for those with less routing experience.

The KVM might seem not all that important, but trust me, it is.  When you have 11+ servers, perhaps in a different part of your house or office, an IP KVM is very useful.  Do I have to do some tricks to get this older hardware happy? Yes, it doesn’t work as well with a modern JVM as it used to, so you end up having to turn off certificate enforcement and turn down some security settings, but it does still work nicely.  It also saves you from plugging and unplugging a monitor, keyboard and mouse when you absolutely MUST be on the console.  Also the use of Cat 5 cabling makes it easier to keep a small footprint for the cable mess you are generating by plugging in all this gear.

Let’s talk about power usage.  IF I were to leave all this gear on 24×7 I would see a significant power cost associated with it, something along the order of $150 per month.  I know this thanks to the Kill-a-watt meter I have the PDUs running through.  The meter indicates that power consumption for my configuration is around 2kW per hour.  This is important to monitor and know as it may pay into home office reimbursement OR be something you can claim on your taxes (consult your tax professional).  This doesn’t count the extra cost for cooling the heated air that I would be releasing as well as that varies throughout the seasons here in Oklahoma.

All that being said, I only run the gear when I actually need it on.   This keeps the power usage in check and also keeps noise level down.

Ok, so not everyone has the space and tolerance for a 24U cabinet in their house.  How else can you build a lab that provides that you need on the cheap.  There are a few primary building blocks that I really like.

  1. Business class laptops that are used.  These can usually be found for a few hundred each on ebay and upgraded with SSDs, RAM and an extra USB based network connection.  I have had a strong preference for Dell Latitude D630c systems in the past.  There are a lot of them, you get dual cores and you can put 8GB of RAM in them, although, it probably makes sense to identify a newer model at this point in time.
  2. Developer boards/systems like the Minnowboard Max.  With the Flotsam Lure, an mSATA drive, an extra USB3 1GbE and SSD for the SATA port, the total investment for each of these systems is around $250 – $275.  Not bad from a unit that draws about 5W.
  3. Dell T110 II, Lenovo TS140 or similar servers.  These tower servers were designed for small office environments and thus are quiet, but yet relatively well suited for lab environments.  The T110 I have actually was used as a home theater system for a period of time because it is so quiet.  Again, ebay is a great source for these systems.

At the end of the day, what matters is that if you are building a home lab, it doesn’t have to be the latest and greatest.  Think outside the box, don’t be afraid to use older components and maximize your learning and skill improvement from whatever you invest in.  The key is that the lab serves the need, not that it is the latest technological wonder.

New Technology Available in 2015

Thursday, 17 December, 2015

studioUntitled

Apply security fixes to your IT systems with zero interruption

It is called live patching that enable you to keep your IT system running while mitigating new threats. In other word, no more panic when the market discover new operating system vulnerability. New technology protect your operating system as it keeps running.

Less than a penny for 10GB per month!

Software-defined storage (SDS) is the process of separating the physical storage hardware (data plane) from the data storage management logic or “intelligence” (control plane). This storage solution requires no proprietary hardware components, enabling the use of off-the-shelf, low-cost commodity hardware.

Pain-Free Cloud Experience

65% of companies report that they have found the experience of trying to implement OpenStack cloud difficult. As the fastest and easiest OpenStack solution to deploy, maintain and manage, Pain-Free Cloud Experience takes the pain out of getting your private cloud up so you get real business benefits faster.

Effortless compliance

Regulatory compliance standards such as HIPAA and SOX require all IT systems to be protected, regardless of platform. Automate operating system tracking and auditing processes to ensure compliance with internal policies and external regulations. In parallel, automate your systems patch management.

Automates application deployment with containers

With containers and Docker, a technology that simplifies the application develop, build and deploy process, it takes just seconds. It provides customers with enterprise-focused features and easy-to-use tools that improve operational efficiency and allow you to more easily and fully use innovations in the Docker space.

Additional Information

Seven Features of SUSE Enterprise Storage 2 Which Make it the Preferred Data Center Storage Solution

Monday, 23 November, 2015

Simon Graphics is a design studio generating huge amounts of image and video files and are getting close to the limits of their proprietary storage solution. While it has worked well for them, it is a legacy from the company they acquired and is unaffordable to upgrade with fairly complex management. Their storage requirements are:

  • expand existing capacity with mostly regular disks
  • invest in some solid-state devices for faster data access
  • have some logic which automatically configures which data is accessed more often and makes it faster to access
  • policy-defined data redundancy between their onsite and remote location file storage

SUSE Enterprise Storage can do all this…. and very easy too.

SUSE Enterprise Storage is a highly scalable and resilient software-based storage solution. Based on Ceph, it scales to infinity while its self-healing and self-managing features let businesses add capacity at very reasonable cost and with little effort.

SES

What’s new with SUSE Enterprise Storage 2?

  • iSCSI block level access support for VMWare, Windows, Unix and other heterogeneous operating systems
  • Disk level data encryption with flexible placement for the key value
  • Data cache tiering with support for multiple performance or availability levels within a single cluster
  • Erasure coding for space-efficient redundancy – works a lot like a configurable network RAID with more control and less cost
    Erasure_coding_SUSE_Storage
  • Thin provisioning for optimized data utilization
  • Copy-on-write clones for application rollback
  • Object and block data access for unified data access

See SUSE Enterprise Storage 2 in an action video with use cases from SUSEcon 2015.

Looking for more technical details – see David Byte’s technical blog on SUSE Enterprise Storage.

Rancher and Spotinst partner to introduce a new model for utilizing Docker orchestration tools on spot instances

Monday, 16 November, 2015

spotinstlogo](https://cdn.rancher.com/wp-content/uploads/2015/11/16025649/spotinstlogo.png)
We
are very excited to announce a new partnership
with Spotinst today to deliver intelligent
management and migration of container workloads running on spot
instances. With this new solution, we have developed a simple, intuitive
way for using spot instances to run any
container workload reliably and for a fraction of the cost of
traditional applications. Since the dawn
of data centers we’ve seen continuous improvements in utilization and
cost efficiency. But like [Jevons’
Paradox]](https://en.wikipedia.org/wiki/Jevons_paradox),
the more efficient we become in consuming
a resource, the more of that resource we consume
. So we always are
seeking the newest, fastest and uber-optimized of everything.

How it works:

Spotinst is a SaaS platform that enables reliable, highly available use
of AWS Spot Instances and Google Preemptible VMs with typical savings of
70-90%.

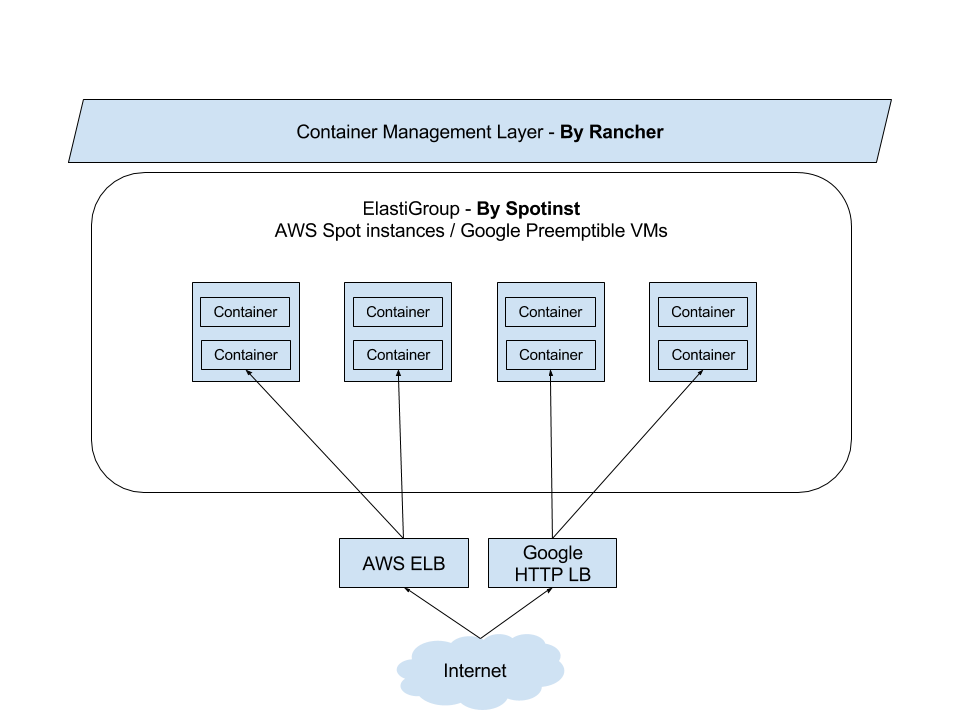
We’ve worked with the team at Spotinst to integrate with the Rancher API directly. The integration
utlizes Docker “checkpoint and resume” (CRIU project). Based on metrics
and business rules provided by Spotinst, Rancher can freeze any
container and resume it on any other instance, automating the process a
typical DevOps team might implement to manage container
deployment.
rancher-spotinst-1](https://www.suse.com/c/wp-content/uploads/2021/09/rancher_blog_rancher-spotinst-1.png)
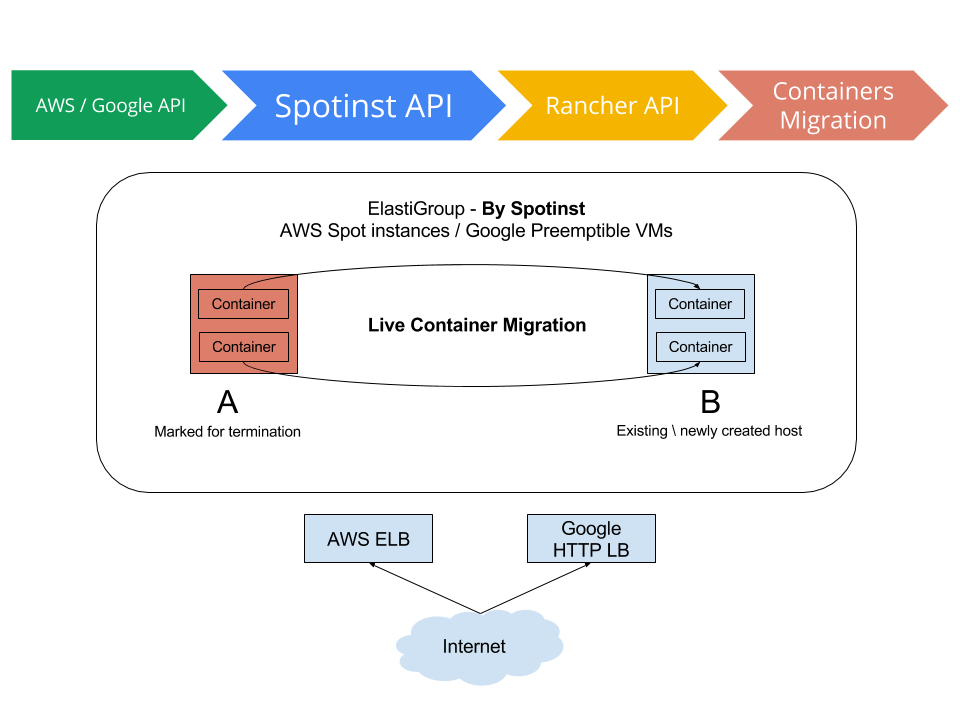
For example, if Spotinst identifies that the spot instance a
container is running on, is about to terminate (with a 4 – 7 minute
heads-up), Spotinst will instruct Rancher to pause that container and
relocate it to another relevant instance.
rancher-spotinst-2](https://www.suse.com/c/wp-content/uploads/2021/09/rancher_blog_rancher-spotinst-2.png)

Unprecedented Availability for Online Gaming While pizza servers,
blade racks and eventually virtualization technology paved the way for
modern data centers, today’s cloud computing customer expects
increasingly higher performance and higher availability in everything
from online gaming to genome sequencing. An
awesome example of how Docker is utilizing live migration to deliver
high availability can be seen in this
presentation from
DockerCon earlier this yeaar.

The presenters show how they containerized Quake, had it running on a
DigitalOcean server in Singapore, and then live migrated it to Amsterdam
with the player experiencing practically zero interruption to his game.
Using “checkpoint and resume”, they
didn’t just stop the container, but
took an entire running process with all its memory, file descriptors,
etc. and effortlessly moved it and resumed it halfway around the
world.

How it works?

rancher-spotinst-4](https://www.suse.com/c/wp-content/uploads/2021/09/rancher_blog_rancher-spotinst-4.png)

We’re really excited about the potential of live migrating containers,
and this partnership with Spotinst. By moving workloads to spot
instances, organizations can dramatically reduce the cost of cloud
resources.

To try out the new service, you can sign up for a Spotinst account and directly connect it to your
running Rancher deployment, via your API keys.

To learn more, please request a demonstration from one of our engineers.

Tags: ,,, Category: Uncategorized Comments closed

Introducing Hyper-Converged Infrastructure for Containers, Powered by Rancher and Redapt

Wednesday, 11 November, 2015

converged
nodesHyper-Converged
Infrastructure is one of the greatest innovations in the modern data
center. I have been a big fan ever since I heard the analogy “iPhone
for the data center

from Nutanix, the company who invented hyper-converged infrastructure.
In my previous roles as CEO of Cloud.com, creator of CloudStack, and CTO
of Citrix’s CloudPlatform Group, I helped many organizations transform
their data centers into infrastructure clouds. The biggest challenge was
always how to integrate a variety of technologies from multiple vendors
into a coherent and reliable cloud platform. Hyper-converged
infrastructure is an elegant solution to this complexity, that makes
infrastructure consumable by offering a simple turn-key experience.
Hyper-convergence hides the underlying complexity and makes the lives of
data center operators much better. Typically, hyper-converged
infrastructure is used to run virtual machines (VMs), the popular
workload running in data centers today. The nature of data center
workloads, however, are changing. In the last year, Docker containers
have become a significant type of workloads in data centers. Because of
this, we are beginning to see market demand for purpose-built and
optimized infrastructure solution for containers. Today, our team at
Rancher announced a hyper-converged infrastructure platform for
containers
,
powered by Rancher and Redapt. This is a turn-key solution to stand up a
complete container service platform in the data center. Organizations no
longer need to source hardware, deploy virtualization and cloud
platforms, and integrate separate container orchestration systems.

Support for both VMs and Container Infrastructure

We designed the solution to support both VMs and containers, following
the approach used by Google to run virtual machines in
containers
.
We have experimented with this approach in our
RancherVM
project since April and have received a lot of positive feedback from
users. A benefit of running VMs inside containers is the ability to
leverage the same tools to manage both VMs and containers. Because VMs
and containers in fact behave in similar ways, the Rancher CLI and UI we
have developed for Docker containers seamlessly applies to VMs. We use
RancherOS as the base operating system
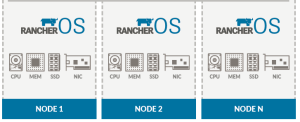
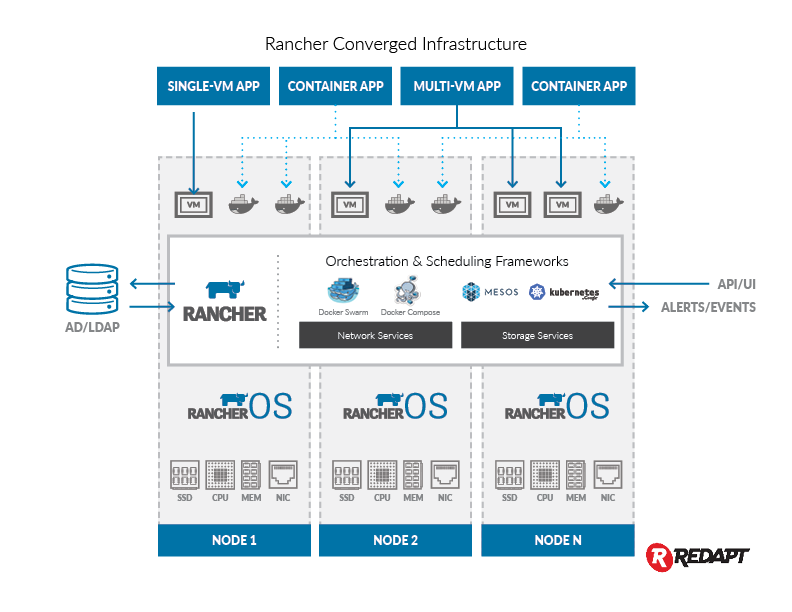
for the converged infrastructure platform. The RancherOS kernel has
builtin support for KVM. The following figure depicts how Rancher and
RancherOS work together to form the complete software stack for our
hyper-converged infrastructure solution.
Rancher Converged Infrastructure

Containerized Storage Services

All hyper-converged infrastructure solutions include a distributed
storage implementation. By leveraging our other major announcement
today, Persistent Storage
Services
,
this hyper-converged infrastructure solution has the unique ability to
use multiple distributed storage implementations. Users have the freedom
to deploy the software storage platform that suits the needs of their
applications. This approach reduces failure domain and improve
reliability. Failure of a distributed storage deployment can only impact
the application that consumes that storage. Users can deploy open source
and commercial storage software, as long as the storage software is
packaged as Docker containers. We are incorporating Gluster and
NexentaEdge into our hyper-converged infrastructure platform, and plan
to support additional storage products in the future. converged
infrastructure for
containers

Access to the Docker Image Ecosystem

Successful hyper-converged infrastructure solutions often target popular
application workload, such as databases or virtual desktops. The Docker
ecosystem offers a rich set of applications that can run on the Rancher
hyper-converged infrastructure solution. DockerHub alone, for example,
contains hundreds of thousands of Docker images. In addition, Rancher
makes it easy to run not just single containers, but large application
clusters orchestrated by new container frameworks such as Compose,
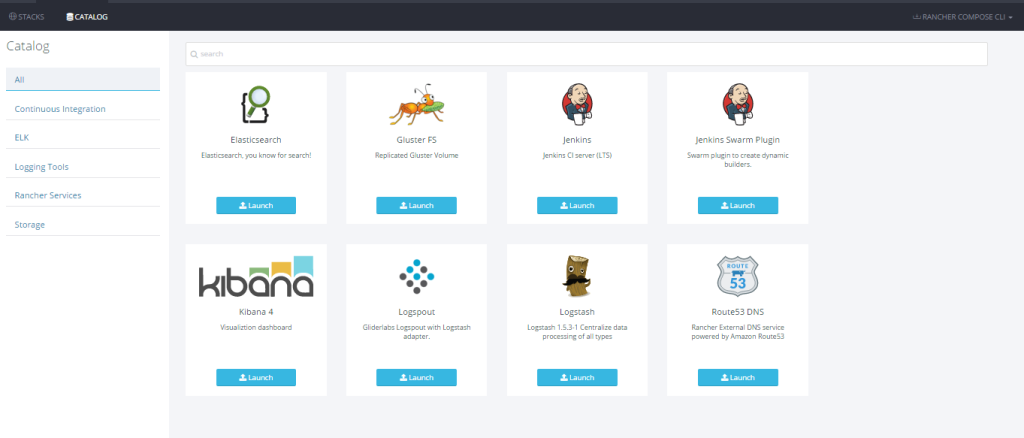
Swarm, and Kubernetes. Rancher Labs has certified and packaged a set of
popular DevOps tools. With a single click, users can deploy, for
example, an entire ELK cluster on the hyper-converged infrastructure.
catalog

Our Partnership with Redapt

redaptlogoWe
have known and worked with Redapt team for many years. Back in 2011, my
team at Cloud.com collaborated with Redapt to build one of the largest
CloudStack-powered private clouds at the time, consisting of over 40,000
physical servers. We were deeply impressed by the technical skills, the
ability to innovate, and the professionalism of the Redapt team.
Creating a hyper-converged infrastructure solution requires close
collaboration between the hardware and software vendors. We are
fortunate to be able to work with Redapt again to bring to market the
industry’s first hyper-converged infrastructure for containers solution.

Availability

Rancher and Redapt are working with early access customers now. We plan
to make the hyper-converged infrastructure solution generally available
in first half of 2016. Please request a demo if you would
like to speak with one of our engineers about converged infrastructure,
or register for our next online meetup, where we will be demonstrating
this new functionality. Sheng Liang is the
CEO and co-founder of Rancher Labs. You can follow him on Twitter at
@shengliang.

Tags: , Category: Uncategorized Comments closed

Deploying a scalable Jenkins cluster with Docker and Rancher

Thursday, 5 November, 2015

Build a CI/CD Pipeline with Kubernetes and Rancher
Recorded Online Meetup of best practices and tools for building pipelines with containers and kubernetes.

Containerization brings several benefits to traditional CI platforms
where builds share hosts: build dependencies can be isolated,
applications can be tested against multiple environments (testing a Java
app against multiple versions of JVM), on-demand build environments can
be created with minimal stickiness to ensure test fidelity, Docker
Compose can be used to quickly bring up environments which mirror
development environments. Lastly, the inherent isolation offered by
Docker Compose-based stacks allow for concurrent builds — a sticking
point for traditional build environments with shared components.

One of the immediate benefits of containerization for CI is that we can
leverage tools such as Rancher to manage distributed build environments
across multiple hosts. In this article, we’re going to launch a
distributed Jenkins cluster with Rancher Compose. This work builds upon
the earlier
work
** **by
one of the authors, and further streamlines the process of spinning up
and scaling a Jenkins stack.

Our Jenkins Stack
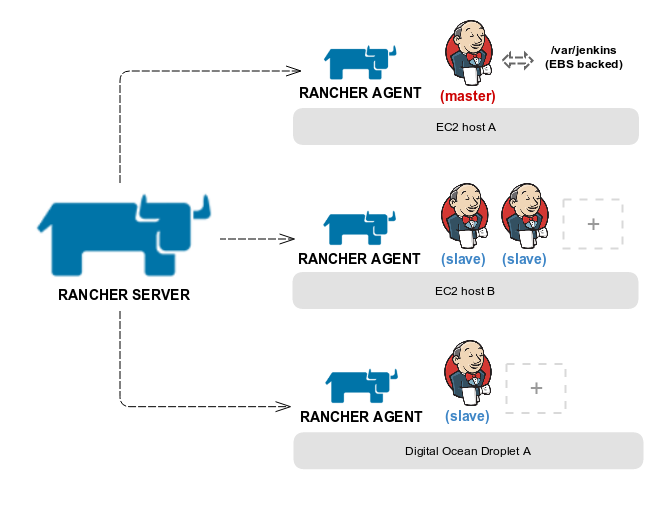
jenkins_master_slave
For our stack, we’re using Docker in Docker (DIND) images for
Jenkins master** and slave **running
on top of Rancher compute nodes launched in Amazon EC2. With DIND, each
Jenkins container runs a Docker daemon within itself. This allows us to
create build pipelines for dockerized applications with Jenkins.

Prerequisites

  • [AWS EC2
    account]
  • [IAM credentials for docker
    machine]
  • [Rancher
    Server v0.32.0+]
  • [Docker 1.7.1+]
  • [Rancher
    Compose]
  • [Docker
    Compose]

Setting up Rancher

Step 1: Setup an EC2 host for Rancher server

First thing first, we need an EC2 instance to run the Rancher server. We
recommend going with Ubuntu 14.04
AMI
for
it’s up-to-date kernel. Make sure[ to configure the security group for
the EC2 instance with access to port 22 (SSH) and 8080 (rancher web
interface):]

launch_ec2_instance_for_rancher_step_2

[Once the instance starts, the first order of business is
to ][install the
latest version of Docker by following the steps below (for Ubuntu
14.04):]

  1. [sudo apt-get
    update]
  2. [curl -sSL https://get.docker.com/ | sh (requires sudo
    password)]
  3. [sudo usermod -aG docker
    ubuntu]
  4. [Log out and log back in to the
    instance]

At this point you should be able to run docker without sudo.

[Step 2: Run and configure Rancher]

[To install and run the latest version of Rancher (v0.32.0 at the time
of writing), follow the instructions in the docs.
In a few minutes your Rancher server should be up and ready to serve
requests on port
8080. ][If you
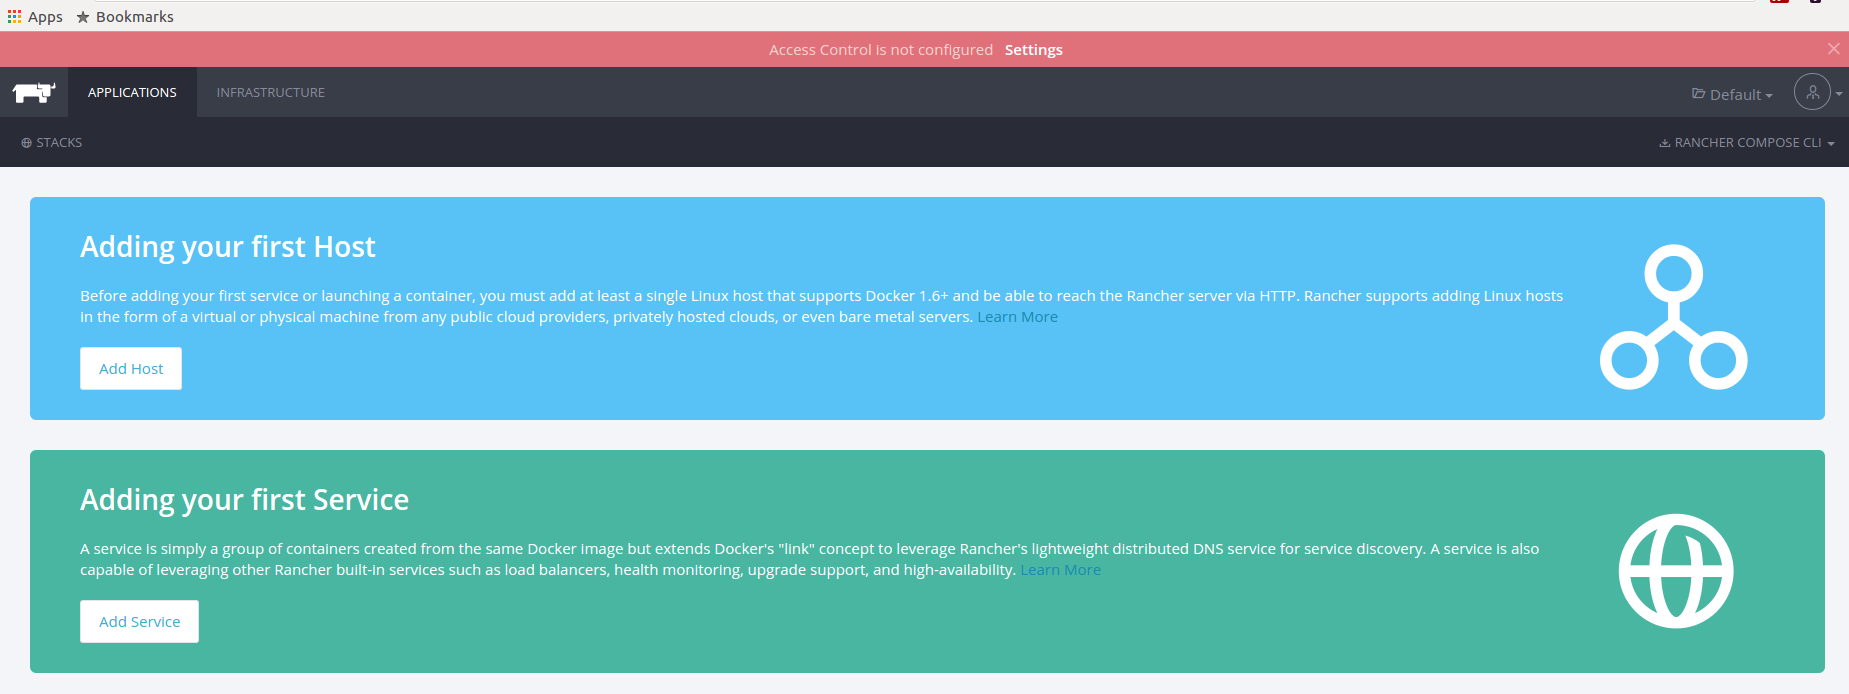
browse to http://YOUR_EC2_PUBLIC_IP:8080/ you will be greeted with a
welcome page and a notice asking you to configure
access. ][This is
an important step to prevent unauthorized access to your Rancher server.
Head over to the settings section and follow the instructions to
configure access
control. ]
rancher_setup_step_1

[We typically create a separate environment for hosting all developer
facing tools, e.g., Jenkins, Seyren, Graphite etc to isolate them from
the public facing live services. To this end, we’re going to create an
environment called *Tools. *From the environments menu (top left),
select “manage environments” and create a new environment. Since
we’re going to be working in this environment exclusively, let’s go
ahead and make this our default environment by selecting “set as
default login environment”
from the environments
menu. ]

rancher_setup_step_2_add_tools_env

The next step is to tell Rancher about our hosts. For this tutorial,
we’ll launch all hosts with Ubuntu 14.04. Alternatively, you can add an
existing host using the custom host** **option
in Rancher. Just make sure that your hosts are running Docker 1.7.1+.
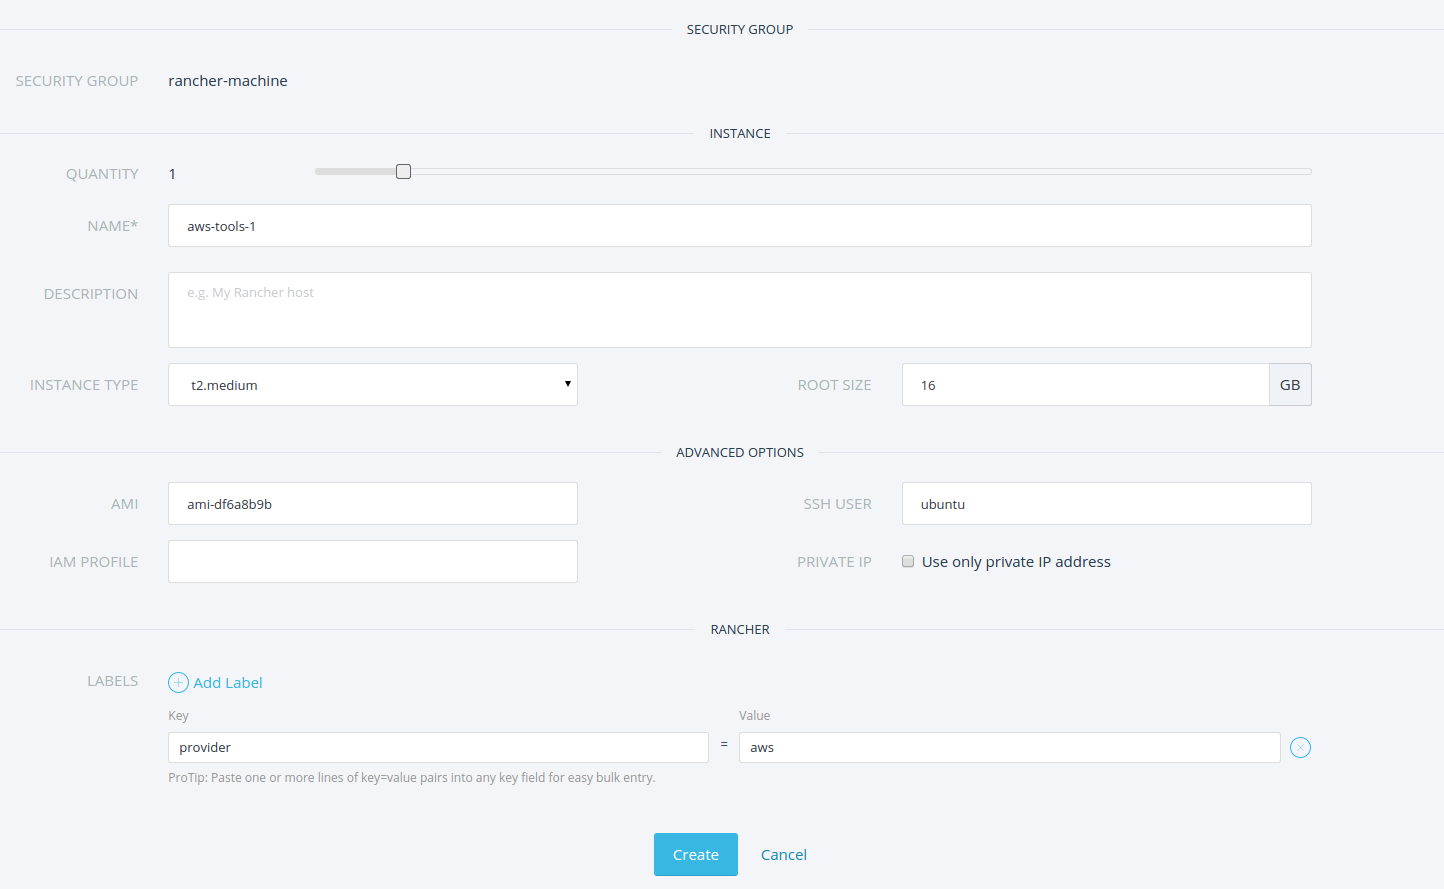
rancher_setup_step_3_add_ec2_host

One of the hosts (JENKINS_MASTER_HOST) is going to run Jenkins master
and would need some additional configuration. First, we need to open up
access to port 8080 (default Jenkins port). You can do that by updating
the security group used by that instance fom the AWS console. In our
case, we updated the security group ( “rancher-machine” ) which was
created by rancher. Second, we need to attach an additional EBS-backed
volume to host Jenkins configuration. Make sure that you allocate enough
space for the volume, based on how large your build workspaces tend to
get. In addition, make sure the flag “delete on termination” is
unchecked. That way, the volume can be re-attached to another instance
and backed up easily:

[![launch_ec2_ebs_volume_for_jenkins](https://cdn.rancher.com/wp-content/uploads/2015/08/01132712/launch_ec2_ebs_volume_for_jenkins.png)](https://cdn.rancher.com/wp-content/uploads/2015/08/01132712/launch_ec2_ebs_volume_for_jenkins.png)

Lastly, let’s add a couple of labels for the JENKINS_MASTER_HOST; 1)
add a label called “profile” with the value as “jenkins” and 2) add
a label called “jenkins-master” with the value “true“. We’re going
to use these labels later to schedule master and slave containers on
our hosts.

Step 3: Download and install rancher-compose CLI

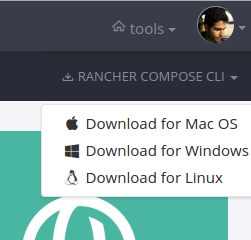
As a last step, we need to install the rancher-compose CLI on our
development machine. To do that, head over to the applications tab in
Rancher and download the rancher compose CLI for your system. All you
need is to add the path-to-your-rancher-compose-CLI to
your *PATH *environment variable.
rancher_setup_step_5_install_rancher_compose

With that, our rancher server is ready and we can now launch and manage
containers with it.

Launching Jenkins stack with Rancher

Step 1: Stack configuration

Before we launch the Jenkins stack, we need to create a new Rancher API
key from API & Keys section under settings. Save the API key pair
some place safe as we’re going to need it with rancher-compose. For the
rest of the article, we refer to the API key pair as [RANCHR_API_KEY
and RANCHER_API_KEY_SECRET]. Next, open up a
terminal to fetch the latest version of Docker and Rancher Compose
templates from Github:

git clone https://github.com/rancher/jenkins-rancher.git
cd jenkins-rancher

Before we can use these templates, let’s quickly update the
configuration. First, open up the Docker Compose file and update the
Jenkins username and password to a username and password of your choice.
Let’s call these credentials JENKINS_USER and JENKINS_PASSWORD.
These credentials will be used by the Jenkins slave to talk to master.
Second, update the host tag for slave and master to match the tags you
specified for your rancher compute hosts. Make sure that the
io.rancher.scheduler.affinity:host_label has a value of
“profile=jenkins” for jenkins-slave. Similarly, for
jenkins-master, make sure that the value
for io.rancher.scheduler.affinity:host_label is
“jenkins-master=true“. This will ensure that rancher containers are
only launched on the hosts that you want to limit them to. For example,
we are limiting our Jenkins master to only run on a host with an
attached EBS volume and access to port 8080.

jenkins-slave:
  environment:
    JENKINS_USERNAME: jenkins
    JENKINS_PASSWORD: jenkins
    JENKINS_MASTER: http://jenkins-master:8080
  labels:
    io.rancher.scheduler.affinity:host_label: profile=jenkins
  tty: true
  image: techtraits/jenkins-slave
  links:
  - jenkins-master:jenkins-master
  privileged: true
  volumes:
  - /var/jenkins
  stdin_open: true
jenkins-master:
  restart: 'no'
  labels:
    io.rancher.scheduler.affinity:host_label: jenkins-master=true
  tty: true
  image: techtraits/jenkins-master
  privileged: true
  stdin_open: true
  volume_driver: /var/jenkins_home
jenkins-lb:
  ports:
  - '8080'
  tty: true
  image: rancher/load-balancer-service
  links:
  - jenkins-master:jenkins-master
  stdin_open: true

Step 2: Create the Jenkins stack with Rancher compose

[Now we’re all set to launch the Jenkins stack. Open up a terminal,
navigate to the “jenkins-rancher” directory and type:
]

rancher-compose --url http://RANCHER_HOST:RANCHER_PORT/v1/ --access-key RANCHER_API_KEY --secret-key RANCHER_API_KEY_SECRET --project-name jenkins --verbose create

[The output of the rancher compose command should look something
like:]

[DEBU[0000] Opening compose file:
docker-compose.yml]
[ DEBU[0000]
Opening rancher-compose file:
/home/mbsheikh/jenkins-rancher/rancher-compose.yml]

[ DEBU[0000] [0/3] [jenkins-slave]:
Adding]
[ DEBU[0000] Found
environment: jenkins(1e9)]
[
DEBU[0000] Launching action for
jenkins-master]
[ DEBU[0000]
Launching action for jenkins-slave]
[
DEBU[0000] Launching action for
jenkins-lb]
[ DEBU[0000] Project
[jenkins]: Creating project]
[
DEBU[0000] Finding service
jenkins-master]
[ DEBU[0000] [0/3]
[jenkins-master]: Creating]
[
DEBU[0000] Found service jenkins-master]

[ DEBU[0000] [0/3] [jenkins-master]:
Created]
[ DEBU[0000] Finding service
jenkins-slave]
[ DEBU[0000] Finding
service jenkins-lb]
[ DEBU[0000]
[0/3] [jenkins-slave]: Creating]
[
DEBU[0000] Found service jenkins-slave]

[ DEBU[0000] [0/3] [jenkins-slave]:
Created]
[ DEBU[0000] Found service
jenkins-lb]
[ DEBU[0000] [0/3]
[jenkins-lb]: Created]

Next, verify that we have a new stack with three services:

rancher_compose_2_jenkins_stack_created

Before we start the stack, let’s make sure that the services are
properly linked. Go to your stack’s settings and select “View Graph”
which should display the links between various services:

rancher_compose_3_jenkins_stack_graph

Step 3: Start the Jenkins stack with Rancher compose

To start the stack and all of Jenkins services, we have a couple of
options; 1) select “Start Services” option from Rancher UI, or 2)
invoke rancher-compose CLI with the following command:

rancher-compose --url http://RANCHER_HOST:RANCHER_PORT/v1/ --access-key RANCHER_API_KEY --secret-key RANCHER_API_KEY_SECRET --project-name jenkins --verbose start

Once everything is running, find out the public IP of the host running
“jenkins-lb” from the Rancher UI and browse
to http://HOST_IP_OF_JENKINS_LB:8080/. If everything is configured
correctly, you should see the Jenkins landing page. At this point, both
your Jenkins master and slave(s) should be running; however, if you
check the logs for your Jenkins slave, you would see 404 errors where
the Jenkins slave is unable to connect to the Jenkins master. We need to
configure Jenkins to allow for slave connections.

Configuring and Testing Jenkins

In this section, we’ll go through the steps needed to configure and
secure our Jenkins stack. First, let’s create a Jenkins user with the
same credentials (JENKINS_USER and JENKINS_PASSWORD) that you
specified in your docker compose configuratio[n
file. ]Next, to enable security for Jenkins,
navigate to “manage Jenkins” and select “enable security” from the
security configuration. Make sure to specify 5000 as a fixed port for
“TCP port for JNLP slave agents“. Jenkins slaves communicate with the
master node on this port.

setup_jenkins_1_security

For the Jenkins slave to be able to connect to the master, we first need
to install the Swarm
plugin
. The
plugin can be installed from the “manage plugins” section in Jenkins.
Once you have the swarm plugin installed, your Jenkins slave should show
up in the “Build Executor Status” tab:
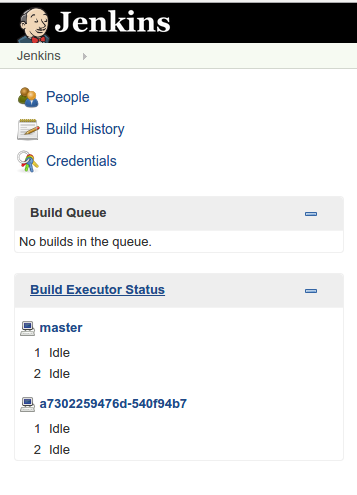
setup_jenkins_2_slave_shows_up

Finally, to complete the master-slave configuration, head over to
“manage Jenkins“. You should now see a notice about enabling master
security subsystem. Go ahead and enable the subsystem; it can be used to
control access between master and slaves:

setup_jenkins_3_master_slave_security_subsystem

Before moving on, let’s configure Jenkins to work with Git and Java
based projects. To configure git, simply install the git plugin. Then,
select “Configure” from “Manage Jenkins” settings and set up the JDK
and maven installers you want to use for your projects:

[setup_jenkins_4_jdk_7
]

setup_jenkins_5_maven_3

The steps above should be sufficient for building docker or maven based
Java projects. To test our new Jenkins stack, let’s create a docker
based job. Create a new “Freestyle Project” type job named
“docker-test” and add the following build step and select “execute
shell” with the following commands:

docker -v
docker run ubuntu /bin/echo hello world
docker stop $(docker ps -a -q)
docker rm $(docker ps -a -q)
docker rmi $(docker images -q)

Save the job and run. In the console output, you should see the version
of docker running inside your Jenkins container and the output for other
docker commands in our job.

Note: The stop, rm and rmi commands used in the above shell script
stops and cleans up all containers and images. Each Jenkins job should
only touch it’s own containers, and therefore, we recommend deleting
this job after a successful test.

Scaling Jenkins with Rancher

This is an area where Rancher really shines; it makes managing and
scaling Docker containers trivially easy. In this section we’ll show
you how to scale up and scale down the number of Jenkins slaves based on
your needs.

In our initial setup, we only had one EC2 host registered with Rancher
and all three services (Jenkins load balancer, Jenkins master and
Jenkins slave) running on the same host. It looks like:
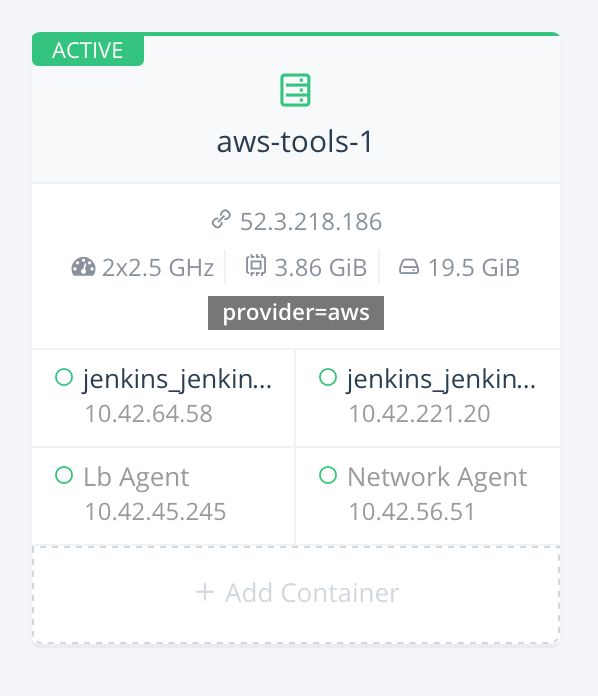
rancher_one_host

We’re now going to register another host by following the instructions:

rancher_setup_step_4_hosts

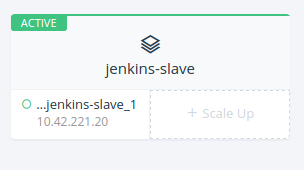
jenkins_scale_upTo launch more
Jenkins slaves, simply click “Scale up” from your “Jenkins” stack in
Rancher. That’s it! Rancher will immediately launch a new Jenkins slave
container. As soon as the slave container starts, it will connect with
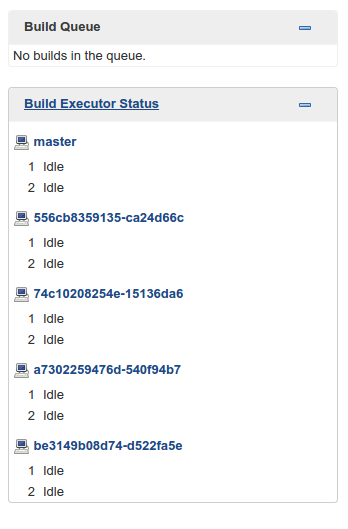
Jenkins master and will show up in the list of build hosts:
jenkins_scale_up_2

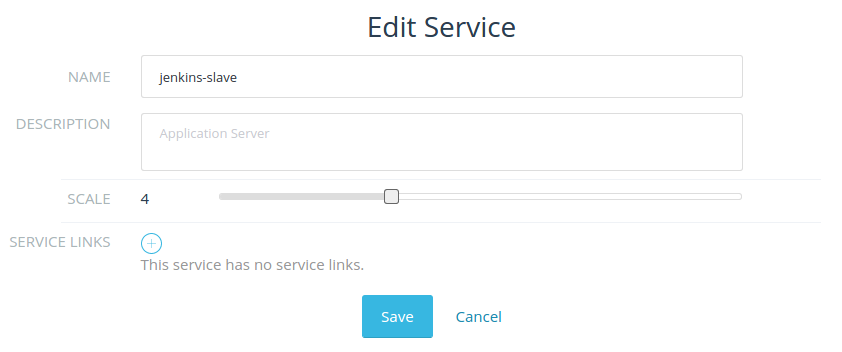
To scale down, select “edit” from jenkins-slave settings and adjust
the number of slaves to your liking:
jenkins_scale_down

In a few seconds you’ll see the change reflected in Jenkins list of
available build hosts. Behind the scenes, Rancher uses labels to
schedule containers on hosts. For more details on Rancher’s container
scheduling, we encourage you to check out the documentation.

Conclusion

In this article, we built Jenkins with Docker and Rancher. We deployed
up a multi-node Jenkins platform with Rancher Compose which can be
launched with a couple of commands and scaled as needed. Rancher’s
cross-node networking allows us to seamlessly scale the Jenkins cluster
on multiple nodes and potentially across multiple clouds with just a few
clicks. Another significant aspect of our Jenkins stack is the DIND
containers for Jenkins master and slave, which allows the Jenkins setup
to be readily used for dockerized and non dockerized applications.

In future articles, we’re going to use this Jenkins stack to create
build pipelines and highlight CI best practices for dockerized
applications. To learn more about managing applications through the
upgrade process, please join our next online meetup where we’ll dive
into the details of how to manage deployments and upgrades of
microservices with Docker and Rancher.

Bilal and Usman are server and infrastructure engineers, with
experience in building large scale distributed services on top of
various cloud platforms. You can read more of their work at
techtraits.com, or follow them on twitter
@mbsheikh and
@usman_ismail respectively.

Build a CI/CD Pipeline with Kubernetes and Rancher
Recorded Online Meetup of best practices and tools for building pipelines with containers and kubernetes.

Tags: ,, Category: Uncategorized Comments closed

SUSE Showcasing Public Cloud Solutions at AWS re:Invent

Friday, 18 September, 2015

As the world of Amazon Web Services (AWS) collides with Las Vegas for AWS re:Invent, SUSE has touched down to demonstrate how to put the “Enterprise” in Enterprise Linux on the public cloud.

SUSE and Amazon Web Services (AWS) share a common goal: making computing convenient and cost-effective. One of the many benefits from the unique SUSE-Amazon partnership, SUSE Linux Enterprise Server and Amazon EC2 virtual machine instances: enables Amazon EC2 customers to maximize cost-effectiveness and performance for their workloads.

But there is much more to explore at AWS re:Invent as well:

  • Explore the 11,000+ applications certified to run on SUSE Linux Enterprise Server on AWS
  • Find out how you can take your existing SUSE subscription to AWS
  • Uncover the fastest way to deploy and maintain your image
  • Discover how to develop, test and deploy mission-critical SAP workloads on AWS
  • Learn how enterprise security and stability on AWS worldwide makes SUSE Linux Enterprise the right choice for your business

When you aren’t participating in “Hackathoning,” hands-on training or just generally learning at AWS re:Invent, stop by the SUSE booth (#735) and see how we are extending the capabilities of the enterprise data center to the public cloud.

AWS_Logo_Advanced_Technology_Partner-450x193