Automate DNS Configuration with ExternalDNS

Monday, 18 June, 2018

Take a deep dive into Best Practices in Kubernetes Networking
From overlay networking and SSL to ingress controllers and network security policies, we’ve seen many users get hung up on Kubernetes networking challenges. In this video recording, we dive into Kubernetes networking, and discuss best practices for a wide variety of deployment options.

One of the awesome things about being in the Kubernetes community is the
constant evolution of technologies in the space. There’s so much
purposeful technical innovation that it’s nearly impossible to keep an
eye on every useful project. One such project that recently escaped my
notice is the ExternalDNS subproject. During a recent POC, a member of
the organization to whom we were speaking asked about it. I promised to
give the subproject a go and I was really impressed.

The ExternalDNS subproject

This subproject (the incubator process has been deprecated), sponsored
by sig-network and championed by Tim
Hockin
, is designed to automatically
configure cloud DNS providers. This is important because it further
enables infrastructure automation allowing DNS configuration to be
accomplished directly alongside application deployment.

Unlike a traditional enterprise deployment model where multiple siloed
business units handle different parts of the deployment process,
Kubernetes with ExternalDNS automates this part of the process. This
removes the potentially aggravating process of having a piece of
software ready to go while waiting for another business unit to
hand-configure DNS. The collaboration via automation and shared
responsibility that can happen with this technology prevents manual
configuration errors and enables all parties to more efficiently get
their products to market.

ExternalDNS Configuration and Deployment on AKS

Those of you who know me, know that I spent many years as a software
developer in the .NET space. I have a special place in my heart for the
Microsoft developer community and as such I have spent much of the last
couple of years sharing Kubernetes on Azure via Azure Container Service
and Azure Kubernetes Service with the user groups and meetups in the
Philadelphia region. It just so happens the persons asking me about
ExternalDNS are leveraging Azure as an IaaS offering. So, I decided to
spin up ExternalDNS on an AKS cluster. For step by step instructions and
helper code check out this
repository
.
If you’re using a different provider, you may still find these
instructions useful. Check out the ExternalDNS
repository
for
more information.

Take a deep dive into Best Practices in Kubernetes Networking
From overlay networking and SSL to ingress controllers and network security policies, we’ve seen many users get hung up on Kubernetes networking challenges. In this video recording, we dive into Kubernetes networking, and discuss best practices for a wide variety of deployment options.

Tags: ,, Category: Products, Rancher Kubernetes Comments closed

Amazon i SUSE przyspieszą migrację aplikacji SAP do Linuksa w chmurze AWS

Wednesday, 14 February, 2018

Systemy SUSE Linux dostępne są u wszystkich głównych dostawców chmury na świecie – AWS, Azure, Google. Mogą one obsługiwać nawet najbardziej newralgiczne aplikacje jak SAP przy zachowaniu korzyści wynikających ze stosowania chmury. Przy czym klienci mogą przenosić do chmury posiadane już subskrypcje na systemy SUSE lub korzystać z subskrypcji od dostawcy chmury i tego właśnie dotyczy współpraca SUSE i AWS.


Dzięki rozszerzeniu współpracy SUSE z firmą Amazon Web Services (AWS) może ona obecnie odsprzedawać oprogramowanie SUSE Linux Enterprise Server for SAP Applications bezpośrednio na platformie AWS Marketplace. Użytkownicy chmury AWS i systemów SAP uruchomionych na SUSE Linux Enterprise Server for SAP Applications otrzymają od firm AWS i SUSE zintegrowane wsparcie na poziomie Amazon Business, pojedynczy punkt kontaktowy do zgłoszeń serwisowych oraz będą mogli kupować systemy SUSE Linux Enterprise na żądanie, płacąc tylko za to, z czego w określonym czasie korzystają.

SUSE Linux Enterprise Server do zarządzania obciążeniem SAP jest dostępny w chmurze AWS od 2012 r., kiedy to AWS po raz pierwszy certyfikował swoją platformę dla aplikacji SAP. Dwa lata później AWS certyfikował swoje instancje dla SAP HANA i wówczas system SUSE Linux Enterprise Server for SAP Applications został również udostępniony w chmurze AWS. Jednak dotychczas j klienci w dużej mierze korzystali z własnych subskrypcji na oprogramowanie SUSE do obsługi aplikacji SAP w chmurze AWS i programu „bring-your-own-subscription”. Z kolei teraz dzięki współpracy AWS i SUSE można czerpać korzyści z opłat za faktyczne użycie systemów SUSE oraz gotowych, zarezerwowanych instancji z serwerami SUSE do uruchamiania obciążeń SAP w chmurze AWS.

Olbrzymia większość użytkowników oprogramowania SAP HANA wykorzystuje system SUSE Linux Enterprise Server for SAP Application do opracowywania, testowania i uruchamiania zadań produkcyjnych, a wiele dużych przedsiębiorstw robi to już dla aplikacji SAP w chmurze AWS. Po wydaniu instancji X1 oraz X1e.32xlarge Amazon Elastic Compute Cloud (Amazon EC2), które zostały stworzone specjalnie do obsługi zadań przetwarzania w pamięci (in-memory), coraz więcej wdrożeń SAP HANA przeprowadzanych jest chmurze AWS. Klienci zainteresowani produkcyjnymi wdrożeniami aplikacji SAP w chmurze AWS mają też do dyspozycji oprogramowanie klastrowe SUSE Linux Enterprise High Availability Extension, które zapewnia ciągłość działania instancji SAP HANA i w razie awarii przełączanie pomiędzy tzw. strefami dostępności (Availability Zones). Ponadto sam system SUSE Linux Enterprise Server for SAP Applications zawiera techniczne ulepszenia, jak zarządzanie podręczną pamięcią i ustawieniami jądra w celu zoptymalizowania działania systemu operacyjnego pod kątem obsługi oprogramowania SAP.

Żeby łatwo i szybko rozpocząć pracę z systemami SUSE Linux Enterprise Server for SAP Applications do obsługi SAP HANA wystarczy skorzystać z oprogramowania AWS SAP HANA Quick Start (https://aws.amazon.com/quickstart/architecture/sap-hana ). Pomaga ono uruchomić i skonfigurować infrastrukturę niezbędną do wdrożenia SAP HANA, często w czasie krótszym niż godzinę, korzystając z najlepszych praktyk AWS, SAP i SUSE.

Po więcej informacji o SAP HANA, AWS i SUSE warto zajrzeć na strony https://aws.amazon.com/marketplace/pp/B01E9GPLB8 i suse.com/aws.

2017 Container Technology Retrospective – The Year of Kubernetes

Wednesday, 27 December, 2017

It is not an
overstatement to say that, when it comes to container technologies, 2017
was the year of Kubernetes. While Kubernetes has been steadily gaining
momentum ever since it was announced in 2014, it reached escape velocity
in 2017. Just this year, more than 10,000 people participated in our
free online Kubernetes Training
classes.
A few other key
data points:

  1. Our company, Rancher Labs, built a product that supported multiple
    container orchestrators, including Swarm, Mesos, and Kubernetes.
    Responding to overwhelming market and customer demands, we decided
    to build Rancher 2.0 to 100% focus
    on Kubernetes. We are not alone. Even vendors who developed
    competing frameworks, like Docker Inc. and Mesosphere, announced
    support for Kubernetes this year.
  2. It has become significantly easier to install and operate
    Kubernetes. In fact, in most cases, you no longer need to install
    and operate Kubernetes at all. All major cloud providers, including
    Google, Microsoft Azure, AWS, and leading Chinese cloud providers
    such as Huawei, Alibaba, and Tencent, launched Kubernetes as a
    Service. Not only is it easier to set up and use cloud Kubernetes
    services like Google GKE, cloud Kubernetes services are cheaper.
    They often do not charge for resources required to run the
    Kubernetes master. Because it takes at least 3 nodes to run
    Kubernetes API servers and the etcd database, cloud
    Kubernetes-as-a-Service can lead to significant savings. For users
    who still want to stand up Kubernetes in their own data center,
    VMware announced Pivotal Container Service (PKS.) Indeed, with more
    than 40 vendors shipping CNCF-certified Kubernetes distributions,
    standing up and operating Kubernetes is easier than ever.
  3. The most important sign of the growth of Kubernetes is the
    significant number of users who started to run their
    mission-critical production workload on Kubernetes. At Rancher,
    because we supported multiple orchestration engines from day one, we
    have a unique perspective of the growth of Kubernetes relative to
    other technologies. One Fortune 50 Rancher customer, for example,
    runs their applications handling billions of dollars of transactions
    every day on Kubernetes clusters.

A significant trend we observed this year was an increased focus on
security among customers who run Kubernetes in production. Back in 2016,
the most common questions we heard from our customers centered around
CI/CD. That was when Kubernetes was primarily used in development and
testing environments. Nowadays, the most common feature requests from
customers are single sign-on, centralized access control, strong
isolation between applications and services, infrastructure hardening,
and secret and credentials management. We believe, in fact, offering a
layer to define and enforce security policies will be one of the
strongest selling points of Kubernetes. There’s no doubt security will
continue to be one of the hottest areas of development in 2018. With
cloud providers and VMware all supporting Kubernetes services,
Kubernetes has become a new infrastructure standard. This has huge
implications to the IT industry. As we all know, compute workload is
moving to public IaaS clouds, and IaaS is built on virtual machines.
There is no standard virtual machine image format or standard virtual
machine cluster manager. As a result, application built for one cloud
cannot easily be deployed on other clouds. Kubernetes is a game changer.
An application built for Kubernetes can be deployed on any compliant
Kubernetes services, regardless of the underlying infrastructure. Among
Rancher customers, we already see wide-spread adoption of multi-cloud
deployments. With Kubernetes, multi-cloud is easy. DevOps team get the
benefit of increased flexibility, increased reliability, and reduced
cost, without having to complicate their operational practices. I am
really excited about how Kubernetes will continue to grow in 2018. Here
are some specific areas we should pay attention:

  1. Service Mesh gaining mainstream adoption. At the recent KubeCon
    show, the hottest topic was Service Mesh. Linkerd, Envoy, Istio,
    etc. all gained traction in 2017. Even though the adoption of these
    technologies is still at an early stage, the potential is huge.
    People often think of service mesh as a microservices framework. I
    believe, however, service mesh will bring benefits far beyond a
    microservice framework. Service mesh can become a common
    underpinning for all distributed applications. It offers application
    developers a great deal of support in communication, monitoring, and
    management of various components that make up an application. These
    components may or may not be microservices. They don’t even have to
    be built from containers. Even though not many people use service
    mesh today, we believe it will become popular in 2018. We, like most
    people in the container industry, want to play a part. We are busy
    integrating service mesh technologies into Rancher 2.0 now!
  2. From cloud-native to Kubernetes-native. The term “cloud native
    application” has been popular for a few years. It means applications
    developed to run on a cloud like AWS, instead of static environments
    like vSphere or bare metal clusters. Applications developed for
    Kubernetes are by definition cloud-native because Kubernetes is now
    available on all clouds. I believe, however, the world is ready to
    move from cloud-native to, using a term I first heard from Joe Beda,
    “Kubernetes-native“. I know of many organizations developing
    applications specifically to run on Kubernetes. These applications
    don’t just use Kubernetes as a deployment platform. They persist
    data in Kubernetes’s own etcd database. They use Kubernetes custom
    resource definition (CRD) as data access objects. They encode
    business logic in Kubernetes controllers. They use Kubelets to
    manage distributed clusters. They build their own API layer on
    Kubernetes API server. They use `kubectl` as their own CLI.
    Kubernetes-native applications are easy to build, run anywhere, and
    are massively scalable. In 2018, we will surely see more
    Kubernetes-native applications!
  3. Massive number of ready-to-run applications for Kubernetes. Most
    people use Kubernetes today to deploy their own applications. Not
    many organizations ship their application packages as YAML files or
    Helm charts yet. I believe this is about to change. Already most
    modern software (such as AI frameworks like Tensorflow) are
    available as Docker containers. It is easy to deploy these
    containers in Kubernetes clusters. A few weeks ago, Apache Spark
    project added support to use Kubernetes as a scheduler, in addition
    to Mesos and YARN. Kubernetes is now a great big-data platform. We
    believe, from this point onward, all service-side software packages
    will be distributed as containers and will be able to leverage
    Kubernetes as a cluster manager. Watch out for vast growth and
    availability of ready-to-run YAML files or Helm charts in 2018.

Looking back, growth of Kubernetes in 2017 far exceeded what all of us
thought at the end of 2016. While we expected AWS to support Kubernetes,
we did not expect the interest in service mesh and Kubernetes-native
apps to grow so quickly. 2018 could very well bring us many unexpected
technological developments. I can’t wait to find out!

Category: Uncategorized Comments closed

Two Dot Awesome

Wednesday, 25 October, 2017

Rancher 2.0 is coming, and it’s amazing.

In the Beginning…

When Rancher released 1.0 in early 2016, the container landscape looked
completely different. Kubernetes wasn’t the powerhouse that it is today.
Swarm and Mesos satisfied specific use cases, and the bulk of the
community still used Docker and Docker Compose with tools like Ansible,
Puppet, or Chef. It was still BYOLB (bring your own load balancer), and
volume management was another manual nightmare. Rancher stepped in with
Cattle, and with it we augmented Docker with overlay networking,
multi-cloud environments, health checking, load balancing, storage
volume drivers, scheduling, and other features, while keeping the format
of Docker Compose for configuration. We delivered an API, command-line
tools, and a user interface that made launching services simple and
intuitive. That’s key: simple and intuitive. With these two things, we
abstracted the complexities of disparate systems and offered a way for
businesses to run container workloads without having to manage the
technology required to do so. We also gave the community the ability to
run Swarm, Kubernetes, or Mesos, but we drew the line at managing the
infrastructure components and stepped back, giving operators the ability
to do whatever they wanted within each of those systems. “Here’s
Kubernetes,” we said. “We’ll keep the lights on but, beyond that, using
Kubernetes is up to you. Have fun!” If you compress the next 16 months
into a few thoughts, looking only at our user base, we can say that
Kubernetes adoption has grown dramatically, while Mesos and Swarm
adoption has fallen. The functionality of Kubernetes has caught up with
the functionality of Cattle and, in some areas, has surpassed it as
vendors develop Kubernetes integrations that they aren’t developing
directly for Docker. Many of the features in Cattle have analogs in
Kubernetes, such as label-based selection for scheduling and load
balancing, resource limits for services, collecting containers into
groups that share the same network space, and more. If we take a few
steps back and look at it objectively, one might say that by developing
Cattle-specific services, we’re essentially developing a clone of
Kubernetes at a slower pace than Kubernetes themselves. Rancher
2.0
changes that.

The Engine Does Not Matter

First, let me be totally clear: our beloved Cattle is not going
anywhere, nor is RancherOS or Longhorn. If you get into your car and
drive somewhere, what matters is that you get there. Some of you might
care about the model of your car or its top speed, but most people just
care about getting to the destination. Few people care about the engine
or its specifics. We only look under the hood when something is going
wrong. The engine for Cattle in Rancher 1.x was Docker and Docker
Compose. In Rancher 2.x, the engine is Kubernetes, but it doesn’t
matter. In Rancher 1.x, you can go to the UI or the API and deploy
environments with an overlay network, bring up stacks and services,
import docker-compose.yml files, add load balancers, deploy items from
the Catalog, and more. In Rancher 2.x, guess what you can do? You can do
the exact same things, in the exact same way. Sure, we’ve improved the
UI and changed the names of some items, but the core functionality is
the same. We’re moving away from using the term Cattle, because now
Cattle is no different from Kubernetes in practice. It might be
confusing at first, but I assure you that a rose by any other name still
smells as sweet. If you’re someone who doesn’t care about Kubernetes,
then you can continue not caring about it. In Rancher 1.x, we deployed
Kubernetes into an environment as an add-on to Rancher. In 2.x, we
integrated Kubernetes with the Rancher server. It’s transparent, and
unless you go looking for it, you’ll never see it. What you will see
are features that didn’t exist in 1.x and that, frankly, we couldn’t
easily build on top of Docker because it doesn’t support them. Let’s
talk about those things, so you can be excited about what’s coming.

The Goodies

Here is a small list of the things that you can do with Rancher 2.x
without even knowing that Kubernetes exists.

Storage Volume Drivers

In Rancher 1.x, you were limited to named and anonymous Docker volumes,
bind-mounted volumes, EBS, NFS, and some vendor-specific storage
solutions (EMC, NetApp, etc.). In Rancher 2.x, you can leverage any
storage volume driver supported by Kubernetes. Out of the box, this
brings NFS, EBS, GCE, Glusterfs, vSphere, Cinder, Ceph, Azure Disk,
Azure File, Portworx, and more. As other vendors develop storage drivers
for Kubernetes, they will be immediately available within Rancher 2.x.

Host Multitenancy

In Rancher 1.x, an environment was a collection of hosts. No host could
exist in more than one environment, and this delineation wasn’t always
appropriate. In Rancher 2.x, we have a cluster, which is a collection of
hosts and, within that cluster, you can have an infinite number of
environments that span those hosts. Each environment comes with its own
role-based access control (RBAC), for granular control over who can
execute actions in each environment. Now you can reduce your footprint
of hosts and consolidate resources within environments.

Single-Serving Containers

In Rancher 1.x, you had to deploy everything within a stack, even if it
was a single service with one container. In Rancher 2.x, the smallest
unit of deployment is a container, and you can deploy containers
individually if you wish. You can promote them into services within a
common stack or within their own stacks, or you can promote them to
global services, deployed on every host.

Afterthought Sidekicks

In Rancher 1.x, you had to define sidekicks at the time that you
launched the service. In Rancher 2.x, you can add sidekicks later and
attach them to any service.

Rapid Rollout of New Technology

When new technology like Istio or linkerd hits the community, we want to
support it as quickly as possible. In Rancher 1.x, there were times
where it was technologically impossible to support items because we were
built on top of Docker. By rebasing onto Kubernetes, we can quickly
deploy support for new technology and deliver on our promise of allowing
users to get right to work using technology without needing to do the
heavy lifting of installing and maintaining the solutions themselves.

Out-of-the-Box Metrics

In Rancher 1.x, you had to figure out how to monitor your services. We
have some monitoring extracted from Docker statistics, but it’s a
challenge to get those metrics out of Rancher and into something else.
Rancher 2.x ships with Heapster, InfluxDB, and Grafana, and these
provide per-node and per-pod metrics that are valuable for understanding
what’s going on in your environment. There are enhancements that you can
plug into these tools, like Prometheus and Elasticsearch, and those
enhancements have templates that make installation fast and easy.

Broader Catalog Support

The Catalog is one of the most popular items in Rancher, and it grows
with new offerings on a weekly basis. Kubernetes has its own
catalog-like service called Helm. In Rancher 1.x, if something wasn’t in
the Catalog, you had to build it yourself. In Rancher 2.x, we will
support our own Catalog, private catalogs, or Helm, giving you a greater
pool of pre-configured applications from which to choose.

We Still Support Compose

The option to import configuration from Docker Compose still exists.
This makes migrating into Rancher 2.x as easy as ever, either from a
Rancher 1.x environment or from a standalone Docker/Compose setup.

Phased Migration into Kubernetes

If you’re a community member who is interested in Kubernetes but has
shied away from it because of the learning curve, Rancher 2.x gives you
the ability to continue doing what you’re doing with Cattle and, at your
own pace, look at and understand how that translates to Kubernetes. You
can begin deploying Kubernetes resources directly when you’re ready.

What’s New for the Kubernetes Crowd?

If you’re part of our Kubernetes user base, or if you’re a Kubernetes
user who hasn’t yet taken Rancher for a spin, we have some surprises for
you as well.

Import Existing Kubernetes Clusters

This is one of the biggest new features in Rancher 2.x. If you like the
Rancher UI but already have Kubernetes clusters deployed elsewhere, you
can now import those clusters, as-is, into Rancher’s control and begin
to manage them and interact with them via our UI and API. This feature
is great for seamlessly migrating into Rancher, or for consolidating
management of disparate clusters across your business under a single
pane of glass.

Instant HA

If you deploy the Rancher server in High Availability (HA) mode, you
instantly get HA for Kubernetes.

Full Kubernetes Access

In Rancher 1.x, you could only interact with Kubernetes via the means
that Kubernetes allows — kubectl or the Dashboard. We were
hands-off. In Rancher 2.x, you can interact with your Kubernetes
clusters vi the UI or API, or you can click the Advanced button,
grab the configuration for kubectl, and interact with them via that
means. The Kubernetes Dashboard is also available, secured behind
Rancher’s RBAC.

Compose Translation

Do you want to set up a deployment from a README that includes a sample
Compose file? In Rancher 2.x, you can take that Compose file and apply
it, and we’ll convert it into Kubernetes resources. This conversion
isn’t just a 1:1 translation of Compose directives; this is us
understanding the intended output of the Compose file and creating that
within Kubernetes.

It Really is This Awesome

I’ve been using Docker in production since 2013 and, during that time,
I’ve moved from straight Docker commands to an in-house deployment
utility that I wrote, to Docker Compose configs managed by Ansible, and
then to Rancher. Each of those stages in my progression were defined by
one requirement: the need to do more things faster and in a way that
could be automated. Rancher allows me to do 100x more than I could do
myself or with Compose, and removes the need for me to manage those
components. Over the year that I’ve been using Rancher, I’ve seen it
grow with one goal in mind: making things easy. Rancher 2.x steps up the
delivery of that goal with accomplishments that are amazing. Cattle
users still have the Cattle experience. Kubernetes users have greater
access to Kubernetes. Everyone has access to all the amazing work being
done by the community. Rancher still makes things easy and still
manages the
infrastructure

so that you can get right to deploying containers and getting work done.
I cannot wait to see where we go next.

About the Author

Adrian Goins is a
field engineer for Rancher Labs who resides in Chile and likes to put
out fires in his free time. He loves Rancher so much that he can’t
contain himself.

Tags: ,,, Category: Rancher Blog Comments closed

DockerCon EU Impressions

Friday, 20 October, 2017

I just came back from DockerCon EU. I have not met a more friendly and
helpful group of people than the users, vendors, and Docker employees at
DockerCon. It was a well-organized event and a fun
experience.

I went into the event with some
questions[
about where Docker was headed. Solomon Hykes addressed these questions
in his keynote, which was the highlight of the entire show. Docker
embracing Kubernetes is clearly the single biggest piece of news coming
out of DockerCon.

If there’s one thing
Docker wanted the attendees to take away, it was the Modernize
Traditional Applications (MTA) program. The idea of MTA is simple:
package a traditional Windows or Linux app as a Docker container then
deploy the app on modern cloud infrastructure and achieve some savings.
By dedicating half of the day one keynote and the entire day two keynote
to this topic, Docker seems to have bet its entire business on this
single value proposition.

I am surprised, however, that MTA became the sole business case focus at DockerCon. The
DockerCon attendees I talked to expected Docker to outline a more
complete vision of business opportunities for Docker. MTA did not appeal
to majority of DockerCon attendees. Even enterprise customers I met had
much bigger plans than MTA. I wish Docker had spent some time
reinforcing the value containers can deliver in transforming application
development, which is a much bigger business
opportunity.

MTA builds on the most basic capabilities of Docker as an application packaging format, a practice
that has existed since the very beginning of Docker. But what specific
features of Docker EE makes MTA work better than before? Why is Docker
as a company uniquely positioned to offer a solution for MTA? What other
tools will customers need to complete the MTA journey? The MTA keynotes
left these and many other questions unanswered.

Beyond supporting Kubernetes, Docker made
no announcements that made Swarm more likely to stay relevant. As an
ecosystem partner, I find it increasingly difficult to innovate based on
Docker’s suite of technologies. I miss the days when Docker announced
great innovations like Docker Machine, Docker Swarm, Docker Compose,
Docker network and volume plugins, and all kinds of security-related
innovations. We all used to get busy working on these technologies the
very next day. There are still plenty of innovations in container
technologies today, but the innovations are happening in the Kubernetes
and CNCF ecosystem.

After integrating Kubernetes, I hope Docker can get back to producing more innovative
technologies. I have not seen many companies who possess as much
capacity to innovate and attention to usability as Docker. I look
forward to what Docker will announce at the next
DockerCon
.

Tags: ,, Category: Products, Rancher Kubernetes Comments closed

Linux przyszłością centrów danych z oprogramowaniem SAP

Thursday, 21 September, 2017

Do 2025 roku wszyscy klienci SAP powinni przejść na rozwiązanie HANA, które działa wyłącznie na platformie Linux. Dodajmy, w przytłaczającej większości dotychczasowe instalację są oparte na SUSE Linux, ale o tym za chwilę.

Do niedawna typowa migracja przebiegała następująco: pierwszy krok to przejście na SAP Business Warehouse z SAP HANA, głównie z uwagi na wydajność i prostotę. Drugi krok drugi to wdrożenie SAP Business Suite skutkujące również wzrostem wydajności. Tymczasem obok pojawiała się nowa propozycja od SAP – migracja aplikacji SAP od razu do oprogramowania S/4HANA, które zostało napisane od podstaw dla platformy SAP HANA. Cieszy się to sporym zainteresowaniem klientów, gdyż odnotowano wzrost tego typu migracji o 70% tylko w ciągu ostatniego roku.

Niezależnie od wybranego kierunku migracji Linux na dobre staje się kluczowym systemem centrów danych użytkowników aplikacji SAP wypierając całkowicie systemy Unix i Windows. W niemal wszystkich nowych instalacjach S/4 HANA, SAP NetWeaver, czy SAP HANA wybierany jest jako platforma SUSE Linux. Powodów tego jest wiele. Najważniejszy to wzrost wydajności, nawet o 600%, zapewnienie wysokiej dostępności systemów SAP na poziomie 99,999%, obniżenie kosztów TCO o 70% w porównaniu do systemów Unix i 30% dla Red Hat,  czy skrócenie czasu wdrożenia nawet do 10 minut dla nowych instancji SUSE Linux. Zainteresowanych głębszym poznaniem przewag technologicznych systemu SUSE Linux zapraszam do zapoznania się naszą najnowszą prezentacją na ten temat z konferencji SAP Technology Forum z 12 września 2017 r. pt. “Kierunek S/4 Hana.”

Marcin Madey, szef polskiego oddziału SUSE, podczas wystąpienia “Kierunek S/4 Hana” na  konferencji SAP Technology Forum 12 września  2017 r. w Gdyni.

Kwestie bezpieczeństwa w centrum danych są ważne dla każdej firmy, tym bardziej dla użytkowników aplikacji SAP. Migrując do S/4 HANA czy SAP HANA użytkownicy otrzymują wsparcie priorytetowe 24×7 wspólne od SUSE i SAP plus dedykowany kanał dla poprawek SUSE pod aplikacje SAP z jednym punktem zgłaszania w SUSE lub SAP. Dodatkowo zapewniany jest wydłużony czas wsparcia do 4,5 roku dla danej wersji systemu operacyjnego oraz 18 miesięcy na każdy  Support Pack. Z kolei stosując SUSE Linux Enterprise High Availability Extension można zapewnić maksymalną ochronę dla obciążeń i aplikacji, które nigdy nie mogą przestać być dostępne w sposób nieplanowany – zarówno na systemach fizycznych, wirtualnych jak i chmurowych. Jak to zrobić – prezentowaliśmy podczas warsztatów na SAP Technology Forum pt.  “Ciągłość działania systemów SAP

Ziemowit Buczyński, architekt rozwiązań SUSE, podczas warsztatów “Ciągłość działania systemów SAP” na  konferencji SAP Technology Forum 13 września 2017 r. w Gdyni.

Newralgicznym elementem centrum danych z aplikacjami SAP są dane wykorzystywane przez te aplikacje. Nie wszystkie dane są w danym momencie przetwarzane w pamięci na platformie HANA. Olbrzymia większość musi być gdzieś przechowywana i tu z pomocą przychodzą rozwiązania SDS (Software Defined Storage) takie jak SUSE Enterprise Storage. Rozwiązanie SUSE może być wykorzystane w dowolnych zastosowaniach wymagających pamięci masowej, ale ze względu na efekt skali najlepiej sprawdza się w dużych implementacjach takich jak centra danych SAP. SUSE Enterprise Storage oparto na projekcie open source  Ceph, pozwala on na efektywne skalowanie przestrzeni dla danych, minimalizuje problem „vendor lockingu” i drastycznie zmniejsza koszty utrzymania dużych ilości danych. Temat wykorzystania pamięci masowej SDS był omawiany podczas drugich naszych warsztatów na SAP Technology Forum pt.  ” Software Defined-Storage dla SAP HANA“.

Po więcej informacji warto zajrzeć na stronę https://www.suse.com/solutions/sap oraz do dokumentu “Linux Is the Future of the SAP Data Center

________________________

Prezentacje SUSE z SAP Technology Forum 2017:


Installing Rancher – From Single Container to High Availability

Thursday, 7 September, 2017

Update: This tutorial was updated for Rancher 2.x in 2019 here

Any time an organization, team or developer adopts a new platform, there
are certain challenges during the setup and configuration process. Often
installations have to be restarted from scratch and workloads are lost.
This leaves adopters apprehensive about moving forward with new
technologies. The cost, risk and effort are too great in the business of
today. With Rancher, we’ve established a clear container installation and upgrade
path so no work is thrown away. Facilitating a smooth upgrade path is
key to mitigating against risk and increasing costs. This guide has two
goals:

  1. Take you through the installation and upgrade process from a
    technical perspective.
  2. Inform you of the different types of installations and their
    purpose.

With that in mind, we’re going to walk through the set-up of Rancher
Server in each of the following scenarios, with each step upgrading from
the previous one:

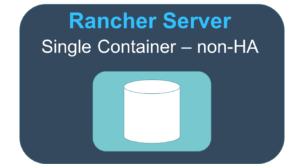
  • Single Container (non-HA) – installation
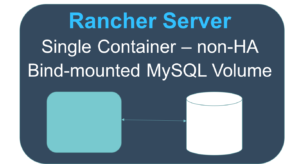
  • Single Container (non-HA)- Bind mounted MySQL volume
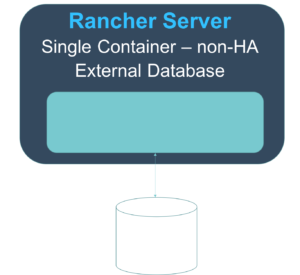
  • Single Container (non-HA) – External database
  • Full Active/Active HA – (upgrading to this from our previous set up)

A working knowledge of Docker is assumed. For this guide, you’ll need
one or two Linux virtual machines with the Docker engine installed and
an available MySQL database server. All virtual machines need to be able
to talk to each other, so be mindful of any restrictions you have in a
cloud environment (AWS, GCP, Digital Ocean etc.). Detailed
documentation is located
here
.

**Single Container (non-HA) – Installation

Container With a Text Above That Says 'Rancher Server'**

  1. SSH into your Linux virtual machine
  2. Verify your Docker
    installation with docker -v. You should see something resembling Docker
    version 1.12.x
  3. Run sudo docker run -d –restart=unless-stopped -p
    8080:8080 rancher/server
  4. Docker will pull the rancher/server
    container image and run it on port 8080
  5. Run docker ps -a. You should
    see an output similar to this:
    Output After Entering 'Run docker ps-a' Command
    (Note: remember the name or ID of the rancher/server container)
  6. At this point, you should be able to go to http://<server_ip>:8080 in
    your browser and see the Rancher UI.

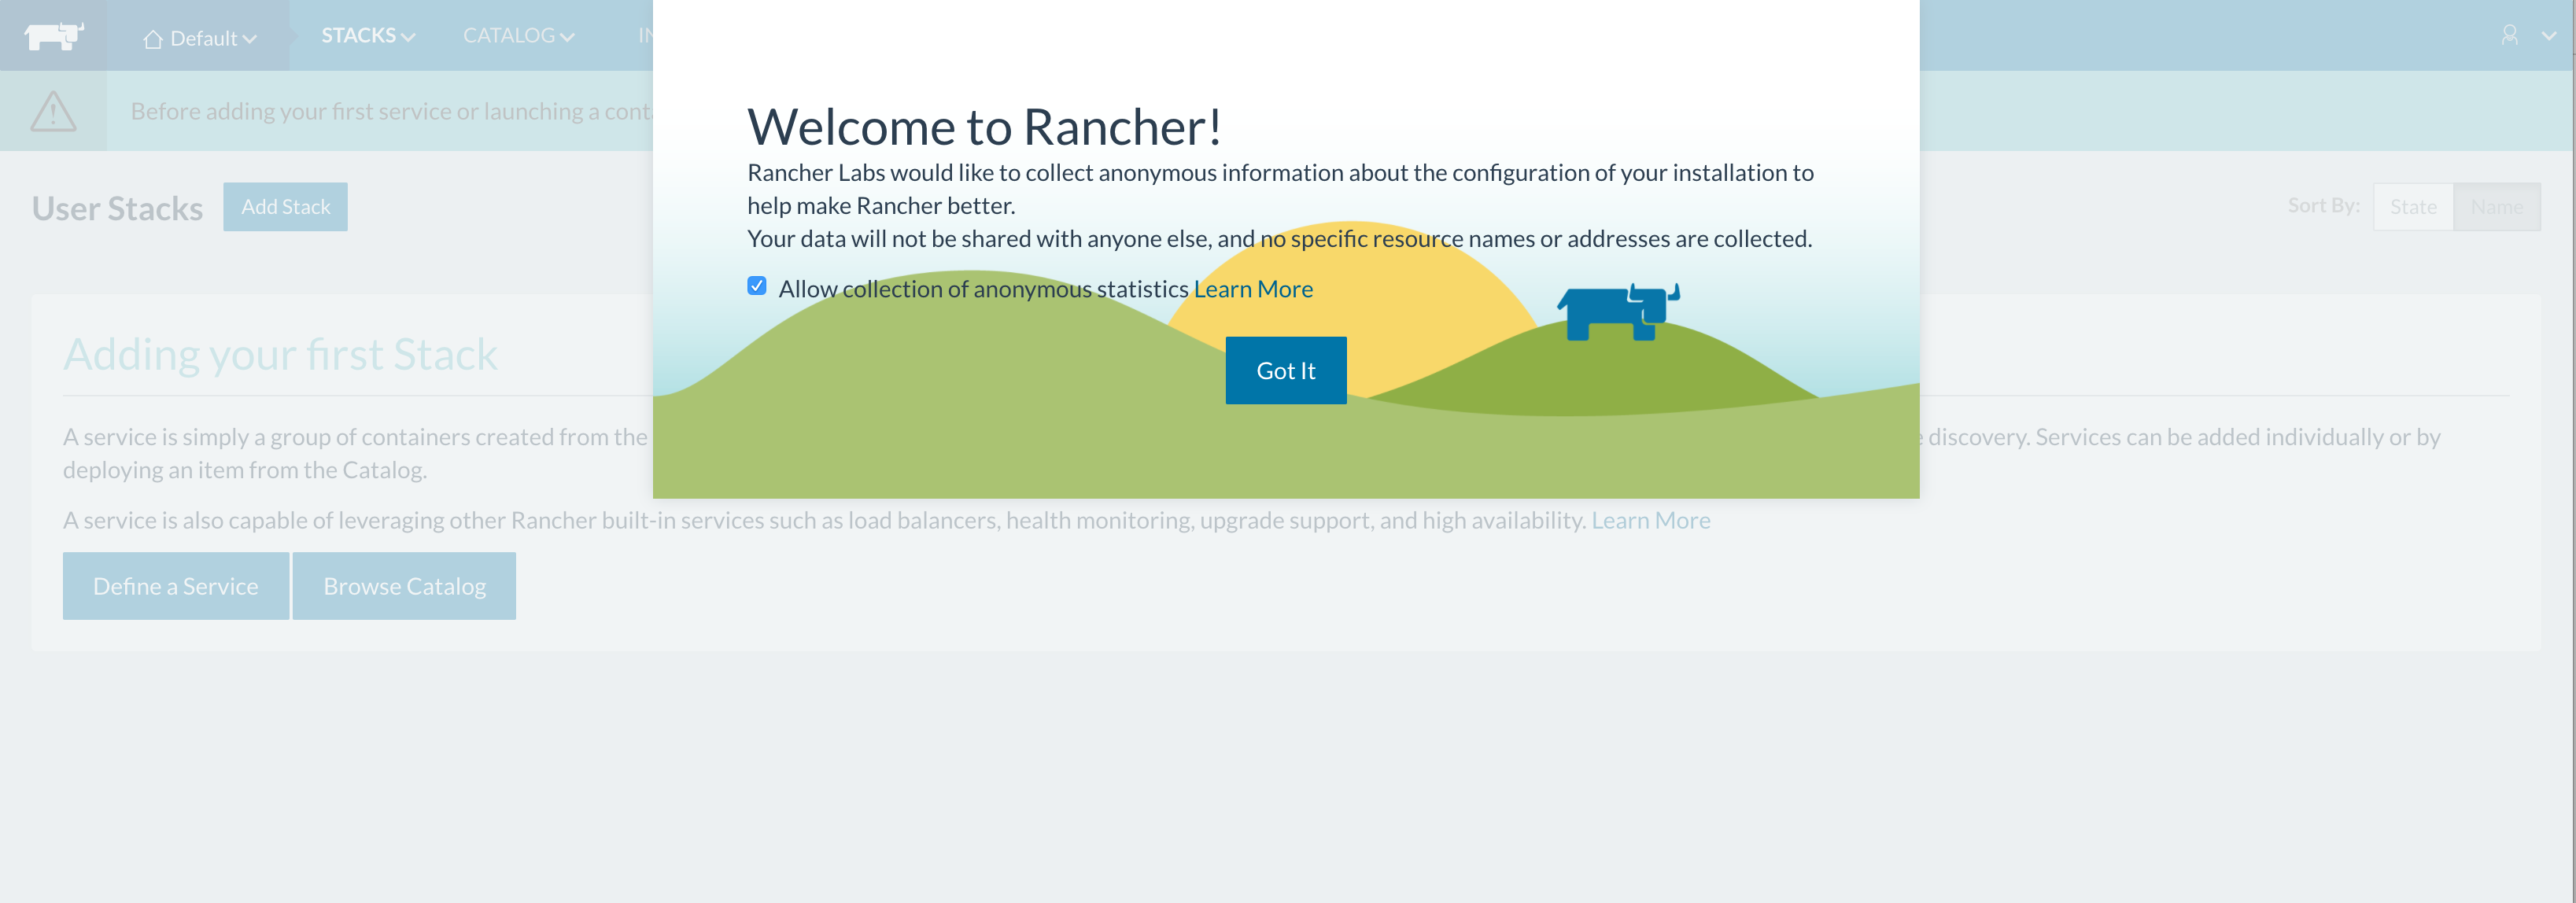
You should see the Rancher UI with the welcome modal: Rancher UI
welcome Since this is our initial set up, we need to add a host to our Rancher environment:
A Detailed Overview of Rancher’s Architecture


This newly-updated, in-depth guidebook provides a detailed overview of the features and functionality of the new Rancher: an open-source enterprise Kubernetes platform.

Get the eBook

  1. Click ‘Got it!’
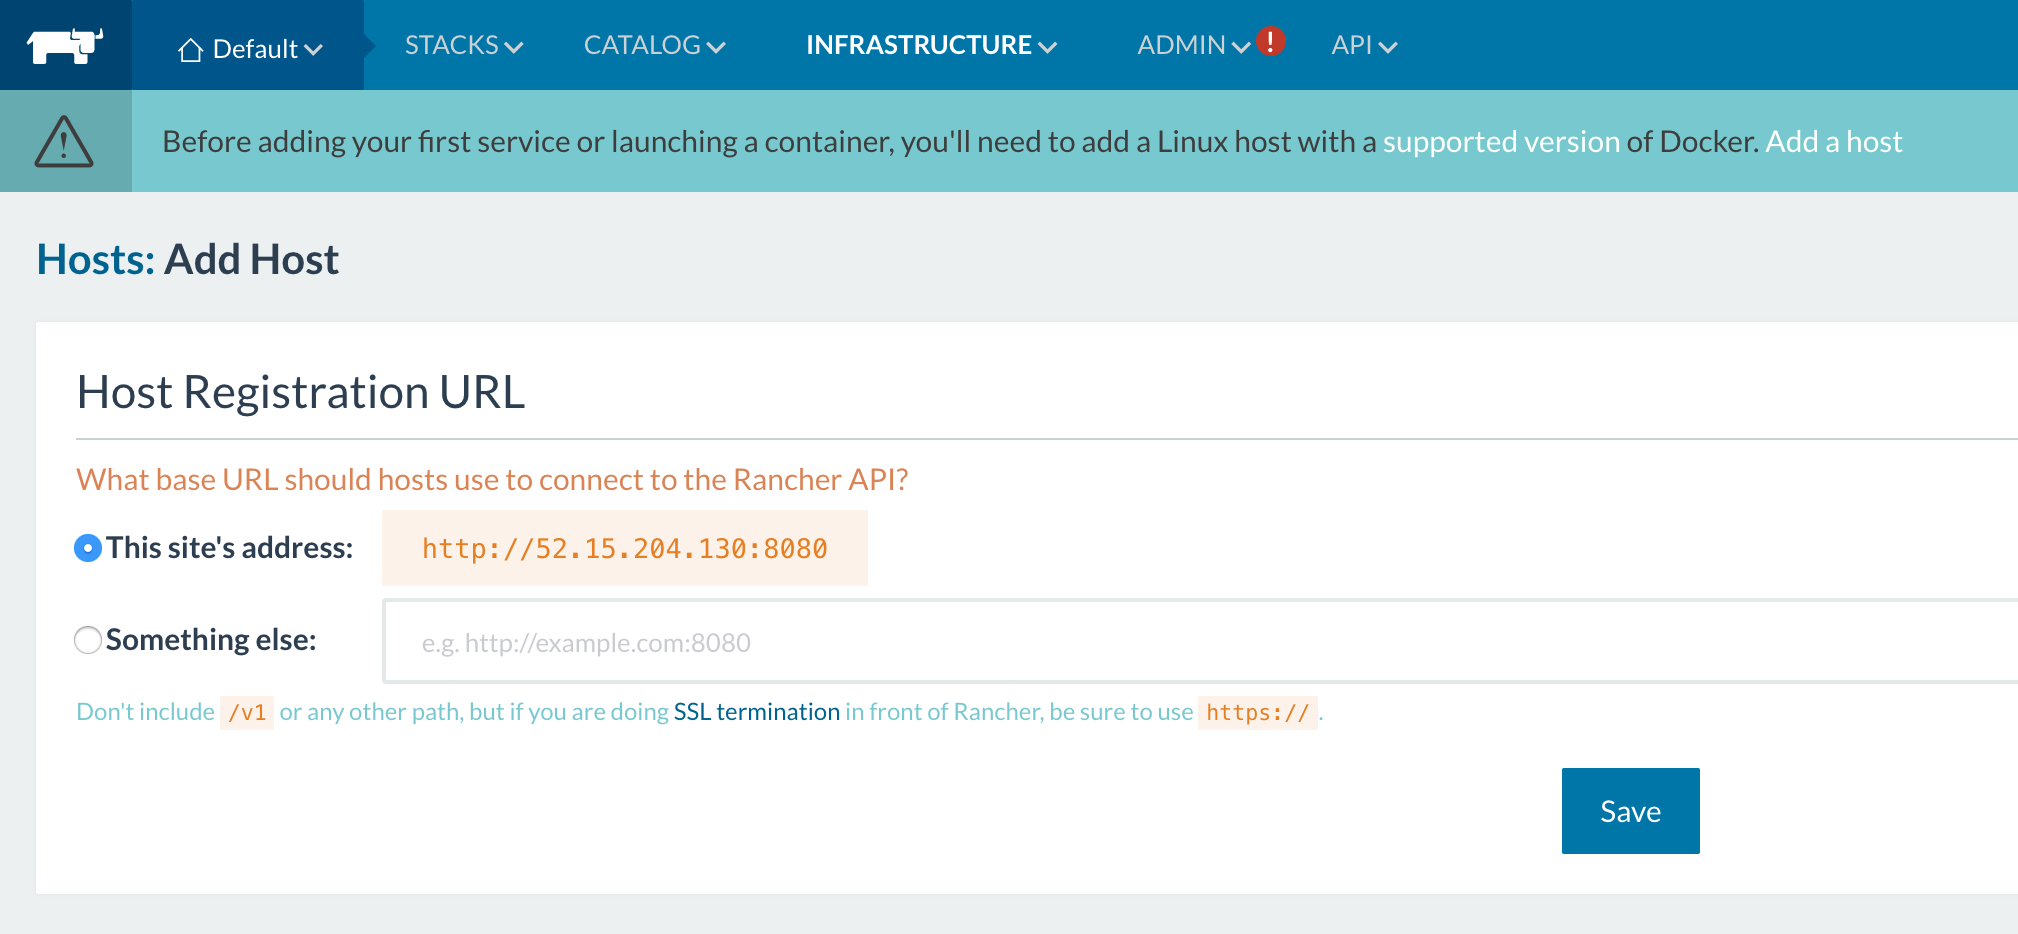
  2. Then click ‘Add a Host’. This first time you’ll see
    a Host Registration URL page: Add
host
  3. For this
    article, we’ll just go with whatever IP address we have. Click ‘Save’.
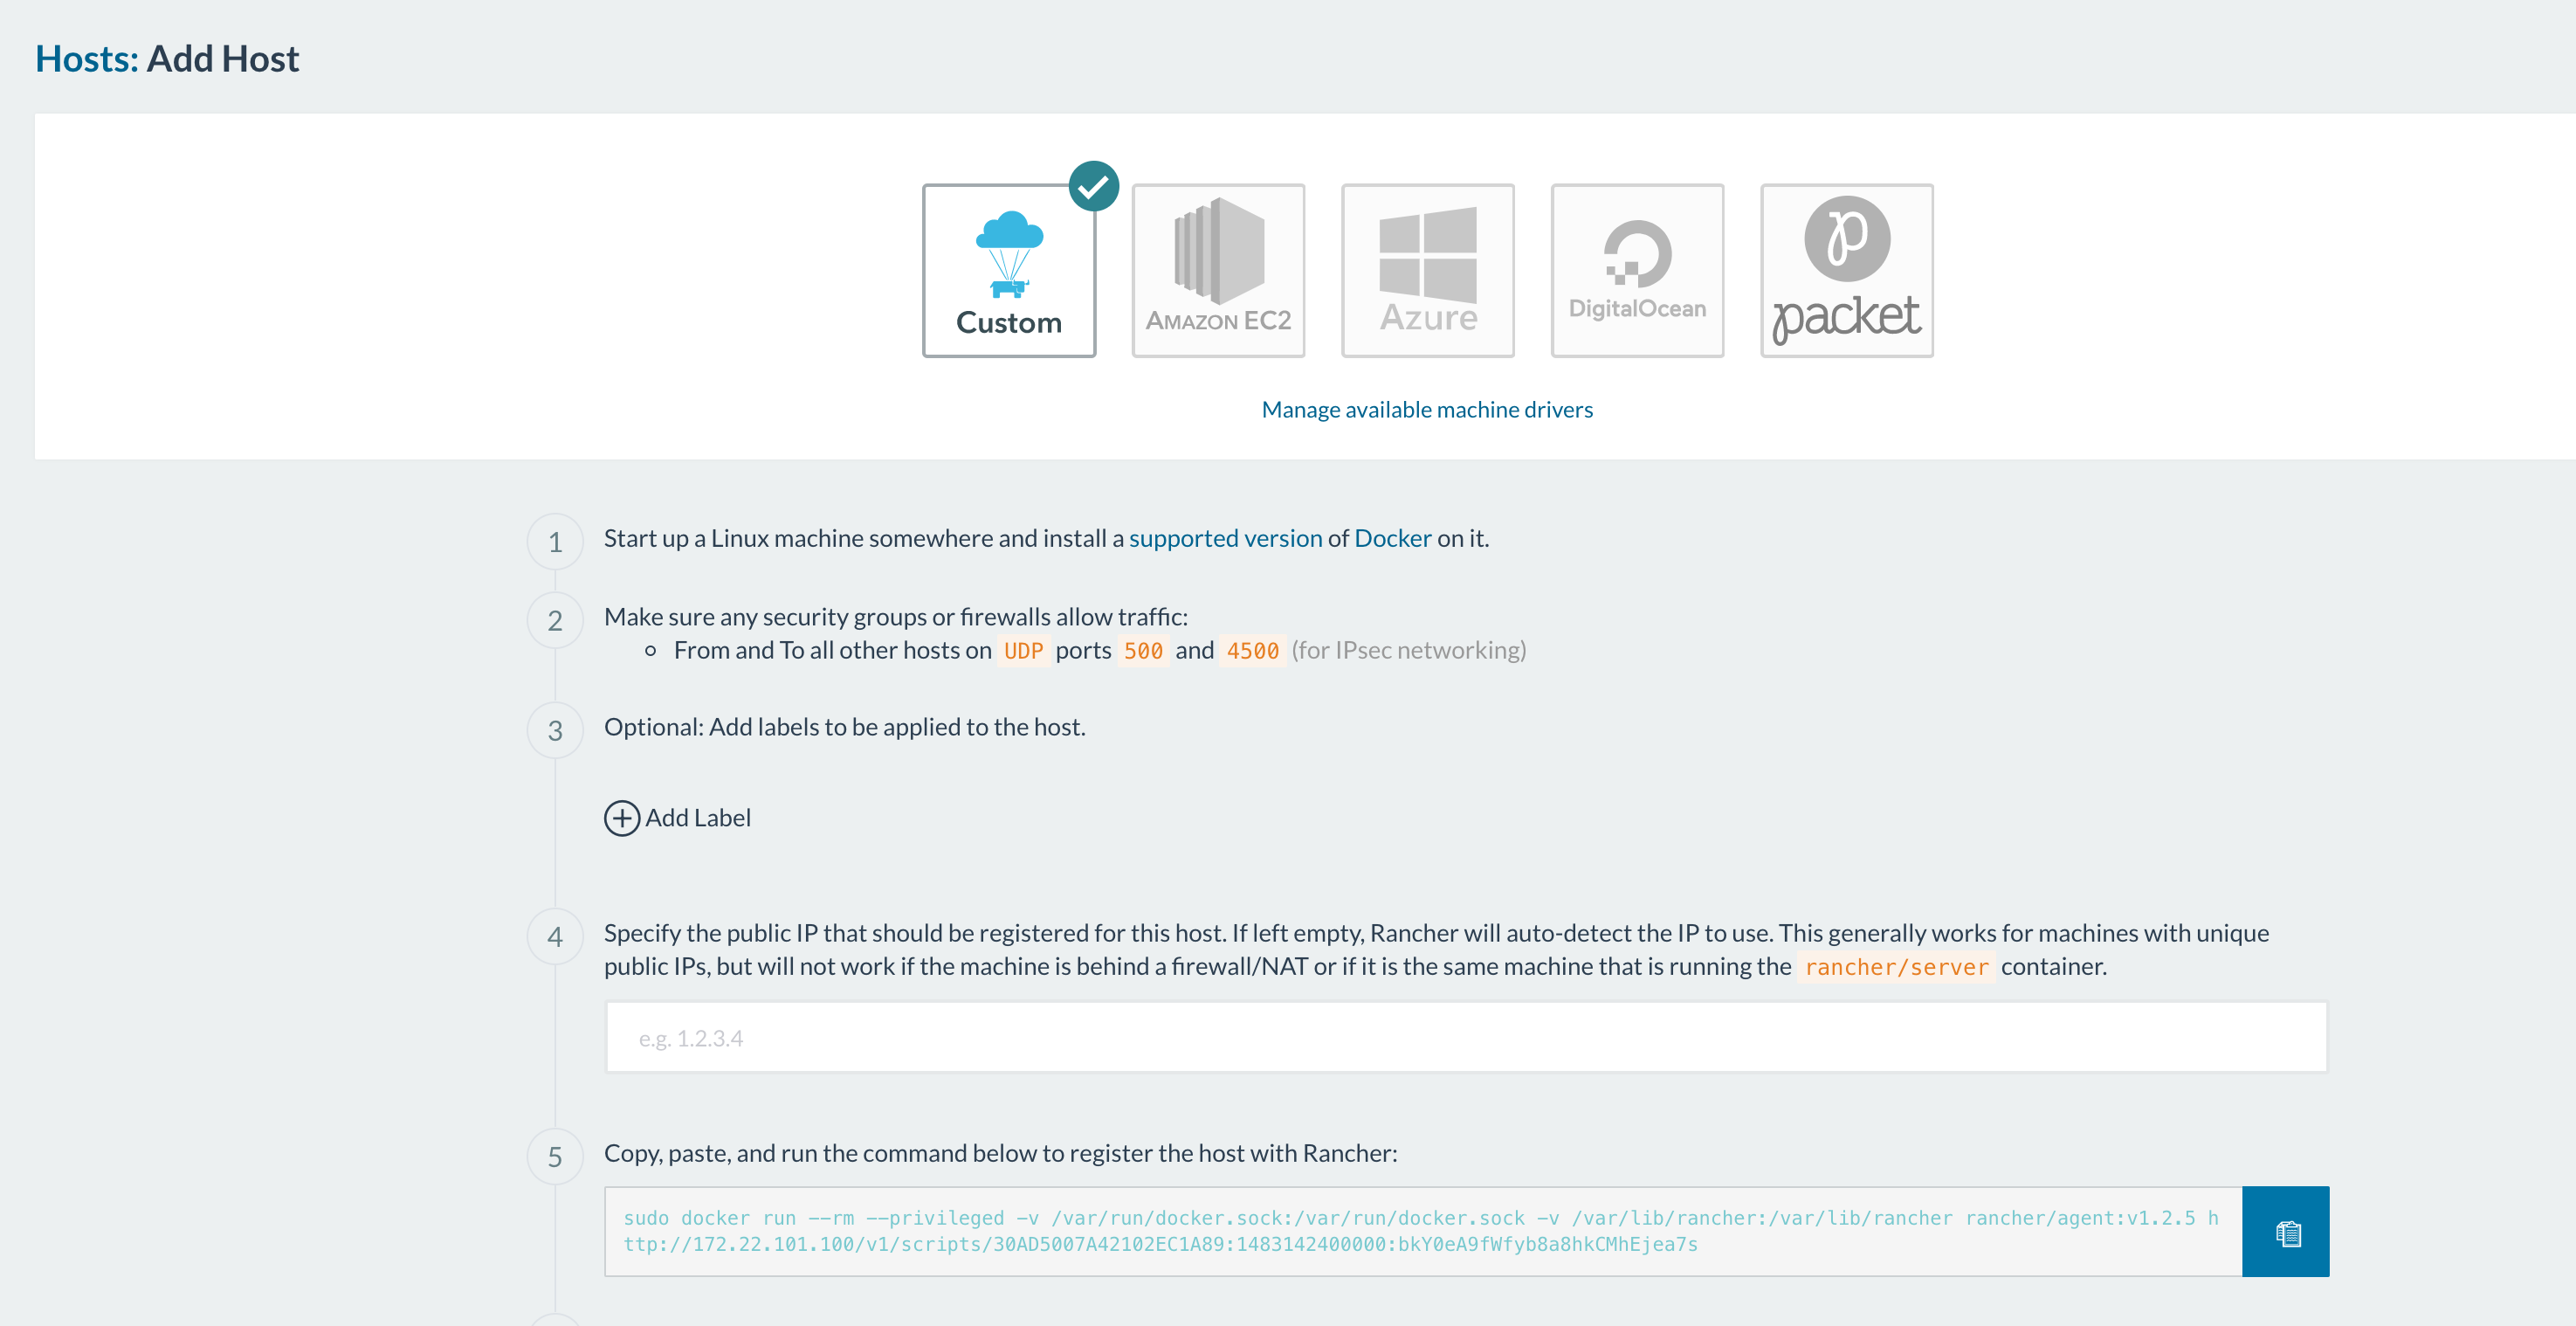
  4. Now, click ‘Add a Host’ again. You’ll see this: Add host cloud
provider (note: the ports that have to been open for hosts to be able to communicate are 500 and
    4500.) From here you can decide how you want to add your hosts based on
    your infrastructure.
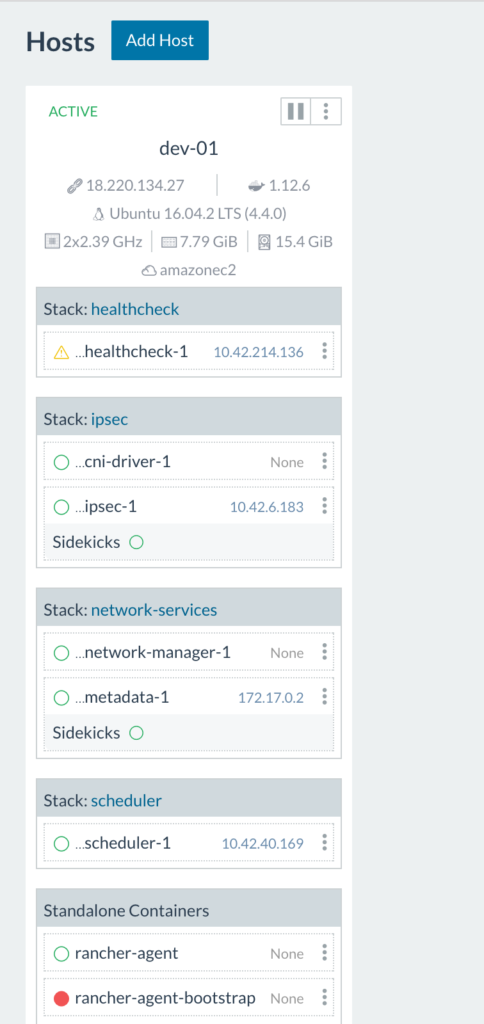
  5. After adding your host(s) you should see something like this:
    Rancher host details

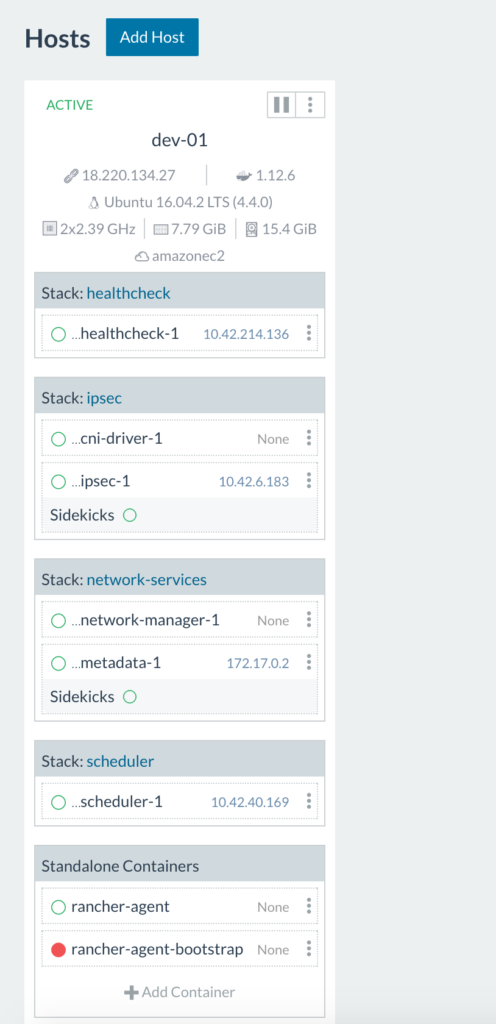
So, what’s going on here? The rancher-agent-bootstrap container runs once to get the rancher-agent up and running then stops (notice the red circle indicating a stopped container). As we can see above, the health check container is starting up. Once all infrastructure containers are up and running on the host you’ll see this:

Host wit infrastructure
container

Here we see all infrastructure containers (health check, scheduler, metadata, network
manager, IPsec, and cni-driver) are all up and running on the host.

Tip:
to view only user containers, uncheck ‘Show System’ in the top right
corner of the Host view. Congratulations! You’ve set up a Rancher
Server in a single container. Rancher is up and running and has a local
MySQL database running inside of the container. You can add items from
the catalog
, deploy
your own containers etc. As long as you don’t delete the rancher/server
container, any changes you make to the environment will be preserved as
we go to our next step.

**Single Container (non-HA) – Bind-mounted volume

**

Now we’re going to take our existing Rancher server and upgrade it to
use a bind-mounted volume for the database. This way, should the
container die when we upgrade to a later version of Rancher, we don’t
lose the data for what we’ve built. In our next steps, we’re going to
stop the rancher-server container, externalize the data to the host,
then start a new instance of the container using the bind-mounted
volume. Detailed documentation is located
here
.

  1. Let’s say our rancher/server container is named fantastic_turtle.
  2. Run docker stop fantastic_turtle.
  3. Run docker cp fantastic_turtle:/var/lib/mysql <path on host> (Any
    path will do but using /opt/docker or something similar is not
    recommended). I use /data as it’s usually empty. This will copy the
    database files out of the container to the file system to /data. The
    export will put your database files at /data/mysql.
  4. Verify the location by running ls -al /data You will see
    a mysql directory within the path.
  5. Run sudo chown -R 102:105 /data. This will allow the mysql user
    within the container to access the files.
  6. Run docker run -d -v /data/mysql:/var/lib/mysql -p 8080:8080
    –restart=unless-stopped rancher/server:stable. Give it about 60
    seconds to start up.
  7. Open the Rancher UI at http://<server_ip>:8080. You should see
    the UI exactly as you left it. You’ll also notice your workloads
    that you were running have continued to run.
  8. Let’s clean up the environment a bit. Run docker ps -a.
  9. You’ll see 2 rancher/server Image containers. One will have a
    status of Exited (0) X minutes ago and one will have a status of Up
    X minutes. Copy the name of the container with exited status.
  10. Run docker rm fantastic_turtle.
  11. Now our docker environment is clean with Rancher server running with
    the new container.

**Single Container (non-HA) – External database

**

As we head toward an HA set up, we need have Rancher server running with
an external database. Currently, if anything happens to our host, we
could lose the data supporting the Rancher workloads. We’re going to
launch our Rancher server with an external database. We don’t want to
disturb our current set up or workloads so we’ll have to export our
data, import into a proper MySQL or MySQL compliant database and restart
our Rancher server that points to our external database with our data in
it.

  1. SSH into our Rancher server host.
  2. Run docker exec -it
    <container name> bash. This will give you a terminal session in
    your rancher/server container.
  3. Run mysql -u root -p.
  4. When prompted
    for a password, press [Enter].
  5. You now have a mysql prompt.
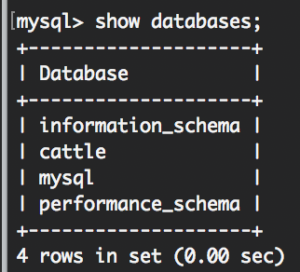
    6.Run show databases. You’ll see this:

    This way we know we have the rancher/server database.
  6. Run exit.
  7. Run mysqldump -u root -p cattle > /var/lib/mysql/rancher-backup.sql
    When prompted for a password hit [Enter].
  8. Exit the container.
    10.Run ls -al /data/mysql. You’ll see your rancher-backup.sql in the
    directory. We’ve exported the database! At this point, we can move the
    data to any MySQL compliant database running in our infrastructure as
    long as our rancher/server host can reach the MySQL database host. Also,
    keep in mind all this while your workloads that you have been running on
    the Rancher server and hosts are fine. Feel free to use them. We haven’t
    stopped the server yet, so of course they’re fine.
  9. Move
    your rancher-backup.sqlto a target host running a MySQL database server.
  10. Open a mysql session with your MySQL database server. Run mysql -u
    <user> -p.
  11. Enter your decided or provided password.
  12. 14. Run CREATE
    DATABASE IF NOT EXISTS cattle COLLATE = ‘utf8_general_ci’ CHARACTER
    SET = ‘utf8’;
  13. Run GRANT ALL ON cattle.* TO ‘cattle’@‘%’
    IDENTIFIED BY ‘cattle’; This creates our cattle user for
    the cattle database using the cattle password. (note: use a strong
    password for production)
  14. Run GRANT ALL ON cattle.* TO
    ‘cattle’@‘localhost’ IDENTIFIED BY ‘cattle’; This will allow us to
    run queries from the MySQL database host.
  15. Find where you put your rancher-backup.sql file on the MySQL database host. From there, run mysql -u cattle -p cattle < rancher-backup.sql This says “hey mysql, using the cattle user import this file into the cattle
    database“. You can also use root if you prefer.
  16. Let’s verify the
    import. Run mysql -u cattle -p to get a mysql session.
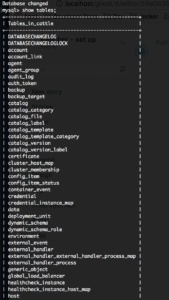
  17. Once in, run use cattle; Then show tables; You should see something like this:

Now we’re ready to bring up our Rancher server talking to our external

database.

  1. Log into the host where Rancher server is running.
  2. Run docker ps -a. Again, we see our rancher/server container is
    running:
  3. Let’s stop our rancher/server. Again, our workloads will continue
    to run. Run docker stop <container name>’.
  4. Now let’s bring it up using our external database. Run docker run
    -d –restart=unless-stopped -p 8080:8080 rancher/server –db-host
    <mysql host> –db-port 3306 –db-user cattle –db-pass cattle
    –db-name cattle. Give it about 60+ seconds for
    the rancher/server container to run.
  5. Now open the Rancher UI at http://<server_ip>:8080.

Congrats! You’re now running Rancher server with an external database
and your workloads are preserved.

**Rancher Server – Full Active/Active HA

**

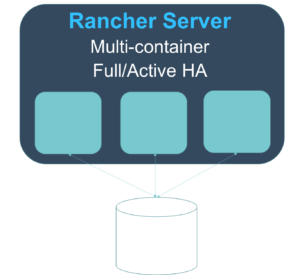
Now it’s time to configure our Rancher server for High Availability.
Running Rancher server in High Availability (HA) is as easy as running
Rancher server using an external database, exposing an additional port,
and adding in an additional argument to the command so that the servers
can find each other.
1. Be sure that port 9345 is open between the
Rancher server host and any other hosts we want to add to the cluster.
Also, be sure port 3306 is open between any Rancher server and the MySQL
server host.
2. Run docker stop <container name>.
3. Run docker run -d
–restart=unless-stopped -p 8080:8080 -p 9345:9345 rancher/server
–db-host <mysql host> –db-port 3306 –db-user cattle –db-pass
cattle –db-name cattle –advertise-address <IP_of_the_Node>
(*note: Cloud provider users should use the internal/private IP
address). Give it 60+ seconds for the container to run. (note: if after
75 seconds you can’t view the Rancher UI, see the troubleshooting
section below)
4. Open the Rancher UI at http://<server_ip>:8080.
You’ll see all your workloads and settings as you left them.
5. Click
on Admin then High Availability. You should see your single host you’ve
added. Let’s add another node to the cluster.
6. On another host, run
the same command but replacing the –advertise-address
<IP_of_the_Node> with the IP address of the new host you’re adding
to the cluster. Give it 60+ seconds. Refresh your Rancher server UI.
7.
Click on Admin then High Availability. You should see both nodes have
been added to your cluster. HA
setup
8. Because we
recommend an odd number of Rancher server nodes, add either 1 or 3 more
nodes to the cluster using the same method. Congrats! You have a Rancher
server cluster configured for High Availability.

Troubleshooting & Tips

During my time walking through these steps myself I ran into a few
issues. Below are some you might run into and how to deal with them.
Issue: Can’t view the Rancher UI after 75 seconds.
1. SSH into the
Rancher server host.
2. Confirm rancher/server is running. Run docker ps
–a. Given an output like this:
Output After Entering 'Run docker ps-a' Command
3. To view logs, run
`docker logs –t tender_bassi` (in this case). If you see something
like this: RANCHER BLOG
3 It’s Rancher being unable to reach the database server or authenticate with the credentials we’ve provided it in our start up command. Take a look at networking settings, username and password and access privileges in the MySQL
server.

Tip: While you may be tempted to name your rancher/server
‘—name=rancher-server’ or something like it this is not recommended.
The reason for this is if you need to rollback to your prior container
version after an upgrade step, you’ll have clear distinction between
container versions.

Conclusion

So, what have we done? We’ve installed Rancher server as a single
container. We’ve upgraded the Rancher installation to a high
availability platform instance without impacting running workloads.
We’ve also established guidelines for different types of environments.
We hope this was helpful. Further details on upgrading are available
here https://rancher.com/docs/rancher/v1.6/en/upgrading/.

Tags: Category: Uncategorized Comments closed

Microservices Made Easier Using Istio

Thursday, 24 August, 2017

Expert Training in Kubernetes and Rancher
Join our free online training sessions to learn more about Kubernetes, containers, and Rancher.

Update: This tutorial on Istio was updated for Rancher 2.0 here.

One of the recent open source initiatives that has caught our interest
at Rancher Labs is Istio, the micro-services
development framework. It’s a great technology, combining some of the
latest ideas in distributed services architecture in an easy-to-use
abstraction. Istio does several things for you. Sometimes referred to as
a “service mesh“, it has facilities for API
authentication/authorization, service routing, service discovery,
request monitoring, request rate-limiting, and more. It’s made up of a
few modular components that can be consumed separately or as a whole.
Some of the concepts such as “circuit breakers” are so sensible I
wonder how we ever got by without them.

Circuit breakers
are a solution to the problem where a service fails and incoming
requests cannot be handled. This causes the dependent services making
those calls to exhaust all their connections/resources, either waiting
for connections to timeout or allocating memory/threads to create new
ones. The circuit breaker protects the dependent services by
“tripping” when there are too many failures in a some interval of
time, and then only after some cool-down period, allowing some
connections to retry (effectively testing the waters to see if the
upstream service is ready to handle normal traffic again).

Istio is
built with Kubernetes in mind. Kubernetes is a
great foundation as it’s one of the fastest growing platforms for
running container systems, and has extensive community support as well
as a wide variety of tools. Kubernetes is also built for scale, giving
you a foundation that can grow with your application.

Deploying Istio with Helm

Rancher includes and enterprise Kubernetes distribution makes it easy to
run Istio. First, fire up a Kubernetes environment on Rancher (watch
this
demo
or see our quickstart
guide
for
help). Next, use the helm chart from the Kubernetes Incubator for
deploying Istio to start the framework’s components. You’ll need to
install helm, which you can do by following this
guide
.
Once you have helm installed, you can add the helm chart repo from
Google to your helm client:

helm repo add incubator http://storage.googleapis.com/kubernetes-charts-incubator

Then you can simply run:

helm install -n istio incubator/istio


A view in kube dash of the microservices that makeup Istio
This will deploy a few micro-services that provide the functionality of
Istio. Istio gives you a framework for exchanging messages between
services. The advantage of using it over building your own is you don’t
have to implement as much “boiler-plate” code before actually writing
the business logic of your application. For instance, do you need to
implement auth or ACLs between services? It’s quite possible that your
needs are the same as most other developers trying to do the same, and
Istio offers a well-written solution that just works. Its also has a
community of developers whose focus is to make this one thing work
really well, and as you build your application around this framework, it
will continue to benefit from this innovation with minimal effort on
your part.

Deploying an Istio Application

OK, so lets try this thing out. So far all we have is plumbing. To
actually see it do something you’ll want to deploy an Istio
application. The Istio team have put together a nice sample application
they call ”BookInfo” to
demonstrate how it works. To work with Istio applications we’ll need
two things: the Istio command line client, istioctl, and the Istio
application templates. The istioctl client works in conjunction with
kubectl to deploy Istio applications. In this basic example,
istioctl serves as a preprocessor for kubectl, so we can dynamically
inject information that is particular to our Istio deployment.
Therefore, in many ways, you are working with normal Kubernetes resource
YAML files, just with some hooks where special Istio stuff can be
injected. To make it easier to get started, you can get both istioctl
and the needed application templates from this repo:
https://github.com/wjimenez5271/rancher-istio. Just clone it on your
local machine. This also assumes you have kubectl installed and
configured. If you need help installing that see our
docs.
Now
that you’ve cloned the above repo, “cd” into the directory and run:

kubectl apply -f <(istioctl kube-inject -f samples/apps/bookinfo/bookinfo.yaml)

This deploys the kubernetes resources using kubectl while injecting some
istio specific values. It will deploy new services to K8 that will serve
the “BookInfo” application, but it will leverage the Istio services
we’ve already deployed. Once the BookInfo services finish deploying we
should be able to view the UI of the web app. We’ll need to get the
address first, we can do that by running

kubectl get services istio-ingress -o wide

This should show you the IP address of the istio ingress (under the
EXTERNAL-IP column). We’ll use this IP address to construct the URL to
access the application. For example, my output with my local Rancher
install looks like:
Example output of kubectl get services istio-ingress -o wide
The istio ingress is shared amongst your applications, and routes to the
correct service based on a URI pattern. Our application route is at
/productpage so our request URL would be:

http://$EXTERNAL_IP/productpage

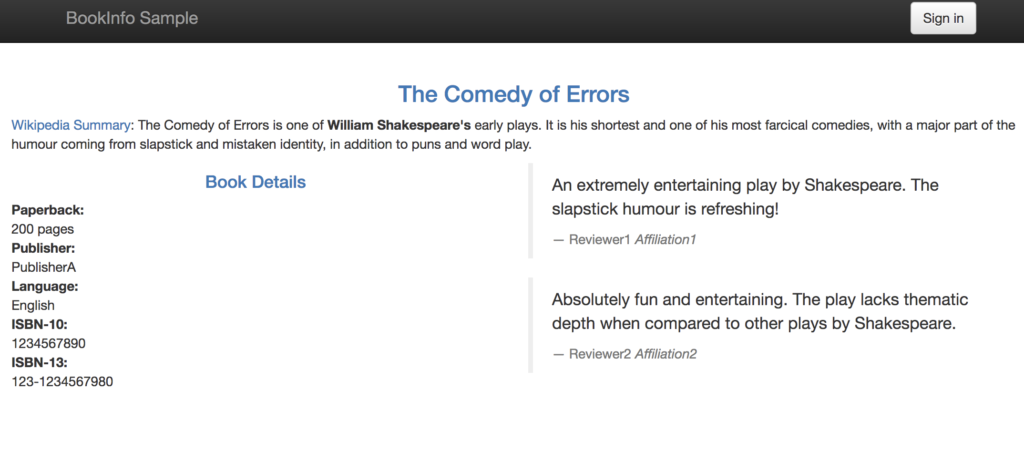
Try loading that in your browser. If everything worked you should see
a page like this:
Sample application “BookInfo“, built on Istio

Built-in metrics system

Now that we’ve got our application working we can check out the built
in metrics system to see how its behaving. As you can see, Istio has
instrumented our transactions automatically just by using their
framework. Its using the Prometheus metrics collection engine, but they
set it up for you out of the box. We can visualize the metrics using
Grafana. Using the helm chart in this article, accessing the endpoint of
the Grafana pod will require setting up a local kubectl port forward
rule:

export POD_NAME=$(kubectl get pods --namespace default -l "component=istio-istio-grafana" -o jsonpath="{.items[0].metadata.name}")

kubectl port-forward $POD_NAME 3000:3000 --namespace default

You can then access Grafana at:
http://127.0.0.1:3000/dashboard/db/istio-dashboard
The Grafana Dashboard with the included Istio template that highlights
useful metrics Have you developed something cool with Istio
on Rancher? If so, we’d love to hear about it. Feel free to drop us a
line on twitter @Rancher_Labs, or
on our user slack.

Expert Training in Kubernetes and Rancher
Join our free online training sessions to learn more about Kubernetes, containers, and Rancher.

Moving Your Monolith: Best Practices and Focus Areas

Monday, 26 June, 2017

You have a complex monolithic system that is critical to your business.
You’ve read articles and would love to move it to a more modern platform
using microservices and containers, but you have no idea where to start.
If that sounds like your situation, then this is the article for you.
Below, I identify best practices and the areas to focus on as you evolve
your monolithic application into a microservices-oriented application.

Overview

We all know that net new, greenfield development is ideal, starting with
a container-based approach using cloud services. Unfortunately, that is
not the day-to-day reality inside most development teams. Most
development teams support multiple existing applications that have been
around for a few years and need to be refactored to take advantage of
modern toolsets and platforms. This is often referred to as brownfield
development. Not all application technology will fit into containers
easily. It can always be made to fit, but one has to question if it is
worth it. For example, you could lift and shift an entire large-scale
application into containers or onto a cloud platform, but you will
realize none of the benefits around flexibility or cost containment.

Document All Components Currently in Use

Our
newly-updated eBook walks you through incorporating containers into your
CI/CD pipeline. Download the
eBook

Taking an assessment of the current state of the application and its
underpinning stack may not sound like a revolutionary idea, but when
done holistically, including all the network and infrastructure
components, there will often be easy wins that are identified as part of
this stage. Small, incremental steps are the best way to make your
stakeholders and support teams more comfortable with containers without
going straight for the core of the application. Examples of
infrastructure components that are container-friendly are web servers
(ex: Apache HTTPD), reverse proxy and load balancers (ex: haproxy),
caching components (ex: memcached), and even queue managers (ex: IBM
MQ). Say you want to go to the extreme: if the application is written in
Java, could a more lightweight Java EE container be used that supports
running inside Docker without having to break apart the application
right away? WebLogic, JBoss (Wildfly), and WebSphere Liberty are great
examples of Docker-friendly Java EE containers.

Identify Existing Application Components

Now that the “easy” wins at the infrastructure layer are running in
containers, it is time to start looking inside the application to find
the logical breakdown of components. For example, can the user interface
be segmented out as a separate, deployable application? Can part of the
UI be tied to specific backend components and deployed separately, like
the billing screens with billing business logic? There are two important
notes when it comes to grouping application components to be deployed as
separate artifacts:

  1. Inside monolithic applications, there are always shared libraries
    that will end up being deployed multiple times in a newer
    microservices model. The benefit of multiple deployments is that
    each microservice can follow its own update schedule. Just because a
    common library has a new feature doesn’t mean that everyone needs it
    and has to upgrade immediately.
  2. Unless there is a very obvious way to break the database apart (like
    multiple schemas) or it’s currently across multiple databases, just
    leave it be. Monolithic applications tend to cross-reference tables
    and build custom views that typically “belong” to one or more other
    components because the raw tables are readily available, and
    deadlines win far more than anyone would like to admit.

Upcoming Business Enhancements

Once you have gone through and made some progress, and perhaps
identified application components that could be split off into separate
deployable artifacts, it’s time to start making business enhancements
your number one avenue to initiate the redesign of the application into
smaller container-based applications which will eventually become your
microservices. If you’ve identified billing as the first area you want
to split off from the main application, then go through the requested
enhancements and bug fixes related to those application components. Once
you have enough for a release, start working on it, and include the
separation as part of the release. As you progress through the different
silos in the application, your team will become more proficient at
breaking down the components and making them in their own containers.

Conclusion

When a monolithic application is decomposed and deployed as a series of
smaller applications using containers, it is a whole new world of
efficiency. Scaling each component independently based on actual load
(instead of simply building for peak load), and updating a single
component (without retesting and redeploying EVERYTHING) will
drastically reduce the time spent in QA and getting approvals within
change management. Smaller applications that serve distinct functions
running on top of containers are the (much more efficient) way of the
future. Vince Power is a Solution Architect who has a focus on cloud
adoption and technology implementations using open source-based
technologies. He has extensive experience with core computing and
networking (IaaS), identity and access management (IAM), application
platforms (PaaS), and continuous delivery.

Tags: , Category: Uncategorized Comments closed