Installing Rancher – From Single Container to High Availability

quinta-feira, 7 setembro, 2017

Update: This tutorial was updated for Rancher 2.x in 2019 here

Any time an organization, team or developer adopts a new platform, there
are certain challenges during the setup and configuration process. Often
installations have to be restarted from scratch and workloads are lost.
This leaves adopters apprehensive about moving forward with new
technologies. The cost, risk and effort are too great in the business of
today. With Rancher, we’ve established a clear container installation and upgrade
path so no work is thrown away. Facilitating a smooth upgrade path is
key to mitigating against risk and increasing costs. This guide has two
goals:

  1. Take you through the installation and upgrade process from a
    technical perspective.
  2. Inform you of the different types of installations and their
    purpose.

With that in mind, we’re going to walk through the set-up of Rancher
Server in each of the following scenarios, with each step upgrading from
the previous one:

  • Single Container (non-HA) – installation
  • Single Container (non-HA)- Bind mounted MySQL volume
  • Single Container (non-HA) – External database
  • Full Active/Active HA – (upgrading to this from our previous set up)

A working knowledge of Docker is assumed. For this guide, you’ll need
one or two Linux virtual machines with the Docker engine installed and
an available MySQL database server. All virtual machines need to be able
to talk to each other, so be mindful of any restrictions you have in a
cloud environment (AWS, GCP, Digital Ocean etc.). Detailed
documentation is located
here
.

**Single Container (non-HA) – Installation

Container With a Text Above That Says 'Rancher Server'**

  1. SSH into your Linux virtual machine
  2. Verify your Docker
    installation with docker -v. You should see something resembling Docker
    version 1.12.x
  3. Run sudo docker run -d –restart=unless-stopped -p
    8080:8080 rancher/server
  4. Docker will pull the rancher/server
    container image and run it on port 8080
  5. Run docker ps -a. You should
    see an output similar to this:
    Output After Entering 'Run docker ps-a' Command
    (Note: remember the name or ID of the rancher/server container)
  6. At this point, you should be able to go to http://<server_ip>:8080 in
    your browser and see the Rancher UI.

You should see the Rancher UI with the welcome modal: Rancher UI
welcome 
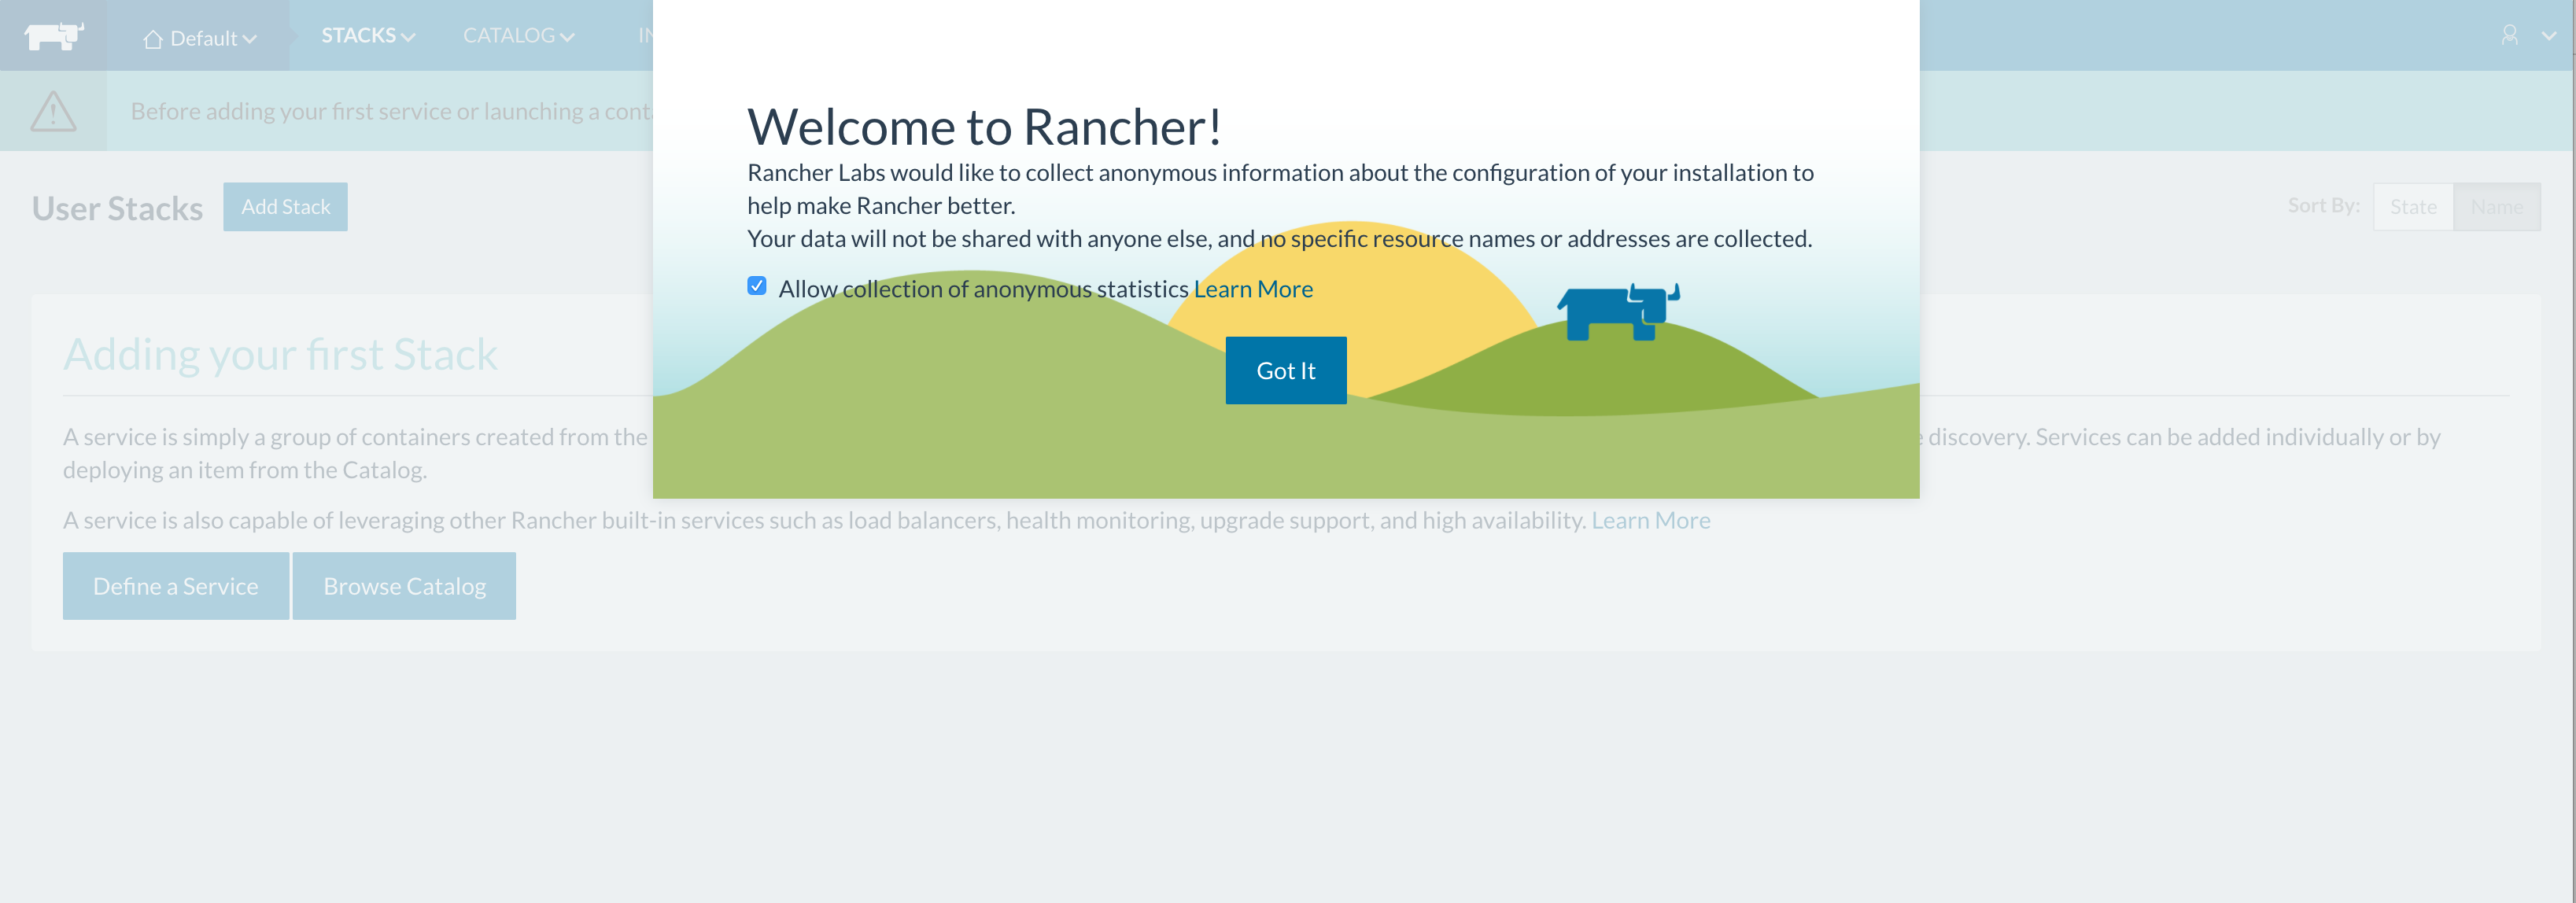
Since this is our initial set up, we need to add a host to our Rancher environment:

A Detailed Overview of Rancher’s Architecture


This newly-updated, in-depth guidebook provides a detailed overview of the features and functionality of the new Rancher: an open-source enterprise Kubernetes platform.

Get the eBook

  1. Click ‘Got it!’
  2. Then click ‘Add a Host’. This first time you’ll see
    a Host Registration URL page:
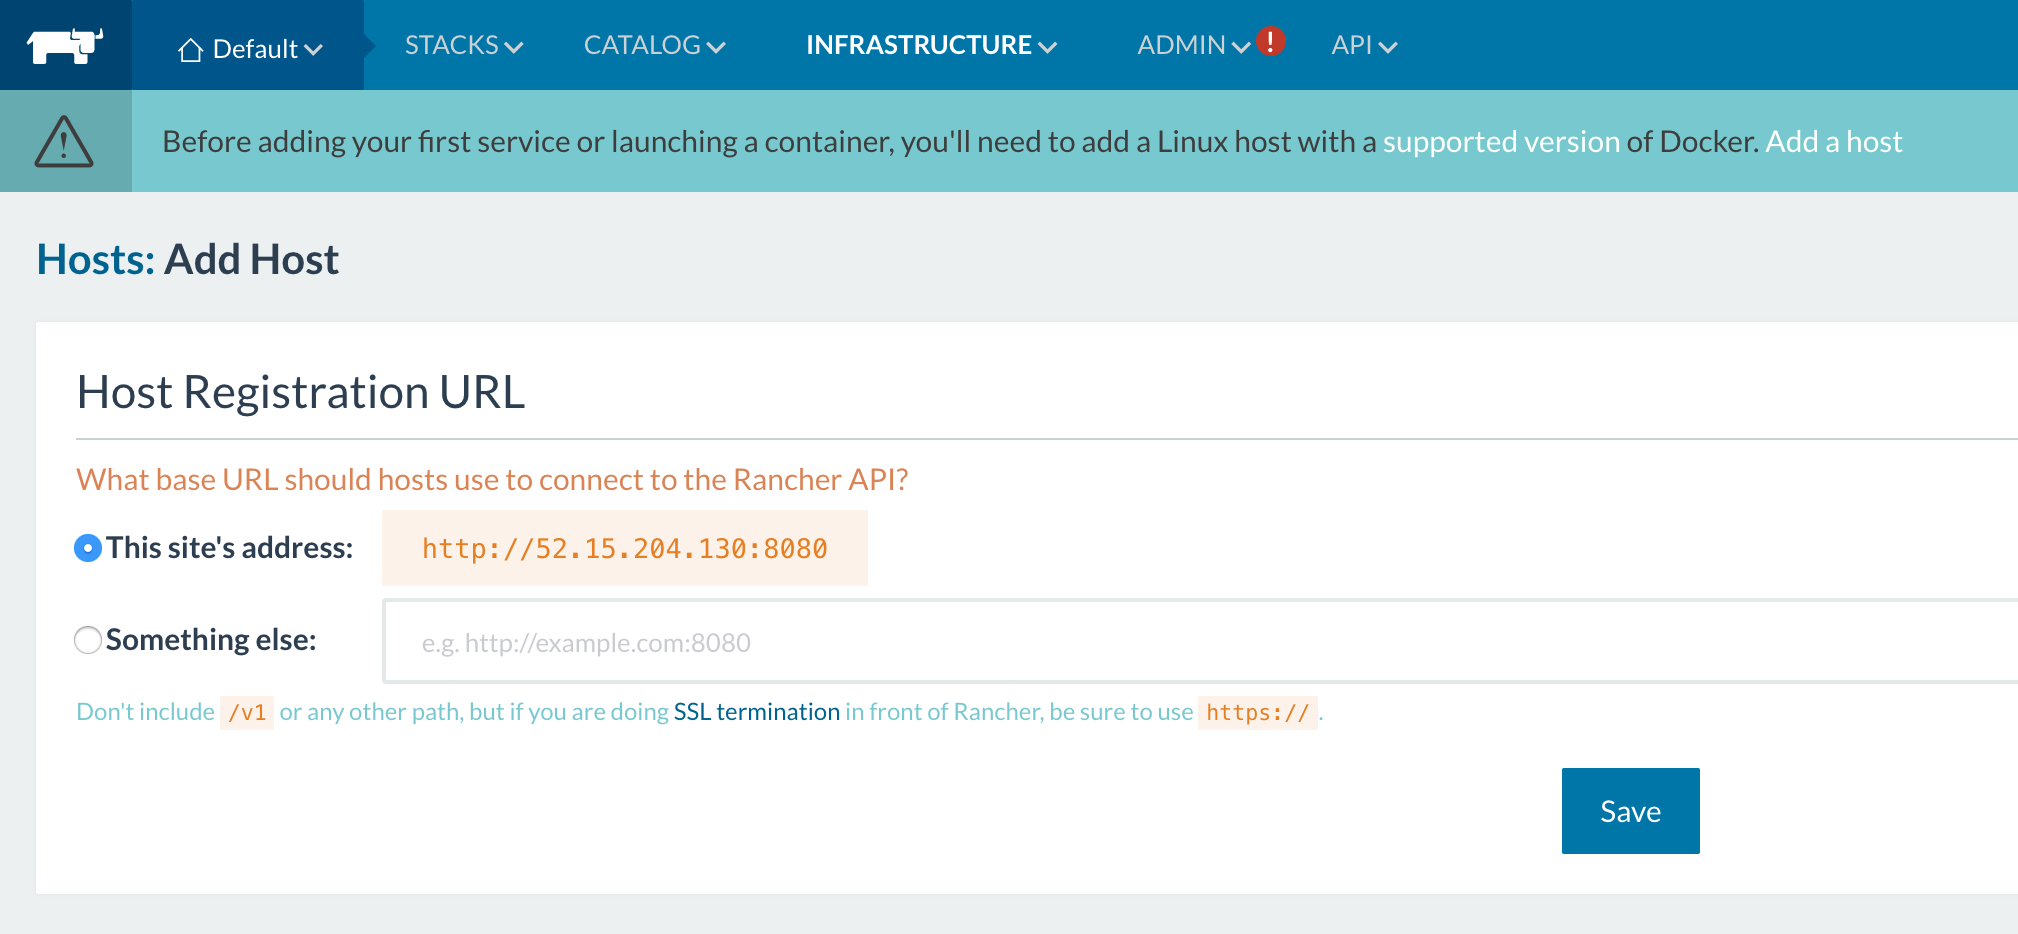
 Add
host
  3. For this
    article, we’ll just go with whatever IP address we have. Click ‘Save’.
  4. Now, click ‘Add a Host’ again. You’ll see this: Add host cloud
provider 
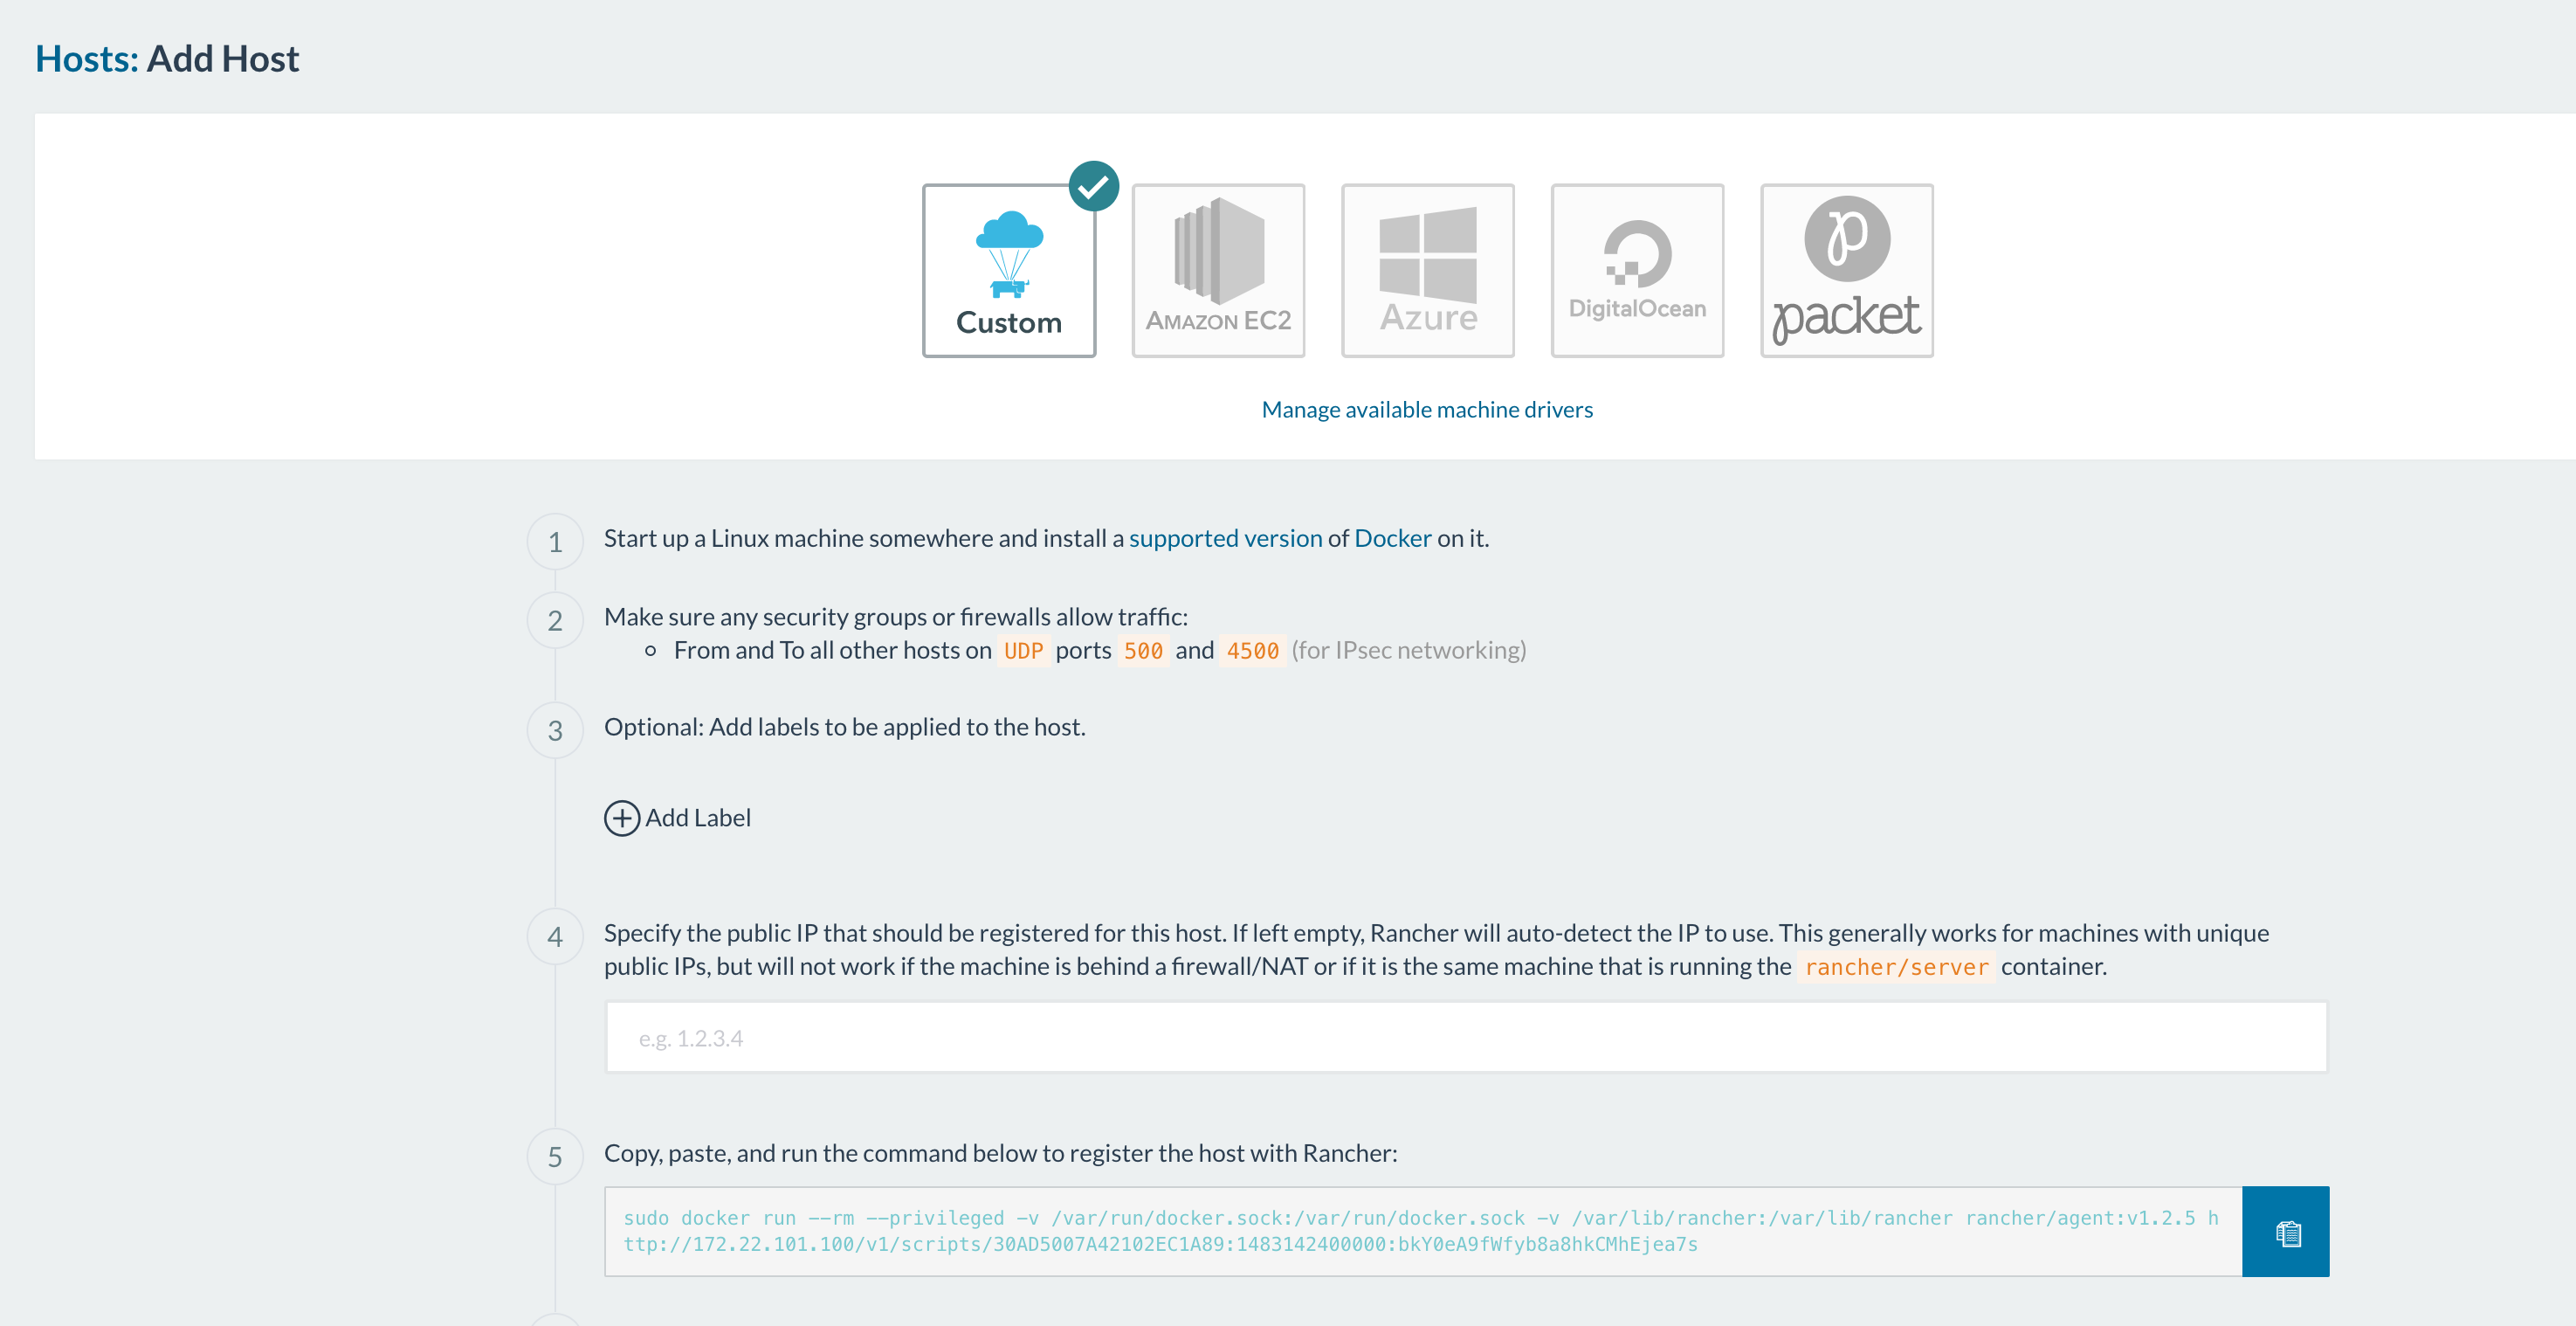
(note: the ports that have to been open for hosts to be able to communicate are 500 and
    4500.) From here you can decide how you want to add your hosts based on
    your infrastructure.
  5. After adding your host(s) you should see something like this:
    Rancher host details

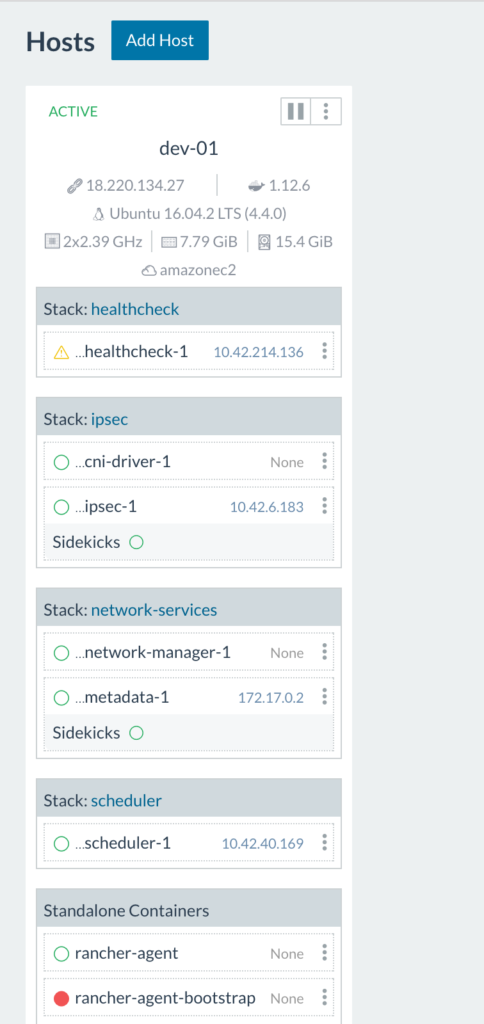
So, what’s going on here? The rancher-agent-bootstrap container runs once to get the rancher-agent up and running then stops (notice the red circle indicating a stopped container). As we can see above, the health check container is starting up. Once all infrastructure containers are up and running on the host you’ll see this:

Host wit infrastructure
container

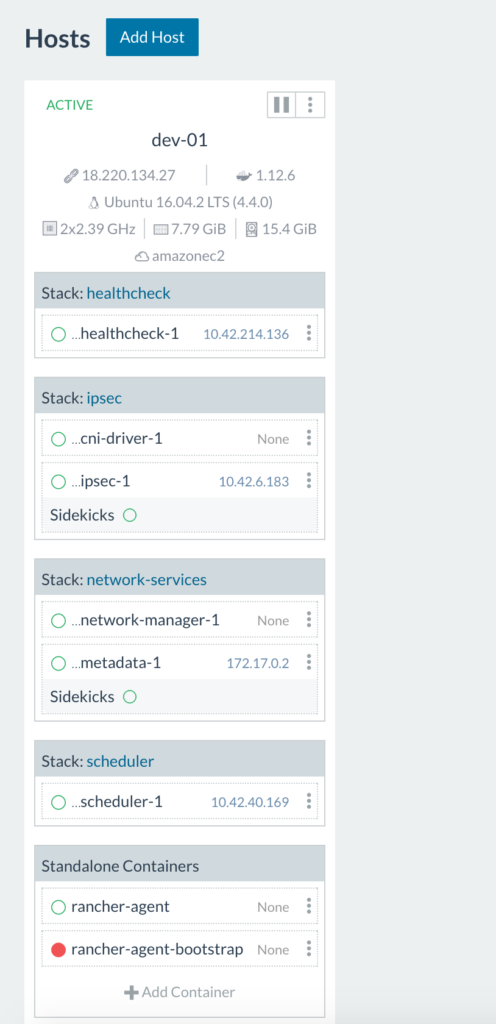
Here we see all infrastructure containers (health check, scheduler, metadata, network
manager, IPsec, and cni-driver) are all up and running on the host.

Tip:
to view only user containers, uncheck ‘Show System’ in the top right
corner of the Host view. Congratulations! You’ve set up a Rancher
Server in a single container. Rancher is up and running and has a local
MySQL database running inside of the container. You can add items from
the catalog
, deploy
your own containers etc. As long as you don’t delete the rancher/server
container, any changes you make to the environment will be preserved as
we go to our next step.

**Single Container (non-HA) – Bind-mounted volume

**

Now we’re going to take our existing Rancher server and upgrade it to
use a bind-mounted volume for the database. This way, should the
container die when we upgrade to a later version of Rancher, we don’t
lose the data for what we’ve built. In our next steps, we’re going to
stop the rancher-server container, externalize the data to the host,
then start a new instance of the container using the bind-mounted
volume. Detailed documentation is located
here
.

  1. Let’s say our rancher/server container is named fantastic_turtle.
  2. Run docker stop fantastic_turtle.
  3. Run docker cp fantastic_turtle:/var/lib/mysql <path on host> (Any
    path will do but using /opt/docker or something similar is not
    recommended). I use /data as it’s usually empty. This will copy the
    database files out of the container to the file system to /data. The
    export will put your database files at /data/mysql.
  4. Verify the location by running ls -al /data You will see
    a mysql directory within the path.
  5. Run sudo chown -R 102:105 /data. This will allow the mysql user
    within the container to access the files.
  6. Run docker run -d -v /data/mysql:/var/lib/mysql -p 8080:8080
    –restart=unless-stopped rancher/server:stable. Give it about 60
    seconds to start up.
  7. Open the Rancher UI at http://<server_ip>:8080. You should see
    the UI exactly as you left it. You’ll also notice your workloads
    that you were running have continued to run.
  8. Let’s clean up the environment a bit. Run docker ps -a.
  9. You’ll see 2 rancher/server Image containers. One will have a
    status of Exited (0) X minutes ago and one will have a status of Up
    X minutes. Copy the name of the container with exited status.
  10. Run docker rm fantastic_turtle.
  11. Now our docker environment is clean with Rancher server running with
    the new container.

**Single Container (non-HA) – External database

**

As we head toward an HA set up, we need have Rancher server running with
an external database. Currently, if anything happens to our host, we
could lose the data supporting the Rancher workloads. We’re going to
launch our Rancher server with an external database. We don’t want to
disturb our current set up or workloads so we’ll have to export our
data, import into a proper MySQL or MySQL compliant database and restart
our Rancher server that points to our external database with our data in
it.

  1. SSH into our Rancher server host.
  2. Run docker exec -it
    <container name> bash. This will give you a terminal session in
    your rancher/server container.
  3. Run mysql -u root -p.
  4. When prompted
    for a password, press [Enter].
  5. You now have a mysql prompt.
    6.Run show databases. You’ll see this:

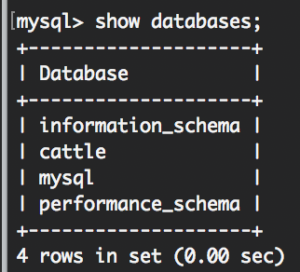
    This way we know we have the rancher/server database.
  6. Run exit.
  7. Run mysqldump -u root -p cattle > /var/lib/mysql/rancher-backup.sql
    When prompted for a password hit [Enter].
  8. Exit the container.
    10.Run ls -al /data/mysql. You’ll see your rancher-backup.sql in the
    directory. We’ve exported the database! At this point, we can move the
    data to any MySQL compliant database running in our infrastructure as
    long as our rancher/server host can reach the MySQL database host. Also,
    keep in mind all this while your workloads that you have been running on
    the Rancher server and hosts are fine. Feel free to use them. We haven’t
    stopped the server yet, so of course they’re fine.
  9. Move
    your rancher-backup.sqlto a target host running a MySQL database server.
  10. Open a mysql session with your MySQL database server. Run mysql -u
    <user> -p.
  11. Enter your decided or provided password.
  12. 14. Run CREATE
    DATABASE IF NOT EXISTS cattle COLLATE = ‘utf8_general_ci’ CHARACTER
    SET = ‘utf8’;
  13. Run GRANT ALL ON cattle.* TO ‘cattle’@‘%’
    IDENTIFIED BY ‘cattle’; This creates our cattle user for
    the cattle database using the cattle password. (note: use a strong
    password for production)
  14. Run GRANT ALL ON cattle.* TO
    ‘cattle’@‘localhost’ IDENTIFIED BY ‘cattle’; This will allow us to
    run queries from the MySQL database host.
  15. Find where you put your rancher-backup.sql file on the MySQL database host. From there, run mysql -u cattle -p cattle < rancher-backup.sql This says “hey mysql, using the cattle user import this file into the cattle
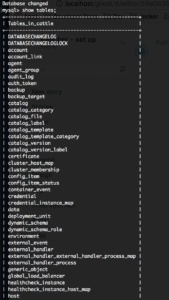
    database“. You can also use root if you prefer.
  16. Let’s verify the
    import. Run mysql -u cattle -p to get a mysql session.
  17. Once in, run use cattle; Then show tables; You should see something like this:

Now we’re ready to bring up our Rancher server talking to our external

database.

  1. Log into the host where Rancher server is running.
  2. Run docker ps -a. Again, we see our rancher/server container is
    running:
  3. Let’s stop our rancher/server. Again, our workloads will continue
    to run. Run docker stop <container name>’.
  4. Now let’s bring it up using our external database. Run docker run
    -d –restart=unless-stopped -p 8080:8080 rancher/server –db-host
    <mysql host> –db-port 3306 –db-user cattle –db-pass cattle
    –db-name cattle. Give it about 60+ seconds for
    the rancher/server container to run.
  5. Now open the Rancher UI at http://<server_ip>:8080.

Congrats! You’re now running Rancher server with an external database
and your workloads are preserved.

**Rancher Server – Full Active/Active HA

**

Now it’s time to configure our Rancher server for High Availability.
Running Rancher server in High Availability (HA) is as easy as running
Rancher server using an external database, exposing an additional port,
and adding in an additional argument to the command so that the servers
can find each other.
1. Be sure that port 9345 is open between the
Rancher server host and any other hosts we want to add to the cluster.
Also, be sure port 3306 is open between any Rancher server and the MySQL
server host.
2. Run docker stop <container name>.
3. Run docker run -d
–restart=unless-stopped -p 8080:8080 -p 9345:9345 rancher/server
–db-host <mysql host> –db-port 3306 –db-user cattle –db-pass
cattle –db-name cattle –advertise-address <IP_of_the_Node>
(*note: Cloud provider users should use the internal/private IP
address). Give it 60+ seconds for the container to run. (note: if after
75 seconds you can’t view the Rancher UI, see the troubleshooting
section below)
4. Open the Rancher UI at http://<server_ip>:8080.
You’ll see all your workloads and settings as you left them.
5. Click
on Admin then High Availability. You should see your single host you’ve
added. Let’s add another node to the cluster.
6. On another host, run
the same command but replacing the –advertise-address
<IP_of_the_Node> with the IP address of the new host you’re adding
to the cluster. Give it 60+ seconds. Refresh your Rancher server UI.
7.
Click on Admin then High Availability. You should see both nodes have
been added to your cluster.
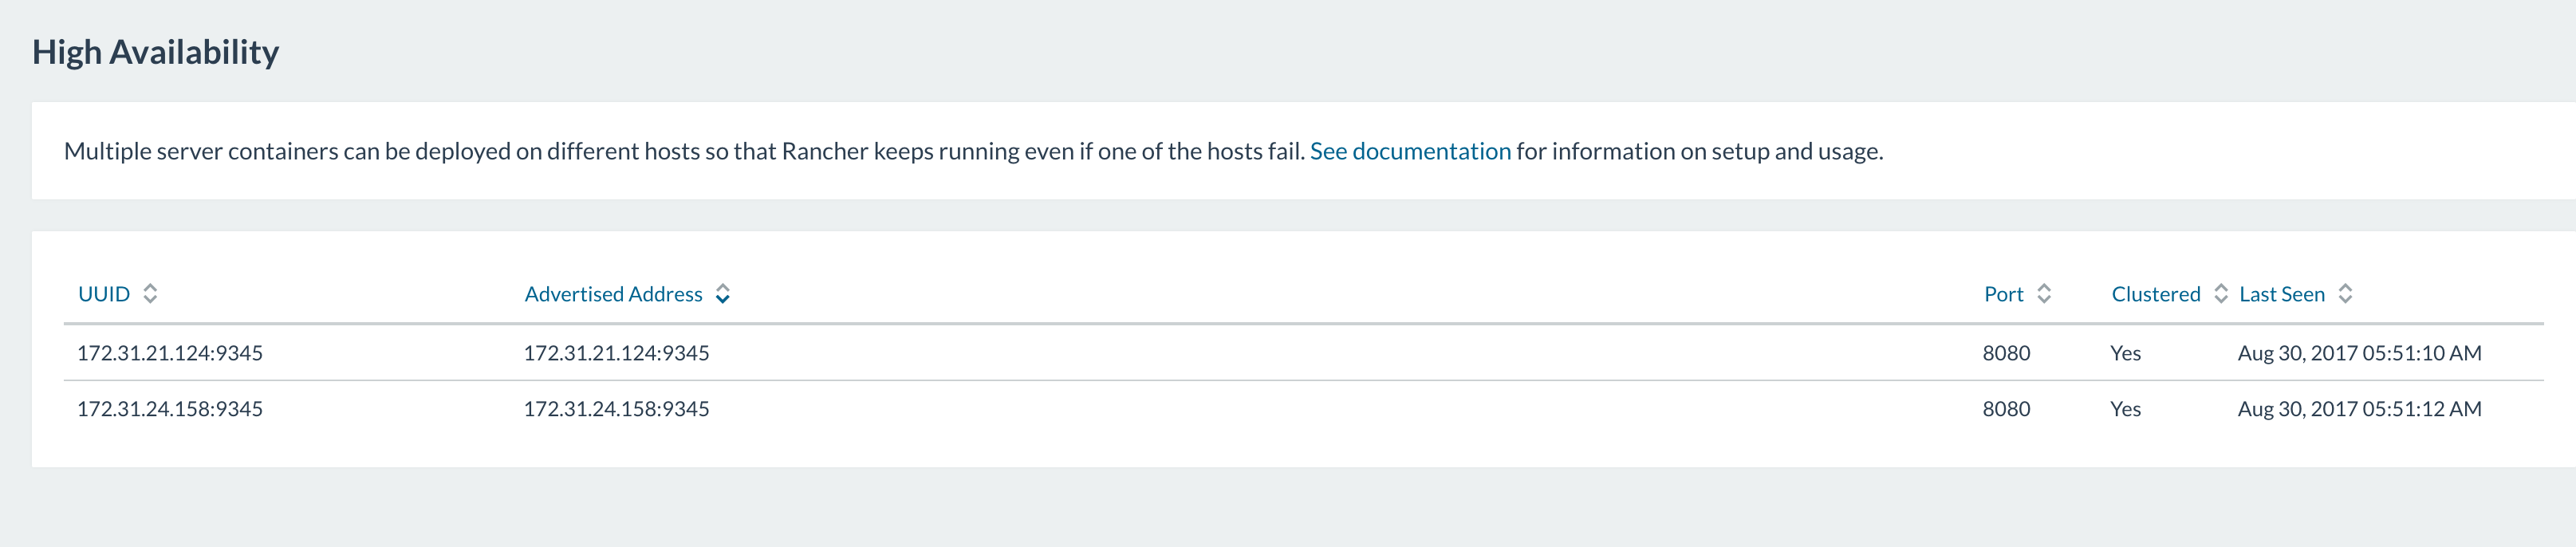
 HA
setup
8. Because we
recommend an odd number of Rancher server nodes, add either 1 or 3 more
nodes to the cluster using the same method. Congrats! You have a Rancher
server cluster configured for High Availability.

Troubleshooting & Tips

During my time walking through these steps myself I ran into a few
issues. Below are some you might run into and how to deal with them.
Issue: Can’t view the Rancher UI after 75 seconds.
1. SSH into the
Rancher server host.
2. Confirm rancher/server is running. Run docker ps
–a. Given an output like this:
Output After Entering 'Run docker ps-a' Command
3. To view logs, run
`docker logs –t tender_bassi` (in this case). If you see something
like this: RANCHER BLOG
3 It’s Rancher being unable to reach the database server or authenticate with the credentials we’ve provided it in our start up command. Take a look at networking settings, username and password and access privileges in the MySQL
server.

Tip: While you may be tempted to name your rancher/server
‘—name=rancher-server’ or something like it this is not recommended.
The reason for this is if you need to rollback to your prior container
version after an upgrade step, you’ll have clear distinction between
container versions.

Conclusion

So, what have we done? We’ve installed Rancher server as a single
container. We’ve upgraded the Rancher installation to a high
availability platform instance without impacting running workloads.
We’ve also established guidelines for different types of environments.
We hope this was helpful. Further details on upgrading are available
here https://rancher.com/docs/rancher/v1.6/en/upgrading/.

Tags: Category: Sem categoria Comments closed

Microservices Made Easier Using Istio

quinta-feira, 24 agosto, 2017

Expert Training in Kubernetes and Rancher
Join our free online training sessions to learn more about Kubernetes, containers, and Rancher.

Update: This tutorial on Istio was updated for Rancher 2.0 here.

One of the recent open source initiatives that has caught our interest
at Rancher Labs is Istio, the micro-services
development framework. It’s a great technology, combining some of the
latest ideas in distributed services architecture in an easy-to-use
abstraction. Istio does several things for you. Sometimes referred to as
a “service mesh“, it has facilities for API
authentication/authorization, service routing, service discovery,
request monitoring, request rate-limiting, and more. It’s made up of a
few modular components that can be consumed separately or as a whole.
Some of the concepts such as “circuit breakers” are so sensible I
wonder how we ever got by without them.

Circuit breakers
are a solution to the problem where a service fails and incoming
requests cannot be handled. This causes the dependent services making
those calls to exhaust all their connections/resources, either waiting
for connections to timeout or allocating memory/threads to create new
ones. The circuit breaker protects the dependent services by
“tripping” when there are too many failures in a some interval of
time, and then only after some cool-down period, allowing some
connections to retry (effectively testing the waters to see if the
upstream service is ready to handle normal traffic again).

Istio is
built with Kubernetes in mind. Kubernetes is a
great foundation as it’s one of the fastest growing platforms for
running container systems, and has extensive community support as well
as a wide variety of tools. Kubernetes is also built for scale, giving
you a foundation that can grow with your application.

Deploying Istio with Helm

Rancher includes and enterprise Kubernetes distribution makes it easy to
run Istio. First, fire up a Kubernetes environment on Rancher (watch
this
demo
or see our quickstart
guide
for
help). Next, use the helm chart from the Kubernetes Incubator for
deploying Istio to start the framework’s components. You’ll need to
install helm, which you can do by following this
guide
.
Once you have helm installed, you can add the helm chart repo from
Google to your helm client:

helm repo add incubator http://storage.googleapis.com/kubernetes-charts-incubator

Then you can simply run:

helm install -n istio incubator/istio


A view in kube dash of the microservices that makeup Istio
This will deploy a few micro-services that provide the functionality of
Istio. Istio gives you a framework for exchanging messages between
services. The advantage of using it over building your own is you don’t
have to implement as much “boiler-plate” code before actually writing
the business logic of your application. For instance, do you need to
implement auth or ACLs between services? It’s quite possible that your
needs are the same as most other developers trying to do the same, and
Istio offers a well-written solution that just works. Its also has a
community of developers whose focus is to make this one thing work
really well, and as you build your application around this framework, it
will continue to benefit from this innovation with minimal effort on
your part.

Deploying an Istio Application

OK, so lets try this thing out. So far all we have is plumbing. To
actually see it do something you’ll want to deploy an Istio
application. The Istio team have put together a nice sample application
they call ”BookInfo” to
demonstrate how it works. To work with Istio applications we’ll need
two things: the Istio command line client, istioctl, and the Istio
application templates. The istioctl client works in conjunction with
kubectl to deploy Istio applications. In this basic example,
istioctl serves as a preprocessor for kubectl, so we can dynamically
inject information that is particular to our Istio deployment.
Therefore, in many ways, you are working with normal Kubernetes resource
YAML files, just with some hooks where special Istio stuff can be
injected. To make it easier to get started, you can get both istioctl
and the needed application templates from this repo:
https://github.com/wjimenez5271/rancher-istio. Just clone it on your
local machine. This also assumes you have kubectl installed and
configured. If you need help installing that see our
docs.
Now
that you’ve cloned the above repo, “cd” into the directory and run:

kubectl apply -f <(istioctl kube-inject -f samples/apps/bookinfo/bookinfo.yaml)

This deploys the kubernetes resources using kubectl while injecting some
istio specific values. It will deploy new services to K8 that will serve
the “BookInfo” application, but it will leverage the Istio services
we’ve already deployed. Once the BookInfo services finish deploying we
should be able to view the UI of the web app. We’ll need to get the
address first, we can do that by running

kubectl get services istio-ingress -o wide

This should show you the IP address of the istio ingress (under the
EXTERNAL-IP column). We’ll use this IP address to construct the URL to
access the application. For example, my output with my local Rancher
install looks like:
Example output of kubectl get services istio-ingress -o wide
The istio ingress is shared amongst your applications, and routes to the
correct service based on a URI pattern. Our application route is at
/productpage so our request URL would be:

http://$EXTERNAL_IP/productpage

Try loading that in your browser. If everything worked you should see
a page like this:
Sample application “BookInfo“, built on Istio

Built-in metrics system

Now that we’ve got our application working we can check out the built
in metrics system to see how its behaving. As you can see, Istio has
instrumented our transactions automatically just by using their
framework. Its using the Prometheus metrics collection engine, but they
set it up for you out of the box. We can visualize the metrics using
Grafana. Using the helm chart in this article, accessing the endpoint of
the Grafana pod will require setting up a local kubectl port forward
rule:

export POD_NAME=$(kubectl get pods --namespace default -l "component=istio-istio-grafana" -o jsonpath="{.items[0].metadata.name}")

kubectl port-forward $POD_NAME 3000:3000 --namespace default

You can then access Grafana at:
http://127.0.0.1:3000/dashboard/db/istio-dashboard
The Grafana Dashboard with the included Istio template that highlights
useful metrics Have you developed something cool with Istio
on Rancher? If so, we’d love to hear about it. Feel free to drop us a
line on twitter @Rancher_Labs, or
on our user slack.

Expert Training in Kubernetes and Rancher
Join our free online training sessions to learn more about Kubernetes, containers, and Rancher.

Moving Your Monolith: Best Practices and Focus Areas

segunda-feira, 26 junho, 2017

You have a complex monolithic system that is critical to your business.
You’ve read articles and would love to move it to a more modern platform
using microservices and containers, but you have no idea where to start.
If that sounds like your situation, then this is the article for you.
Below, I identify best practices and the areas to focus on as you evolve
your monolithic application into a microservices-oriented application.

Overview

We all know that net new, greenfield development is ideal, starting with
a container-based approach using cloud services. Unfortunately, that is
not the day-to-day reality inside most development teams. Most
development teams support multiple existing applications that have been
around for a few years and need to be refactored to take advantage of
modern toolsets and platforms. This is often referred to as brownfield
development. Not all application technology will fit into containers
easily. It can always be made to fit, but one has to question if it is
worth it. For example, you could lift and shift an entire large-scale
application into containers or onto a cloud platform, but you will
realize none of the benefits around flexibility or cost containment.

Document All Components Currently in Use

Our
newly-updated eBook walks you through incorporating containers into your
CI/CD pipeline. Download the
eBook

Taking an assessment of the current state of the application and its
underpinning stack may not sound like a revolutionary idea, but when
done holistically, including all the network and infrastructure
components, there will often be easy wins that are identified as part of
this stage. Small, incremental steps are the best way to make your
stakeholders and support teams more comfortable with containers without
going straight for the core of the application. Examples of
infrastructure components that are container-friendly are web servers
(ex: Apache HTTPD), reverse proxy and load balancers (ex: haproxy),
caching components (ex: memcached), and even queue managers (ex: IBM
MQ). Say you want to go to the extreme: if the application is written in
Java, could a more lightweight Java EE container be used that supports
running inside Docker without having to break apart the application
right away? WebLogic, JBoss (Wildfly), and WebSphere Liberty are great
examples of Docker-friendly Java EE containers.

Identify Existing Application Components

Now that the “easy” wins at the infrastructure layer are running in
containers, it is time to start looking inside the application to find
the logical breakdown of components. For example, can the user interface
be segmented out as a separate, deployable application? Can part of the
UI be tied to specific backend components and deployed separately, like
the billing screens with billing business logic? There are two important
notes when it comes to grouping application components to be deployed as
separate artifacts:

  1. Inside monolithic applications, there are always shared libraries
    that will end up being deployed multiple times in a newer
    microservices model. The benefit of multiple deployments is that
    each microservice can follow its own update schedule. Just because a
    common library has a new feature doesn’t mean that everyone needs it
    and has to upgrade immediately.
  2. Unless there is a very obvious way to break the database apart (like
    multiple schemas) or it’s currently across multiple databases, just
    leave it be. Monolithic applications tend to cross-reference tables
    and build custom views that typically “belong” to one or more other
    components because the raw tables are readily available, and
    deadlines win far more than anyone would like to admit.

Upcoming Business Enhancements

Once you have gone through and made some progress, and perhaps
identified application components that could be split off into separate
deployable artifacts, it’s time to start making business enhancements
your number one avenue to initiate the redesign of the application into
smaller container-based applications which will eventually become your
microservices. If you’ve identified billing as the first area you want
to split off from the main application, then go through the requested
enhancements and bug fixes related to those application components. Once
you have enough for a release, start working on it, and include the
separation as part of the release. As you progress through the different
silos in the application, your team will become more proficient at
breaking down the components and making them in their own containers.

Conclusion

When a monolithic application is decomposed and deployed as a series of
smaller applications using containers, it is a whole new world of
efficiency. Scaling each component independently based on actual load
(instead of simply building for peak load), and updating a single
component (without retesting and redeploying EVERYTHING) will
drastically reduce the time spent in QA and getting approvals within
change management. Smaller applications that serve distinct functions
running on top of containers are the (much more efficient) way of the
future. Vince Power is a Solution Architect who has a focus on cloud
adoption and technology implementations using open source-based
technologies. He has extensive experience with core computing and
networking (IaaS), identity and access management (IAM), application
platforms (PaaS), and continuous delivery.

Tags: , Category: Sem categoria Comments closed

Sweating hardware assets at Experian with SUSE Enterprise Storage

terça-feira, 6 junho, 2017

When Experian’s Business Information (BI) team overseeing infrastructure and IT functions saw the customers’ demand for better and more comprehensive data insights grow at an unprecedented rate, the company required a better storage solution that would enable them to maintain the same performance level. Implementing the SUSE Enterprise Storage solution gave Experian a starting platform for seamless capacity and performance growth that will enable future infrastructure and data projects without the company having to worry about individual servers hitting capacity.

The Problem

As a company facing increasing customer demands for better and more comprehensive insights, Experian began incorporating new data feeds into their core databases, enabling them to provide more in-depth insights and analytical tools for their clients. Experian went from producing a few gigabytes a month to processing hundreds of gigabytes an hour. This deep dive into big data analytics, however, came with limitations – how and where would Experian store larger data-sets while maintaining the same level of performance?

From the start, Experian had great success running ZFS as a primary storage platform, providing the flexibility to alternate between performance and capacity growth, depending on the storage medium. The platform enabled them to adapt to changing customer and business needs by seamlessly shifting between the two priorities.

But Experian’s pace of growth highlighted several weaknesses: First off, standalone NASes platforms were insufficient, becoming unwieldy and extremely time-consuming to manage. Shuffling data stores between devices took days to complete, causing disruptions during switchovers. The second challenge was a lack of high availability – Experian had developed robust business continuity and disaster recovery abilities, but in the process, had given up a certain degree of automation and responsiveness. Their systems could not accommodate the customer demand for 24/7 real-time access to data created by the advent of APIs and the digitalization of the economy. Experian’s third and greatest challenge was in replicating data. Data would often fluctuate and wind up asynchronous, creating a precarious balance – if anything started to lag, the potential for disruption and data loss was huge.

Experian had implemented another solution exclusively in their storage environment that had proven to be rock solid and equally flexible. While the team was happy with its performance, the new platform failed to fully address the true performance issue and devices and controller cards would still occasionally stall. As a company in the business of providing quick data access, the lag time raised serious concerns and presented obstacles in meeting client and business needs.

The Solution

Experian only saw one real short-term solution and moved to running ZFS on SUSE Linux Enterprise. This switch saved Experian time to find a more durable resolution, but was also fraught with limitations. Experian spent a number of weeks trying to find a permanent solution that would protect both their existing investment and future budget. To fix the limitation issue, Experian temporarily added another layer above their existing estate that would manage the distribution and replication of data.

As Experian was preparing to purchase the software and hardware needed to provide a more long-term solution, they come across SUSE’s new product offering – SUSE Enterprise Storage, version 3. Based on an open source project called Ceph, SUSE Enterprise Storage offered everything Experian needed with file and block storage and snapshots to run well on their existing HPE DL380 platform. SUSE was already Experian’s operating system of choice for a few years, proving to be reliable, fast and flexible. SUSE support teams were also responsive and reliable – this new solution offered the perfect product to meet Experian’s need.

The Outcome Experian’s initial SES build was modest, based around four DL380s for OSDs and four blades as MONs. Added to that were two gateway servers to provide block storage access from VMWare and Windows clients. SUSE Enterprise Storage’s performance met and exceeded Experian’s expectations – even being a cross site, real-life IOPS easily go into thousands. The benefit to Software-defined storage is that it allows clients to abstract problems away from hardware and to eliminate the issue of individual servers hitting capacity. By adding more disks to make space for more data and adding another server when access has slowed down without having to pinpoint exactly where they need to go, capacity planning is much less of a headache for Experian. Software-defined storage also enables Experian to sweat their server hardware for longer, making budgeting and capacity planning easier.

While SES doesn’t replace the flash-based storage Experian uses for databases, having a metro-area cluster means that business continuity is taken care of. Experian ended up with is a modern storage solution on modern hardware that gives the company a starting platform for both seamless capacity and performance growth that enables future infrastructure and data projects

Refactoring Your App with Microservices

quinta-feira, 1 junho, 2017

So you’ve decided to use microservices. To help implement them, you may
have already started refactoring your app. Or perhaps refactoring is
still on your to-do list. In either case, if this is your first major
experience with refactoring, at some point, you and your team will come
face-to-face with the very large and very obvious question: How do you
refactor an app for microservices? That’s the question we’ll be
considering in this post.

Refactoring Fundamentals

Before discussing the how part of refactoring into microservices, it
is important to step back and take a closer look at the what and
when of microservices. There are two overall points that can have a
major impact on any microservice refactoring strategy. Refactoring =
Redesigning
A
business guide to effective container
management –
Refactoring a monolithic application into microservices and designing a
microservice-based application from the ground up are fundamentally
different activities. You might be tempted (particularly when faced with
an old and sprawling application which carries a heavy burden of
technical debt from patched-in revisions and tacked-on additions) to
toss out the old application, draw up a fresh set of requirements, and
create a new application from scratch, working directly at the
microservices level. As Martin Fowler suggests in this
post
, however,
designing a new application at the microservices level may not be a good
idea at all. One of the key takeaway points from Fowler’s analysis is
that starting with an existing monolithic application can actually work
to your advantage when moving to microservice-based architecture. With
an existing monolithic application, you are likely to have a clear
picture of how the various components work together, and how the
application functions as a whole. Perhaps surprisingly, starting with a
working monolithic application can also give you greater insight into
the boundaries between microservices. By examining the way that they
work together, you can more easily see where one microservice can
naturally be separated from another. Refactoring isn’t generic
There is no one-method-fits-all approach to refactoring. The design
choices that you make, all the way from overall architecture down to
code-level, should take into account the application’s function, its
operating conditions, and such factors as the development platform and
the programming language. You may, for example, need to consider code
packaging—If you are working in Java, this might involve moving from
large Enterprise Application Archive (EAR) files, (each of which may
contain several Web Application Archive (WAR) packages) into separate
WAR files.

General Refactoring Strategies

Now that we’ve covered the high-level considerations, let’s take a look
at implementation strategies for refactoring. For the refactoring of an
existing monolithic application, there are three basic approaches.

Incremental

With this strategy, you refactor your application piece-by-piece, over
time, with the pieces typically being large-scale services or related
groups of services. To do this successfully, you first need to identify
the natural large-scale boundaries within your application, then target
the units defined by those boundaries for refactoring, one unit at a
time. You would continue to move each large section into microservices,
until eventually nothing remained of the original application.

Large-to-Small

The large-to-small strategy is in many ways a variation on the basic
theme of incremental refactoring. With large-to-small refactoring,
however, you first refactor the application into separate, large-scale,
“coarse-grained” (to use Fowler’s term) chunks, then gradually break
them down into smaller units, until the entire application has been
refactored into true microservices.

The main advantages of this strategy are that it allows you to stabilize
the interactions between the refactored units before breaking them down
to the next level, and gives you a clearer view into the boundaries
of—and interactions between—lower-level services before you start
the next round of refactoring.

Wholesale Replacement

With wholesale replacement, you refactor the entire application
essentially at once, going directly from a monolith to a set of
microservices. The advantage is that it allows you to do a full
redesign, from top-level architecture on down, in preparation for
refactoring. While this strategy is not the same as
microservices-from-scratch, it does carry with it some of the same
risks, particularly if it involves extensive redesign.

Basic Steps in Refactoring

What, then, are the basic steps in refactoring a monolithic application
into microservices? There are several ways to break the process down,
but the following five steps are (or should be) common to most
refactoring projects.

**(1) Preparation: **Much of what we have covered so far is preparation.
The key point to keep in mind is that before you refactor an existing
monolithic application, the large-scale architecture and the
functionality that you want to carry over to the refactored,
microservice-based version should already be in place. Trying to fix a
dysfunctional application while you are refactoring it will only make
both jobs harder.

**(2) Design: Microservice Domains: **Below the level of large-scale,
application-wide architecture, you do need to make (and apply) some
design decisions before refactoring. In particular, you need to look at
the style of microservice organization which is best suited to your
application. The most natural way to organize microservices is into
domains, typically based on common functionality, use, or resource
access:

  • Functional Domains. Microservices within the same functional
    domain perform a related set of functions, or have a related set of
    responsibilities. Shopping cart and checkout services, for example,
    could be included in the same functional domain, while inventory
    management services would occupy another domain.
  • Use-based Domains. If you break your microservices down by use,
    each domain would be centered around a use case, or more often, a
    set of interconnected use cases. Use cases are typically centered
    around a related group of actions taken by a user (either a person
    or another application), such as selecting items for purchase, or
    entering payment information.
  • Resource-based Domains. Microservices which access a related
    group of resources (such as a database, storage, or external
    devices) can also form distinct domains. These microservices would
    typically handle interaction with those resources for all other
    domains and services.

Note that all three styles of organization may be present in a given
application. If there is an overall rule at all for applying them, it is
simply that you should apply them when and where they best fit.

(3) Design: Infrastructure and Deployment

This is an important step, but one that is easy to treat as an
afterthought. You are turning an application into what will be a very
dynamic swarm of microservices, typically in containers or virtual
machines, and deployed, orchestrated, and monitored by an infrastructure
which may consist of several applications working together. This
infrastructure is part of your application’s architecture; it may (and
probably will) take over some responsibilities which were previously
handled by high-level architecture in the monolithic application.

(4) Refactor

This is the point where you actually refactor the application code into
microservices. Identify microservice boundaries, identify each
microservice candidate’s dependencies, make any necessary changes at
the level of code and unit architecture so that they can stand as
separate microservices, and encapsulate each one in a container or VM.
It won’t be a trouble-free process, because reworking code at the scale
of a major application never is, but with sufficient preparation, the
problems that you do encounter are more likely to be confined to
existing code issues.

(5) Test

When you test, you need to look for problems at the level of
microservices and microservice interaction, at the level of
infrastructure (including container/VM deployment and resource use), and
at the overall application level. With a microservice-based application,
all of these are important, and each is likely to require its own set of
testing/monitoring tools and resources. When you detect a problem, it is
important to understand at what level that problem should be handled.

Conclusion

Refactoring for microservices may require some work, but it doesn’t
need to be difficult. As long as you approach the challenge with good
preparation and a clear understanding of the issues involved, you can
refactor effectively by making your app microservices-friendly without
redesigning it from the ground up.

Tags: Category: Sem categoria Comments closed

New Machine Driver from cloud.ca!

quarta-feira, 24 Maio, 2017

Cloud.ca machine
driverOne of the great
benefits of the Rancher container
management platform is that it runs on any infrastructure. While it’s
possible to add any Linux machine as a host using our custom setup
option, using one of the machine drivers in Rancher makes it especially
easy to add and manage your infrastructure.

Today, we’re pleased to
have a new machine driver available in Rancher, from our friends at
cloud.ca. cloud.ca is a regional cloud IaaS for
Canadian or foreign businesses requiring that all or some of their data
remain in Canada, for reasons of compliance, performance, privacy or
cost. The platform works as a standalone IaaS and can be combined with
hybrid or multi-cloud services, allowing a mix of private cloud and
other public cloud infrastructures such as Amazon Web Services. Having
the cloud.ca driver available within Rancher makes it that much easier
for our collective users to focus on building and running their
applications, while minding data compliance requirements. To access the
cloud.ca machine driver, navigate to the “Add Hosts” screen within
Rancher, select “Manage available machine drivers“. Click the arrow to
activate the driver; it’ll be easily available for subsequent
deployments. cloud.ca Click the > arrow to activate the
cloud.ca machine driver You can learn more about using the
driver and Rancher together on the** cloud.ca
blog
**.
If you’re headed to Devops Days
Toronto
(May
25-26) as well, we encourage you to visit the cloud.ca booth, where you
can see a demo in person! And as always, we’re happy to hear from
members of our community on how they’re using Rancher. Reach out to us
any time on our forums, or on Twitter
@Rancher_Labs!

Tags: , Category: Sem categoria Comments closed

Do Microservices Make SOA Irrelevant?

terça-feira, 9 Maio, 2017

Is service-oriented architecture, or SOA, dead? You may be tempted to
think so. But that’s not really true. Yes, SOA itself may have receded
into the shadows as newer ideas have come forth, yet the remnants of SOA
are still providing the fuel that is propelling the microservices market
forward. That’s because incorporating SOA principles into the design and
build-out of microservices is the best way to ensure that your product
or service offering is well positioned for the long term. In this sense,
understanding SOA is crucial for succeeding in the microservices world.
In this article, I’ll explain which SOA principles you should adopt when
designing a microservices app.

Introduction

In today’s mobile-first development environment, where code is king, it
is easier than ever to build a service that has a RESTful interface,
connect it to a datastore and call it a day. If you want to go the extra
mile, piece together a few public software services (free or paid), and
you can have yourself a proper continuous delivery pipeline. Welcome to
the modern Web and your fully buzzworthy-compliant application
development process. In many ways, microservices are a direct descendant
of SOA, and a bit like the punk rock of the services world. No strict
rules, just some basic principles that loosely keep everyone on the same
page. And just like punk rock, microservices initially embraced a
do-it-yourself ethic, but has been evolving and picking up some
structure which moved microservices into the mainstream. It’s not just
the dot com or Web companies that use microservices anymore—all
companies are interested.

Definitions

For the purposes of this discussion, the following are the definitions I
will be using.

Microservices: The implementation of a specific business function,
delivered as a separate deployable artifact, using queuing or a RESTful
(JSON) interface, which can be written in any language, and that
leverages a continuous delivery pipeline.

SOA: Component-based architecture which has the goal of driving
reuse across the technology portfolio within an organization. These
components need to be loosely coupled, and can be services or libraries
which are centrally governed and require an organization to use a single
technology stack to maximize reusability.

Positive things about microservices-based development

As you can tell, microservices possess a couple of distinct features
that SOA lacked, and they are good:

Allowing smaller, self-sufficient teams to own a product/service
that supports a specific business function has drastically improved
business agility and IT responsiveness (to any directions that the
business units they support) want to take.

Automated builds and testing, while possible under SOA, are now
serious table stakes.

Allowing teams to use the tools they want, primarily around which
language and IDE to use.

Using-agile based development with direct access to the business.
Microservices and mobile development teams have successfully shown
businesses how technologists can adapt to and accept constant feedback.
Waterfall software delivery methods suffered from unnecessary overhead
and extended delivery dates as the business changed while the
development team was off creating products that often didn’t meet the
business’ needs by the time they were delivered. Even iterative
development methodologies like the Rational Unified Process (RUP) had
layers of abstraction between the business, product development, and the
developers doing the actual work.

A universal understanding of the minimum granularity of a service.
There are arguments around “Is adding a client a business function, or
is client management a business function?” So it isn’t perfect, but at
least both can be understood by the business side that actually runs the
business. You may not want to believe it, but technology is not the
entire business (for most of the world’s enterprises anyway). Back in
the days when SOA was the king on the hill, some services performed
nothing but a single database operation, and other services were adding
a client to the system, which led to nothing but confusion from business
when IT did not have a consistent answer.

How can SOA help?

Want to learn more about
Docker, Kubernetes, and Rancher? Join us for free online
training After reading those definitions, you are probably
thinking, “Microservices sounds so much better.” You’re right. It is the
next evolution for a reason, except that it threw away a lot of the
lessons that were hard-learned in the SOA world. It gave up all the good
things SOA tried to accomplish because the IT vendors in the space
morphed everything to push more product. Enterprise integration patterns
(which define how new technologies or concepts are adopted by
enterprises) are a key place where microservices are leveraging the work
done by the SOA world. Everyone involved in the integration space can
benefit from these patterns, as they are concepts, and microservices are
a great technological way to implement them. Below, I’ve listed two
other areas where SOA principles are being applied inside the
microservices ecosystem to great success.

API Gateways (née ESB)

Microservices encourage point-to-point connections, and that each client
take care of their own translations for dates and other nuanced things.
This is just not sustainable as the number of microservices available
from most companies skyrockets. So in comes the concept of an Enterprise
Service Bus (ESB), which provides a means of communication between
different application in an SOA environment. SOA originally intended the
ESB to be used to carry things between service components—not to be
the hub and spoke of the entire enterprise, which is what vendors
pushed, and large companies bought into, and left such a bad taste in
people’s mouths. The successful products in the ESB have changed into
today’s API gateway vendors, which is a centralized way for a single
organization to manage endpoints they are presenting to the world, and
provide translation to older services (often SOA/SOAP) that haven’t been
touched in years but are vital to the business.

Overarching standards

SOA had WS-* standards. They were heavy-handed, but guaranteed
interoperability (mostly). Having these standards in place, especially
the more common ones like WS-Security and WS-Federation, allowed
enterprises to call services used in their partner systems—in terms
that anyone could understand, though they were just a checklist.
Microservices have begun to formalize a set of standards and the vendors
that provide the services. The OAuth and OpenID authentication
frameworks are two great examples. As microservices mature, building
everything in-house is fun, fulfilling, and great for the ego, but
ultimately frustrating as it creates a lot of technical debt with code
that constantly needs to be massaged as new features are introduced. The
other side where standards are rapidly consolidating is API design and
descriptions. In the SOA world, there was one way. It was ugly and
barely readable by humans, but the Web service definition language
(WSDL), a standardized format for cataloguing network services, was
universal. As of April 2017, all major parties (including Google, IBM,
Microsoft, MuleSoft, and Salesforce.com) involved in providing tools to
build RESTful APIs are members of the OpenAPI Initiative. What was once
a fractured market with multiple standards (JSON API, WASL, RAML, and
Swagger) is now becoming a single way for everything to be described.

Conclusion

SOA originated as a set of concepts, which are the same core concepts as
microservices architecture. Where SOA fell down was driving too much
governance and not enough “Just get it done.” For microservices to
continue to survive, the teams leveraging them need to embrace their
ancestry, continue to steal the best of the ideas, and reintroduce them
using agile development methodologies—with a healthy dose of
anti-governance to stop SOA
Governance

from reappearing. And then, there’s the side job of keeping ITIL and
friends safely inside the operational teams where they thrive. Vince
Power is a Solution Architect who has a focus on cloud adoption and
technology implementations using open source-based technologies. He has
extensive experience with core computing and networking (IaaS), identity
and access management (IAM), application platforms (PaaS), and
continuous delivery.

Tags: Category: Rancher Blog Comments closed

Press Release: Rancher Labs Partners with Docker to Embed Docker Enterprise Edition into Rancher Platform

terça-feira, 18 Abril, 2017

Docker Enterprise Edition technology and support now available from Rancher Labs

Cupertino, Calif. – April 18, 2017 – Rancher
Labs
, a provider of container management
software, today announced it has partnered with
Docker to integrate Docker Enterprise Edition
(Docker EE) Basic into its Rancher container management platform. Users
will be able to access the usability, security and portability benefits
of Docker EE through the easy to use Rancher interface. Docker provides
a powerful combination of runtime with integrated orchestration,
security and networking capabilities. Rancher provides users with easy
access to these Docker EE capabilities, as well as the Rancher
platform’s rich set of infrastructure services and other container
orchestration tools. Users will now be able to purchase support for both
Docker Enterprise Edition and the Rancher container management platform
directly from Rancher Labs. “Since we started Rancher Labs, we have
strived to provide users with a native Docker experience,” said Sheng
Liang, co-founder and CEO, Rancher Labs. “As a result of this
partnership, the native Docker experience in the Rancher platform
expands to include Docker’s enterprise-grade security, management and
orchestration capabilities, all of which is fully supported by Rancher
Labs.” Rancher is a comprehensive container management platform that, in
conjunction with Docker EE, helps to further reduce the barriers to
adopting containers. Users no longer need to develop the technical
skills required to integrate a complex set of open source technologies.
Infrastructure services and drivers, such as networking, storage and
load balancers, are easily configured for each Docker EE environment.
The robust Rancher application catalog makes it simple to package
configuration files as templates and share them across the organization.
The partnership enables Rancher customers to obtain official support
from Rancher Labs for Docker Enterprise Edition. Docker EE is a fully
integrated container platform that includes built in orchestration
(swarm mode), security, networking, application composition, and many
other aspects of the container lifecycle. Rancher users will now be able
to easily deploy Docker Enterprise Edition clusters and take advantage
of features such as:

  • Certified infrastructure, which provides an integrated
    environment for enterprise Linux (CentOS, Oracle Linux, RHEL, SLES,
    Ubuntu) Windows Server 2016, and Cloud providers like AWS and Azure.
  • Certified containers that provide trusted ISV products packaged
    and distributed as Docker containers – built with secure best
    practices cooperative support.
  • Certified networking and volume plugins, making it easy to
    download and install containers to the Docker EE environment.

“The release of Docker Enterprise Edition last month was a huge
milestone for us due to its integrated, and broad support for both Linux
and Windows operating systems, as well as for cloud providers, including
AWS and Azure,” said Nick Stinemates, VP Business Development &
Technical Alliances, Docker. “We are committed to offering our users
choice, so it was natural to partner with Rancher Labs to embed Docker
Enterprise Edition into the Rancher platform. Users will now have the
ability to run Docker Enterprise Edition on any cloud from the easy to
use Rancher interface, while also benefitting from a Docker solution
that provides a simplified yet rich user experience with its integrated
runtime, multi-tenant orchestration, security, and management
capabilities as well as access to an ecosystem of certified
technologies.”

Product Availability

Rancher with Docker EE Basic is available in the US and Europe
immediately, with more advanced editions and other territories planned
for future. For additional information on Rancher software and to learn
more about Rancher Labs, please visit
www.rancher.com or contact
sales@rancher.com. Supporting Resources

  • Company blog
  • Twitter
  • LinkedIn

About Rancher Labs Rancher Labs builds
innovative, open source software for enterprises leveraging containers
to accelerate software development and improve IT operations. With
infrastructure services management and robust container orchestration,
as well as commercially-supported distributions of Kubernetes, Mesos and
Docker Enterprise Edition, the flagship
Rancher container management platform
allows users to easily manage all aspects of running containers in
production, on any infrastructure.
RancherOS is a simplified Linux
distribution built from containers for running containers. For
additional information, please visit
www.rancher.com. All product and company
names herein may be trademarks of their registered owners.
Media
Contact
Eleni Laughlin MindsharePR (510) 406-0798
eleni@mindsharepr.com

Tags: , Category: Sem categoria Comments closed

Beyond Kubernetes Container Orchestration

quinta-feira, 23 Março, 2017

If you’re going to successfully deploy containers in production, you need more than just container orchestration

Kubernetes is a valuable tool

Kubernetes is an open-source container orchestrator for deploying and
managing containerized applications. Building on 15 years of experience
running production workloads at Google, it provides the advantages
inherent to containers, while enabling DevOps teams to build
container-ready environments which are customized to their needs.
The Kubernetes architecture is comprised of loosely coupled components
combined with a rich set of APIs, making Kubernetes well-suited
for running highly distributed application architectures, including
microservices, monolithic web applications and batch applications. In
production, these applications typically span multiple containers across
multiple server hosts, which are networked together to form a cluster.
Kubernetes provides the orchestration and management capabilities
required to deploy containers for distributed application workloads. It
enables users to build multi-container application services and schedule
the containers across a cluster, as well as manage the health of the
containers. Because these operational tasks are automated, DevOps team
can now do many of the same things that other application platforms
enable them to do, but using containers.

But configuring and deploying Kubernetes can be hard

It’s commonly believed that Kubernetes is the key to successfully
operationalizing containers at scale. This may be true if you are
running a single Kubernetes cluster in the cloud or have reasonably
homogenous infrastructure. However, many organizations have a diverse
application portfolio and user requirements, and therefore have more
expansive and diverse needs. In these situations, setting up and
configuring Kubernetes, as well as automating infrastructure deployment,
gives rise to several challenges:

  1. Creating a Kubernetes environment that is customized to the DevOps
    teams’ needs
  2. Automating the deployment of multiple Kubernetes clusters
  3. Managing the health of Kubernetes clusters (e.g. detecting and
    recovering from etcd node problems)
  4. Automating the upgrade of Kubernetes clusters
  5. Deploying multiple clusters on premises and/or across disparate
    cloud providers
  6. Ensuring enterprise readiness, including access to 24×7 support
  7. Customizing then repeatedly deploying multiple combinations of
    infrastructure and other services (e.g. storage, networking, DNS,
    load balancer)
  8. Deploying and managing upgrades for Kubernetes add-ons such as
    Dashboard, Helm and Heapster

Rancher is designed to make Kubernetes easy

Containers make software development easier by making code portable
across development, test, and production environments. Once in
production, many organizations look to Kubernetes to manage and scale
their containerized applications and services. But setting up,
customizing and running Kubernetes, as well as combining the
orchestrator with a constantly changing set of technologies, can be
challenging with a steep learning curve. The Rancher container
management platform makes it easy for you to manage all aspects of
running containers. You no longer need to develop the technical skills
required to integrate and maintain a complex set of open source
technologies. Rancher is not a Docker orchestration tool—it is the
most complete container management platform. Rancher includes everything
you need to make Kubernetes work in production on any infrastructure,
including:

  • A certified and supported Kubernetes distribution with simplified
    configuration options
  • Infrastructure services including load balancers, cross-host
    networking, storage drivers, and security credentials management
  • Automated deployment and upgrade of Kubernetes clusters
  • Multi-cluster and multi-cloud suport
  • Enterprise-class features such as role-based access control and 24×7
    support

We included a fully supported Kubernetes distro

The certified and supported Kubernetes distribution included with
Rancher makes it easy for you to take advantage of proven, stable
Kubernetes features. Kubernetes can be launched via the easy to use
Rancher interface in a matter of minutes. To ensure a consistent
experience across all public and private cloud environments, you can
then leverage Rancher to manage underlying containers, execute commands,
and fetch logs. You can also use it to stay up-to-date with the
latest stable Kubernetes release as well as adopt upstream bug fixes in
a timely manner. You should never again be stuck with old, outdated and
proprietary technologies. The Kubernetes Dashboard can be automatically
started via Rancher, and made available for each Kubernetes environment.
Helm is automatically made available for each Kubernetes environment as
well, and a convenient Helm client is included in the out-of-the-box
kubectl shell console.

We make Kubernetes enterprise- and production-ready

Rancher makes it easy to adopt open source Kubernetes while complying
with corporate security and availability standards. It provides
enterprise readiness via a secure, multi-tenant environment, isolating
resources within clusters and ensuring separation of controls. A private
registry can be configure that is used by Kubernetes and tightly coupled
to the underlying cluster (e.g. Google Cloud Platform registry can be
used only in a GCP cluster, etc.). Features such as role-based access
control, integration with LDAP and active directories, detailed audit
logs, high-availability, metering (via Heapster), and encrypted
networking are available out of the box. Enterprise-grade 24x7x365
support provides you with the confidence to deploy Kubernetes and
Rancher in production at any scale.

**Multi-cluster, multi-cloud deployments? No problem **

Kubernetes eBook
Quickly get started with Rancher and Kubernetes by following the
step-by-step instructions in the latest release of the Kubernetes
eBook
.
Rancher makes it possible to run multi-node, multi-cloud clusters, and
even deploy stateful applications. With Rancher, Kubernetes clusters
can span multiple resource pools and clouds. All hosts that are added
using Docker machine drivers or manual agent registration will
automatically be added to the Kubernetes cluster. The simple to use
Rancher user interface provides complete visibility into all hosts, the
containers running in those hosts, and their overall status.

But you need more than just container orchestration…

Kubernetes is maturing into a stable platform. It has strong adoption
and ecosystem growth. However, it’s important not to lose sight that
the end goal for container adoption is to make it easier and more
efficient for developers to create applications and for operations to
manage them. Application deployment and management requires more than
just orchestration. For example, services such as load balancers and
DNS are required to run the applications.

Customizable infrastructure services

The Rancher container management platform makes it easy to define and
save different combinations of networking, storage and load balancer
drivers as environments. This enables users to repeatedly deploy
consistent implementations across any infrastructure, whether it is
public cloud, private cloud, a virtualized cluster, or bare-metal
servers. The services integrated with Rancher include:

  • Ingress controller with multiple load balancer implementations
    (HAproxy, traefik, etc.)
  • Cross-host networking drivers for IPSEC and VXLAN
  • Storage drivers
  • Certificate and security credentials management
  • Private registry credential management
  • DNS service, which is a drop-in replacement for SkyDNS
  • Highly customizable load balancer

If you choose to deploy an ingress controller on native Kubernetes, each
provider will have its own code base and set of configuration values.
However, Rancher load balancer has a high level of customization to meet
user needs. The Rancher ingress controller provides the flexibility to
select your load balancer of choice—including HAproxy, Traefik, and
nginx—while the configuration interface remains the same. Rancher also
provides the ability to scale the load balancer, customize load balancer
source ports, and schedule the load balancer on a specific set of hosts.

A complete container management platform

You’ve probably figured this out for yourself by now but, to be clear,
Rancher is NOT a container orchestrator. It is a complete container
management platform that includes everything you need to manage
containers in production. You can quickly deploy and run multiple
clusters across multiple clouds with a click of the button using Rancher
or select from one of the integrated and supported container
orchestrator distributions, including Kubernetes as well as Mesos,Docker
Swarm and Windows. Pluggable infrastructure services provide the basis
for portability across infrastructure providers Whether running
containers on a single on-premises cluster or multiple clusters running
on Amazon AWS and other service providers, Rancher is quickly becoming
the container management platform of choice for thousands of Kubernetes
users.

Get started with containers, Kubernetes, and Rancher today!

For step-by-step instructions on how to get started with Kubernetes
using the Rancher container management platform, please refer to the
Kubernetes eBook, which is available
here. Or,
if you are heading to KubeCon 2017 in Berlin, stop by booth S17 and we
can give you an in-person demonstration. Louise is the Vice
President of Marketing at Rancher Labs where she is focused on defining
and executing impactful go-to-market strategy and marketing programs by
analyzing customer needs and market trends. Prior to joining Rancher,
Louise was Marketing Director for IBM’s Software Defined Infrastructure
portfolio of big data, cloud native and high performance computing
management solutions. Before the company was acquired by IBM in 2012,
Louise was Director of Marketing at Platform Computing. She has 15+
years of marketing and product management experience, including roles at
SGI and Sun Microsystems. Louise holds an MBA from Santa Clara
University’s Leavey School of Business and a Bachelor’s degree from
University of California, Davis. You can follow Louise in Twitter
@lwestoby.