Refactoring Isn’t the Same for All    

Tuesday, 9 November, 2021

Cloud Native: it’s been an industry buzzword for a few years now. It holds different meanings for different people, and even then a different context. While we have overused this word, it does have a place when it comes to modernizing applications.

To set the context here, we are talking about apps you would build in the cloud rather than for it. This means these apps, if modernized, would run in a cloud platform. In this post, we will discuss how “refactoring,” as Gartner puts it, isn’t the same for every app.

When we look at legacy applications sitting in data centers across the globe, some are traditional mainframes; others are “Custom off the Shelf Software” (CotS). We care about the business-critical apps we can leverage for the cloud. Some of these are CotS, and many of these applications are custom.

When it comes to the CotS, companies should rely on the vendor to modernize their CotS to a cloud platform. This is the vendor’s role, and there is little business value in a company doing it for them.

Gartner came up with the five R’s: Rehost, Refactor, Revise, Rebuild and Replace. But when we look at refactoring, it shouldn’t be the same for every app because not all apps are the same. Some are mission-critical; most of your company’s revenue is made with those apps. Some apps are used once a month to make accounting’s life easier. Both might need to be refactored, but not to the same level. When you refactor, you change the structure, architecture, and business logic. All to leverage core concepts and features of a cloud. This is why we break down refactoring into Scale of Cloud Native.

Custom apps are perfect candidates for modernization. With every custom app, modernization brings risks and rewards. Most systems depend on other technologies like libraries, subsystems, and even frameworks. Some of these dependencies are easy to modernize into a cloud platform, but not all are like this. Some pose considerable challenges that limit how much you can modernize.

If we look at what makes an app cloud native, we first have to acknowledge that this term means something different depending on who you ask; however, most of these concepts are at least somewhat universal. Some of these concepts are:

  • Configuration
  • Disposability
  • Isolation
  • Scalability
  • Logs

Outside of technical limitations, there’s the question of how much an application should be modernized. Do you go all in and rewrite an app to be fully cloud native? Or do you do the bare minimum to get the app to run in the cloud?

We delineate these levels of cloud native as Suitable, Compatible, Durable, and Native. These concepts build upon one another so that an app can be Compatible and, with some refactoring, can go to Durable.

What does all this actually mean? Well, let’s break them down based on a scale:

  • Suitable – First on the scale and the bare minimum you need to get your app running in your cloud platform. This could just be the containerization of the application, or that and a little more.
  • Compatible – Leveraging a few of the core concepts of the cloud. An app that is cloud-compatible leverages things like environmental configs and disposability. This is a step further than Suitable.
  • Durable – At this point, apps should be able to handle a failure in the system and not let it cascade, meaning the app can handle it when some underlying services are unavailable. Being Durable also means the app can start up fast and shut down gracefully. These apps are well beyond Suitable and Compatible.
  • Native – These apps leverage most, if not all, of the cloud native core concepts. Generally, this is done with brand-new apps being written in the cloud. It might not make sense to modernize an existing app to this level.

This scale isn’t absolute; as such, different organizations may use different scales. A scale is important to ensure you are not over or under-modernizing an app.

When starting any modernization effort, collectively set the scale. This should be done organizationally rather than team-by-team. When it comes to budget and timing, making sure that all teams use the same scale is critical.

Learn more about this in our Webinar, App Modernization: When and How Far to Modernize. Watch the replay, Register here. 

Want to make sure you don’t miss any of the action? Join the SUSE & Rancher Community to get updates on new content coming your way!

Stupid Simple Service Mesh: What, When, Why Part 1

Thursday, 26 August, 2021

Recently microservices-based applications became very popular, and with the rise of microservices, the concept of Service Mesh also became a very hot topic. Unfortunately, there are only a few articles about this concept and most of them are hard to digest.

In this blog, we will try to demystify the concept of Service Mesh using “Stupid Simple” explanations, diagrams, and examples to make this concept more transparent and accessible for everyone. In the first article, we will discuss the basic building blocks of a Service Mesh and implement a sample application to have a practical example of each theoretical concept. In the next articles, based on this sample app, we will touch on more advanced topics, like Service Mesh in Kubernetes, and we will talk about some more advanced Service Mesh implementations like IstioLinkerd, etc.

To understand the concept of Service Mesh, the first step is to understand what problems it solves and how it solves them.

Software architecture has evolved a lot in a short time, from classical monolithic architecture to microservices. Although many praise microservice architecture as the holy grail of software development, it introduces some serious challenges.

Overview of the sample application

For one, a microservices-based architecture means that we have a distributed system. Every distributed system has challenges such as transparencysecurityscalabilitytroubleshooting, and identifying the root cause of issues. In a monolithic system, we can find the root cause of a failure by tracing. But in a microservice-based system, each service can be written in different languages, so tracing is no trivial task. Another challenge is service-to-service communication. Instead of focusing on business logic, developers must take care of service discovery, handle connection errors, detect latency, and retry logic. Applying SOLID principles on the architecture level means that these kinds of network problems should be abstracted away and not mixed with the business logic. This is why we need Service Mesh.

Ingress Controller vs. API Gateway vs. Service Mesh

As I mentioned above, we need to apply SOLID principles on an architectural level. For this, it is important to set the boundaries between Ingress Controller, API Gateway, and Service Mesh and understand each one’s role and responsibility.

On a stupidly oversimplified level, these are the responsibilities of each concept:

  1. Ingress Controller: allows a single IP port to access all services from the cluster, so its main responsibilities are path mapping, routing and simple load balancing, like a reverse proxy
  2. API Gatewayaggregates and abstracts away APIs; other responsibilities are rate-limiting, authentication, and security, tracing, etc. In a microservices-based application, you need a way to distribute the requests to different services, gather the responses from multiple/all microservices, and then prepare the final response to be sent to the caller. This is what an API Gateway is meant to do. It is responsible for client-to-service communication, north-south traffic.
  3. Service Mesh: responsible for service-to-service communication, east-west traffic. We’ll dig more into the concept of Service Mesh in the next section.

Service Mesh and API Gateway have overlapping functionalities, such as rate limiting, security, service discovery, tracing, etc. but they work on different levels and solve different problems. Service Mesh is responsible for the flow of requests between services. API Gateway is responsible for the flow of requests between the client and the services, aggregating multiple services and creating and sending the final response to the client.

The main responsibility of an API gateway is to accept traffic from outside your network and distribute it internally, while the main responsibility of a service mesh is to route and manage traffic within your network. They are complementary concepts, and a well-defined microservices-based system should combine them to ensure application uptime and resiliency while ensuring that your applications are easily consumable.

What Does a Service Mesh Solve?

As an oversimplified and stupid simple definition, a Service Mesh is an abstraction layer hiding away and separating networking-related logic from business logic. This way developers can focus only on implementing business logic. We implement this abstraction using a proxy, which sits in the front of the service. It takes care of all the network-related problems. This allows the service to focus on what is really important: business logic. In a microservice-based architecture, we have multiple services, each with a proxy. Together, these proxies are called Service Mesh.

As best practices suggest, proxy and service should be in separate containers, so each container has a single responsibility. In the world of Kubernetes, the container of the proxy is implemented as a sidecar. This means that each service has a sidecar containing the proxy. A single Pod will contain two containers: the service and the sidecar. Another implementation is to use one proxy for multiple pods. In this case, the proxy can be implemented as a Deamonset. The most common solution is using sidecars. Personally, I prefer sidecars over Deamonsets because they keep the logic of the proxy as simple as possible.

Multiple Service Mesh solutions exist, including IstioLinkerdConsulKong, and Cilium. (We will talk about these solutions in a later article.) Let’s focus on the basics and understand the concept of Service Mesh, starting with Envoy. This is a high-performance proxy and not a complete framework or solution for Service Meshes (in this tutorial, we will build our own Service Mesh solution). Some of the Service Mesh solutions use Envoy in the background (like Istio), so before starting with these higher-level solutions, it’s a good idea to understand the low-level functioning.

Understanding Envoy

Ingress and Egress

Simple definitions:

  • Any traffic sent to the server (service) is called ingress.
  • Any traffic sent from the server (service) is called egress.

The Ingress and the Egress rules should be added to the configuration of the Envoy proxy, so the sidecar will take care of these. This means that any traffic to the service will first go to the Envoy sidecar. Then the Envoy proxy redirects the traffic to the real service. Vice-versa, any traffic from this service will go to the Envoy proxy first, and Envoy resolves the destination service using Service Discovery. By intercepting the inbound and outbound traffic, Envoy can implement service discovery, circuit breaker, rate limiting, etc.

The Structure of an Envoy Proxy Configuration File

Every Envoy configuration file has the following components:

  1. Listeners: where we configure the IP and the Port number that the Envoy proxy listens to
  2. Routes: the received request will be routed to a cluster based on rules. For example, we can have path matching rules and prefix rewrite rules to select the service that should handle a request for a specific path/subdomain. Actually, the route is just another type of filter, which is mandatory. Otherwise, the proxy doesn’t know where to route our request.
  3. Filters: Filters can be chained and are used to enforce different rules, such as rate-limiting, route mutation, manipulation of the requests, etc.
  4. Clusters: act as a manager for a group of logically similar services (the cluster has similar responsibility as a service in Kubernetes; it defines the way a service can be accessed), and acts as a load balancer between the services.
  5. Service/Host: the concrete service that handles and responds to the request

Here is an example of an Envoy configuration file:

---
admin:  
  access_log_path: "/tmp/admin_access.log"  
  address:     
    socket_address: 
      address: "127.0.0.1" 
      port_value: 9901
static_resources:   
  listeners:    
   -       
      name: "http_listener"      
      address:         
        socket_address:           
          address: "0.0.0.0"          
          port_value: 80      
      filter_chains:          
        filters:             
          -               
            name: "envoy.http_connection_manager"              
            config:                
              stat_prefix: "ingress"                
              codec_type: "AUTO"               
              generate_request_id: true                
              route_config:                   
                name: "local_route"                  
                virtual_hosts:                    
                  -                       
                    name: "http-route"                      
                    domains:                         
                      - "*"                      
                    routes:                       
                      -                           
                        match:                             
                          prefix: "/nestjs"                          
                        route:                            
                          prefix_rewrite: "/"                            
                          cluster: "nestjs"                        
                      -                           
                        match:                             
                            prefix: "/nodejs"                          
                          route:                            
                            prefix_rewrite: "/"                            
                            cluster: "nodejs"                         
                       -                           
                         match:                             
                           path: "/"                          
                         route:                            
                           cluster: "base"                
              http_filters:                  
                -                     
                  name: "envoy.router"                    
                  config: {}  

  clusters:    
    -       
      name: "base"      
      connect_timeout: "0.25s"      
      type: "strict_dns"      
      lb_policy: "ROUND_ROBIN"      
      hosts:        
        -           
          socket_address:             
            address: "service_1_envoy"            
            port_value: 8786        
        -           
          socket_address:             
            address: "service_2_envoy"            
            port_value: 8789        
    -      
      name: "nodejs"      
      connect_timeout: "0.25s"      
      type: "strict_dns"      
      lb_policy: "ROUND_ROBIN"      
      hosts:        
        -          
          socket_address:            
            address: "service_4_envoy"            
            port_value: 8792        
    -      
      name: "nestjs"      
      connect_timeout: "0.25s"      
      type: "strict_dns"      
      lb_policy: "ROUND_ROBIN"      
      hosts:        
        -          
          socket_address:            
            address: "service_5_envoy"            
            port_value: 8793

The configuration file above translates into the following diagram:

This diagram did not include all configuration files for all the services, but it is enough to understand the basics. You can find this code in my Stupid Simple Service Mesh repository.

As you can see, between lines 10-15 we defined the Listener for our Envoy proxy. Because we are working in Docker, the host is 0.0.0.0.

After configuring the listener, between lines 15-52 we define the Filters. For simplicity we used only the basic filters to match the routes and rewrite the target routes. In this case, if the subdomain is “host:port/nodeJs,” the router will choose the nodejs cluster and the URL will be rewritten to “host:port/” (this way the request for the concrete service won’t contain the /nodesJs part). The logic is the same also in the case of “host:port/nestJs”. If we don’t have a subdomain in the request, then the request will be routed to the cluster called base without a prefix rewrite filter.

Between lines 53-89 we defined the clusters. The base cluster will have two services; the chosen load-balancing strategy is round-robin. Other available strategies can be found here. The other two clusters (nodejs and nestjs) are simple, with only a single service.

The complete code for this tutorial can be found in my Stupid Simple Service Mesh git repository.

Conclusion

In this article, we learned about the basic concepts of Service Mesh. In the first part, we understood the responsibilities and differences between the Ingress Controller, API Gateway, and Service Mesh. Then we talked about what Service Mesh is and what problems it solves. In the second part, we introduced Envoy, a performant and popular proxy used to build our Service Mesh example. We learned about the different parts of the Envoy configuration files and created a Service Mesh with five example services and a front-facing edge proxy.

In the next article, we will look at how to use Service Mesh with Kubernetes and will create an example project that can be used as a starting point in any project using microservices.

There is another ongoing “Stupid Simple AI” series. The first two articles can be found here: SVM, Kernel SVM, and KNN in Python.

Thank you for reading this article!

Stupid Simple Open Source

Thursday, 26 August, 2021

Even if we don’t realize it, almost all of us have used open source software. When we buy a new Android phone, we read its specs and, usually, focus on the hardware capabilities, like CPU, RAM, camera, etc. The brains of these tools are their operating systems, which are open source software. The Android operating system powers more than 70 percent of mobile phones, demonstrating the prowess of open source software.

Before the free software movement, the first personal computer was hard to maintain and expensive; this wasn’t because of the hardware but the software. You could be the best programmer in the world, but without collaboration and knowledge sharing, your software creation will likely have issues: bugs, usability problems, design problems, performance issues, etc. What’s more, maintaining these products will cost time and money. Before the appearance of open source software, big companies believed they had to protect their intellectual property, so they kept the source code secret. They did not realize that letting people inspect their source codes and fix bugs would improve their software. Collaboration leads to great success.

What is Open Source Software?

Simply put, open source software has public source code, which can be seeninspectedmodifiedimproved or even sold by anyone. In contrast, non-open source, proprietary software has code that can be seen, modified and maintained only by a limited amount of people, a person, a team or an organization.

In both cases, the user must accept the licensing agreements. To use proprietary software, users must promise (typically by signing a license displayed the first time they run it) that they will not do anything with the software that its developers/owners have not explicitly authorized. Examples of proprietary software are the Windows operating system and Microsoft Office.

Users must accept the terms of a license when using open source software, just as they do when using proprietary software, but these terms are very different. Basically, you can do whatever you want as long as you include the original copyright and license notice in any copy of the software/source. Furthermore, these licenses usually state that the original creator cannot be liable for any harm or damage that the open source code may cause. This protects the creator of the open source code. Good examples of open source software are the Linux operating system, the Android operating system, LibreOffice and Kubernetes.

The Beginning of Open Source

Initially, software was developed by companies in-house. The creators controlled this software, with no right for the user to modify it, fix it or even inspect it. This also made collaboration between programmers difficult as knowledge sharing was near impossible.

In 1971, Richard Stallman joined the MIT Artificial Intelligence Lab. He noticed that most MIT developers were joining private corporations, which were not sharing knowledge with the outside world. He realized that this privacy and lack of collaboration would create a bigger gap between users and technical developers. According to Stallman, “software is meant to be free but in terms of accessibility and not price.” To fight against privatization, Stallman developed the GNU Project and then founded the Free Software Foundation (FSF). Many developers started using GNU in response to these initiatives, and many even fixed bugs they detected.

Stallman’s initiative was a success. Because he pushed against privatized software, more open source projects followed. The next big steps in open source software were the releases of Mozilla and the Linux operating system. Companies had begun to realize that open source might be the next big thing.

The Rise of Open Source

After the GNU, Mozilla, and Linux open source projects, more developers started to follow the open source movement. As the next big step in the history of open source, David Heinemeier Hansson introduced Ruby on Rails. This web application framework soon became one of the world’s most prominent web development tools. Popular platforms like Twitter would go on to use Ruby on Rails to develop their sites. When Sun Microsystems bought MySql for 1 billion dollars in 2008, it showed that open source could also be a real business, not just a beautiful idea.

Nowadays, big companies like IBM, Microsoft and Google embrace open source. So, why do these big companies give away their fearfully guarded source code? They realized the power of collaboration and knowledge sharing. They hoped that outside developers would improve the software as they adapted it to their needs. They realized that it is impossible to hire all the great developers of the world, and many developers are out there who could positively contribute to their product. It worked. Hundreds of outsiders collaborated on one of the most successful AI tools at Google, Tensorflow, which was a great success. Another success story is Microsoft’s open source .Net Core.

Why Would I Work on Open Source Projects?

Just think about it: how many times have open source solutions (libraries, frameworks, etc.) helped you in your daily job? How often did you finish your tasks earlier because you’d found a great open source, free tool that worked for you?

The most important reason to participate in the open source community is to help others and to give something back to the community. Open source has helped us a lot, shaping our world unprecedentedly. We may not realize it, but many of the products we are using currently result from open source.

In a modern world, collaboration and knowledge sharing are a must. Nowadays, inventions are rarely created by a single individual. Increasingly, they are made through collaboration with people from all around the world. Without the movement of free and open source software, our world would be completely different.  We’d live with isolated knowledge and isolated people, lots of small bubble worlds, and not a big, collaborative and helpful community (think about what you would do without StackOverflow?).

Another reason to participate is to gain real-world experience and technical upskilling. In the open source community, you can find all kinds of challenges that aren’t present in a single company or project. You can also earn recognition through problem-solving and helping developers with similar issues.

Finding Open Source Projects

If you would like to start contributing to the open source community, here are some places where you can find great projects:

CodeTriage: a website where you can find popular open source projects based on your programming language preferences. You’ll see popular open source projects like K8sTensorflowPandasScikit-LearnElasticsearch, etc.

awesome-for-beginners: a collection of Git repositories with beginner-friendly projects.

Open Source Friday: a movement to encourage people, companies and maintainers to contribute a few hours to open source software every Friday.

For more information about how to start contributing to open source projects, visit the newbie open source Git repository.

Conclusion

In the first part of this article, we briefly introduced open source. We described the main differences between open source and proprietary software and presented a brief history of the open source and free software movement.

In the second part, we presented the benefits of working on open source projects. In the last part, we gave instructions on how to start contributing to the open source community and how to find relevant projects.

Tags: Category: Cloud Computing, DevOps, Digital Transformation Comments closed

Harvester: Intro and Setup    

Tuesday, 17 August, 2021
I mentioned about a month back that I was using Harvester in my home lab. I didn’t go into much detail, so this post will bring some more depth. We will cover what Harvester does, as well as my hardware, installation, setup and how to deploy your first virtual machine. Let’s get started.

What is Harvester?

Harvester is Rancher’s open source answer to a hyperconverged infrastructure platform. Like most things Rancher is involved with, it is built on Kubernetes using tools like KubeVirt and Longhorn. KubeVirt is an exciting project that leverages KVM and libvirt to run virtual machines inside Kubernetes; this allows you to run both containers and VMs in your cluster. It reduces operational overhead and provides consistency. This combination of tried and tested technologies provides an open source solution in this space.

It is also designed to be used with bare metal, making it an excellent option for a home lab.

Hardware

If you check the hardware requirements, you will notice they focus more on business usage. So far, my personal experience says that you want at least a 4 core/8 thread CPU, 16GB of RAM, and a large SSD, preferably an NVMe drive. Anything less resource-wise doesn’t leave enough capacity for running many containers or VMs. I will install it on an Intel NUC 8i5BEK, which has an Intel Core i5-8259U. As far as RAM, it has 32GB of RAM and a 512GB NVMe drive. It can handle running Harvester without any issues. Of course, this is just my experience; your experience may differ.

Installation

Harvester ships as an ISO, which you can download on the GitHub Releases page. You can pull it quickly using wget.

$ wget https://releases.rancher.com/harvester/v0.2.0/harvester-amd64.iso

Once you have it downloaded, you will need to create a bootable USB. I typically use Balena Etcher since it is cross-platform and intuitive. Once you have a bootable USB, place it in the machine you want to use and boot the drive. This screen should greet you:

Select “New Cluster”:

Select the drive you want to use.

Enter your hostname, select your network interface, and make sure you use automatic DHCP.

You will then be prompted to enter your cluster token. This can be any phrase you want; I recommend using your password manager to generate one.

Set a password to use, and remember that the default user name is rancher.

The following several options are attractive, especially if you want to leverage your SSH keys used in GitHub. Since this is a home lab, I left the SSH keys, proxy and cloud-init setup blank. In an enterprise environment, this would be really useful. Now you will see the final screen before installation. Verify that everything is configured to your desires before proceeding.

If it all looks great, proceed with the installation. It will take a few minutes to complete; when it does, you will need to reboot.

After the reboot, the system will startup, and you will see a screen letting you know the URL for Harvester and the system’s status. Wait until it reports that Harvester is ready before trying to connect.

Great! It is now reporting that it is up and running, so it’s now time to set up Harvester.

Initial Setup

We can navigate to the URL listed once the OS boots. Mine is https://harvest:30443. It uses a self-signed certificate by default, so you will see a warning in your browser. Just click on “advanced” to proceed, and accept it. Set a password for the default admin account.

Now you should see the dashboard and the health of the system.

I like to disable the default account and add my own account for authentication. Probably not necessary for a home lab, but a good habit to get into. First, you need to navigate to it.

Now log out and back in with your new account. Once that’s finished, we can create our first VM.

Deploying Your First VM

Harvester has native support for qcow2 images and can import those from a URL. Let’s grab the URL for openSUSE Leap 15.3 JeOS image.

https://download.opensuse.org/distribution/leap/15.3/appliances/openSUSE-Leap-15.3-JeOS.x86_64-kvm-and-xen.qcow2

The JeOS image for openSUSE is roughly 225MB, which is a perfect size for downloading and creating VMs quickly. Let’s make the image in Harvester.

Create a new image, and add the URL above as the image URL.

You should now see it listed.

Now we can create a VM using that image. Navigate to the VM screen.

Once we’ve made our way to the VM screen, we’ll create a new VM.

When that is complete, the VM will show up in the list. Wait until it has been started, then you can start using it.

Wrapping Up

In this article, I wanted to show you how to set up VMs with Harvester, even starting from scratch! There are plenty of features to explore and plenty more on the roadmap. This project is still early in its life, so now is a great time to jump in and get involved with its direction.

Octopod Episode 1: What is an Open Source Community?

Sunday, 1 August, 2021

In Episode 1 of the OCTOpod, Alan Clark talks with Thierry Carrez about open source communities: what they are, how they work and how you can get involved.

Trying to define what an open source community is might sound like a simple task, but it is a layered, nuanced collective with many moving parts. Thierry has been in the open source community for years and is currently the VP of engineering at the Open Infrastructure Foundation. In this episode, Thierry sheds light on some of the key traits that characterize open source communities. We hear about the importance of governance, principles, scope and documentation and find out how everyone, even those who do not code, can contribute. As Thierry notes, it is not about your technical ability, but rather about adding value where you can and being an engaged member of a community. Building a sustainable community requires effort, but that transparency and collaboration make it a worthwhile endeavor.

“It’s really not about code, it’s really not about being a technical rock star. It is really more about being useful to others.”

Listen to the OCTOpod here or subscribe on your favorite podcast platform! And please share it with your friends!

Image 01

Here’s the full transcript:

EPISODE 01

[INTRODUCTION]

AC: I am Alan Clark. I have spent my career in enterprise software with the focus on open source advocacy and emerging tech. These days, I’m a member of the SUSE Office of the CTO, that is OCTO for short. Welcome to our new podcast series, The OCTOPod.

Season one is all about open source. I love being part of open-source communities. I’ve contributed in many ways, from code to chairs, for networking, to cloud. This includes serving as chairman of the board for the Open Infrastructure Foundation, the Linux foundation board of directors, Open SUSE chair, open mainframe project board and many more. I’ve met so many great people along the way.

In season one, I’ll sit down with a few of these experts. We’ll talk about the latest trends and challenges in open source, including findings from our latest report on why IT leaders choose open. We’ll talk about how to manage a community, the importance of diversity and inclusion in open source and much more.

Join me on your favorite podcast platform or at community.suse.com.

[INTERVIEW]

AC: Hello everyone, welcome to the OCTOPod. Today, I’m excited to sit down with Thierry Carrez, someone that I’ve known in the open source community for many years. We’ve worked together for a long time. He is currently the VP of engineering at the Open Infrastructure Foundation.

Thanks for being here today, Thierry. We want to get started here with some questions and we want to talk a little bit about just the basics of open source and open source communities, how they get started, what they’re like and so forth. Just to get people a flavor of how they kind of operate. Let’s start with the real basic question. What exactly is an open source community and what is it not?

TC: Thank you Alan, it’s great to be here. It sounds like a basic question but it’s actually a complex question. An open source community at the very bottom is all the people who contributes to an open source project but obviously, that just kicks the can down the road and now the question is, what is a contribution?

The traditional sense, the contribution to an open source project would be code and code patches but that quickly extended to non-code activities like documentation or user experience studies or walking on the continuous integration for the project and that’s as a result of more using it for tracking everything, not just code but also documentation and other types of documents and infrastructures to us code and those things but sharing your experience is also a form of contribution.

In the end, the community extends to all the users who publicly engage and share their experience and so in the end, the community is all the people who actively engage with the open source project and help it.

Obviously, that definition is working well for open leader block projects where anyone can engage with the project, it works less well for single vendor or open source where the makers are more separated from the consumers and in that case, they call community like more their extended circle of users and conference attendees so it’s not exactly the same meaning as what we call community in a more openly developed project.

AC: That’s a good points. I want to come back to that one because I think that’s a very good point and want to delve into that a little bit but let’s start at a different angle a little bit here. What is it that you see that brings people to participate in this communities? As you mentioned, there’s a lot of different types of contributions which means, we have a lot of different types of backgrounds and experience and interest. What is it that brings people to come and participate in a community?

TC: I would say they are like two categories of things. There is more classic altruistic motivation like giving back to the project that you’re using or participating in cultivating the commons for resource that you are benefiting from but more and more, we are seeing business sense in the form of shared innovation like a multiple organizations, putting resources together so that they don’t waste energy or inventing the wheel separately, that’s what we saw with the open stack project.

A number of organizations coming together because walking on the same body of code and software in common was better than walking on it separately. For any type of complex technology, if you can join a group of experts having the same kind of issues, you learn a lot from it so that makes complete business sense to engage with the community when you’re tackling a complex problem or seeing it for example, with the large scale [SIG 0:05:21.2] within open stack where several operators of large scale clouds get together to share their experiences, obviously, the project benefits from it because we learn from their experience but they also learn from one another and they see benefit in sharing their experience in that group.

It’s really a complex set of motivations but at the bottom, it’s either altruistic based on your usage and wanting to give back or it makes business sense, which is much more sustainable by the way because then it’s a win-win. If everyone wins, there is no sense of the project benefits from having those organizations involved and this organizations see the value of contributing.

AC: Yeah, that makes sense, right? I have to – reminiscing here a little bit, I remember one of the first times I met you, I walked in to I think it was a Nova project meeting, right? Where this was years ago and it was a planning meeting, so planning for the next six months kind of notion.

I was just overwhelmed with the number of people that were in the room at the time. I wouldn’t even dare count but there had to be hundreds of people in that room interested in wanting to participate and contribute to that project.

I remember sitting there to that point, I’ve worked in open source for a long, long time but I had never worked in a project with that many people involved. I was extremely impressed with how you handled the group, able to hear all the voices in the room and enable people to contribute and participate, this is the interesting part that I wanted to ask you.

How does an open-source community work, particularly when you have a large group of people that want to participate? What are the rules, how do you set rules of engagement, so forth, that enables these people to participate, feel like they can participate and contribute and yet when you have a very large group like that, how do you get anything done?

TC: It’s a complex question.

AC: I know it’s a very complex question, I apologize. I might have to break that one down but I was just so impressed because work happened, right? I was totally impressed with how much work was able to get done and how much people – even new people were able to come in and participate in the project.

TC: You have to balance a number of structural elements and allow for a lot of flexibility. Essentially, you have to provide a structure where people would be able to share and at the same time, make it very welcoming so that people feel like they can engage and at the same time, giving – still having a lot of flexibility in terms of the topics that are being discussed or the next steps.

The way we’ve been doing it in our design summits, which we’re referring to the event that you mentioned earlier, those designs summit, the idea was to have anyone be able to join and informs the future of the software and it was based on even to developer summits originally and then we perfected the idea in open stack where we have a theme that is being discussed so there is a first a call for organizing the themes and then every 40 minutes we would switch or 50 minutes we would switch.

During that time, we would discuss, openly discuss that topic with either pads to take notes and fish bowl-type setting where people that are most involved in the discussion sit in the middle but at the same time, you can have like extending circles of people depending on how much they want to get involved and people move in the room and get more involved as the discussion goes.

That provides this structure in which people feel free to communicate and at the same time, a lot of flexibility as to where the discussion goes, that helps with getting that setup. As you said, it’s probably a problem you have once you reach a certain size. In terms of rules of engagement or principles or charters that you have to predefine before you start, I would say, you need three things.

The first one is really to define the scope, what is the problem space your project wants to address and make that very clear from their zero because without scope, you’re really exposed to scope creep and that might – Ultimately, that lack of focus might ultimately kill your projects.

It’s actually one thing we didn’t do well in open stack which is to set a very aggressive scope so that we don’t – just because we are a community, it doesn’t mean that we should address every problem earth practically.

The second one is like the big principles, the big 10x that you want your community to follow and write those down so that it’s really clear to whoever joins the community, what they’re signing up for and finally, governance, which describes how decisions are made, governance is really needed in any social group like absence of rules is in itself a form of governance called anarchy and there is the benevolent dictator model where all decisions go up to one person.

You need to define the governance and you need to do it before any problems arise because if you wait for the problem to arrive to have the rule on how to solve it then it’s a bit too late.

AC: Too late, isn’t it?

TC: People will discuss forever. They can be simple but in the end, it really needs to be clear where the bucket stops and avoid gray areas and what we’ve seen in OpenStack at least and in other projects since is that usually, writing things down in advance avoids the situation that the rule is designed to address.

Sometimes just saying, “Well, this doesn’t get solved at that level, this gets escalated to that level for resolution” then it forces in a way, the first group to come to terms and not escalate because they don’t want to escalate basically. They don’t want the situation out of their hands. They usually work it out between themselves without needing to call out for the upper governance body.

AC: Cool, thank you, that was good. Hey, so, we’re going to run out of time here pretty quick but I wanted to get in for this audience, we have a lot of folks that have not participated in a community and they aren’t sure how to get started, right? It can be very intimidating.

Just maybe very basically, how can someone that perhaps hasn’t been involved with open source in the past and their interest maybe some of those contributions that you talked about earlier that are things beyond writing code? If someone’s time is somewhat limited, can they get involved in a community? How would they begin?

TC: We touched on that earlier when we discussed what is a community but even if you don’t write code or if your time is limited, you can definitely participate in and be part of a community, especially like just joining the conference and participating in the discussions and finding a presentation or those are all contributions that are extremely worthwhile because otherwise, you end up with the same speakers every conference, those who are comfortable speaking.

It is really good to have that people feel empowered to do that and teaches like documentation, people that use project, they’re probably not as issues with the documentation as they first try to run it, so talking on documentation is really an easy way to get involved. Showing your experience like I said, we have this example recently where we have interns on the outreach program in open stack where we pair them with a mentor and experienced developer and they walk together on some specific project.

One that outreaching intern did is documenting her full experience of this onboarding on blog posts but also on TikTok posts or on every social media and it was extremely useful for us to hear how difficult or how easy it is to pass some of the hurdles that we throw our newest contributors on. Even that like doing a quick write up of how you handle those first step of contributions is extremely valuable to a project. There shouldn’t be like extremely high expectations and the bar is not high. Even the simplest contribution, just hearing it from a diversity of perspective is really useful.

AC: Okay, that’s cool. One last topic before we have to go here and this one maybe too deep, might have to deal on another day but I thought it would be interesting because I know you’ve joined or started projects from the beginning, right? If I have something that I think would be very interesting to start an open source community or start a new project in a community, is that something that somebody should be able to do today? Any advice on how someone would start a new project?

TC: Yeah, sure.

AC: Like I said, that is a big question, isn’t it?

TC: Yeah, that’s like the topic for a whole new episode but I’ll try to make it quick. In terms of creation, I would say today it’s really easy to setup an open source project compared to even ten years ago. It’s really easy to setup shop, you just take a force like GitHub or GitLab or OpenDev that we are using for OpenStack and so it is easy to do it like whether you should do it or not is another good topic.

AC: A whole question, isn’t it?

TC: Yeah, I guess the key question is whether several people or several organizations have the same issue and would benefit from sharing the solution because ultimately for me, the interest in having an open source project is ultimately to avoid the waste of having several parties develop the same thing proprietary on their side while they could collaborate and contribute and avoid wasting that energy by doing it as a collaborative project in open source.

Which is actually why I’m so motivated by open lead develop open source because I don’t really see the point of open source that is owned by a single body because then, you don’t really have that collaboration that reduces waste. It is just one way to do proprietary software where you just publish a code and have some free labor in and on the side. Ultimately, for me what matters is whether multiple people have the same problem and then yes, there is potential for an open source project and then setting it up is not the most difficult part. It used to be but it is not the most difficult part today.

AC: That’s true. That is a good point, so thank you for that, I like your response. All right Thierry, so we wanted to circle back a little bit about how community works and I’ll call them the levels of openness that can be done because some communities are much more directed than others and you know, as we’ve worked together for over these several years, I really like the notion of what we call the four opens.

Could you talk to us a little bit about that and about how that opens up a community and enables a lot of communication and I think a lot more contributions, so give us a little bit of flavor on what we call the Four Opens?

TC: Sure, so like we previously talked, we mentioned rules of engagement and I said that we need to define scope, principles and governance and the four opens would be an example of principles. Those are the principles that the open stack community was built on. The four opens are open source, because back then there weren’t any openly developed open source project that was not open core that would do a cloud software.

It was a way of saying that will do we will open source, not open core. There won’t be a proprietary edition of the product, we will not keep some features or to sell a proprietary edition of whatever, everything should be open source. There is open development, which seems really obvious now because like every open source project on earth is on some open GitForce somewhere that you can see what is happening but 12 years ago or 11 years ago when we started OpenStack, there weren’t anything like it.

Open development is about being able to see what’s happening in development transparently so all the patches, all the reeves, all of the issues or all of the discussions everything should be accessible and transparent without needing people to register or anything to see it happening, so transparency in development.

The third one, which was collectively known as well and we touched on it when we discussed design summits is open design. The fact that development is not done behind closed doors by an elite group of core developers, the design is discussed in the open engaging with the users during those open events that we are throwing and that model was replicated in other successful projects like Kubernetes for example.

Finally, open community. Open community is the idea that anyone can join the community and anyone can become a leader in that community. There is no pay to play, there is no like an enforcement that the leaders, the technical leaders from the project out coming from one of the major sponsors or it is completely disconnected. Technical governance is completely disconnected from any other foundation governance or anything.

It is really one contributor, one vote and you end up with elections and the most respected contributors get elected to the leadership buddies for the project. With those four opens, you actually have a very sustainable community because you really empower your community to participate. There is no place that they can’t see, there is no feature that they can’t use, there is no discussion that they can’t participate in and there is no level of leadership that they can’t attain and I feel like it’s been instrumental in the success of open stack.

It is also instrumental in the success of other communities that I’ve adopted them, if not in the letter, in the spirit and so I feel like it is a good model.

AC: I’m glad you pointed that out. Back when we first stated those Four Opens you’re right, they seemed almost revolutionary in some sense and they have become very adopted in many of the communities that I have participated in over these last years and to me that just says they work and that’s why I really like them, so thank you for elaborating on those. I want to go to that fourth one there, a little bit about open community and where things like the technical boards and so forth are elected not just appointed.

That kind of alludes that things are based on reputation, right? Your merits are earned in a community, so any advice on dos and don’ts on how a person would build a reputation in an open source community to help them be a strength particularly in that open community portion?

TC: Yes, you are right that if you have open elections it can turn into a popularity contests really quickly and then reputation is important. People think that you need to be a technical rock star to get to the level of reputation that will let you be elected as a leader for a project but it is actually not really true. From the things you can do, making yourself useful to others is really the key. Do the things that nobody else does.

Everyone is grateful for that to cover all that blind spot that nobody else is covering, you become really well-known across all of the community including in extremely large communities by doing those things that nobody else is doing and then you can leverage that reputation to get elected to the leadership positions like I said or you can influence decisions because nobody wants to piss off the person that actually does the things they don’t want to do.

That’s actually how I started in most of the communities I got involved in like when I joined Gentu in 2000, I ended up documenting security because it wasn’t documented the way I wanted to be. Clearly, documenting the security processes was not high on everyone’s list and by doing that, I earned a good reputation. I ended up leading the security team there, I ended up elected to the Gentu board of directors. It is really a theme and in open stack, I basically did the same.

I started with waste management, which was a non-development task again by documenting security and I ended up being elected to the technical committee for four years and ended up as a leader for that community by starting with a non-code contribution. It’s really not about code, it’s really not about being a technical rock star. It is really more about being useful to others.

AC: That’s great.

TC: In terms of don’t, don’t put in things you should not do, I would say you shouldn’t assume malicious intent because 99% of the cases in those communities, people try to do good and what is seen as potential malicious intent is actually breaks down to communication problems in the end and 99% of the time. It is really key to not jump to conclusions, give people a chance to voice their side of the story rather than packed in haste and make for a not very welcoming community and as a result.

AC: Well, thank you Thierry. This has been very, very interesting and very educational. I have learned some stuff as well and it reminded me a lot of good stuff. Thank you very much for helping us out today and joining us in this podcast. I very much appreciate it.

TC: Well, thanks Alan for the invitation.

AC: Thierry, this has been great.

[END OF INTERVIEW]

AC: For more information, check out community.suse.com and make sure to subscribe to the OCTOpod on your favorite podcast platform.

[END]

Category: Featured Content, Rancher Kubernetes Comments closed

Kubernetes for the Edge: Key Developments & Implementations

Tuesday, 11 May, 2021

Kubernetes is the key component in the data centers that are modernizing and adopting cloud native development architecture to deliver applications using containers. Capabilities like orchestrating VMs and containers together make Kubernetes the go-to platform for modern application infrastructure adopters. Telecom operators also use Kubernetes to orchestrate their applications in a distributed environment involving many edge nodes.

But due to the large scale of Telco networks that includes disparate cloud systems, Kubernetes adoption requires different architectures for different use cases. Specifically, if we look at a use case where Kubernetes is used to orchestrate edge workloads, there are various frameworks and public cloud-managed Kubernetes solutions available that offer different benefits and give telecom operators choices to select the best fit. In a recent Kubernetes on Edge Day sessions at KubeCon Europe 2021, many new use cases of Kubernetes for the edge have been discussed along with a showcase of cross-platform integration that may help enterprises adopting 5G edge and telecom operators to scale it to a high level.

Here is a high-level overview of some of the key sessions.

The Edge concept

Different concepts of edge have been discussed so far by different communities and technology solution experts. But when Kubernetes is coming into infrastructure, IT operators need to clearly understand the key pillars on which the Kubernetes deployment will seamlessly deliver low latency performance in telco or private 5G use cases. First, there should be a strong implementation of Kubernetes management at scale. Second, operators need to choose the lightweight K8s for edge solution, preferably certified by CNCF. And third, a lightweight OS should be deployed at every node from Cloud to the far edge.

Microsoft’s Akri Project: Microsoft’s Akri project is an innovation that will surely break into multiple Kubernetes-based edge implementations. It discovers and monitors far edge devices of brownfield devices that cannot have their own compute – can be a part of Kubernetes cluster. Akri platform will let these devices be exposed to the Kubernetes cluster.

AI/ML with TensorFlow: TensorFlow is a machine learning platform that takes inputs to generate insights. It can be deployed on the cloud, on-premises, or edge nodes where ML operations need to perform. One session showed that Kubernetes clusters deployed in the cloud and edge can host analytics tools set (Prometheus, EnMasse/MQQT, Apache Camel, AlertManager, Jupyter, etc.) to process ML requests with the lowest latency.

Architectures for Kubernetes on the edge: While deploying Kubernetes for an edge, many architecture choices are varied per use case. And each architecture poses new challenges. But the bottom line is that there is no one-size-fits-all solution as various workloads have different requirements and IT teams focus on connecting network nodes. So, the overall architecture needs to evolve into centralized and distributed control planes.

Robotics: Kubernetes has also been implemented in Robotics. Sony engineers have showcased how the K8s cluster systems can be used for distributed system integration of robots and to perform specific tasks collaboratively.

Laser-based Manufacturing: Another interesting use case discussed by Moritz Kröger, a Researcher at RWTH Chair for Lasertechnology leveraged a Kubernetes-based distributed system. Kubernetes features like automation configuration management and flexibility in moving workloads in clusters give operational benefits to Laser manufacturing machines.

OpenYurt + EdgeXFoundry: OpenYurt is yet another open source framework that extends the orchestration features of upstream Kubernetes to the edge. It is showcased that – it can integrate with EdgeXFoundtry in 5G IoT edge use cases where EdgeXFoundtry is used to manage the IoT devices and OpenYurt is used to handle server environments using OpenYurt plugins set.

Using GitOps: Kubernetes supports the cloud native application orchestration and declarative orchestration. Applying the GitOps approach to achieve the Zero Touch Provisioning at multiple edges from the central data center is possible.

Hong Kong-Zhuhai-Macao Bridge: Another use case discussed is – Kubernetes is implemented in edge infrastructure for managing applications that are managing sensors at Hong Kong-Zhuhai-Macao Bridge. The use case is unique as it focuses on defining the sensor devices on the bridge as CRD in Kubernetes, associating each device with the CI/CD, and managing and operating the Applications deployed on edge nodes.

Node Feature Discovery: Many end devices can be part of thousands of edge nodes connected to data centers. Similar to the Akri project, the Node Feature Discovery (NFD) add-on can detect and push into Kubernetes clusters to orchestrate with edge servers and cloud systems.

Kuiper and KubeEdge: EMQ’s Kuiper is open source data analytics/streaming software that runs on edge devices with low resource requirements. It can integrate with KubeEdge where we get a combined solution that leverages KubeEdge’s application orchestration capabilities and streaming analytics. The combined solution delivers low latency, saving cost on bandwidth, ease in implementing business logic, and operators can manage and deploy Kuiper software applications from the cloud.

What Comes After Kubernetes?

Friday, 23 April, 2021

What Comes After Kubernetes?

You probably can’t believe I’m asking that question. It’s like showing up to a party and immediately asking about the afterparty. Is it really time to look for the exit?

No…but yes.

We used to deploy apps on systems in data centers. Then we moved the systems to the cloud. Then we moved the apps to containers. Then we wrapped it all in Kubernetes for orchestration, and here we are.

  • Have we arrived at PEAK IT?
  • Where do we go from here?

Each advance in technology unlocks doors we couldn’t reach before. As we move from room to room, we’re shifting gears, turning our momentum into energy to go faster and further.

Moving faster requires that we pay more attention to the road ahead, and it’s hard to do that while building the vehicle to take us there and building the road itself.

Whether you’re a business working on products for tomorrow’s world, or an individual who wants to know what skills will advance your career, you’re actually seeking leverage. Leverage gives you an edge over your competitors, and in today’s world, everyone is your competitor.

SUSECON Is Your Map to the Future

SUSECON, from May 18-20, 2021, is the first SUSE event that includes the people and products from Rancher. It packs the content of three events into a single digital platform with three worlds: LinuxWorld, KubeWorld and EdgeWorld.

Each world focuses on the solutions and strategies that its inhabitants care most about:

  • How does Kubernetes enable the next frontier of computing? (This information will shape your business decisions and career choices).
  • What are businesses doing to position themselves as trailblazers in the new frontier, and how can you follow in their footsteps?
  • What is adaptable Linux, and how can it drive digital transformation?

Within each world are keynotes delivered by SUSE leadership and customers from both SUSE and Rancher. Dozens of sessions range from introductory-level tutorials to advanced use cases for specific niche applications across Linux, Kubernetes, and Edge.

Every session was hand-picked to meet the needs of our diverse audience, from beginner to advanced, across topics that include:

  • AI/ML
  • Infrastructure and Operations
  • DevOps
  • Edge and IoT
  • Kubernetes
  • Linux
  • Open Source
  • Business Strategy
  • and more…

If you have questions, SUSECON is where you will find strategic answers.

Open Source Matters

Rancher and SUSE are both innovation leaders, and the combined company is a creative powerhouse. In just a few short months, developers have created solutions for real issues that everyone in the industry faces. These are core issues that slow developer and operations teams, and when solved, the entire organization will move faster.

  • How can I implement security policies in Kubernetes without increasing complexity or making my clusters harder to manage?
  • What can I do to protect myself from a supply chain attack on an upstream container base image?
  • What are the new features in Rancher 2.6?
  • How can I deploy hyperconverged infrastructure (HCI) without paying crippling license fees?
  • How can I use AI/ML to detect and respond to events before they become outages?
  • How can I help my developers build and deploy apps on Kubernetes without them having to learn everything about it?

At SUSECON, we’ll introduce you to projects that answer those questions, along with others that solve even more problems. These are all open source, built to help you succeed.

Open source is in our DNA. It’s the key to the democratization of opportunity, the single most effective solution to level the playing field and reward businesses for generating value. At SUSECON, you’ll learn just how important this is to us, with insights on:

  • Why is it important to be both open and interoperable?
  • What the word “open” means in “open source” (and how other companies use the term to trick you).
  • Why is Linux leadership essential to Kubernetes innovation?
  • How is freedom different from choice, and how does one complement the other?

SUSECON Is Your Event

SUSECON is a conference like none other you’ll attend this year. With actionable information in every session, you’ll leave the event with a plan for your future, and you’ll know the steps to take next on your journey.

I’m excited about it. When SUSE acquired Rancher, there were concerns that Rancher users would lose the freedoms they had. We promised you that wouldn’t happen, and SUSECON is our chance to show you the full power of the combined organization. Not only is Rancher still free and open source, but there is also a non-stop torrent of open source software that we’re adding to the portfolio. Any of those projects could change your world as much as Rancher, K3s, RKE and Longhorn did.

Head over to the event site to browse sessions and sign up for free.

Tags: ,,, Category: Products, Rancher Kubernetes Comments closed

Multi-Tier Architecture vs. Serverless Architecture

Monday, 12 April, 2021

You’ve undoubtedly come across some terms like three-tier application, serverless framework and multi-tier architecture in your knowledge-seeking journey. There’s a lot to keep up with regarding application design. In this post, we’ll briefly compare serverless and multi-tier architectures and look at the benefits of serverless over traditional multi-tier architectures and vice versa.

Before diving into our comparison, let’s look at the unique components of each architecture.

What is Serverless?

The best way to define serverless is to look at where we’ve come from in the last five to ten years —  multi-tier architecture. Historically, when designing software, we plan that software to be run on a particular runtime architecture. Serverless is an approach to software design for client-server applications. It refers to software that runs on a single computer or a group of computers hosting an application that connects to a remote system such as a browser or mobile phone. Business logic is executed on the server systems to respond to that client, whether it’s a phone, browser, etc.

For example, let’s look at your bank’s website. When you connect to their website, you connect to a software application running on a server somewhere. Odds are it’s running on a mini server, and it’s in a complex environment that’s performing the functions of the bank’s website. But for all intents and purposes, it’s a single application. You gain value from that application because you can conduct your online banking transactions. There is logic built into that application that performs various financial transactions; whatever you need is fulfilled by the software running on their servers.

Serverless offers a way to build applications without considering the runtime environment. You don’t need to worry about how the servers are placed into various subnets or what infrastructure software runs on which server. It’s irrelevant. But that hasn’t always been the case, and that’s where we get multi-tier architecture.

What is Multi-Tier?

Let’s say you work at a bank and you need to write a software application for an online banking service. You don’t want to think about how the bank will store the data for the various baking transactions. The odds are that it exists in a database somewhere like FaunaDB (a serverless database service). You’re not recreating the bank’s enterprise reporting software. You’re simply looking to leverage that existing data. Traditionally,  we design software as a multi-tier architecture. That is a runtime architecture for client-server applications composed of tiers. So there can be several different tiers depending on how you approach a particular problem, but generally speaking, the most common tiers are presentation, application and data. Let’s explore those.

  • Presentation Tier: This is the actual UI of the application. It uses something like RedwoodJS, React or HTML+CSS to provide the visual layout of the Data. Part of the application handles displaying that information in some shape or form.
  • Application Tier: This tier passes information to the presentation tier. It processes how we manipulate the data to services. For example, if we need to show a list of banking transactions by date, the application tier handles the date sort and other business logic our application requires.
  • Data Tier: This tier handles getting and storing the data that we are manipulating within our application.

Multi-Tier Application Architecture

I’ve outlined the basics of multi-tier,  a common approach for software development. Understanding where we come from makes it easier to understand the benefits of serverless. Historically, if we were writing software, we’d have to think about database servers, application servers and front-end servers and how they handle different tiers of our application. We’d also have to think about the network paths between those servers and how many servers we need to perform the necessary functions. For example, your application tier may need a substantial number of servers to have the computing power to do the business logic processing. Data tiers also historically have extensive resource needs.

Meanwhile, your front end might not need many servers. These are all considerations in a multi-tier software design approach. With serverless, this is not necessarily the case. Let’s find out why.

Serverless Fundamentals

Before we jump into architecture, let’s familiarize ourselves with several serverless components.

Backend-as-a-service(BAAS)

With the evolution of the public cloud and mobile applications, we’ve seen a different application development approach. Today mobile app developers don’t want to maintain a data center to service their clients. Instead, they’ve designed mobile applications to take advantage of the cloud. Cloud vendors quickly provided a solution to this in the form of a backend as a service. Backend as a service is a cloud service model where server-side logic and state are hosted by cloud providers and used by client applications running via a web or mobile interface. Essentially, this is a series of APIs hosted in the cloud. Let’s say I’m working on a web application and need an authentication mechanism. I can use AUTH0’s cloud-hosted APIs. I don’t need to manage authentication on my servers; AUTH0 handles it for me. At the end of the day, all APIs hosted on the cloud craft a URL, make a rest request to get some data and execute it.BAAS lays the foundation for serverless.

Functions as a service (FaaS)

Functions are just some code that performs a super-specific task, whether it be collecting a user id or formatting some data for output. In the Faas cloud service model, business logic is represented by event triggers, WhileBaaS using APIs from cloud providers, with FaaS, you provide your code, which is executed in the cloud by event-triggered containers that are dynamically allocated and ephemeral. Since our code is event triggered, we don’t have to start the application and wait for a request. The application only exists when it’s triggered; something has to make it spin up. The best part is you have to define what that trigger is. Containers provide the runtime environment for your code. In the true nature of serverless, there aren’t servers; services handling your request only get created when a request comes in that it needs to handle. Faas is also dynamic, so you don’t have to worry about scaling when you get a traffic spike. Cloud providers handle scaling the application up and down. The last thing to keep in mind is that the containers running our code are ephemeral, meaning they will not stick around. When the job is done, so are they.

Serverless Architecture:

Serverless is a runtime architecture where cloud service providers manage the resources and dynamically allocate infrastructure on demand for a given business logic unit. The key to a serverless application is the application runs on a seemingly ethereal phantom infrastructure that exists yet doesn’t. Serverless uses servers, but the beautiful part is you don’t have to manage or maintain them. You don’t have to configure or set up a VPC, set up complex routing rules, or install regular patches to the system to get high-performance and robust applications. The cloud providers take care of all these details, leaving you to focus on developing your application.

Basic Serverless Architecture

Developing an application with serverless takes a lot of overhead. You pay every time your code is triggered and for the time it runs to the cloud provider.
When creating a serverless application, take appropriate measures to protect it from unwanted high traffic, such as a DDOS (Distributed Denial Of Service) attack that could spin up a lot of copies of your code and increase your bill.
Your application can be a mixture of both BaaS and FaaS hosted on your cloud provider’s infrastructure.

Ultimately, with serverless, you only have to focus on developing and shipping the code. Development is easier, making client-server applications simpler because the cloud service provider does the heavy lifting.

Now that we better understand Multi-Tier and Serverless architectures let’s compare them.

Multi-Tier vs. Serverless

There are several critical areas to consider when comparing serverless architecture with multi-tier architecture.

  • Skill Set
  • Costs
  • Use Case

Each has varying degrees of impact depending on your goals.

Skill Set: 

Serverless:
You need only a development background to be successful with serverless. Your cloud provider will take care of the infrastructure complexity.

Multi-Tier:
To succeed in a multi-tier approach, you need an operational level of support expertise: You’ll configure servers, install operating systems and software, manage firewalls and develop all these things alongside the software. Depending on what you’re trying to achieve, having this skill set could be advantageous.

Costs:

Serverless:
When it comes to cost, there are arguments for both architectures.  Startup costs with serverless are really low because you only pay for every execution of your code.

Multi-Tier:
The opposite is true with multi-tier architecture. You’ll have upfront costs for servers and getting them set up in your data center or cloud. However, you’ll save money if you expect a steady traffic volume and you can leverage that cloud configuration. Because you will do the cloud configuration yourself, the cost may vary depending on your use case.

Use Cases:
Let’s look at how we expect to use the software.

Serverless: Serverless is fantastic for sporadic traffic or seasonal traffic. Perhaps you are looking at a retail website with large monthly sales (with huge traffic). With a traditional data center, your infrastructure is available even when you don’t need it, and that’s a significant spike in overall cost. With serverless, you don’t have to worry about the infrastructure. It will automatically scale.

Multi-Tier: Let’s say you have a consistent traffic pattern. You know exactly what you need. In this case, you might be able to save some money by sticking to the traditional approach of software architecture.

Conclusion

In closing, traditional DevOps culture is converging. We’ve moved from servers to virtual machines to containers. Now we are looking at literally just a few lines of code in a function that we have been shrinking away from maintaining a full-on infrastructure with our software. We have to isolate business logic from the infrastructure with serverless. And that is convenient for development’s sake because you don’t have to worry about taking care of the infrastructure as you develop your software.

Tags: ,,, Category: Community page, Containers Comments closed

Using Hybrid and Multi-Cloud Service Mesh Based Applications for Distributed Deployments

Monday, 21 December, 2020

Join the Master Class: Using Hybrid and Multi-Cloud Service Mesh Based Applications for Highly Distributed Environment Deployments

Service Mesh is an emerging architecture pattern gaining traction today. Along with Kubernetes, Service Mesh can form a powerful platform which addresses the technical requirements that arise in a highly distributed environment typically found on a microservices cluster and/or service infrastructure. A Service Mesh is a dedicated infrastructure layer for facilitating service-to-service communications between microservices.

Service Mesh addresses the communication requirements typical in a microservices-based application, including encrypted tunnels, health checks, circuit breakers, load balancing and traffic permission. Leaving the microservices to address these requirements leads to an expensive and time consuming development process.

In this blog, we’ll provide an overview of the most common microservice communication requirements that the Service Mesh architecture pattern solves.

Microservices Dynamics and Intrinsic Challenges

The problem begins when you realize that microservices implement a considerable amount of code not related to the business logic they were originally assigned. Additionally, it’s possible you have multiple microservices implementing similar capabilities in a non-standardized process. In other words, the microservices development team should focus on business logic and leave the low-level communication capabilities to a specific layer.

Moving forward with our scenario, consider the intrinsic dynamics of microservices. In given time, you may (or most likely will) have multiple instances of a microservice due to several reasons, including:

  • Throughput: depending on the incoming requests, you might have a higher or lower number of instances of a microservice
  • Canary release
  • Blue/green deployment
  • A/B testing

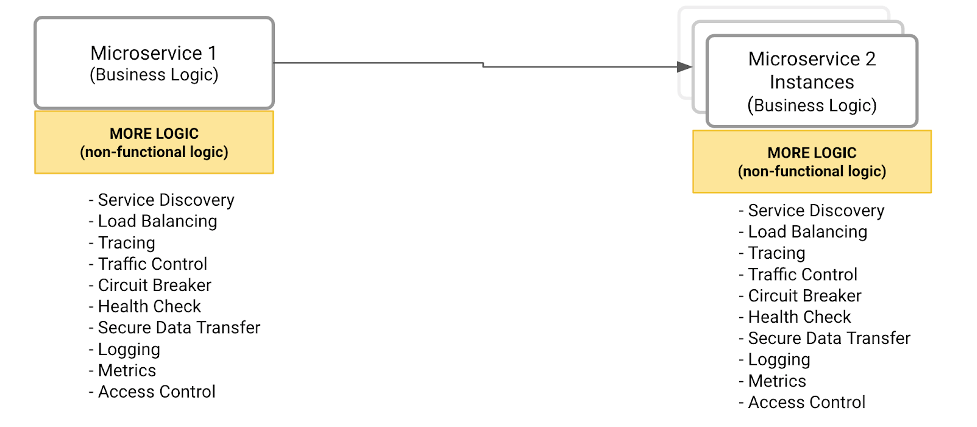
In short, the microservice-to-microservice communication has specific requirements and issues to solve. The illustration below shows this scenario:

Image 01

The illustration depicts several technical challenges. Clearly, one of the main responsibilities of Microservice 1 is to balance the load among all Microservice 2 instances. As such, Microservice 1 has to figure out how many Microservice 2 instances we have at the request moment. In other words, Microservice 1 must implement service discovery and load balancing.

On the other hand, Microservice 2 has to implement some service registration capabilities to tell Microservice 1 when a brand-new instance is available.

In order to have a fully dynamic environment, these other capabilities should be part of the microservices development:

  • Traffic control: a natural evolution of load balancing. We want to specify the number of requests that should go to each of the Microservice 2 instances.
  • Encrypted communication between the Microservices 1 and 2.
  • Circuit breakers and health checks to address and overcome networking problems.

In conclusion, the main problem is that the development team is spending significant resources writing complex code not directly related to business logic expected to be delivered by the microservices.

Potential Solutions

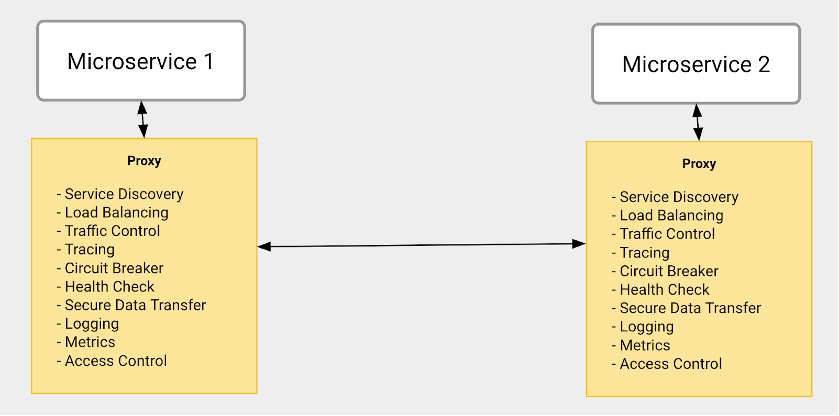
How about externalizing all the non-functional and operational capabilities in an external and standardized component that all microservices can call? For example, the diagram below compiles all capabilities that should not be part of a given microservice. So, after identifying all capabilities, we need to decide where to implement them.

Image 02

Solution #1 – Encapsulating all capabilities in a library

The developers would be responsible for calling functions provided by the library to address the microservice communication requirements.

There are a few drawbacks to this solution:

  • It’s a tightly coupled solution, meaning that the microservices are highly dependent on the library.
  • It’s not an easy model to distribute or upgrade new versions of the library.
  • It doesn’t fit the microservice polyglot principle with different programming languages being applied on different contexts

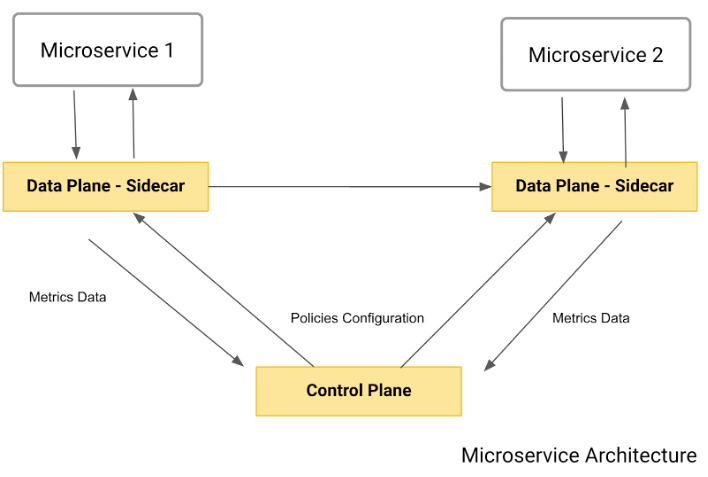
Solution #2 – Transparent Proxy

Image 03

This solution implements the same collection of capabilities. However, with a very different approach: each microservice has a specific component, playing a proxy role, taking care of its incoming and outcoming traffic. The proxy solves the library drawbacks we described before as follows:

  • The proxy is transparent, meaning the microservice is not aware it is running nearby and implementing all needed capabilities to communicate with other microservices.
  • Since it’s a transparent proxy, the developer doesn’t need to change the code to refer to the proxy. Therefore, upgrading the proxy would be a low-impact process from a microservice development perspective.
  • The proxy can be developed using different technologies and programming languages used by microservice.

The Service Mesh Architectural Pattern

While a transparent proxy approach brings several benefits to the microservice development team and the microservice communication requirements, there are still some missing parts:

  • The proxy is just enforcing policies to implement the communication requirements like load balancing, canary, etc.
  • What is responsible for defining such policies and publishing them across all running proxies?

The solution architecture needs another component. Such components would be used by admins for policy definition and it will be responsible for broadcasting the policies to the proxies.

The following diagram shows the final architecture which is the service mesh pattern:

Image 04

As you can see, the pattern comprehends the two main components we’ve described:

  • The data plane: also known as sidecar, it plays the transparent proxy role. Again, each microservice will have its own data plane intercepting all incoming and outgoing traffic and applying the policies previously described.
  • The control plane: used by the admin to define policies and publish them to the data plane.

Some important things to note:

  • It’s “push-based” architecture. The data plane doesn’t do “callouts” to get the policies: that would be a big network consuming architecture.
  • The data plane usually reports usage metrics to the control plane or a specific infrastructure.

Get Hands-On with Rancher, Kong and Kong Mesh

Kong provides an enterprise-class and comprehensive service connectivity platform that includes an API gateway, a Kubernetes ingress controller and a Service Mesh implementation. The platform allows customers to deploy on multiple environments such as on premises, hybrid, multi-­­­­­­region and multi-cloud.

Let’s implement a Service Mesh with a canary release running on a cloud-agnostic Kubernetes cluster, which could include a Google Kubernetes Engine (GKE) cluster or any other Kubernetes distribution. The Service Mesh will be implemented by Kong Mesh (and protected by Kong for Kubernetes as the Kubernetes ingress controller. Generically speaking, the ingress controller is responsible for defining entry points to your Kubernetes cluster, exposing the microservices deployed inside of it and applying consumption policies to it.

First of all, make sure you have Rancher installed, as well as a Kubernetes cluster running and managed by Rancher. After logging into Rancher, choose the Kubernetes cluster we’re going to work on – in our case “kong-rancher”. Click the Cluster Explorer link. You will be redirected to a page like this:

Image 05

Now, let’s start with the Service Mesh:

  1. Kong Mesh Helm Chart

    Go back to Rancher Cluster Manager home page and choose your cluster again. To add a new catalog, pass your mouse over the “Tools” menu option and click on Catalogs. Click the Add Catalog button and include Kong Mesh’s Helm v3 charts .

    Choose global as the scope and Helm v3 as the Helm version.

    Image 06

    Now click on Apps and Launch to see Kong Mesh available in the Catalog. Notice that Kong, as a Rancher partner, provides Kong for Kubernetes Helm Charts, by default:

    Image 07

  2. Install Kong Mesh

    Click on the top menu option Namespaces and create a “kong-mesh-system” namespace.

    Image 08

    Pass your mouse over the kong-rancher top menu option and click on kong-rancher active cluster.

    Image 09

    Click on Launch kubectl

    Image 10

    Create a file named “license.json” for the Kong Mesh license you received from Kong. The license follows the format:

    {“license”:{“version”:1,“signature”:“6a7c81af4b0a42b380be25c2816a2bb1d761c0f906ae884f93eeca1fd16c8b5107cb6997c958f45d247078ca50a25399a5f87d546e59ea3be28284c3075a9769”,“payload”:{“customer”:“Kong_SE_Demo_H1FY22”,“license_creation_date”:“2020-11-30”,“product_subscription”:“Kong Enterprise Edition”,“support_plan”:“None”,“admin_seats”:“5”,“dataplanes”:“5”,“license_expiration_date”:“2021-06-30”,“license_key”:“XXXXXXXXXXXXX”}}}

    Now, create a Kubernetes generic secret with the following command:

    kubectl create secret generic kong-mesh-license -n kong-mesh-system --from-file=./license.json

    Close the kubectl session, click on Default project and on Apps top menu option. Click on Launch button and choose the kong-mesh Helm charts.

    Image 11

    Click on Use an existing namespace and choose the one we just created. There are several parameters to configure Kong Mesh, but we’re going to keep all the default values. After clicking on Launch , you should see the Kong Mesh application deployed:

    Image 12

    And you can check the installation using Rancher Cluster Explorer again. Click on Pods on the left menu and choose kong-mesh-system namespace:

    Image 13

    You can use kubectl as well like this:

    NAMESPACE          NAME                                                      READY   STATUS    RESTARTS   AGE
    cattle-system      cattle-cluster-agent-785fd5f54d-r7x8r                     1/1     Running   0          75m
    fleet-system       fleet-agent-77c78f9c74-f97tv                              1/1     Running   0          75m
    kong-mesh-system   kuma-control-plane-5b9c6f4598-nvq8q                       1/1     Running   0          16m
    kube-system        event-exporter-gke-666b7ffbf7-n9lfl                       2/2     Running   0          76m
    kube-system        fluentbit-gke-xqsdv                                       2/2     Running   0          76m
    kube-system        gke-metrics-agent-gjrqr                                   1/1     Running   0          76m
    kube-system        konnectivity-agent-4c4hf                                  1/1     Running   0          76m
    kube-system        kube-dns-66d6b7c877-tq877                                 4/4     Running   0          76m
    kube-system        kube-dns-autoscaler-5c78d65cd9-5hcxs                      1/1     Running   0          76m
    kube-system        kube-proxy-gke-c-kpwnf-default-0-be059c1c-49qp            1/1     Running   0          76m
    kube-system        l7-default-backend-5b76b455d-v6dvg                        1/1     Running   0          76m
    kube-system        metrics-server-v0.3.6-547dc87f5f-qntjf                    2/2     Running   0          75m
    kube-system        prometheus-to-sd-fdf9j                                    1/1     Running   0          76m
    kube-system        stackdriver-metadata-agent-cluster-level-68d94db6-64n4r   2/2     Running   1          75m
  3. Microservices deployment

    Our Service Mesh deployment is based on a simple microservice-to-microservice communication scenario. As we’re running a canary release, the called microservice has two versions.

    • “magnanimo”: exposed through Kong for Kubernetes ingress controller.
    • “benigno”: provides a “hello” endpoint where it echoes the current datetime. It has a canary release that sends a slightly different response.

    The figure below illustrates the architecture:

    Image 14

    Create a namespace with the sidecar injection annotation. You can use the Rancher Cluster Manager again: choose your cluster and click on Projects/Namespaces. Click on Add Namespace. Type “kong-mesh-app” for name and include an annotation with a “kuma.io/sidecar-injection” key and “enabled” as its value:

    Image 15

    Again, you can use kubectl as an alternative

    kubectl create namespace kong-mesh-app
    
    kubectl annotate namespace kong-mesh-app kuma.io/sidecar-injection=enabled
    
    Submit the following declaration to deploy Magnanimo injecting the Kong Mesh data plane
    
    cat <<EOF | kubectl apply -f -
    
    apiVersion: apps/v1
    
    kind: Deployment
    
    metadata:
    
    name: magnanimo
    
    namespace: kong-mesh-app
    
    spec:
    
    replicas: 1
    
    selector:
    
    matchLabels:
    
    app: magnanimo
    
    template:
    
    metadata:
    
    labels:
    
    app: magnanimo
    
    spec:
    
    containers:
    
    - name: magnanimo
    
    image: claudioacquaviva/magnanimo
    
    ports:
    
    - containerPort: 4000
    
    ---
    
    apiVersion: v1
    
    kind: Service
    
    metadata:
    
    name: magnanimo
    
    namespace: kong-mesh-app
    
    labels:
    
    app: magnanimo
    
    spec:
    
    type: ClusterIP
    
    ports:
    
    - port: 4000
    
    name: http
    
    selector:
    
    app: magnanimo
    
    EOF

    Check your deployment using Rancher Cluster Manager. Pass the mouse over the kong-rancher menu and click on the Default project to see the current deployments:

    Image 16

    Click on magnanimo to check details of the deployment, including its pods:

    Image 17

    Click on the magnanimo pod to check the containers running inside of it.

    Image 18

    As we can see, the pod has two running containers:

    • magnanimo: where the microservice is actually running
    • kuma-sidecar: injected during deployment time, playing the Kong Mesh data plane role.

    Similarly, deploy Benigno with its own sidecar:

    cat <<EOF | kubectl apply -f -
    
    apiVersion: apps/v1
    
    kind: Deployment
    
    metadata:
    
    name: benigno-v1
    
    namespace: kong-mesh-app
    
    spec:
    
    replicas: 1
    
    selector:
    
    matchLabels:
    
    app: benigno
    
    template:
    
    metadata:
    
    labels:
    
    app: benigno
    
    version: v1
    
    spec:
    
    containers:
    
    - name: benigno
    
    image: claudioacquaviva/benigno
    
    ports:
    
    - containerPort: 5000
    
    ---
    
    apiVersion: v1
    
    kind: Service
    
    metadata:
    
    name: benigno
    
    namespace: kong-mesh-app
    
    labels:
    
    app: benigno
    
    spec:
    
    type: ClusterIP
    
    ports:
    
    - port: 5000
    
    name: http
    
    selector:
    
    app: benigno
    
    EOF
    
    And finally, deploy Benigno canary release. Notice that the canary release will be abstracted by the same Benigno Kubernetes Service created before:
    
    cat <<EOF | kubectl apply -f -
    
    apiVersion: apps/v1
    
    kind: Deployment
    
    metadata:
    
    name: benigno-v2
    
    namespace: kong-mesh-app
    
    spec:
    
    replicas: 1
    
    selector:
    
    matchLabels:
    
    app: benigno
    
    template:
    
    metadata:
    
    labels:
    
    app: benigno
    
    version: v2
    
    spec:
    
    containers:
    
    - name: benigno
    
    image: claudioacquaviva/benigno_rc
    
    ports:
    
    - containerPort: 5000
    
    EOF

    Check the deployments and pods with:

    $ kubectl get pod --all-namespaces
    NAMESPACE          NAME                                                      READY   STATUS    RESTARTS   AGE
    cattle-system      cattle-cluster-agent-785fd5f54d-r7x8r                     1/1     Running   0          75m
    fleet-system       fleet-agent-77c78f9c74-f97tv                              1/1     Running   0          75m
    kong-mesh-app      benigno-v1-fd4567d95-drnxq                                2/2     Running   0          110s
    kong-mesh-app      benigno-v2-b977c867b-lpjpw                                2/2     Running   0          30s
    kong-mesh-app      magnanimo-658b67fb9b-tzsjp                                2/2     Running   0          5m3s
    kong-mesh-system   kuma-control-plane-5b9c6f4598-nvq8q                       1/1     Running   0          16m
    kube-system        event-exporter-gke-666b7ffbf7-n9lfl                       2/2     Running   0          76m
    kube-system        fluentbit-gke-xqsdv                                       2/2     Running   0          76m
    kube-system        gke-metrics-agent-gjrqr                                   1/1     Running   0          76m
    kube-system        konnectivity-agent-4c4hf                                  1/1     Running   0          76m
    kube-system        kube-dns-66d6b7c877-tq877                                 4/4     Running   0          76m
    kube-system        kube-dns-autoscaler-5c78d65cd9-5hcxs                      1/1     Running   0          76m
    kube-system        kube-proxy-gke-c-kpwnf-default-0-be059c1c-49qp            1/1     Running   0          76m
    kube-system        l7-default-backend-5b76b455d-v6dvg                        1/1     Running   0          76m
    kube-system        metrics-server-v0.3.6-547dc87f5f-qntjf                    2/2     Running   0          75m
    kube-system        prometheus-to-sd-fdf9j                                    1/1     Running   0          76m
    kube-system        stackdriver-metadata-agent-cluster-level-68d94db6-64n4r   2/2     Running   1          75m
    
    
    $ kubectl get service --all-namespaces
    NAMESPACE          NAME                   TYPE        CLUSTER-IP    EXTERNAL-IP   PORT(S)                                                AGE
    default            kubernetes             ClusterIP   10.0.16.1     <none>        443/TCP                                                79m
    kong-mesh-app      benigno                ClusterIP   10.0.20.52    <none>        5000/TCP                                               4m6s
    kong-mesh-app      magnanimo              ClusterIP   10.0.30.251   <none>        4000/TCP                                               7m18s
    kong-mesh-system   kuma-control-plane     ClusterIP   10.0.21.228   <none>        5681/TCP,5682/TCP,443/TCP,5676/TCP,5678/TCP,5653/UDP   18m
    kube-system        default-http-backend   NodePort    10.0.19.10    <none>        80:32296/TCP                                           79m
    kube-system        kube-dns               ClusterIP   10.0.16.10    <none>        53/UDP,53/TCP                                          79m
    kube-system        metrics-server         ClusterIP   10.0.20.174   <none>        443/TCP                                                79m

    You can use Kong Mesh console to check the microservices and data planes also. On a terminal run:

    kubectl port-forward service/kuma-control-plane -n kong-mesh-system 5681

    Redirect your browser to http://localhost:5681/gui. Click on Skip to Dashboard and All Data Plane Proxies :

    Image 19

    Start a loop to see the canary release in action. Notice the service has been deployed as ClusterIP type, so you need to expose them directly with “port-forward”. The next step will show how to expose the service with the Ingress Controller.

    On a local terminal run:

    kubectl port-forward service/magnanimo -n kong-mesh-app 4000

    Open another terminal and start the loop. The request is going to port 4000 provided by Magnanimo. The path “/hw2” routes the request to Benigno Service, which has two endpoints behind it related to both Benigno releases:

    while [1]; do curl http://localhost:4000/hw2; echo; done

    You should see a result similar to this:

    Hello World, Benigno: 2020-11-20 12:57:05.811667
    Hello World, Benigno: 2020-11-20 12:57:06.304731
    Hello World, Benigno, Canary Release: 2020-11-20 12:57:06.789208
    Hello World, Benigno: 2020-11-20 12:57:07.269674
    Hello World, Benigno, Canary Release: 2020-11-20 12:57:07.755884
    Hello World, Benigno, Canary Release: 2020-11-20 12:57:08.240453
    Hello World, Benigno: 2020-11-20 12:57:08.728465
    Hello World, Benigno: 2020-11-20 12:57:09.208588
    Hello World, Benigno, Canary Release: 2020-11-20 12:57:09.689478
    Hello World, Benigno, Canary Release: 2020-11-20 12:57:10.179551
    Hello World, Benigno: 2020-11-20 12:57:10.662465
    Hello World, Benigno: 2020-11-20 12:57:11.145237
    Hello World, Benigno, Canary Release: 2020-11-20 12:57:11.618557
    Hello World, Benigno: 2020-11-20 12:57:12.108586
    Hello World, Benigno, Canary Release: 2020-11-20 12:57:12.596296
    Hello World, Benigno, Canary Release: 2020-11-20 12:57:13.093329
    Hello World, Benigno: 2020-11-20 12:57:13.593487
    Hello World, Benigno, Canary Release: 2020-11-20 12:57:14.068870
  4. Controlling the Canary Release

    As we can see, the request to both Benigno microservice releases is uses a round-robin policy. That is, we’re not in control of the canary release consumption. Service Mesh allows us to define when and how we want to expose the canary release to our consumers (in our case, the Magnanimo microservice).

    To define a policy to control the traffic going to both releases, use this following declaration. It says that 90 percent of the traffic should go to the current release, while only 10 percent should be redirected to the canary release.

        cat <<EOF | kubectl apply -f -
        apiVersion: kuma.io/v1alpha1
        kind: TrafficRoute
        mesh: default
        metadata:
        namespace: default
        name: route-1
        spec:
        sources:
        - match:
        kuma.io/service: magnanimo_kong-mesh-app_svc_4000
        destinations:
        - match:
        kuma.io/service: benigno_kong-mesh-app_svc_5000
        conf:
        split:
        - weight: 90
        destination:
        kuma.io/service: benigno_kong-mesh-app_svc_5000
        version: v1
        - weight: 10
        destination:
        kuma.io/service: benigno_kong-mesh-app_svc_5000
        version: v2
        EOF

    After applying the declaration, you should see a result like this:

    Hello World, Benigno: 2020-11-20 13:05:02.553389
    Hello World, Benigno: 2020-11-20 13:05:03.041120
    Hello World, Benigno: 2020-11-20 13:05:03.532701
    Hello World, Benigno: 2020-11-20 13:05:04.021804
    Hello World, Benigno: 2020-11-20 13:05:04.515245
    Hello World, Benigno, Canary Release: 2020-11-20 13:05:05.000644
    Hello World, Benigno: 2020-11-20 13:05:05.482606
    Hello World, Benigno: 2020-11-20 13:05:05.963663
    Hello World, Benigno, Canary Release: 2020-11-20 13:05:06.446599
    Hello World, Benigno: 2020-11-20 13:05:06.926737
    Hello World, Benigno: 2020-11-20 13:05:07.410605
    Hello World, Benigno: 2020-11-20 13:05:07.890827
    Hello World, Benigno: 2020-11-20 13:05:08.374686
    Hello World, Benigno: 2020-11-20 13:05:08.857266
    Hello World, Benigno: 2020-11-20 13:05:09.337360
    Hello World, Benigno: 2020-11-20 13:05:09.816912
    Hello World, Benigno: 2020-11-20 13:05:10.301863
    Hello World, Benigno: 2020-11-20 13:05:10.782395
    Hello World, Benigno: 2020-11-20 13:05:11.262624
    Hello World, Benigno: 2020-11-20 13:05:11.743427
    Hello World, Benigno: 2020-11-20 13:05:12.221174
    Hello World, Benigno: 2020-11-20 13:05:12.705731
    Hello World, Benigno: 2020-11-20 13:05:13.196664
    Hello World, Benigno: 2020-11-20 13:05:13.680319
  5. Install Kong for Kubernetes

    Let’s go back to Rancher to install our Kong for Kubernetes Ingress Controller and control the service mesh exposition. In the Rancher Catalog page, click the Kong icon. Accept the default values and click Launch :

    Image 20

    You should see both applications, Kong and Kong Mesh, deployed:

    Image 21

    Image 22

    Again, check the installation with kubectl:

    $ kubectl get pod --all-namespaces
    NAMESPACE          NAME                                                      READY   STATUS    RESTARTS   AGE
    cattle-system      cattle-cluster-agent-785fd5f54d-r7x8r                     1/1     Running   0          84m
    fleet-system       fleet-agent-77c78f9c74-f97tv                              1/1     Running   0          83m
    kong-mesh-app      benigno-v1-fd4567d95-drnxq                                2/2     Running   0          10m
    kong-mesh-app      benigno-v2-b977c867b-lpjpw                                2/2     Running   0          8m47s
    kong-mesh-app      magnanimo-658b67fb9b-tzsjp                                2/2     Running   0          13m
    kong-mesh-system   kuma-control-plane-5b9c6f4598-nvq8q                       1/1     Running   0          24m
    kong               kong-kong-754cd6947-db2j9                                 2/2     Running   1          72s
    kube-system        event-exporter-gke-666b7ffbf7-n9lfl                       2/2     Running   0          85m
    kube-system        fluentbit-gke-xqsdv                                       2/2     Running   0          84m
    kube-system        gke-metrics-agent-gjrqr                                   1/1     Running   0          84m
    kube-system        konnectivity-agent-4c4hf                                  1/1     Running   0          84m
    kube-system        kube-dns-66d6b7c877-tq877                                 4/4     Running   0          84m
    kube-system        kube-dns-autoscaler-5c78d65cd9-5hcxs                      1/1     Running   0          84m
    kube-system        kube-proxy-gke-c-kpwnf-default-0-be059c1c-49qp            1/1     Running   0          84m
    kube-system        l7-default-backend-5b76b455d-v6dvg                        1/1     Running   0          85m
    kube-system        metrics-server-v0.3.6-547dc87f5f-qntjf                    2/2     Running   0          84m
    kube-system        prometheus-to-sd-fdf9j                                    1/1     Running   0          84m
    kube-system        stackdriver-metadata-agent-cluster-level-68d94db6-64n4r   2/2     Running   1          84m
    
    
    $ kubectl get service --all-namespaces
    NAMESPACE          NAME                   TYPE           CLUSTER-IP    EXTERNAL-IP     PORT(S)                                                AGE
    default            kubernetes             ClusterIP      10.0.16.1     <none>          443/TCP                                                85m
    kong-mesh-app      benigno                ClusterIP      10.0.20.52    <none>          5000/TCP                                               10m
    kong-mesh-app      magnanimo              ClusterIP      10.0.30.251   <none>          4000/TCP                                               13m
    kong-mesh-system   kuma-control-plane     ClusterIP      10.0.21.228   <none>          5681/TCP,5682/TCP,443/TCP,5676/TCP,5678/TCP,5653/UDP   24m
    kong               kong-kong-proxy        LoadBalancer   10.0.26.38    35.222.91.194   80:31867/TCP,443:31039/TCP                             78s
    kube-system        default-http-backend   NodePort       10.0.19.10    <none>          80:32296/TCP                                           85m
    kube-system        kube-dns               ClusterIP      10.0.16.10    <none>          53/UDP,53/TCP                                          85m
    kube-system        metrics-server         ClusterIP      10.0.20.174   <none>          443/TCP                                                85m
  6. Ingress Creation

    With the following declaration, we’re going to expose Magnanimo microservice through an Ingress and its route “/route1”.

        cat <<EOF | kubectl apply -f -
        apiVersion: extensions/v1beta1
        kind: Ingress
        metadata:
        name: route1
        namespace: kong-mesh-app
        annotations:
        konghq.com/strip-path: "true"
        spec:
        rules:
        - http:
        paths:
        - path: /route1
        backend:
        serviceName: magnanimo
        servicePort: 4000
        EOF

    Now the temporary “port-forward” exposure mechanism can be replaced by a formal Ingress. And our loop can start consuming the Ingress with similar results:

    while [1]; do curl http://35.222.91.194/route1/hw2; echo; done

Join the Master Class

Rancher and Kong are excited to present a Master Class that will explore API management combined with universal Service Meshes and how they support hybrid and multi-cloud deployments. By combining Rancher with a service connectivity platform, composed of an API Gateway and a Service Mesh infrastructure, we’ll demonstrate how companies can provision, monitor, manage and protect distributed microservice and deployments across multiple Kubernetes Clusters.

The Master Class will explore some of these questions:

  • Why is the Service Mesh architecture pattern important?
  • Why is implementing Service Mesh in Kubernetes even more important?
  • What can an API gateway and Rancher do for you?

Join the Master Class: Using Hybrid and Multi-Cloud Service Mesh Based Applications for Highly Distributed Environment Deployments