Creating a MongoDB Replicaset with the Rancher Kubernetes Catalog
 One of the key
features of the Kubernetes integration in Rancher is the application
catalog that Rancher provides. Rancher provides the ability to create
Kubernetes templates that give users
the ability to launch sophisticated multi-node applications with the
click of a button. Rancher also adds the support of Application Services
to Kubernetes, which leverage the use of Rancher’s meta-data services,
DNS, and Load Balancers. All of this comes with a consistent and easy to
use UI. In this post, I am going to show an example of creating a
Kubernetes catalog template that can be integrated later in complex
stacks. This example will be a MongoDB replicaset. In the past I’ve
shown how to create a MongoDB
replicaset
using Docker Compose, which works in environments using cattle and
Docker Swarm as orchesrators.
MongoDB replicaset
MongoDB replicaset is a group of MongoDB processes that maintain the
same data set. This provides high availability and redundancy between
your replication nodes. Each MongoDB replicaset consists of one primary
node and several secondary nodes. 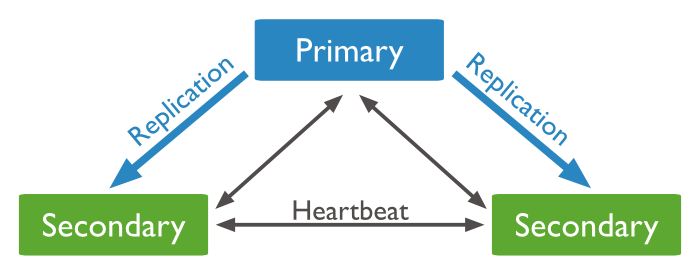
Note: this image is from the official documentation of MongoDB. The
primary node in MongoDB receives all the write operations. The secondary
nodes can handle the read operations. The primary records all the
changes in operation logs, or “oplogs,” which will be replicated to
each secondary node and then apply to the operations. If the primary is
unavailable, an eligible secondary will hold an election to elect itself
the new primary. For more information about MongoDB replicaset, please
refer the official
documentation.
Kubernetes Catalog Item
The Kubernetes catalog item consists of several yaml files. These files
will be responsible for creating pods, services, endpoints, and load
balancers. The files will be executed to create these objects in a
Kubernetes environment. You can create your own private catalog of
templates, or you can add a new catalog template in the
public community
catalog. To create the
catalog item, you need to place the template in a separate directory
under kubernetes-templates. This directory will contain a minimum of
three items:
- config.yml
- catalogIcon-entry.svg
- 0 folder
The 0 folder will contain the kubernetes yaml files and an additional
rancher-compose.yml file. The rancher-compose file will contain
additional information to help you customize your catalog entry. This
will include a “questions” section that will let the user enter values
for some variables that can be used later in the Kubernetes yaml files.
We will see in the later section how to customize the rancher-compose
file to serve your needs.
MongoDB Replica Set with Kubernetes
In order to make MongoDB work with kubernetes, I had to make a custom
MongoDB docker container that will communicate with its peers and
construct the replicaset. This custom solution will be represented by
the following diagram: 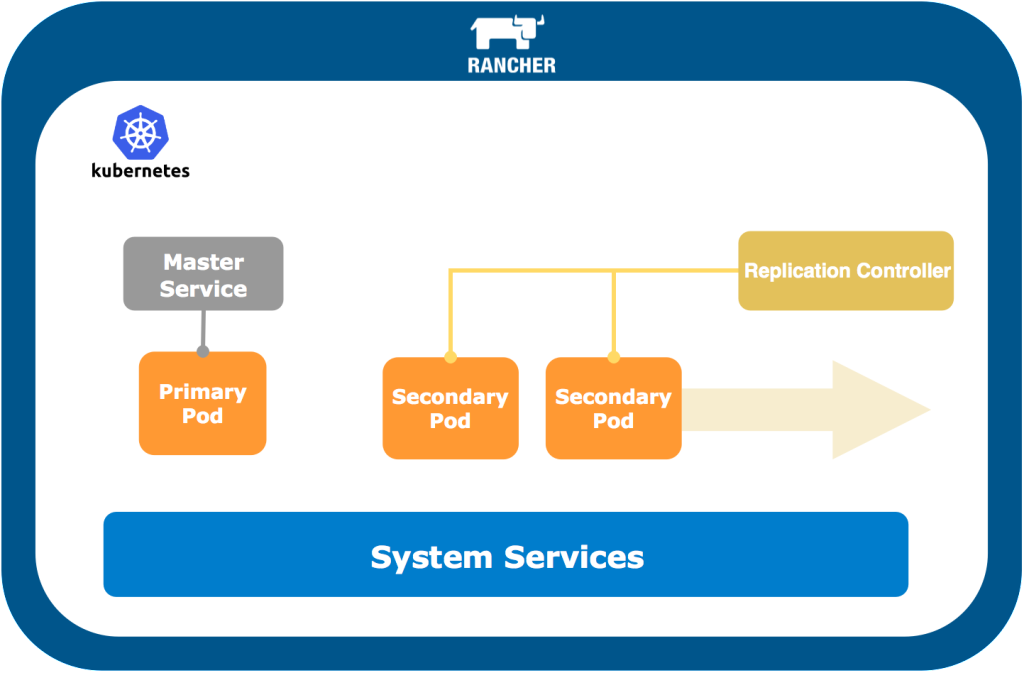
The primary pod will be a single MongoDB container that will initiate
the replicaset and add the secondary pods. The master and secondary pods
are identical. The only difference is that the primary pod has the
PRIMARY environment variable set to “true.” The Pod will have a special
script that will check for this environment variable. If it was set to
primary, then the pod will initiate the MongoDB replicaset with one IP
which is the private IP of the primary pod. The secondary pod will check
the same variable and then attempt to connect to the primary node and
add itself to the replicaset using rs.add(). This script will look
like the following:
#!/bin/bash

set -x

if [ -z "$MONGO_PRIMARY_SERVICE_HOST" ]; then

exit 1

else

primary=${MONGO_PRIMARY_SERVICE_HOST}

if

function initiate_rs() {

sleep 5

IP=$(ip -o -4 addr list eth0 | awk '{print $4}' | cut -d/ -f1 | sed -n 2p)

CONFIG="{"_id" : "rs0","version" : 1,"members" : [{"_id" : 0,"host" : "$IP:27017"}]}"

mongo --eval "printjson(rs.initiate($CONFIG))"

}

function add_rs_member() {

sleep 5

# get pod ip address

IP=$(ip -o -4 addr list eth0 | awk '{print $4}' | cut -d/ -f1 | sed -n 2p)

while true; do

ismaster=$(mongo --host ${primary} --port 27017 --eval "printjson(db.isMaster())" | grep ismaster |grep -o true)

if [[ "$ismaster" == "true" ]]; then

mongo --host ${primary} --port 27017 --eval "printjson(rs.add('$IP:27017'))"

else

new_primary=$(mongo --host ${primary} --port 27017 --eval "printjson(db.isMaster())" | grep primary | cut -d""" -f4 | cut -d":" -f1)

mongo --host ${new_primary} --port 27017 --eval "printjson(rs.add('$IP:27017'))"

if

if [[ "$?" == "0" ]]; then

break

if

echo "Connecting to primary failed. Waiting..."

sleep 10

done

}

if [[ $PRIMARY == "true" ]]; then

initiate_rs &

else

add_rs_member &

if

/entrypoint.sh $@
As described in the previous script, the pod will check if the MongoDB
master pod is still primary or not. If it is not the primary node in
the replicaset, the pod will search for the master node using the
rs.isMaster() function and then try to connect and add itself to the
new master. This simple script will also give the users the ability to
scale this replicaset as needed. Every new node will try to connect to
the same replicaset.
Kubernetes Template Files
The template files consists of 3 yaml files:
- Mongo-master.yaml
This is the file that contains the instruction to create the master pod
and the master service that will hold the IP of the primary MongoDB
container. 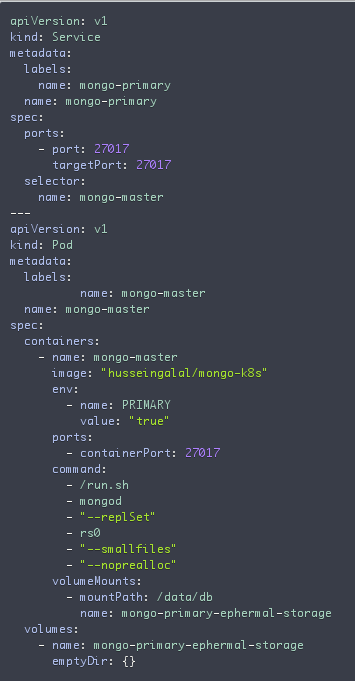
- Mongo-controller.yaml
This file contains the instruction to create replication controller with
the default of 2 pods. These pods will represent the secondary
containers. 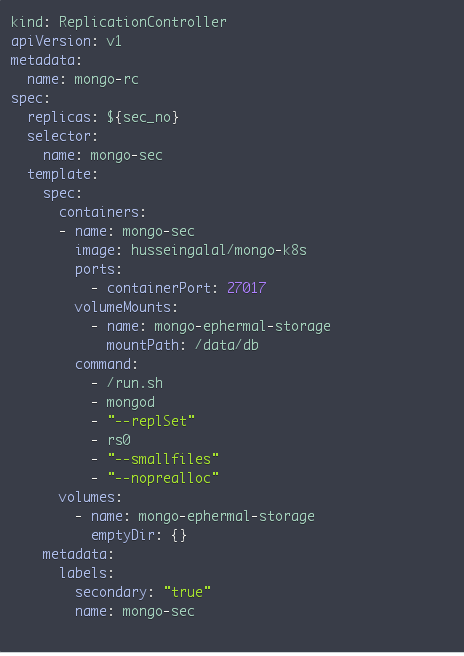
Note that the variable ${sec_no} is used to specify the number of
replicas in the replicaset. This should be an even number because it
will be responsible for creating secondary containers. This value, by
default, is 2.
- Mongo-sec-service.yaml
This file contains the instruction to create a kubernetes service for
the secondary MongoDB containers. 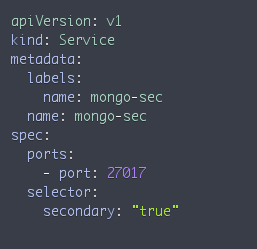
The final file inside the template directory. This is the
rancher-compose file that contains some information about the
template and the questions that will be used as a variable. 
Running MongoDB replicaset You can find the template in the catalog
section in your Kubernetes environment: 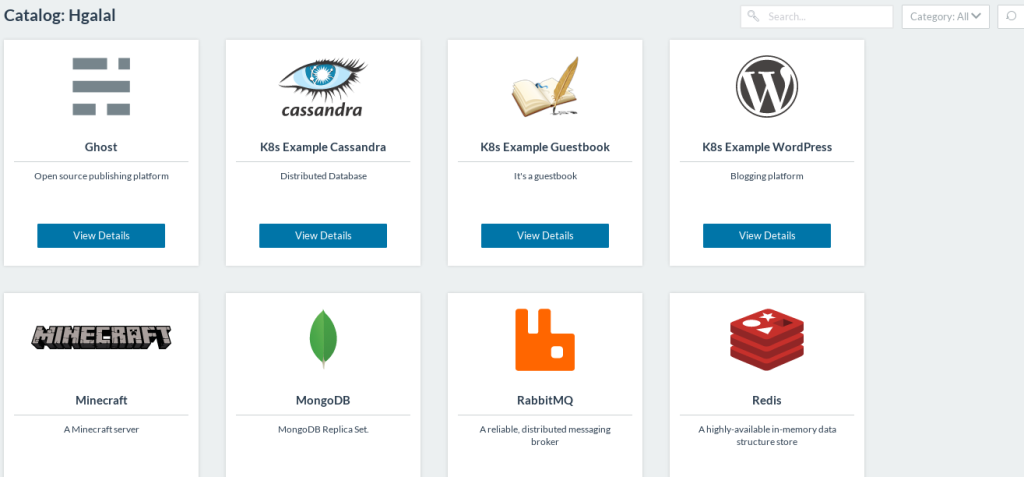
Click on view details, and then specify the number of replicas you want
to start. As mentioned before, the default value is two secondary nodes.
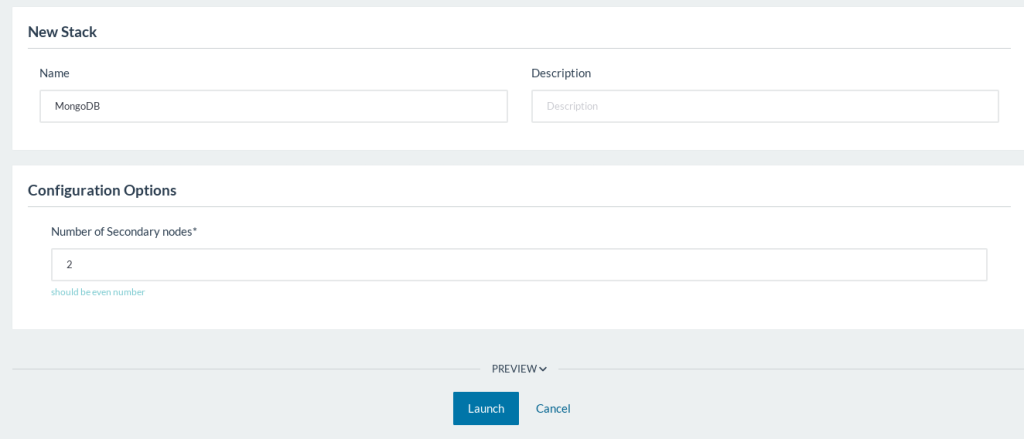
Then click launch. You should be able to see, after few minutes, the
fully functional replicaset. 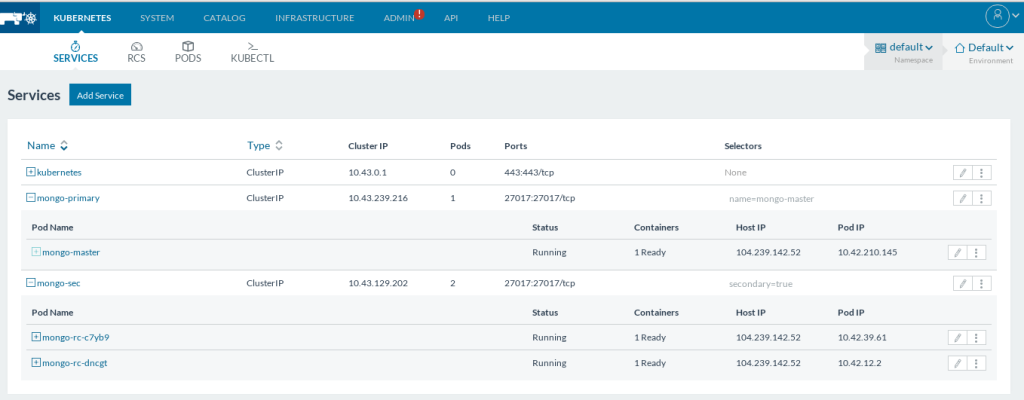
Also, you should be able to see the logs of the master container which
should look something like the following: ……
4/5/2016 1:02:42 AM2016-04-04T22:02:42.518+0000 I NETWORK  [conn8] end connection 10.42.0.1:50022 (2 connections now open)
4/5/2016 1:02:42 AM2016-04-04T22:02:42.519+0000 I NETWORK  [initandlisten] connection accepted from 10.42.39.61:48684 #11 (3 connections now open)
4/5/2016 1:02:42 AM2016-04-04T22:02:42.521+0000 I NETWORK  [conn11] end connection 10.42.39.61:48684 (2 connections now open)
4/5/2016 1:02:42 AM2016-04-04T22:02:42.948+0000 I NETWORK  [initandlisten] connection accepted from 10.42.12.2:36571 #12 (3 connections now open)
4/5/2016 1:02:42 AM2016-04-04T22:02:42.956+0000 I NETWORK  [conn12] end connection 10.42.12.2:36571 (2 connections now open)
4/5/2016 1:02:43 AM2016-04-04T22:02:43.962+0000 I NETWORK  [initandlisten] connection accepted from 10.42.39.61:48692 #13 (3 connections now open)
4/5/2016 1:02:43 AM2016-04-04T22:02:43.969+0000 I NETWORK  [conn13] end connection 10.42.39.61:48692 (2 connections now open)
4/5/2016 1:02:44 AM2016-04-04T22:02:44.513+0000 I REPL     [ReplicationExecutor] Member 10.42.12.2:27017 is now in state SECONDARY
4/5/2016 1:02:44 AM2016-04-04T22:02:44.515+0000 I REPL     [ReplicationExecutor] Member 10.42.39.61:27017 is now in state SECONDARY
…… This shows that two members are added to the replicaset and are
in the secondary state. Conclusion Rancher is expanding its
capabilities by adding Kubernetes
support by adding all the key features
of Kubernetes to Rancher management platform. This gives the users the
ability to use and create their own intricate designs using features
like the Application Catalog. Join us for our next meetup later this
month to learn more about running Kubernetes environments in
Rancher.