Running AI locally
There is no doubt that using AI Large Language Models(LLM) is getting popular for private use as well as even in the restrictive corporate world. And while private users face the challenge of personal privacy while using online offers, in company environments one faces the challenge of keeping data confidential, and consequently using “ready to go” 3rd party cloud solutions for this purpose turns often out to be quite difficult. Therefore it becomes more and more popular to run Large Language Models on a local server or even a laptop. This might seem difficult at first glance but the good news is that there are several open source projects available, that try to provide easy ways to do so. In this post I’d like to explain the LocalAI project and show how you can deploy and configure it on an openSUSE system, and then use a VisualCode extension to use the model for code generation and analysis.
Hardware Requirements
Large Language Models do require a considerable amount of memory and compute power. In order to run larger models, it is highly recommended to utilize a graphics card with a large amount of VRAM. For this example however, I’ll use only a smaller model that also runs without a powerful graphics card (GPU) on a modern Laptop CPU at an acceptable speed. Everything described was done with the following system:
OS: openSUSE Tumbleweed
CPU: Intel i7-8665U (note: the CPU requires the avx2 flag)
Memory: 16G
Disc: approx 10G
GPU: none required. (This will be part of a followup post)
You can check with cat /proc/cpuinfo | grep avx2 if your CPU has the required flag.
LocalAI
LocalAI is a free, opensource community-driven and local-first drop-in replacement for OpenAI running on consumer-grade hardware. Other than most projects that enable you to run only language models locally, LocalAI provides the possibility to run language models as well as a variety of other models like e.g. StableDiffusion for image generation. While this post focuses exclusively on text generation, there are a lot more features available.
Its main feature however is it providing an API that is identical to the OpenAI API, which is used by most AI enabled applications. By pointing them to the API running on a local machine instead of openai.org, it is possible to use most applications without further modifications. These applications won’t even know that are not talking to OpenAI (e.g. ChatGPT) but instead are using your local LLM instead. And thus your data will never leave your computer or company internal network. In this example, everything runs on the same machine, but it also is possible to have a powerful server running LocalAI and providing the API to the local network.
To get a broad overview of how LocalAI works, here a picture with its main components:

The API is a replication of the OpenAI API. By default its URL is http://localhost:8080/v1, and in order to use existing OpenAI Apps, it only is required to change the API url in the applications accordingly. Here an example, how a typical API request for text generation would look like, using curl:
curl http://localhost:8080/v1/chat/completions -H "Content-Type: application/json" -d '{
"model": "llama-3-8b-instruct-coder",
"messages": [{"role": "user", "content": "Say this is a test!"}],
"temperature": 0.7
}'
Other methods like using the OpenAI python module work as well, in this case you need to specify a custom base URL by passing the base_url argument to the constructor: OpenAI(base_url='...') .
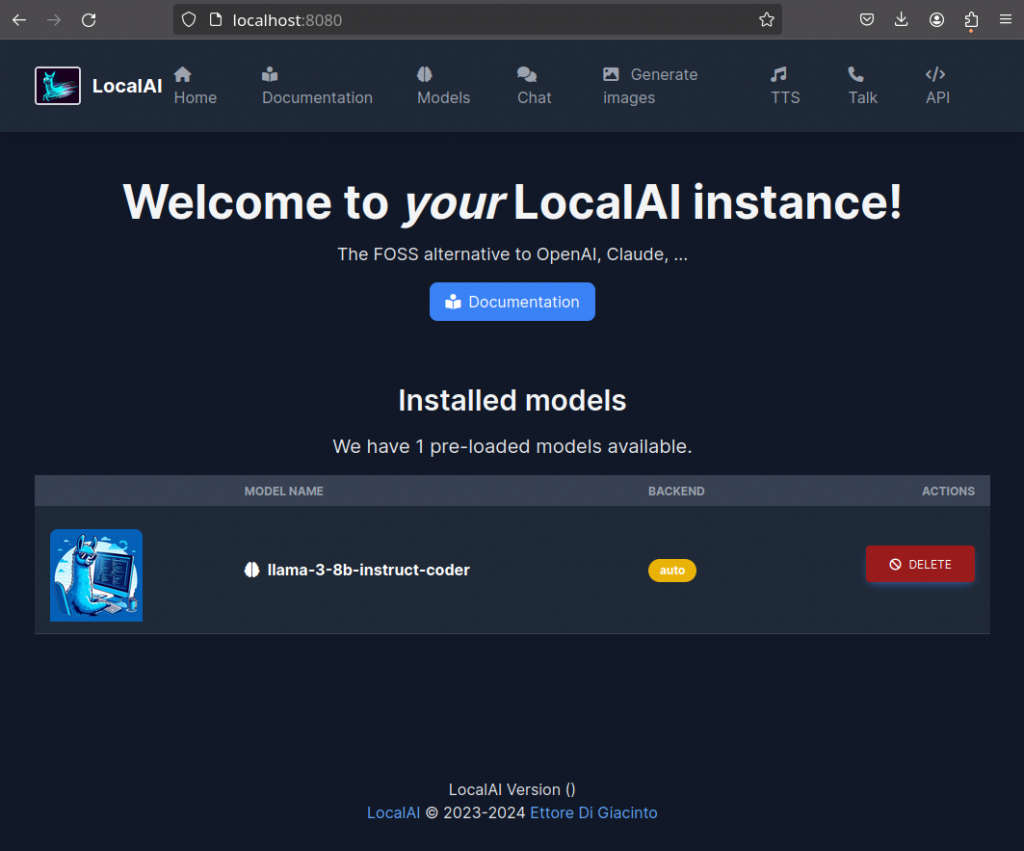
Additionally, LocalAI provides a basic User Interface(UI) in form of a web interface, to interact with models as well as to install new ones from the model gallery. The default URL for the UI is http://localhost:8080/:
Each model used by LocalAI requires a Config file in yaml format, which describes the name of the model, options for its loading and usage as well as which backend should be used. When deploying LocalAI with docker, all config files are accessible from the outside in the /models directory. To make it easier for users to install new models, Model Galleries can be used. Here preconfigured configurations are offered for installation, that trigger the automatic download of the required model from their original online locations. They are available from the default gallery here or in the LocalAI web interface:
To facilitate the use of different model types like image or text generation as well as systems with and without GPU support, LocalAI provides a set of different Backends. An overview of available backends and compatible models can be found here. Models can be downloaded manually and placed with a config file in the /models folder, or are downloaded automatically using the configurations available from the gallery.
Installation
As there are several ways to install and run LocalAI, docker compose will be used for the deployment here. LocalAI does offer several containers that are configured for different hardware and usage requirements. For this demonstration a smaller container will be selected, and only a single model is added, so everything can run on a laptop with limited available space.
NOTE: LocalAI is still under heavy development. The web interface does not come with ssl or authentication, and is available not only for the machine running it, but also other systems in the network. If you plan to use it regularly, please make sure that your firewall is closed for port 8080.
If you like to try all other available AI functionality, like image or voice generation, skip the install instructions below, and try out the AIO container following the instructions in the LocalAI documentation. You also will be able to use it as provider for Continue/VisualCode, but you have to have at least 80GB disc space available as several models are installed with it.
Deploying with docker-compose
At a suitable location, that at least has 10GB of free space for the models:
- Create a directory named LocalAI and change into it
mkdir LocalAI
cd LocalAI
- Create a docker-compose.yaml file and paste the following
services:
  api:
    image: quay.io/go-skynet/local-ai:latest-cpu
    healthcheck:
      test: ["CMD", "curl", "-f", "http://localhost:8080/readyz"]
      interval: 1m
      timeout: 10m
      retries: 20
    build:
      dockerfile: Dockerfile
    ports:
      - 8080:8080
    environment:
      - DEBUG=true
      - MODELS_PATH=/models
    volumes:
      - ./models:/models:cached
- Create a .env file with LocalAI settings
LOCALAI_THREADS=8 LOCALAI_GALLERIES=[{"name":"localai", "url":"github:mudler/LocalAI/gallery/index.yaml@master"}] LOCALAI_MODELS_PATH=/models LOCALAI_LOG_LEVEL=debug COMPEL=0 LOCALAI_SINGLE_ACTIVE_BACKEND=true LOCALAI_IMAGE_PATH=/tmp/generated/images - Start the container by running
docker-compose up
The download of the containers will take a while, but once that is done, you should see the LocalAI web service running:
LocalAI API is listening! Please connect to the endpoint for API documentation. endpoint=http://0.0.0.0:8080
- Test the API by either sending a curl request
curl http://localhost:8080/v1/models
or pointing a browser to http://localhost:8080
Choosing a Model
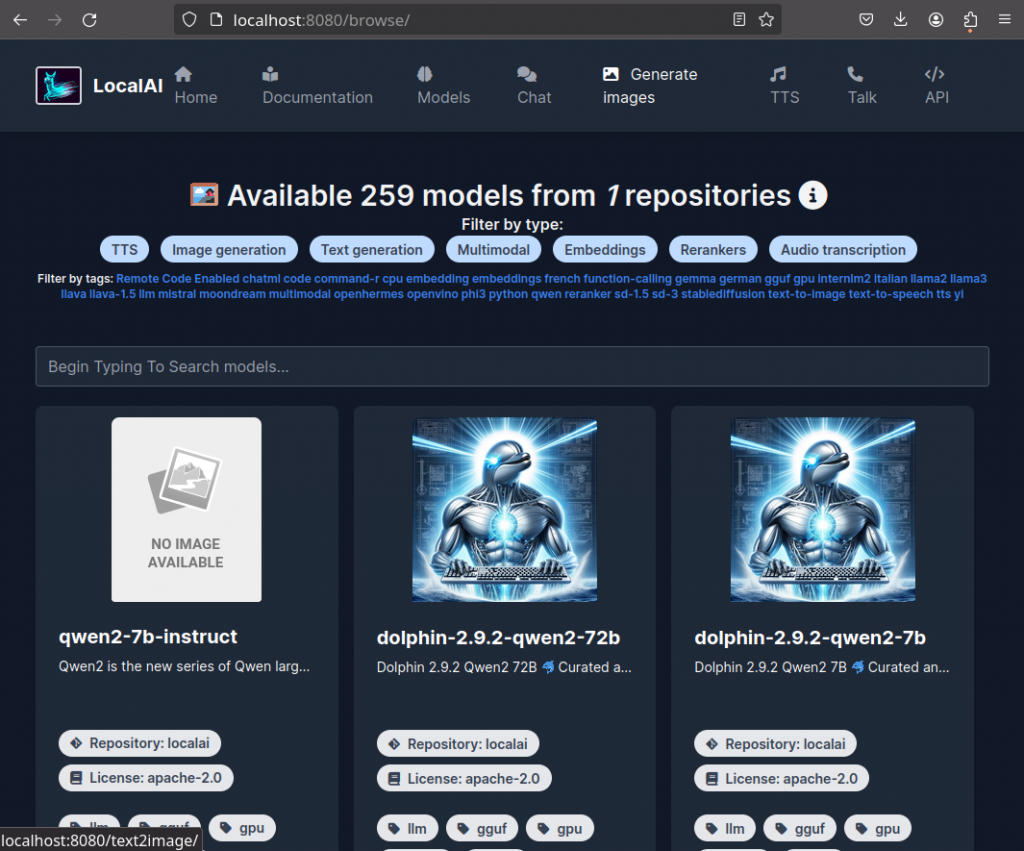
Once running, open http://localhost:8080/browse on the same computer:

Here enter llama-3-8b-instruct-coder in the search field and click Install. This will first download llama-3-8b-instruct-coder.yaml from the LocalAI gallery and place it in the /models folder. The file defines the model to be used, which in turn also is downloaded by LocalAI. The model as well as its yaml configuration file can be found inside the LocalAI directory, the docker compose command was launched in:
LocalAI/models
As the model size is several gigabytes, it will take some time to finish downloading, please be patient.
Testing the deployment
Once config and model have been retrieved, simply click on the Chat interface in the UI, choose the model from the pull-down menu on the top right, and give it a prompt to see if everything works:
“Hi, please respond with Hello World”
Take also a look at the output of docker compose in the terminal. You will see the made request, the loading of the model and the replies sent to the browser. Once this works, the next step is to configure an application to use the local API.
Shutdown
To stop LocalAI, either hit CTRL+C in the terminal you started it from, or run docker compose down in the LocalAI directory.
Connecting Visual Code to LocalAI
For demonstrating the interaction between an AI Application with LocalAI, the Visual Code plugin Continue is chosen. It supports a variety of AI services, among those also OpenAI and LocalAI.
Please note that LLMs, especially smaller models can not replace a human programmer. This is a demonstration on how to install and configure such a setup, but the use cases are in fact limited. It is helpful for scaffolding, code understanding or speeding up the creation of simple or unit tests. Never rely on the code that is generated, but just view it as some tool that can help speedup some aspects of software development.
I will describe 4 basic use cases:
- Explaining an existing code
- Creating code from scratch
- Creating unit tests for existing code
- Improving (editing) existing code
Installation
The installation is done like for any VSCode extension through the VSCode UI:
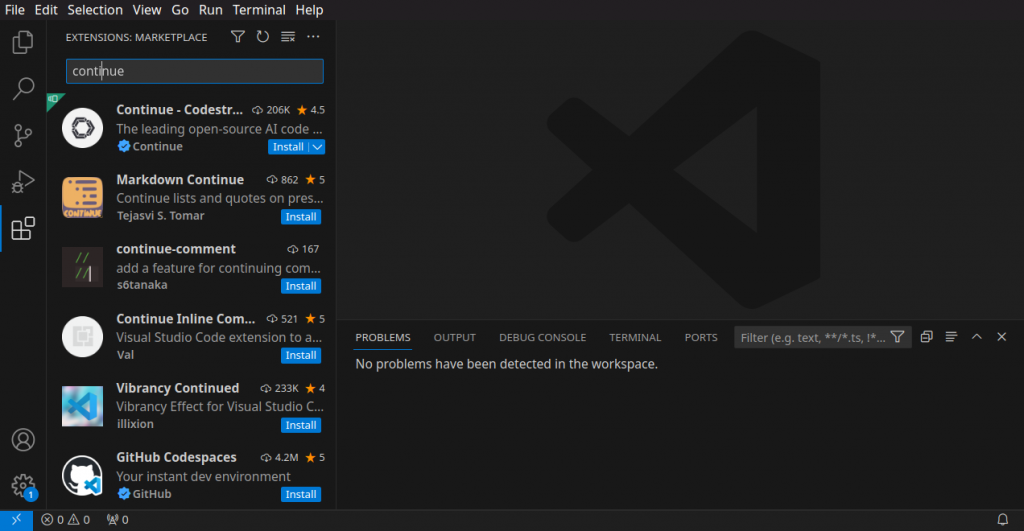
- Go to the extensions section
- Search for “continue”
- Install the extension
A new icon will appear in the left bar, that opens the Continue column, when clicked:

Setup
To setup Continue with LocalAI as provider, click the + icon at the bottom of the Continue column, scroll down and select “Other OpenAI-compatible API”:
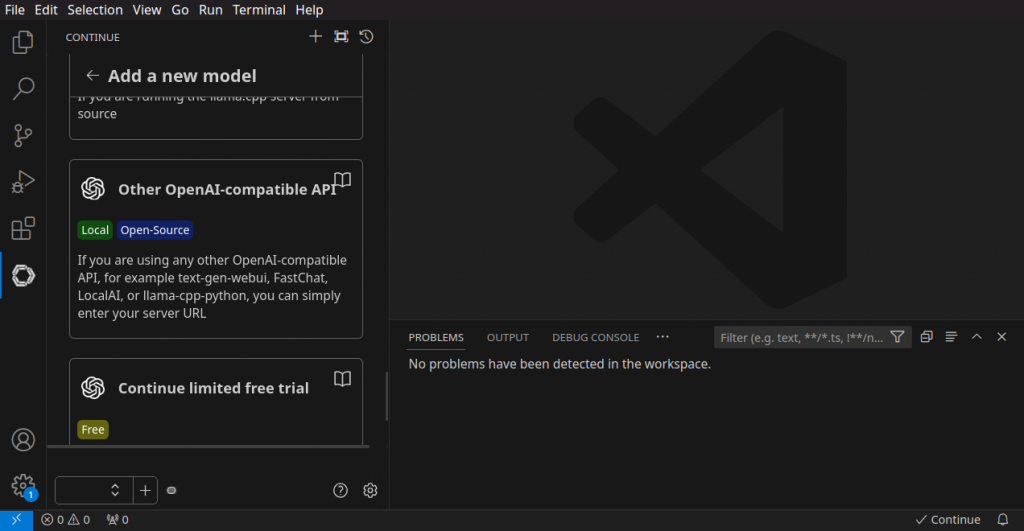
Next, click on Advanced(optional) and change the API URL to “http://localhost:8080/v1”:
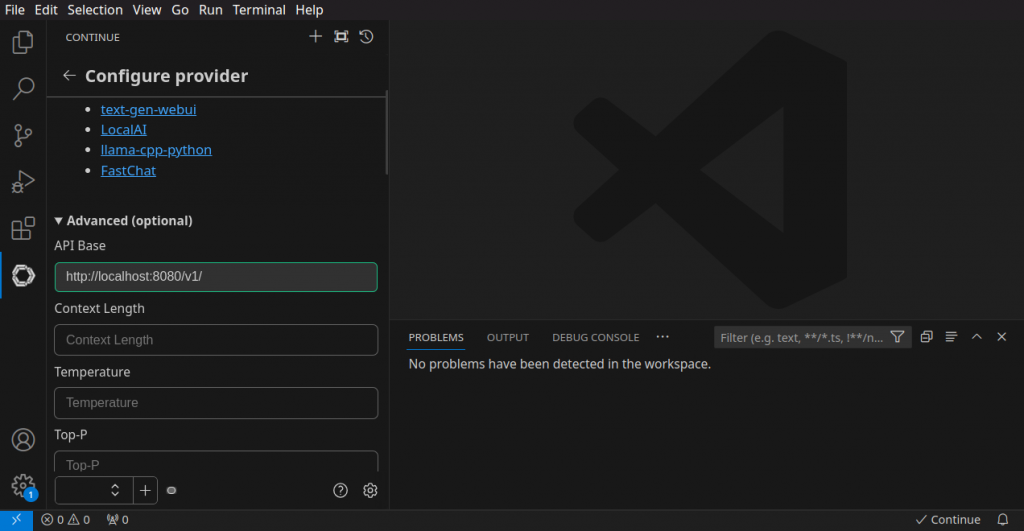
After this, scroll down, and click on auto detect model:

And with this, Continue is setup to use LocalAI. You can verify the configuration, by clicking on the config icon in the Continue column, which opens ~/.continue/config.json for editing. Here you should have an entry like this:
{
"model": "AUTODETECT",
"title": "OpenAI",
"apiBase": "http://localhost:8080/v1/",
"provider": "openai"
},
You will see a warning, that the apiKey entry is missing, when opening the file, this can be fixed by simply adding the line:
"apiKey": "0123456789"
to the entry. It is possible to define a specific key for LocalAI, however in its basic configuration, it accepts any key.
Usage
NOTE: Due to the tab completion feature not properly working when this post was written either with LocalAI or other providers like ollama, this feature isn’t used here. It can be disabled in the Extensions settings, available in the VSCode extension column, when clicking the config icon of the there listed continue extension. Please refer to the Continue documentation for details on using this feature.
With everything in place, it now is time to make use of the AI code generation features. Here an overview of the most common functions:
Explain Code
One convenient function, is to let the model explain existing code, especially when written in an unfamiliar language:
- Create an empty file and paste the following code snippet:
def mysterious_function(x){ for i in range(len(x)): for j in range(len(x) - 1): if x[j] > x[j + 1]: x[j], x[j + 1] = x[j + 1], x[j] return x - Select the code and press CTRL+L. This adds the code to the Continue column on the right.
- Add a question like “What does this code snippet do?” and hit Enter

An explanation of the code will appear shortly after in the Continue column.
Create Code
Next, it’s possible to let the model create code from scratch. This works well for simple functionality, for more complex tasks however, smaller models tend to create erroneous results. To try it, open a new text file and hit CTRL+I. In the entry field, create prompt for what you need, e.g. “Write a python class that calculates the week number for a given date”
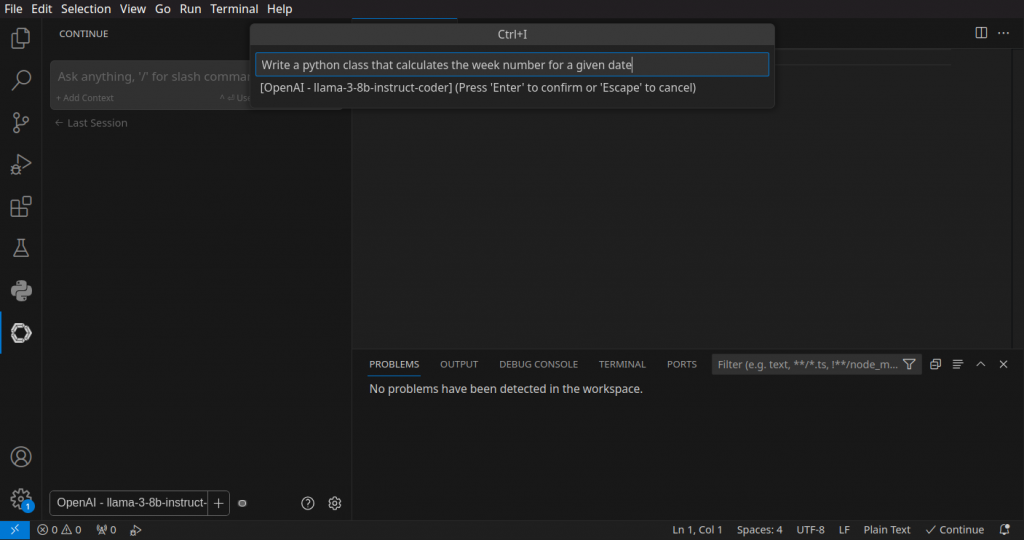

Continue will now create code that tries to fulfill the requirement of the prompt and paste it into the empty file. Once done, you can use CTRL+SHIFT+Enter to accept it, or CTRL+SHIFT+DEL to remove it again.
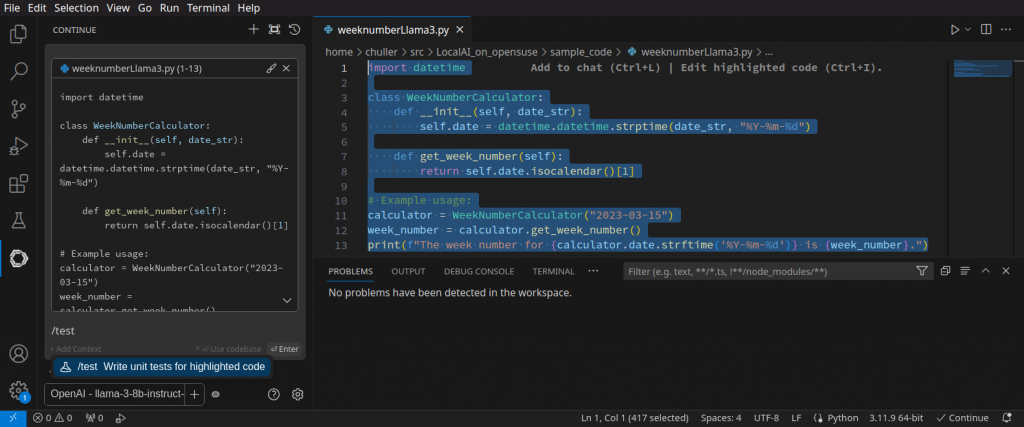
Create Unit Tests for Existing Code
Continue has a feature of add custom slash commands. One pre configured example is test code creation, you can find it defined in the ~/.continue/config.json file. To use it, select the code you want to create tests for, hit CTRL+L to add them to the Continue column. Below the added code, type /test and hit Enter. This will send the code alongside the following prompt to LocalAI:
Write a comprehensive set of unit tests for the selected code. It should setup, run tests that check for
correctness including important edge cases, and teardown. Ensure that the tests are complete and sophisticated.
Give the tests just as chat output, don't edit any file.
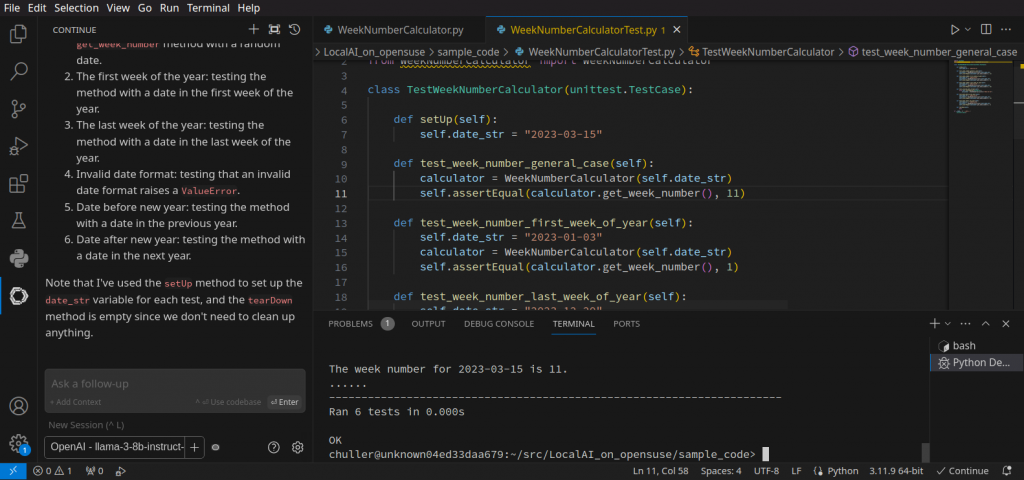
The unit tests will now be generated in the Continue column with an explanation. You can add them to the an empty file and then run them. Please note that you always need to manually verify that they test actual code functionality and not just do bogus things.
Code editing
Beside creating code and analysing it, Continue also gives you the ability to let the model edit your code. For that, select the code you want to edit, type CTRL+I, and enter the edit request in the entry field:

Continue will show the changes as a diff, and like with code creation, the changes can be accepted with CTRL+SHIFT+Enter or declined with CTRL+SHIFT+DEL:

Further Steps
You can experiment now further with LocalAI, e.g. install additional language models. They will be picked up by the Continue extension, and appear as additional choice in the pull up menu of the Continue column:

Have fun!
Conclusion
I hope that this post has shown how easy it is to run LLM AI model on a local machine using LocalAI and that it even works with a laptop without any GPU acceleration for simple tasks. Furthermore, once everything is setup, it is very easy to install additional models as well as to configure existing AI related tools and applications to just run within a local network or machine. This enables you to keep your data in-house and confidential while being able to use them with LLMs.
Related Articles
Mar 13th, 2025
What is Application Performance Monitoring (APM)?
Feb 12th, 2025
No comments yet