Containers and Application Modernization: Extend, Refactor, or Rebuild?

Monday, 27 February, 2017

Technology is a
constantly changing field, and as a result, any application can feel out
of date in a matter of months. With this constant feeling of impending
obsolescence, how can we work to maintain and modernize legacy
applications? While rebuilding a legacy application from the ground up
is an engineer’s dream, business goals and product timelines often make
this impractical. It’s difficult to justify spending six months
rewriting an application when the current one is working just fine, code
debt be damned. Unfortunately, we all know that product development is
never that black and white. Compromises must be made on both sides of
the table, meaning that while a complete rewrite might not be possible,
the long-term benefits of application modernization efforts must still
be valued. While many organizations don’t have the luxury of building
brand new, cloud-native applications, there are still techniques that
can be used to modernize existing applications using container
technology like Docker. These modernization techniques ultimately fall
into three different categories: extend, refactor, and rebuild. But
before we get into them, let’s first touch on some Dockerfile basics.

Dockerfile Basics

For the uninitiated, Docker is a containerization platform that “wraps
a piece of software in a complete filesystem that contains everything
needed to run: code, runtime, system tools, system libraries” and
basically everything that can be installed on a server, without the
overhead of a virtualization platform. While the pros and cons of
containers are out of the scope of this article, one of the biggest
benefits of Docker is the ability to quickly and easily spin up
lightweight, repeatable server environments with only a few lines of
code. This configuration is accomplished through a file called the
Dockerfile, which is essentially a blueprint that Docker uses to build
container images. For reference, here’s a Dockerfile that spins up a
simple Python-based web server (special thanks to Baohua
Yang
for the awesome example):

# Use the python:2.7 base image
 FROM python:2.7

# Expose port 80 internally to Docker process
 EXPOSE 80

# Set /code to the working directory for the following commands
 WORKDIR /code

# Copy all files in current directory to the /code directory
 ADD . /code

# Create the index.html file in the /code directory
 RUN touch index.html

# Start the python web server
 CMD python index.py

This is a simplistic example, but it does a good job of illustrating
some Dockerfile basics, namely extending pre-existing images, exposing
ports, and running commands and services. Even these few instructions
can be used to spin up extremely powerful microservices, as long as the
base source code is architected properly.

Application Modernization

At a high level, containerizing an existing application is a relatively
straightforward process, but unfortunately not every application is
built with containerization in mind. Docker has an ephemeral filesystem,
which means that storage within a container is not persistent. Any file
that is saved within a Docker container will be lost unless specific
steps are taken to avoid this. Additionally, parallelization is another
big concern with containerized applications. Because one of the big
benefits of Docker is the ability to quickly adapt to increasing traffic
requirements, these applications need to be able to run in parallel with
multiple instances. As mentioned above, in order to prepare a legacy
application for containerization, there are a few options available:
extend, refactor, or rebuild. But which solution is the best depends
entirely on the needs and resources of an organization.

Extend

Extending the existing functionality of a non-containerized application
often requires the least amount of commitment and effort on this list,
but if it isn’t done right, the changes that are made can lead to
significantly more technical debt. The most effective way to extend an
existing application with container technology is through microservices
and APIs. While the legacy application itself isn’t being
containerized, isolating new features into Docker-based microservices
allows for the modernization of a product, and at the same time tees the
legacy code up for easier refactoring or rebuilding in the future.

At a high level, extension is a great choice for applications that are
likely to be rebuilt or sunset at some point in the not-too-distant
future—but the older the codebase, the more it might be necessary to
completely refactor certain parts of it to accommodate a Docker
platform.

Refactor

Sometimes, extending an application through microservices or APIs isn’t
practical or possible. Whether there is no new functionality to be
added, or the effort to add new features through extension is too high
to justify, refactoring parts of a legacy codebase might be necessary.
This can be easily accomplished by isolating individual pieces of
existing functionality from the current application into containerized
microservices. For example, refactoring an entire social network into a
Docker-ready application might be impractical, but pulling out the piece
of functionality that runs the user search engine is a great way to
isolate individual components as separate Docker containers.

Another great place to refactor a legacy application is the storage
mechanism used for writing things like logs, user files, etc. One of the
biggest roadblocks to running an application within Docker is the
ephemeral filesystem. Dealing with this can be handled in one of a few
ways, the most popular of which is through the use of a cloud-based
storage method like Amazon S3 or Google Cloud Storage. By refactoring
the file storage method to utilize one of these platforms, an
application can be easily run in a Docker container without losing any
data.

Rebuild

When a legacy application is unable to support multiple running
instances, it might be impossible to add Docker support without
rebuilding it from the ground up. Legacy applications can have a long
shelf life, but there comes a point when poor architecture and design
decisions made in the early stages of an application can prevent
efficient refactoring of an application in the future. Being aware of
impending development brick walls is crucial to identifying risks to
productivity.

Ultimately, there is no hard rule when it comes to modernizing legacy
applications with container technology. The best decision is often the
one that is dictated by both the needs of the product and the needs of
the business, but understanding how this decision affects the
organization in the long run is crucial to ensuring a stable application
without losing productivity.

To learn more about using containers, join our February Online
Meetup: More Tips and Tricks for Running Containers Like a
Pro
,
happening Tuesday, Feb 28.

Zachary Flower (@zachflower) is a
freelance web developer, writer, and polymath. He’s built projects for
the NSA and created features for companies like Name.com and Buffer.

Tags: , Category: Uncategorized Comments closed

Playing Catch-up with Docker and Containers

Friday, 17 February, 2017

This article is essentially a guide to getting started with Docker for
people who, like me, have a strong IT background but feel a little
behind the curve when it comes to containers. We live in an age where
new and wondrous technologies are being introduced into the market
regularly. If you’re an IT professional, part of your job is to identify
which technologies are going to make it into the toolbox for the average
developer, and which will be relegated to the annals of history. Docker
is one of those technologies that sounded interesting when it first
debuted in 2013, but was easy to ignore because at the time it was not
clear whether Docker would ever graduate beyond something that
developers liked to play with in their spare time. Personally, I didn’t
pay close attention to Docker containers in Docker’s early days. They
got lost amid all the other noise in the IT world. That’s why, in 2016,
as Docker continued to rise in prominence, I realized that I’d missed
the container boat. Docker was becoming a must-know technology, and I
was behind the curve. If you’re reading this, you may well be in a
similar position. But there’s good news:
Register now for free online training on deploying containers with
Rancher Container technology, and Docker specifically, are
not hard to pick up and learn if you already have a background in IT.

Sure, containers can be a little scary when you’re first getting
started, just like any new technology. But rest assured that it’s not
too late to get on the container train, even if you weren’t writing
Docker files back in 2013. I’ll explain what Docker is and how container
technology works, then go through the first steps in setting Docker up
on your workstation and getting a container running that you can
interact with. Finally, I’ll direct you to some of the resources I used
to familiarize myself with Docker, so you can continue your journey.

What is Docker and How Does it Work?

Docker is technology that allows you to create and deploy an application
together with a filesystem and everything needed to run it. The Docker
container, as it is called, can be installed on any machine, as long as
the Docker engine has been installed, and can be expected to always run
in the same manner. A physical machine with the Docker Engine installed
can host multiple Docker containers, each sharing the resources of the
host machine. You may already be familiar with machine virtualization,
either as a result of running local virtual machines using VMware on
your workstations, or interacting with cloud services like Amazon Web
Services or Microsoft Azure. Container technology is similar in some
ways, and different in others. Let’s start by comparing the two by
looking at the diagram below which shows the basic structure of a
machine hosting Docker containers, and another hosting virtual machines.
In both cases the host machine has its infrastructure and host operating
system. Virtual machines then require a hypervisor which is software or
firmware that allows virtual machines to be hosted. The virtual machines
themselves each contain their own operating system and the application,
together with its required binaries, libraries and any other
dependencies. Similarly, the machine hosting the Docker containers has
its own infrastructure and operating system. Instead of the hypervisor,
it has the Docker Engine installed, and this is what interacts with the
containers. Each container holds its application and the required
binaries, libraries and other dependencies. It is important to note that
they don’t require their own guest operating system. This allows the
containers to be significantly smaller in size, and able to be
distributed, deployed and started in a fraction of the time taken by
virtual machines.

Other key differences are that virtual machines have specifically
allocated access to the system resources, while Docker containers share
host system resources through the Docker engine.

Installing Docker and Discovering Docker Hub

I can’t think of a better way to learn about new technology than to
install it, and get your hands dirty. Let’s install the Docker Engine on
your workstation and a simple Docker container. Before we can deploy a
container, we’ll need the Docker Engine. This is the platform that will
host the container and allow it to interact with the underlying
operating system. You’ll want to pick the appropriate download from the
Docker products page, and
install it on your workstation. Downloads are available for OS X,
Windows, Linux, and a host of other operating systems. Once we have the
Docker platform installed, we’re now ready to get a container running.
Before we do that though, let’s familiarize ourselves with Docker
Hub
. Docker Hub is a central repository for
Docker Container images. Let’s pretend that you’re working on a Windows
machine, and you’d like to deploy an app on SUSE Linux. If you go to
Docker Hub, and search for OpenSuse, you’ll be shown a list of
repositories. At the time of writing there were 212 repositories listed.
You’ll want to look for the “official” repository. The official
repositories are maintained by a team of engineers sponsored by Docker.
Official repositories have clear documentation and promote best
practices. Now search for BusyBox.
Busybox is a tiny Unix distribution, which provides all of the
functionality we’ll need for this example. If you go to the official
repository, you’ll be able to read some good documentation on the image.
Let’s get a BusyBox container running on your workstation.

Getting Your First Container Running

Assuming you’ve installed the Docker Engine, open a new command prompt
on your workstation. If you’re on a Windows machine, I’d recommend using
the Docker Quick Start link which was included as part of your
installation. This will launch an interactive shell that will make it
easier to work with Docker. You don’t need this on IOS or other
Linux-based system. Enter the following command:

$ docker run -it --rm busybox

This will search the local machine for the latest BusyBox image, and
then download it from DockerHub if it isn’t found. The process should
take only a couple of seconds, and you should have something similar to
the the text shown below on your screen:

$ docker run -it --rm busybox
Unable to find image `busybox:latest` locally
latest: Pulling from library/busybox
4b0b=bc1c4050b: Pull complete
Digest: sha256”817q12c32a39bbe394944ba49de563e08f1d3c5266eb89723256bc4448680e
Status: Downloaded newer image for busybox:latest
/ #

We started a new Docker container, using the BusyBox image. We used the
-it parameters to specify that we want an interactive, pseudo TTY
session, and the –rm flag indicates that we want to delete the
container once we exit it. If you execute a command like ‘ls’ you’ll see
that you have access to a new Linux filesystem. Play around a little,
and when you’re done, enter `exit` to exit the container, and remove
it from the system. Congratulations! You’ve now created, interacted
with, and shut down your own Docker container.

Creating Your Own Docker Image

Being able to start up and close down a container is fun, but it doesn’t
have much practical use. Let’s start a new container, install something
on it, and then save it as a container for someone else to use. We’ll
start with a Debian container, install Git on it, and then save it for
later use. This time, we’ll start the container without the –rm flag,
and we’ll specify a version to use as well. Type the following into your
command prompt:

$ docker run -it debian:jessie

You should now have a Debian container running—specifically the jessie
tag/release from Docker Hub. Type the `git` command when you have the
container running. You should observe something similar to the
following:

root@4a4882a7ed59:/# git
bash: git: command not found

So it appears this container doesn’t have Git installed. Let’s rectify
that situation by installing Git:

root@4a4882a7ed59:# apt-get update && apt-get install -y git

This may take a little longer to run, but it will update the apt-get
utility, and then install Git. When it finishes up, type `git` again.
Voila! At this point, we have a container started, and we’ve installed
Git. We started the container without the –rm parameter, so when we
exit it, it won’t destroy the container. Let’s exit now. Type `exit`.
Now we want to get the ID of the container we just ran. To find this, we
type the following command:

$ docker ps -a

You should now see a list of recent containers. My results looked
similar to what’s below:

CONTAINER ID       IMAGE            COMMAND       CREATED        STATUS                          PORTS       NAMES
4a4882a7ed59       debian:jessie    “/bin/bash”   9 minutes ago  Exited (1) About a minute ago               hungry_fermet

It can be a little hard to read, especially if the results get wrapped
in your command window. What we’re looking for is the container ID,
which in my case was 4a4882a7ed59. Yours will be different, but similar
in format. Run the following command, replacing my container ID with
yours. Test:example are arbitrary names as well—Test will be the
name of your saved image, and example will be the version or tag of
that image.

$ docker commit 4a4882a7ed59 test:example

You should see a sha256 response once the container is saved. Now, run
the following to list all the images available on your local machine:

$ docker images

Docker will list the images on your machine. You should be able to find
a repository called test with a tag of example. Let’s see if it worked.
Start up your container using the following command, assuming you saved
your image with the same name and tag as I did.

$ docker run -it test:example

Once you have it running, try and execute the git command. It should
return with a list of possible options for Git. You did it! You created
a custom image of Debian with Git installed. You’re practically a Docker
Master at this point.

Following the Container Ecosystem

Using containers effectively also requires a familiarity with the trends
that are defining the container ecosystem. In 2013, when Docker debuted,
the ecosystem consisted of, well, Docker. But it has changed in big ways
since then. Orchestrators, which automate the provisioning of
infrastructure for containers, have evolved and become an essential part
of large-scale container deployment. Storage options have become more
sophisticated, simplifying the task of moving data between containers
and external, persistent storage systems. Monitoring solutions for
containers have been extended from basic tools like the Docker stats
command to include commercial monitoring and APM tools designed for
containers. And Docker now even runs on Windows as well as Linux (albeit
with some important caveats, like limited networking support at this
time). Discussing all of the container ecosystem trends in detail is
beyond the scope of this article. But in order to make the most of
containers, you should follow the news in the container ecosystem to
gain a sense of what is coming next as containers and the solutions that
support them become more and more sophisticated.

Continuing to Learn About Containers

Obviously this just scratches the surface of what containers offers, but
this should give you a good start, and afford you enough of a base of
understanding to create, modify and deploy your own containers locally.
If you would like to know more about Docker, the Web is full of useful
tutorials and additional information:

Mike Mackrory is a Global citizen who has settled down in the Pacific
Northwest – for now. By day he works as a Senior Engineer on a Quality
Engineering team and by night he writes, consults on several web based
projects and runs a marginally successful eBay sticker business. When
he’s not tapping on the keys, he can be found hiking, fishing and
exploring both the urban and the rural landscape with his kids.

Tags: , Category: Uncategorized Comments closed

Introducing Containers into Your DevOps Processes: Five Considerations

Wednesday, 15 February, 2017

Docker
has been a source of excitement and experimentation among developers
since March 2013, when it was released into the world as an open source
project. As the platform has become more stable and achieved increased
acceptance from development teams, a conversation about when and how to
move from experimentation to the introduction of containers into a
continuous integration environment is inevitable. What form that
conversation takes will depend on the players involved and the risk to
the organization. What follows are five important considerations which
should be included in that discussion.

Define the Container Support Infrastructure

When you only have a developer or two experimenting with containers, the
creation and storage of Docker images on local development workstations
is to be expected, and the stakes aren’t high. When the decision is made
to use containers in a production environment, however, important
decisions need to be made surrounding the creation and storage of Docker
images. Before embarking on any kind of production deployment journey,
ask and answer the following questions:

  • What process will be followed when creating new images?

    • How will we ensure that images used are up-to-date and secure?
    • Who will be responsible for ensuring images are kept current,
      and that security updates are applied regularly?
  • Where will our Docker images be stored?

    • Will they be publicly accessible on DockerHub?
    • Do they need to be kept in a private repository? If so, where
      will this be hosted?
  • How will we handle the storage of secrets on each Docker image? This
    will include, but is not limited to:

    • Credentials to access other system resources
    • API keys for external systems such as monitoring
  • Does our production environment need to change?

    • Can our current environment support a container-based approach
      effectively?
    • How will we manage our container deployments?
    • Will a container-based approach be cost-effective?

Don’t Short-Circuit Your Continuous Integration Pipeline

Rancher Free Ebook 'Continuous Integration and Deployment with Docker and Rancher' Free
eBook: Continuous Integration and Deployment with Docker and
Rancher Perhaps one of Docker’s best features is that a
container can reasonably be expected to function in the same manner,
whether deployed on a junior developer’s laptop or on a top-of-the-line
server at a state-of-the-art data center. Therefore, development teams
may be tempted to assume that localized testing is good enough, and that
there is limited value from a full continuous integration (CI) pipeline.
What the CI pipeline provides is stability and security. By running all
code changes through an automated set of tests and assurances, the team
can develop greater confidence that changes to the code have been
thoroughly tested.

Follow a Deployment Process

In the age of DevOps and CI, we have the opportunity to deliver bug
fixes, updates and new features to customers faster and more efficiently
than ever. As developers, we live for solving problems and delivering
quality that people appreciate. It’s important, however, to define and
follow a process that ensures key steps aren’t forgotten in the thrill
of deployment. In an effort to maximize both uptime and delivery of new
functionality, the adoption of a process such as blue-green deployments
is imperative (for more information, I’d recommend Martin Fowler’s
description of Blue Green
Deployment
).
The premise as it relates to containers is to have both the old and new
containers in your production environment. Use of dynamic load balancing
to slowly and seamlessly shift production traffic from the old to the
new, whilst monitoring for potential problems, permits relatively easy
rollback should issues be observed in the new containers.

Don’t Skimp on Integration Testing

Containers may run the same, independently of the host system, but as we
move containers from one environment to another, we run the risk of
breaking our external dependencies, whether they be connections to
third-party services, databases, or simply differences in the
configuration from one environment to another. For this reason, it is
imperative that we run integration tests whenever a new version of a
container is deployed to a new environment, or when changes to an
environment may affect the interactions of the containers within.
Integration tests should be run as part of your CI process, and again as
a final step in the deployment process. If you’re using the
aforementioned blue-green deployment model, you can run integration
tests against your new containers before configuring the proxy to
include the new containers, and again once the proxy has been directed
to point to the new containers.

Ensure that Your Production Environment is Scalable

The ease with which containers can be created and destroyed is a
definite benefit of containers, until you have to manage those
containers in a production environment. Attempting to do this manually
with anything more than one or two containers would be next to
impossible. Consider this with a deployment containing multiple
different containers, scaled at different levels, and you face an
impossible task. []

When considering the inclusion of container technology as part of the DevOps
process and putting containers into production, I’m reminded of some
important life advice I received many years ago—“Don’t do dumb
things.” Container technology is amazing, and offers a great deal to
our processes and our delivery of new solutions, but it’s important that
we implement it carefully. Mike Mackrory is a Global citizen who has
settled down in the Pacific Northwest – for now. By day he works as a
Senior Engineer on a Quality Engineering team and by night he writes,
consults on several web based projects and runs a marginally successful
eBay sticker business. When he’s not tapping on the keys, he can be
found hiking, fishing and exploring both the urban and the rural
landscape with his kids.

Tags: , Category: Uncategorized Comments closed

Containers: Making Infrastructure as Code Easier

Tuesday, 31 January, 2017

Containers and Infrastructure as
CodeWhat
do Docker containers have to do with Infrastructure as Code (IaC)? In a
word, everything. Let me explain. When you compare monolithic
applications to microservices, there are a number of trade-offs. On the
one hand, moving from a monolithic model to a microservices model allows
the processing to be separated into distinct units of work. This lets
developers focus on a single function at a time, and facilitates testing
and scalability. On the other hand, by dividing everything out into
separate services, you have to manage the infrastructure for each
service instead of just managing the infrastructure around a single
deployable unit. Infrastructure as Code was born as a solution to this
challenge. Container technology has been around for some time, and it
has been implemented in various forms and withvarying degrees of
success, starting with chroot in the early 1980s and taking the form of
products such as Virtuozzo and Sysjail since
then. It wasn’t until Docker burst onto the scene in 2013 that all the
pieces came together for a revolution affecting how applications can be
developed, tested and deployed in a containerized model. Together with
the practice of Infrastructure as Code, Docker containers represent one
of the most profoundly disruptive and innovative changes to the process
of how we develop and release software today.

What is Infrastructure as Code?

Rancher Free Ebook 'Continuous Integration and Deployment with Docker and Rancher' Free
eBook: Continuous Integration and Deployment with Docker and
Rancher Before we delve into Infrastructure as Code and how
it relates to containers, let’s first look at exactly what we mean when
we talk about IaC. IaC refers to the practice of scripting the
provisioning of hardware and operating system requirements concurrently
with the development of the application itself. Typically, these scripts
are managed in a similar manner to the software code base, including
version control and automated testing. When properly implemented, the
need for an administrator to log into a new machine and configure it
manually is replaced by scripts which describe the ideal state of the
new machine, and execute the necessary steps in order to configure the
machine to realize that state.

Key Benefits Realized in Infrastructure as Code

IaC seeks to relieve the most common pain points with system
configuration, especially the fact that configuring a new environment
can take a significant amount of time. Each environment needs to be
configured individually, and when something goes wrong, it can often
require starting the process all over again. IaC eliminates these pain
points, and offers the following additional benefits to developers and
operational staff:

  1. Relatively easy reuse of common scripts.
  2. Automation of the entire provisioning process, including being able
    to provision hardware as part of a continuous delivery process.
  3. Version control, allowing newer configurations to be tested and
    rolled back as necessary.
  4. Peer review and hardening of scripts. Rather than manual
    configuration from documentation or memory, scripts can be reviewed,
    updated and continually improved.
  5. Documentation is automatic, in that it is essentially the scripts
    themselves.
  6. Processes are able to be tested.

Taking Infrastructure as Code to a Better Place with Containers

As developers, I think we’re all familiar with some variant of, “I don’t
know mate, it works on my machine!” At best, it’s mildly amusing to
utter, and at worst it represents one of the key frustrations we deal
with on a daily basis. Not only does the Docker revolution effectively
eliminate this concern, it also brings IaC into the development process
as a core component. To better illustrate this, let’s consider a
Dockerized web application with a simple UI. The application would have
a Dockerfile similar to the one shown below, specifying the
configuration of the container which will contain the application.

FROM ubuntu:12.04

# Install dependencies
RUN apt-get update -y && apt-get install -y git curl apache2 php5 libapache2-mod-php5 php5-mcrypt php5-mysql

# Install app
RUN rm -rf /var/www/*
ADD src /var/www

# Configure apache
RUN a2enmod rewrite
RUN chown -R www-data:www-data /var/www
ENV APACHE_RUN_USER www-data
ENV APACHE_RUN_GROUP www-data
ENV APACHE_LOG_DIR /var/log/apache2

EXPOSE 80

CMD ["/usr/sbin/apache2", "-D", "FOREGROUND"]

If you’re familiar with Docker, this is a fairly typical and simple
Dockerfile, and you should already know what it does. If you’re not
familiar with the Dockerfile, understand that this file will be used to
create a Docker image, which is essentially a template that will be used
to create a container. When the Docker container is created, the image
will be used to build the container, and a self-contained application
will be created. It will be available for use on whatever machine it is
instantiated on, from developer workstation to high-availability cloud
cluster. Let’s look at a couple of key elements of the file, and explore
what they accomplish in the process.

FROM ubuntu:12.04

This line pulls in an Ubuntu Docker image from Docker Hub to use as the
base for your new container. Docker Hub is the primary online repository
of Docker images. If you visit Docker Hub and search for this image,
you’ll be taken to the repository for
Ubuntu
. The image is an
official image, which means that it is one of a library of images
managed by a dedicated team sponsored by Docker. The beauty of using
this image is that when something goes wrong with your underlying
technology, there is a good chance that someone has already developed
the fix and implemented it, and all you would need to do is update your
Dockerfile to reference the new version, rebuild your image, and test
and deploy your containers again. The remaining lines in the Dockerfile
install various packages on the base image using apt-get. Add the source
of your application to the /var/www directory, configure Apache, and
then set the exposed port for the container to port 80. Finally, the CMD
command is run when the container is brought up, and this will initiate
the Apache server and open it for http requests. That’s Infrastructure
as Code in its simplest form. That’s all there is to it. At this point,
assuming you have Docker installed and running on your workstation, you
could execute the following command from the directory in which the
Dockerfile resides.

$ docker build -t my_demo_application:v0.1

Docker will build your image for you, naming it my_demo_application
and tagging it with v0.1, which is essentially a version number. With
the image created, you could now take that image and create a container
from it with the following command.

$ docker run -d my_demo_application:v0.1

And just like that, you’ll have your application running on your local
machine, or on whatever hardware you choose to run it.

Taking Infrastructure as Code to a Better Place with Docker Containers and Rancher

A single file, checked in with your source code that specifies an
environment, configuration, and access for your application. In its
purest form, that is Docker and Infrastructure as Code. With that basic
building block in place, you can use docker-compose to define composite
applications with multiple services, each containing an individualized
Dockerfile, or an imported image for a Docker repository. For further
reading on this topic, and tips on implementation, check out Rancher’s
documentation on infrastructure
services
and
environment
templates
.
You can also read up on Rancher
Compose
,
which lets you define applications for multiple hosts. Mike Mackrory
is a Global citizen who has settled down in the Pacific Northwest – for
now. By day he works as a Senior Engineer on a Quality Engineering team
and by night he writes, consults on several web based projects and runs
a marginally successful eBay sticker business. When he’s not tapping on
the keys, he can be found hiking, fishing and exploring both the urban
and the rural landscape with his kids.

Tags: ,, Category: Uncategorized Comments closed

Security for your Container Environment

Thursday, 26 January, 2017

As
one of the most disruptive technologies in recent years, container-based
applications are rapidly gaining traction as a platform on which to
launch applications. But as with any new technology, the security of
containers in all stages of the software lifecycle must be our highest
priority. This post seeks to identify some of the inherent security
challenges you’ll encounter with a container environment, and suggests
base elements for a docker security plan to mitigate those vulnerabilities.

Benefits of a Container Environment and the Vulnerabilities They Expose

Before we investigate what aspects of your container infrastructure will
need to be covered by your security plan, it would be wise to identify
what potential security problems running applications in such an
environment will present. The easiest way to do this is to contrast a
typical virtual machine (VM) environment with that in use for a typical
container-based architecture. In a traditional VM environment, each
instance functions as an isolated unit. One of the downsides to this
approach is that each unit needs to have its own operating system
installed, and there is a cost both in terms of resources and initiation
time that needs to be incurred when starting a new instance.
Additionally, resources are dedicated to each VM, and might not be
available for use by other VMs running on the same base machine.
Rancher Free Ebook 'Comparing Kubernetes, Mesos and Swarm'
Free eBook: Compare architecture, usability, and feature sets for
Kubernetes, Mesos/Marathon, and Docker Swarm In a
container-based environment, each container comprises a bare minimum of
supporting functionality. There is no need to virtualize an
entireoperating system within each container and resource use is shared
between all containers on a device. The overwhelming benefit to this
approach is that initiation time is minimized, and resource usage is
generally more efficient. The downside is a significant loss in
isolation between containers, relative to the isolation that exists in a
VM environment, and this brings with it a number of security
vulnerabilities.

Identifying Vulnerabilities

Let’s identify some of the vulnerabilities that we inherit by virtue of
the container environment, and then explore ways to mitigate these, and
thus create a more secure environment in which to deploy and maintain
your containers.

  • Shared resources on the underlying infrastructure expose the risk of
    attack if the integrity of the container is compromised.

    • Access to the shared kernel key ring means that the user running
      the container has the same access within the kernel across all
      containers.
    • Denial of Service is possible if a container is able to access
      all resources in the underlying infrastructure.
    • Kernel modules are accessible by all containers and the kernel.
  • Exposing a port on a container opens it to all traffic by default.
  • Docker Hub and other public facing image repositories are “public.”
  • Compromised container secrets

Addressing the Problems of Shared Resources

Earlier versions of the Docker machine, especially those prior to
version 1.0, contained a vulnerability that allowed a user breakout of
the container and into the kernel of the host machine. Exploiting this
vulnerability when the container was running as the root user exposed
all kernel functionality to the person exploiting it. While this
vulnerability has been patched since version 1.0, it is still
inadvisable to run a container with a user who has anything more than
the minimum required privileges. If you are running containers with
access to sensitive information, it is also recommended that you
segregate different containers onto different virtual machines, with
additional security measures applied to the virtual machines as
well—although at this point, it may be worth considering whether using
containers to serve your application is the best approach. An additional
precaution you may want to consider is to install additional security
measure on the virtual machine, such as
SecComp
or other kernel security features. Finally, tuning the capabilities
available to containers using the *cap-add*and cap-drop flags when the
container is created can further protect your host machine from
unauthorized access.

Limiting Port Access Through Custom IPTables Rules

When configuring a Docker image, your Dockerfile might include a line
similar to “EXPOSE 80”—which opens port 80 for traffic into the
container by default. Depending on the access you are expecting or
allowing into your container, it may be advantageous to add rules to the
iptables on the image to restrict access on this port. The exact
commands may vary depending on the base container and rules you would
like to enforce, so it would be best to work with operations personnel
in implementing these rules.

Avoiding the Dangers Inherent with a Public Image Repository

As a repository for images, Docker Hub is an extremely valuable
resource. Docker Hub is also publically accessible, and harnesses the
power of the global community in the development and maintenance of
images. But it’s also publicly accessible, which introduces additional
risks alongside the benefits. If your container strategy involves usage
of images from Docker Hub or another public repository, it’s imperative
that you and your developers:

  • Know where the images came from and verify that you’re getting the
    image you expect.
  • Always specify a tag in your FROM statement; make it specific to a
    stable version of the image, and not “:latest”
  • Use the official version of an image, which is supported, maintained
    and verified by a dedicated team, sponsored by Docker, Inc.,
    wherever possible.
  • Secure and harden host machines through a rigorous QA process.
  • Scan container images for vulnerabilities.

When dealing with intellectual property, or applications which handle
sensitive information, it may be wise to investigate using a private
repository for your images instead of a public repository like Docker
Hub, or similar. Amazon Web Services provides information on setting up
an Amazon EC2 Container Registry (Amazon ECR)
here,
and DigitalOcean provides the instructions (albeit a few years old) for
creating a private repository on Ubuntu
here.

Securing Container Secrets

For the Docker community recently, the subject of securing credentials,
such as database passwords, SSH keys, and API tokens has been at the
forefront. One solution to the issue is the implementation of a secure
store, such as HashiCorp Vault or Square Keywhiz. These stores all
provide a virtual file system to the application, which maintain the
integrity of secure keys and passwords.

Security Requires an Upfront Plan, and Constant Vigilance

Any security plan worth implementing needs to have two parts. The first
involves the comprehensive identification and mitigation of potential
threats and vulnerabilities to the system. The second is a commitment to
constant evaluation of the environment, including regular testing and
vulnerability scans, and monitoring of production systems. Together with
your security plan, you need to identify the methods by which you will
monitor your system, including the automation of alerts to be triggered
when system resources exceed predetermined limits and when non-standard
behavior is being exhibited by the containers and their underlying
hosts. Mike Mackrory is a Global citizen who has settled down in the
Pacific Northwest – for now. By day he works as a Senior Engineer on a
Quality Engineering team and by night he writes, consults on several web
based projects and runs a marginally successful eBay sticker business.
When he’s not tapping on the keys, he can be found hiking, fishing and
exploring both the urban and the rural landscape with his kids.

Tags: ,, Category: Uncategorized Comments closed

Moving Containers to Production – A Short Checklist

Tuesday, 10 January, 2017

containers to production checklistIf
you’re anything like me, you’ve been watching the increasing growth of
container-based solutions with considerable interest, and you’ve
probably been experimenting with a couple of ideas. At some point in the
future, perhaps you’d like to take those experiments and actually put
them out there for people to use. Why wait? It’s a new year, and there
is no time like the present to take some action on that goal.
Experimenting is great, and you learn a great deal, but often in the
midst of trying out new things, hacking different technologies together
and making it all work, things get introduced into our code which
probably shouldn’t be put into a production environment. Sometimes,
having a checklist to follow when we’re excited and nervous about
deploying new applications out into the wild can help ensure that we
don’t do things we shouldn’t. Consider this article as the start of a
checklist to ready your Docker applications for prime time.

Item 1: Check Your Sources

Rancher Free Ebook 'Continuous Integration and Deployment with Docker and Rancher' Free
eBook: Continuous Integration and Deployment with Docker and
Rancher Years ago, I worked on a software project with a
fairly large team. We started running into a problem—Once a week, at 2
PM on a Tuesday afternoon, our build would start failing. At first we
blamed the last guy to check his code in, but then it mysteriously
started working before he could identify and check-in a fix. And then
the next week it happened again. It took a little research, but we
traced the source of the failure to a dependency in the project which
had been set to always pull the latest snapshot release from the vendor,
and it turned out that the vendor had a habit of releasing a new, albeit
buggy version of their library around 2 PM on Tuesday afternoons. Using
the latest and greatest versions of a library or a base image can be fun
in an experiment, but it’s risky when you’re relying on it in a
production environment. Scan through your Docker configuration files,
and check for two things.

First, ensure that you have your source images tied to a stable
version of the image. Any occurrence of :latest in your Docker
configuration files should fail the smell test.

Second, if you are using Dockerhub as your image repository, use the
official image wherever possible. Among the reasons for doing this:
“These repositories have clear documentation, promote best practices,
and are designed for the most common use case.” ([Official Repositories
on Docker
Hub]
[)
]

Item 2: Keep your Secrets…Secret

As Gandalf asked, “Is it secret? Is it safe?” Our applications have a
need for secret information. Most applications have a need for a
combination of database credentials, API tokens, SSH keys and other
necessary information which is not appropriate, or advisable for a
public audience. Secret storage is one of the biggest weaknesses of
container technology. Some solutions which have been implemented, but
are not recommended are:

Baking the secrets into the image. Anyone with access to the
registry can potentially access the secrets, and if you have to update
them, this can be a rather tedious process.

Using volume mounts. Unfortunately, this keeps all of your secrets
in a single and static location, and usually requires them to be stored
in plain text.

Using environment variables. These are easily accessible by all
processes using the image, and are usually easily viewed with Docker
inspect.

Encrypted solutions. Secrets are stored in an encrypted state, with
decryption keys on the host machines. While your passwords and other key
data elements aren’t stored in plain text, they are fairly easy to
locate, and the decryption methods identified.

The best solution at this point is to use a secrets store, such as
Vaultby HashiCorp or
Keywhiz from Square. Implementation
is typically API-based and very reliable. Once implemented, a secret
store provides a virtual filesystem to an application, which it can use
to access secured information. Each store provides documentation on how
to set up, test and deploy a secret store for your application.

Item 3: Secure the Perimeter

A compelling reason for the adoption of a container-based solution is
the ability to share resources on a host machine. What we gain in ease
of access to the host machine’s resources, however, we lose in the
ability to separate the processes from a single container from those of
another. Great care needs to be taken to ensure that the user under
which a containers application is started has the minimum required
privileges on the underlying system. In addition, it is important that
we establish a secure platform on which to launch our containers. We
must ensure that the environment is protected wherever possible from the
threat of external influences. Admittedly this has less to do with the
containers themselves, and more with the environment into which they are
deployed, but it is important nonetheless.

Item 4: Make Sure to Keep an Eye on Things

The final item on this initial checklist for production-readying your
application is to come up with a monitoring solution. Along with secret
management, monitoring is an area related to container-based
applications which is still actively evolving. When you’re experimenting
with an application, you typically don’t run it under much significant
load, or in a multiple-user environment. Additionally, for some reason,
our users insist on finding new and innovative ways to leverage the
solutions we provide, which is both a blessing and a curse. This article
[Comparing monitoring options for Docker
deployments]

provides information and comparison between a number of monitoring
options, as does a more recent online meetup on the topic.
The landscape for Docker monitoring solutions is still under continued
development.

Go Forth and Containerize in an Informed Manner

The container revolution is without a doubt one of the most exciting and
disruptive developments in the world of software development in recent
years. Docker is the tool which all the cool kids are using, and let’s
be honest, we all want to be part of that group. When you’re ready to
take your project from an experimental phase into production, make sure
you’re proceeding in an informed manner. The technology is rapidly
evolving, and offers many advantages over traditional technologies, but
be sure that you do your due diligence and confirm that you’re using the
right tool for the right job. Mike Mackrory is a Global citizen who
has settled down in the Pacific Northwest – for now. By day he works as
a Senior Engineer on a Quality Engineering team and by night he writes,
consults on several web based projects and runs a marginally successful
eBay sticker business. When he’s not tapping on the keys, he can be
found hiking, fishing and exploring both the urban and the rural
landscape with his kids.

Tags: Category: Uncategorized Comments closed

Container Registries You Might Have Missed

Thursday, 10 November, 2016

Registries are one of the key components that make working with
containers, primarily Docker, so appealing to the masses. A registry
hosts images that are downloaded and run on hosts in a container engine.
A container is simply a running instance of a specific image. Think of
an image as a ready-to-go package, like an MSI on Microsoft Windows or
an RPM on SUSE Linux Enterprise. I won’t go into the details of how
registries work here, but if you want to learn more,this
article
is
a great read. Instead, what I’d like to do in this post is highlight
some of the container registries that currently remain under the radar.
While the big-name registries are already familiar to most people who
work with Docker, there are smaller registries worth considering, too,
when you are deciding where to host your images. Keep reading for a
discussion of these lesser-known container registries.

The Well-Known Registries

First, though, let me identify the big-name registries, so that it’s
clear what I’m comparing the under-the-radar registries to. By all
accounts, currently, the most popular registry is Docker
Hub
. Docker Hub is the center of the known
registry universe. It is the default hosted registry that every Docker
install is configured to reference. Other popular registries include:

The Registries you Might Be Missing

Now, let’s get to the interesting part. Here is an overview of
lesser-known registries.

Amazon EC2 Container Registry (ECR)

ec2You probably already know that Amazon offers a hosted container service called Amazon EC2 Container Service (ECS). But the registry that Amazon provides to complete ECS tends to receive less attention. That registry, called Amazon EC2 Container Registry
(ECR)
, is a hosted Docker container
registry. It integrates with ECS. Introduced in December 2015, it is a
somewhat newer registry option than most of the better-known registries,
explaining why some users may not be familiar with it. ECS is not the
only container registry that is compatible with ECR. ECS supports
external registries, too. However, the main advantage of ECR is that it
is a fully hosted and managed registry, which simplifies deployment and
management. ECR also is as scalable as the rest of the ECS
infrastructure — which means it is very, very scalable. Best Use
Cases:
If you are a heavy user of AWS services, or plan to be, and are
starting to look for a place to host private images, then ECR makes
perfect sense to use. It is also a good choice if you have a large
registry deployment or expect your registry to expand significantly over
time; in that case, you’ll benefit from the virtually unlimited
scalability of ECR.

FlawCheck Private Registry

flawcheck

FlawCheck Private Registry (which was recently
acquired, along with the rest of FlawCheck’s business, by security
vendor Tenable) is a security-focused registry option. It offers
integrated vulnerability scanning and malware detection for container
images. While there is no magic bullet for keeping your container images
free of malicious code, or preventing the insertion of malicious images
into your registry, FlawCheck’s scanning features can help mitigate the
risks. Best Use Case: For security-conscious companies out there, this
is a really great option. I foresee a lot of adoption for this registry
in heavily regulated industries.

GitLab Container Registry

gitlab

GitLab Container Registry, which can run as a hosted or on-premises registry, is GitLab’s solution for hosting container images. It’s built into GitLab and completely compatible with the rest of GitLab’s tools, which means it can integrate directly into your GitLab delivery pipeline. That’s an advantage if your team is seeking to adopt a seamless, DevOps workflow with as few moving
parts as possible. Best Use Case: Some developers will find it
convenient to store their Docker images on the same platform as their
source code. If you use GitLab for your source code, then you’ll likely
find the GitLab Container Registry handy. Otherwise, however, GitLab
Container Registry doesn’t offer any killer features unavailable from
most other registries.

Portus by SUSE

portus

Portus is not technically a registry, but it provides a front-end that replaces the native UI for on-premises deployments of Docker Registry. Portus is designed to add value to Docker Registry by providing extra access control options. These include the ability to configure “Teams” or
registry users, with different access levels established for each Team.
(In many ways, this feature is similar to user groups on Unix-like
systems.) Portus also supports registry namespaces, which make it
possible to configure the types of modifications individual users, as
well as teams of users, can make to different repositories on a granular
basis. Also notable is that Portus provides a user-friendly Web
interface for configuring registry settings and access controls. (A CLI
configuration tool, portusctl, is available as well.) Best Use Case:
If you like Docker Registry but need extra security controls, or have
other reasons to use fine-grained access control, Portus is a strong
solution.

Sonatype Nexus

nexus

Sonatype Nexus, which supports
hosted and on-premises deployments, is a general-purpose repository. It
supports much more than Docker image hosting, but it can be used as a
Docker registry as well. It has been around for much longer than Docker,
and is likely to be familiar to seasoned admins even if they have not
previously worked with container registries. The core Nexus platform is
open source, but a commercial option is available as well. Best Use
Case:
Many companies have had Nexus deployed as a repository for Maven
for years. By simply upgrading to a modern release of the platform,
organizations can add support for hosting Docker images, thereby
creating their own Docker registry without having to train development
or operational staff on a new product. Plus, they can host other types
of artifacts alongside Docker images.

VMware Harbor Registry

harborYou
might not think of VMware as a major player in the Docker ecosystem, but
the company certainly has its toes in the water. Harbor
Registry
is VMware’s answer for
hosting Docker images. This registry is built on the foundation of
Docker Distribution, but it adds security and identity-management
features. It also supports multiple registries on a single host. Best
Use Case:
Because of Harbor’s focus on security and user management,
this option offers some valuable registry features that enterprises
might seek, which are not available from all other registries. It’s a
good choice in the enterprise. It’s worth noting, too, that because
Harbor runs as Docker containers, it is easy to install on any server
that has a Docker environment — and the developers even offer an
offline installer, which could be handy in situations where security
considerations or other factors mean that a connection to the public
Internet is not available.

Conclusion

The main variables between the different registry offerings include what
type of deployment environment they support (hosted, on-premise or
both); how fine-tuned their access control options are; and how much
additional security they provide for container registries. Choosing the
right registry for your needs, of course, will depend on how these
features align with your priorities. But with so many choices, it’s not
difficult to find a registry that delivers the perfect balance for a
given organization’s needs. About the Author: Vince Power is an
Enterprise Architect at Medavie Blue Cross. His focus is on cloud
adoption and technology planning in key areas like core computing
(IaaS), identity and access management, application platforms (PaaS),
and continuous delivery.
You might also be interested in:

Tags: ,,,, Category: Containers Comments closed

Kubernetes, Mesos, and Swarm: Comparing the Rancher Orchestration Engine Options

Thursday, 20 October, 2016

A Detailed Overview of Rancher’s Architecture
This newly-updated, in-depth guidebook provides a detailed overview of the features and functionality of the new Rancher: an open-source enterprise Kubernetes platform.

kubernetes_mesos_swarm

Note: You can find an updated comparison of Kubernetes vs. Docker Swarm
in a recent blog post
here.

Recent versions of Rancher have added support for several common
orchestration engines in addition to the standard Cattle. The three
newly supported engines, Swarm (soon to be Docker Native Orchestration),
Kubernetes and Mesos are the most widely used orchestration systems in
the Docker community and provide a gradient of usability versus feature
sets. Although Docker is the defacto standard for containerization,
there are no clear winners in the orchestration space. In this article,
we go over the features and characteristics of the three systems and
make recommendations of use cases where they may be suitable.

Docker Native Orchestration is fairly bare bones at the moment but is
getting new features at a rapid clip. Since it is part of the official
Docker system, it will be the default choice for many developers and
hence will have likely have good tooling and community support.
Kubernetes is among the most widely used container orchestration systems
today and has the support of Google. Lastly, Mesos with Mesosphere (or
Marathon, its open source version) takes a much more compartmentalized
approach to service managements where a lot of features are left to
independent plug-ins and applications. This makes it easier to customize
the deployment as individual parts can be swapped out or customized.
However, this also means more tinkering is required to get a working
setup. Kubernetes is more opinionated about how to build clusters and
ships with integrated systems for many common use cases.

Docker Native Orchestration

Basic Architecture

Docker Engine 1.12 shipped with Native Orchestration, which is a
replacement for stand alone Docker Swarm. The Docker native cluster
(Swarm) consists of a set of nodes (Docker Engines/ Daemons) which can
either be managers or workers. Workers run the containers you launch and
managers maintain cluster state. You can have multiple managers for
high-availability, but no more than seven are recommended. The masters
maintain consensus using an internal implementation of the the
RAFT algorithm. As with all consensus
algorithms, having more managers has a performance implication. The fact
that managers maintain consensus internally means that there are no
external dependencies for Docker native orchestration which makes
cluster management much easier.

###

Usability

Docker native uses concepts from single-node Docker and extends them to
the Swarm. If you are up to date on Docker concepts, the learning curve
is fairly gradual. The setup for a swarm is trivial once you have Docker
running on the various nodes you want to add to your swarm: you just
call docker swarm init on one node and docker swarm join on any
other nodes you want to add. You can use the same Docker Compose
templates and the same Docker CLI command set as with standalone Docker.

Feature Set

Docker native orchestration uses the same primitives as Docker Engine
and Docker Compose to support orchestrations. You can still link
services, create volumes and define expose ports. All of these
operations apply on a single node. In addition to these, there are two
new concepts, services and networks.

A docker service is a set of containers that are launched on your nodes
and a certain number of containers are kept running at all times. If one
of the the containers dies it is replaced automatically. There are two
types of services, replicated or global. Replicated services maintain a
specified number of containers across the cluster where as global
services run one instance of a container on each of your swarm nodes. To
create a replicated service use the command shown below.

docker service create          
   –name frontend              
   –replicas 5                 
   -network my-network         
   -p 80:80/tcp nginx:latest.

You can create named overlay networks using docker network
create –driver overlay NETWORK_NAME.
Using the named overlay network
you can create isolated, flat, encrypted virtual networks across your
set of nodes to launch your containers into.

You can use constraints and labels to do some very basic scheduling of
containers. Using constraints you can add an affinity to a service and
it will try to launch containers only on nodes which have the specified
labels.

docker service create                        
   –name frontend                            
   –replicas 5                               
   -network my-network                       
   --constraint engine.labels.cloud==aws     
   --constraint node.role==manager           
   -p 80:80/tcp nginx:latest.

Furthermore, you can use the reserve CPU and reserve memory flags to
define the resources consumed by each container of the service so that
when multiple services are launched on a swarm the containers can be
placed to minimize resource contention.

You can do rudimentary rolling deployments using the command below.
This will update container image for the service but do so 2 containers
at a time with a 10s interval between each set of two. However,
health-checks and automatic rollbacks are not supported.

docker service update        
   –name frontend            
   –replicas 5               
   -network my-network       
   --update-delay 10s        
   --update-parallelism 2    
   -p 80:80/tcp nginx:other-version.

Docker supports persistent external volumes using volume drivers, and
Native orchestration extends these using the mount option to service
create command. Adding the following snippet to the command above will
mount a NFS mount into your container. Note this requires NFS to be
setup on your underlying host external to docker, some of the other
drivers which add support for Amazon EBS volume drivers or Google
container engine volume drivers have the ability to work without host
support. Also this feature is not yet well documented and may require a
bit of testing creating github issues on the docker project to get
working.

    --mount type=volume,src=/path/on/host,volume-driver=local,
    dst=/path/in/container,volume-opt=type=nfs,
    volume-opt=device=192.168.1.1:/your/nfs/path

Kubernetes
Basic Architecture

Conceptually, Kubernetes is somewhat similar to Swarm in that it uses a
manager (master) node with RAFT for consensus. However, that is where
the similarities end. Kubernetes uses an external
etcd cluster for this purpose. In
addition you will need a network layer external to Kubernetes, this can
be an overlay network like flannel, weave etc. With these external tools
in place, you can launch the Kubernetes master components; API Server,
Controller Manager and Scheduler. These normally run as a Kubernetes pod
on the master node. In addition to these you would also need to run the
kubelet and kubeproxy on each node. Worker nodes only run the Kubelet
and Kubeproxy as well as a network layer provider such as flanneld if
needed.
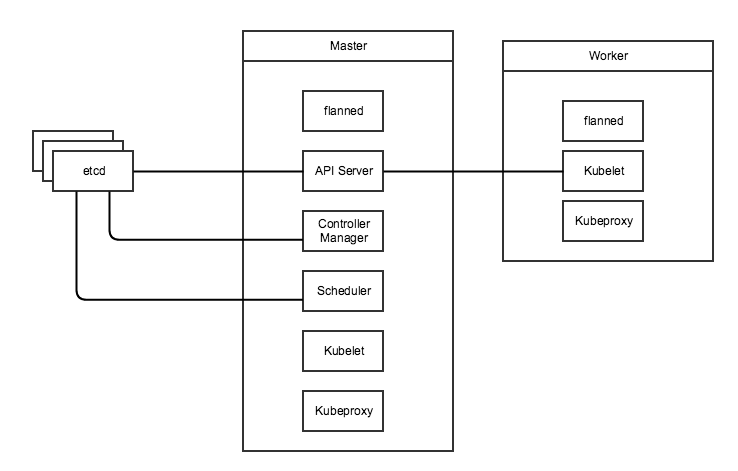
In this setup, the kubelet will control the containers (or pods) on the
given node in conjunction with the Controller manager on the master. The
scheduler on the master takes care of resource allocation and balancing
and will help place containers on the worker node with the most
available resources. The API Controller is where your local kubectl CLI
will issue commands to the cluster. Lastly, the kubeproxy is used to
provide load balancing and high availability for services defined in
Kubernetes.

Usability

Setting up Kubernetes from scratch is a non-trivial endeavor as it
requires setting up etcd, networking plugins, DNS servers and
certificate authorities. Details of setting up Kubernetes from scratch
are available here
but luckily Rancher does all of this setup for us. We have covered how
to setup a Kubernetes cluster in an earlier
article
.

Beyond initial setup, Kubernetes still has somewhat of a steep learning
curve as it uses its own terminology and concepts. Kubernetes uses
resource types such as Pods, Deployments, Replication Controllers,
Services, Daemon sets and so on to define deployments. These concepts
are not part of the Docker lexicon and hence you will need to get
familiar with them before your start creating your first deployment. In
addition some of the nomenclature conflicts with Docker. For example,
Kubernetes services are not Docker services and are also conceptually
different (Docker services map more closely to Deployments in the
Kubernetes world). Furthermore, you interact with the cluster using
kubectl instead of the docker CLI and you must use Kubernetes
configuration files instead of docker compose files.

The fact that Kubernetes has such a detailed set of concepts independent
of core Docker is not in itself a bad thing. Kubernetes offers a much
richer feature set than core Docker. However, Docker will add more
features to compete with Kubernetes with divergent implementations and
divergent or conflicting concepts. This will almost surely repeat the
CoreOS/rkt situation with large portions of the community working on
similar but competing solutions. Today, Docker Swarm and Kubernetes
target very different use cases (Kubernetes is much more suitable for
large production deployments of service-oriented architectures with
dedicated cluster-management teams) however as Docker Native
Orchestration matures it will move into this space.

Feature Set

The full feature set of Kubernetes is much too large to cover in this
article, but we will go over some basic concepts and some interesting
differentiators. Firstly, Kubernetes uses the concept of Pods as its
basic unit of scaling instead of single containers. Each pod is a set of
containers (set may be size one) which are always launched on the same
node, share the same volumes and are assigned a Virtual IP (VIP) so they
can be addressed in the cluster. A Kubernetes spec file for a single pod
may look like the following.

kind: Pod
metadata:
  name: mywebservice
spec:
  containers:
  - name: web-1-10
    image: nginx:1.10
    ports:
    - containerPort: 80

Next you have deployments; these loosely map to what services are in
Docker Native orchestration. You can scale the deployment much like
services in Docker Native and a deployment will ensure the requite
number of containers is running. It is important to note that
deployments only analogous to replicated service in docker native as
Kubernetes uses the Daemon Set concept to support its equivalent of
globally scheduled services. Deployments also support Health checks
which use HTTP or TCP reachability or custom exec commands to determine
if a container/pod is healthy. Deployments also support rolling
deployments with automatic rollback using the health check to determine
if each pod deployment is successful.

kind: Deployment
metadata:
  name: mywebservice-deployment
spec:
  replicas: 2 # We want two pods for this deployment
  template:
    metadata:
      labels:
        app: mywebservice
    spec:
      containers:
      - name: web-1-10
        image: nginx:1.10
        ports:
        - containerPort: 80

Next you have Kubernetes Services which provide simple load balancing to
a deployment. All pods in a deployment will be registered with a service
as they come and go, and services also abstract away multiple
deployments so that if you want to run rolling deployments you will
register two Kubernetes deployments with the same service, then
gradually add pods to one while reducing pods from the other. You can
even do blue-green deployments where you point the service at a new
Kubernetes deployment in one go. Lastly, services are also useful for
service discovery within your Kubernetes cluster, all services in the
cluster get a VIP and are exposed to all pods in the cluster as docker
link style environment variables as well as through the integrated DNS
server.

In addition to basic services, Kubernetes supports
Jobs, Scheduled
Jobs
, and Pet
Sets
.
Jobs create one or more pods and wait until they terminate. A job makes
sure that the specified number of pods terminate successfully. For
example, you may start a job to start processing business intelligence
data for 1 hour in the last day. You would launch a job with 24 pods for
the previous day and once they are all run to completion the job is
done. A scheduled job as the name suggests is a job that is
automatically run, on a given schedule. In our example, we would
probably make our BI processor a daily scheduled job. Jobs are great for
issuing batch style work loads to your cluster which are not services
that always need to be up but instead tasks that need to run to
completion and then be cleaned up.

Another extension that Kubernetes provides to basic services is Pet
Sets. Pet sets support stateful service workloads that are normally very
difficult to containerize. This includes databases and real-time
connected applications. Pet sets provide stable hostnames for each
“pet” in the set. Pets are indexed; for example, pet5 will be
addressable independently of pet3, and if the 3rd pet container/pod dies
it will be relaunched on a new host with the same index and hostname.

Pet Sets also provide stable storage using persistent
volumes
, i.e
if pet1 dies and is relaunched on another node it will get its volumes
remounted with the original data. Furthermore you can also use NFS or
other network file systems to share volumes between containers, even if
they are launched on different hosts. This addressed one of the most
problematic issues when transitioning from single-host to distributed
docker environments.

Pet sets also provide peer-discovery, with normal services you can
discover other services (through Docker linking etc) however,
discovering other container within a service is not possible. This makes
gossip protocol based services such as Cassandra and Zookeeper very
difficult to launch.

Lastly, Pet Sets provide startup and tear down ordering which is
essential for persistent, scalable services such as Cassandra. Cassandra
relies on a set of seed nodes, and when you scale your service up and
down you must ensure the seed nodes are the first ones to be launched
and the last to be torn down. At the time of writing of this article,
Pet Sets are one of the big differentiators for Kubernetes, as
persistent stateful workloads are almost impossible to run at production
scale on Docker without this support.

Kubernetes also
provides namespaces
to isolate workloads on a cluster, secrets
management
and
auto-scaling
support. All these features an more mean that Kubernetes is also to
support large, diverse workloads in a way that Docker Swarm is just not
ready for at the moment.

Marathon

Basic Architecture

Another common orchestration setup for large scale clusters is to run
Marathon on top of Apache Mesos. Mesos is an open source cluster
management system that supports a diverse arrays of workloads. Mesos is
composed of a Mesos agent running on each host in the cluster which
reports its available resources to the master. There can be one or more
Mesos masters which coordinate using a Zookeeper cluster. At any given
time one of the masters nodes is active using a master election process.
The master can issue tasks to any of the Mesos agents, and will report
on the status of those tasks. Although you can issue tasks through the
API, the normal approach is to use a framework on top of Mesos. Marathon
is one such framework which provides support for running Docker
containers (as well as native Mesos containers).

Usability

Again compared to Swarm, Marathon has a fairly steep learning curve as
it does not share most of the concepts and terminology with Docker.
However, Marathon is not as feature rich, and is thus easier to learn
than Kubernetes. However, the complexity of managing a Marathon
deployment comes from the fact that it is layered on top of Mesos and
hence there are two layers of tools to manage. Furthermore, some of the
more advanced features of Marathon such as load balancing are only
available as additional frameworks that run on top of Marathon. Some
features such as authentication are only available if you run Marathon
on top of DC/OS, which in turns run on top of Mesos – adding yet another
layer of abstraction to the stack.

Feature Set

To define services in Marathon, you need to use its internal JSON
format as shown below. A simple definition like the one below will
create a service with two instances each running the nginx container.

{
  "id": "MyService"
  "instances": 2,
  "container": {
    "type": "DOCKER",
    "docker": {
      "network": "BRIDGE",
      "image": "nginx:latest"
    }
  }
}

A slightly more complete version of the above definition is shown below,
we now add port mappings and the health check. In port mapping, we
specify a container port, which is the port exposed by the docker
container. The host port defines which port on the public interface of
the host is mapped to the container port. If you specify 0 for host
port, then a random port is assigned at run-time. Similarly, we may
optionally specify a service port. The service port is used for service
discovery and load balancing as described later in this section. Using
the health check we can now do both rolling (default) and blue-green
deployments
.

{
  "id": "MyService"
  "instances": 2,
  "container": {
    "type": "DOCKER",
    "docker": {
      "network": "BRIDGE",
      "image": "nginx:latest"
      "portMappings": [
        { "containerPort": 8080, "hostPort": 0, "servicePort": 9000, "protocol": "tcp" },
      ]
    }
  },
  "healthChecks": [
    {
      "protocol": "HTTP",
      "portIndex": 0,
      "path": "/",
      "gracePeriodSeconds": 5,
      "intervalSeconds": 20,
      "maxConsecutiveFailures": 3
    }
  ]
}

[[In addition to single services, you can define Marathon Application
Groups, with a nested tree structure of services. The benefit of
defining application in groups is the ability to scale the entire group
together. This can be very useful in microservice stacks where tuning
individual services can be difficult. As of now, the scaling assumes
that all services will scale at the same rate so if you require ‘n’
instances of one service, you will get ‘n’ instances of all services.
] ]

{
  "id": "/product",
  "groups": [
    {
      "id": "/product/database",
      "apps": [
         { "id": "/product/mongo", ... },
         { "id": "/product/mysql", ... }
       ]
    },{
      "id": "/product/service",
      "dependencies": ["/product/database"],
      "apps": [
         { "id": "/product/rails-app", ... },
         { "id": "/product/play-app", ... }
      ]
    }
  ]
}

In addition to being able to define basic services, Marathon can also do
scheduling of containers based on specified constraints as detailed
here,
including specifying that each instance of the service must be on a
different physical host “constraints“: [[“hostname“,
“UNIQUE”]].
You can use the cpus and mem tags to specify the
resource utilization of that container. Each Mesos agent reports its
total resource availability hence the scheduler can place workloads on
hosts in an intelligent fashion.

By default, Mesos relies on the traditional Docker port mapping and
external service discover and load balancing mechanisms. However, recent
beta features add support for DNS based service discovery using Mesos
DNS
or Load balancing using
Marathon LB. Mesos DNS is
an application that runs on top of Mesos and queries the Mesos API for a
list of all running tasks and applications. It then creates DNS records
for nodes running those tasks. All Mesos agents then manually need to be
updated to use Mesos DNS service as its primary DNS server. Mesos DNS
uses the hostname or IP address used to register Mesos agents with the
master; and Port mappings can be queried as SRV records. Since Marathon
DNS works on agent hostnames, and there for the host network ports must
be exposed and hence must not collide. Mesos DNS does provide a way to
refer to individual containers persistently for stateful workloads such
as we would be able to using Kubernetes pet sets. In addition, unlike
Kubernetes VIPs which are addressable on any container in the cluster,
we must manually update /etc/resolve.conf to the set of Mesos DNS
servers and update the configuration if the DNS servers change.
Marathon-lb uses the Marathon Event bus to keep track of all service
launches and tear-downs. It then launches a HAProxy instance on agent
nodes to relay traffic to the requisite service node.

Marathon also has beta support for persistent
volumes
as
well as external persistent
volumes
.
However, both of these features are in a very raw state. Persistent
volumes are only persistent on a single node across container restarts,
volumes are deleted if the application using them is deleted however,
the actual data on disk is not deleted and must be removed manually.
External volumes require DC/OS and currently only allow your service to
scale to single instance.

Final Verdict

Today we have looked at three options for Docker container
orchestration: Docker Native (Swarm), Kubernetes and Mesos/Marathon. It
is difficult to pick a system to recommend because the best system is
highly dependent on your use case, scale and history. Furthermore, all
three systems are under heavy development and some of the features
covered are in beta and may be changed, removed or replaced very soon.

Docker Native gives you the quickest ramp-up with little to no vendor
lock-in beyond dependence on Docker. The dependence on Docker is not a
big issue, since it has become the defacto container standard. Given the
lack of a clear winner in the orchestration wars and the fact that
Docker native is the most flexible approach, it is a good choice for
simple web/stateless applications. However, Docker Native is very bare
bones at the moment and if you need to get complicated, larger-scale
applications to production you need to choose one of Mesos/Marathon or
Kubernetes.

Between Mesos/Marathon and Kubernetes is also not an easy choice as both
have their pros and cons. Kubernetes is certainly the more feature rich
and mature of the two, but it is also a very opinionated piece of
software. We think a lot of those opinions make sense, but Kubernetes
does not have the flexibility of Marathon. This makes sense when you
consider the rich history of non-Docker, non-containerized applications
that can run on Mesos in addition to Marathon (e.g. Hadoop clusters). If
you are doing a green field implementation and either don’t have strong
opinions about how to layout clusters, or your opinions agree with those
of Google, then Kubernetes is a better choice. Conversely, if you have
large, complicated legacy workloads that will gradually shift over to
containers then Mesos/Marathon is the way to go.

Another concern is scale: Kubernetes has been tested to thousands of
nodes, whereas Mesos has been tested to tens of thousands of nodes. If
you are launching clusters with tens of thousands of nodes, you’ll want
to use Mesos for the scalability of the underlying infrastructure – but
note that scaling advanced features such as load balancing to that range
will still be left to you. However, at that scale, few (if any)
off-the-shelf solutions work as advertised without careful tuning and
monkey patching.

Usman is a server and infrastructure engineer, with experience in
building large scale distributed services on top of various cloud
platforms. You can read more of his work at
techtraits.com, or follow him on twitter
@usman_ismailor
on GitHub.

You might also be interested in:
A Detailed Overview of Rancher’s Architecture
This newly-updated, in-depth guidebook provides a detailed overview of the features and functionality of the new Rancher: an open-source enterprise Kubernetes platform.

Rancher Labs Introduces Global Partner Network

Tuesday, 18 October, 2016

Consulting and reseller partner programs expand company’s global reach;
Service provider program helps partners deliver Containers-as-a-Service
and other Rancher-powered offerings
**Cupertino, Calif. – October 18,
2016 – **Rancher Labs, a provider of container
management software, today announced the launch of the Rancher Partner
Network, a comprehensive partner program designed to expand the
company’s global reach, increase enterprise adoption, and provide
partners and customers with tools for success. The program will support
consultancies and systems integrators, as well as resellers and service
providers worldwide, with initial partners from North and South America,
Europe, Asia and Australia. As the only container management platform to
ship with fully supported commercial distributions of Kubernetes, Docker
Swarm and Mesos, Rancher is unique in its ability to enable partners to
deliver container-based solutions using the customer’s choice of
orchestration tool. “Community interest in Rancher’s open and
easy-to-use container management platform has shattered expectations,
with over a million downloads and over ten million Rancher nodes
launched since this year alone,” said Shannon Williams, co-founder and
vice president of sales and marketing at Rancher Labs. “To help us meet
demand within the enterprise, we’re partnering with leading DevOps
consultancies, system integrators and service providers around the
world. We’re excited and humbled by the strong interest we’ve seen from
the partner community, and we’re looking forward to working with our
partners to help make containers a reality for our joint customers.”
The Rancher Partner Network The Rancher Partner Network provides
tools and support to meet the unique needs of each of type of partner.
The Network includes:

  • Consulting partners such as consultancies, system integrators (SIs),
    and agencies focused on helping customers successfully embrace
    digital transformation and rapidly deliver software using modern,
    open processes and technologies.
  • Resellers and OEMs that include Rancher in solutions they deliver to
    customers.
  • Managed services providers (MSPs) and cloud providers offering
    Rancher-based Containers-as-a-Service (CaaS) environments to
    end-users.
  • Application services providers (ASPs) delivering
    Software-as-a-Service (SaaS) and hosted applications on a
    Rancher-powered platform.

Partners benefit from a variety of sales, marketing, product, training
and support programs aimed at helping them ensure customer success while
capturing a greater share of the rapidly growing container marketplace.
Additionally, members of the service provider program can take exclusive
advantage of a unique pricing model specifically designed for and
exclusively available to that community. Prospective partners can learn
more about the program and apply by visiting
www.rancher.com/partners. Customers
can visit the same page to identify Rancher-authorized consultancies,
resellers and service providers in their area. Supporting Quotes “At
Apalia, we have extensive experience delivering software-defined
infrastructure and cloud solutions to a variety of enterprise customers
in France and Switzerland. As those customers began looking to take
advantage of containers, we needed a partner that supported the full
range of infrastructure we deliver, as well as emerging options in the
space. We’re thrilled to be partnering with Rancher to do so.” Pierre
Vacherand, CTO, Apalia
“As a container and cloud
company our clients have diverse levels of expertise and support
workloads utilizing Mesos, Kubernetes and Docker. With Rancher’s
ease-of-use and excellent support for multiple schedulers this
partnership was a natural fit for us.” Steven Borrelli, Founder & CEO,
Asteris
“Our business is delivering
mission-critical infrastructure and software solutions to government and
enterprise customers in Brazil. To do this, we partner with a variety of
IT industry leaders such as Oracle, IBM, Microsoft and Amazon Web
Services. Adding the capabilities of Rancher Labs complements all of
these and allows us, as a service provider, to easily support the
emerging container needs of these customers.” Hélvio Lima, CEO,
BRCloud
“Since 2001, Camptocamp has
established itself as a leading supporter of, and contributor to, open
source software. Our infrastructure solutions team uses open source to
deliver a full range of cloud migration, IT & DevOps automation, and
application deployment solutions to customers in Switzerland, France,
Germany and beyond. Rancher helps us deliver modern, containerized
applications across a wide range of cloud and on-premises
infrastructure, and easily works with the other open source products we
like.” Claude Philipona, Managing Partner,
Camptocamp
“Containers are an important
element of the emerging enterprise execution platform. Rancher’s
Application Catalog allows Data Essential customers to deploy custom
applications as well as big data and analytics software with a single
click, allowing their staff to get more done, more quickly. As one of
Rancher Labs’ first partners in Europe, the relationship has been
invaluable in helping us address this need.” Jonathan Basse, Founder,
Data Essential
“At Industrie IT, we
are committed to helping companies succeed with, and benefit from, top
technologies available today. Containers and DevOps have become a major
part of this, and we’re thrilled to be partnering with Rancher Labs to
enable customers to take advantage of the benefits.” Ameer Deen,
Director of On Demand Platforms, Industrie
IT
“We were quick to recognize the extremely
vibrant community that has formed around Rancher and its products,
having leaned on it for support during an early deployment. Establishing
ourselves as experts through active contributions in the community has
led to a number of opportunities for us in Europe and Asia. We’re
excited to take advantage of new ways to engage with Rancher through
this program.” Girish Shilamkar, Founder and CEO,
InfraCloud
“Nuxeo is a fast-growing company
offering an open source, hyperscale digital asset platform used by
customers like Electronic Arts, TBWA, and the U.S. Navy. Containers are
an important part of our cloud strategy, and we depend on our partner
Rancher to make them easy to use and manage. The Service Provider
program provides a flexible product with an equally flexible pricing
model and support, making it a perfect & future-proofed fit for our
cloud computing efforts.” Eric Barroca, CEO, Nuxeo
“Object Partners has been developing custom software solutions for our
clients since 1996. Our solutions enable our clients to leverage the
latest in language, framework, and cloud technologies to lower costs and
maximize profits. Rancher is helping us to bring the latest in container
technologies to our clients. Its intuitive, comprehensive, and
easy-to-manage platform is enabling our clients to create scalable,
highly available, and continuously deployed platforms for their
applications. Rancher’s new partner program will be a great resource for
us as we continue to grow our DevOps business.” John Engelman, Chief
Software Technologist, Object Partners

“The Persistent ‘Software 4.0’ vision is about helping enterprises in
healthcare, financial services and other industries put the people,
processes and tools in place in order to build software-driven
businesses and manage software-driven projects at speed. The container
technology that Rancher has developed is enabling DevOps teams in
realizing this vision.” Sudhir Kulkarni, President Digital at
Persistent Systems
“Our engineers and
consultants have come to love Rancher’s open source product, leading to
multiple successful customer deployments and happy customers. We’re
excited for the launch of Rancher’s formal partner program and looking
forward to continued success with their team.” Josh Lindenbaum, VP,
Business & Corporate Development, Redapt

“Treeptik is building upon an extensive history of delivering cloud and
Java/JEE-based solutions for European enterprises, helping customers
transform all aspects of the software development process. We were early
to recognize the significance of containers, and our team has been early
pioneers of using Docker, Mesos and Kubernetes. We’re big fans of
Rancher because it makes this easier than any other tool out there, and
we’re excited to be a part of the company’s partner program.” Fabien
Amico, Founder & CTO, Treeptik

Supporting ResourcesIntroducing the Rancher Partner
Network

Partner Network Program page
Partner Network directory
Company Blog
Twitter

About Rancher Labs Rancher Labs builds innovative, open source
container management software for enterprises leveraging containers to
accelerate software development and improve IT operations. With
commercially-supported distributions of Kubernetes, Mesos, and Docker
Swarm, our flagship Rancher platform allows users to manage all aspects
of running containers in development and production environments. For
additional information, please visit
www.rancher.com. Contact Eleni Laughlin
Mindshare PR

Tags: , Category: Rancher Blog Comments closed