Using IPtables Masquerade on SUSE Linux in Azure to migrate data to HLI
Abstract and problem statement
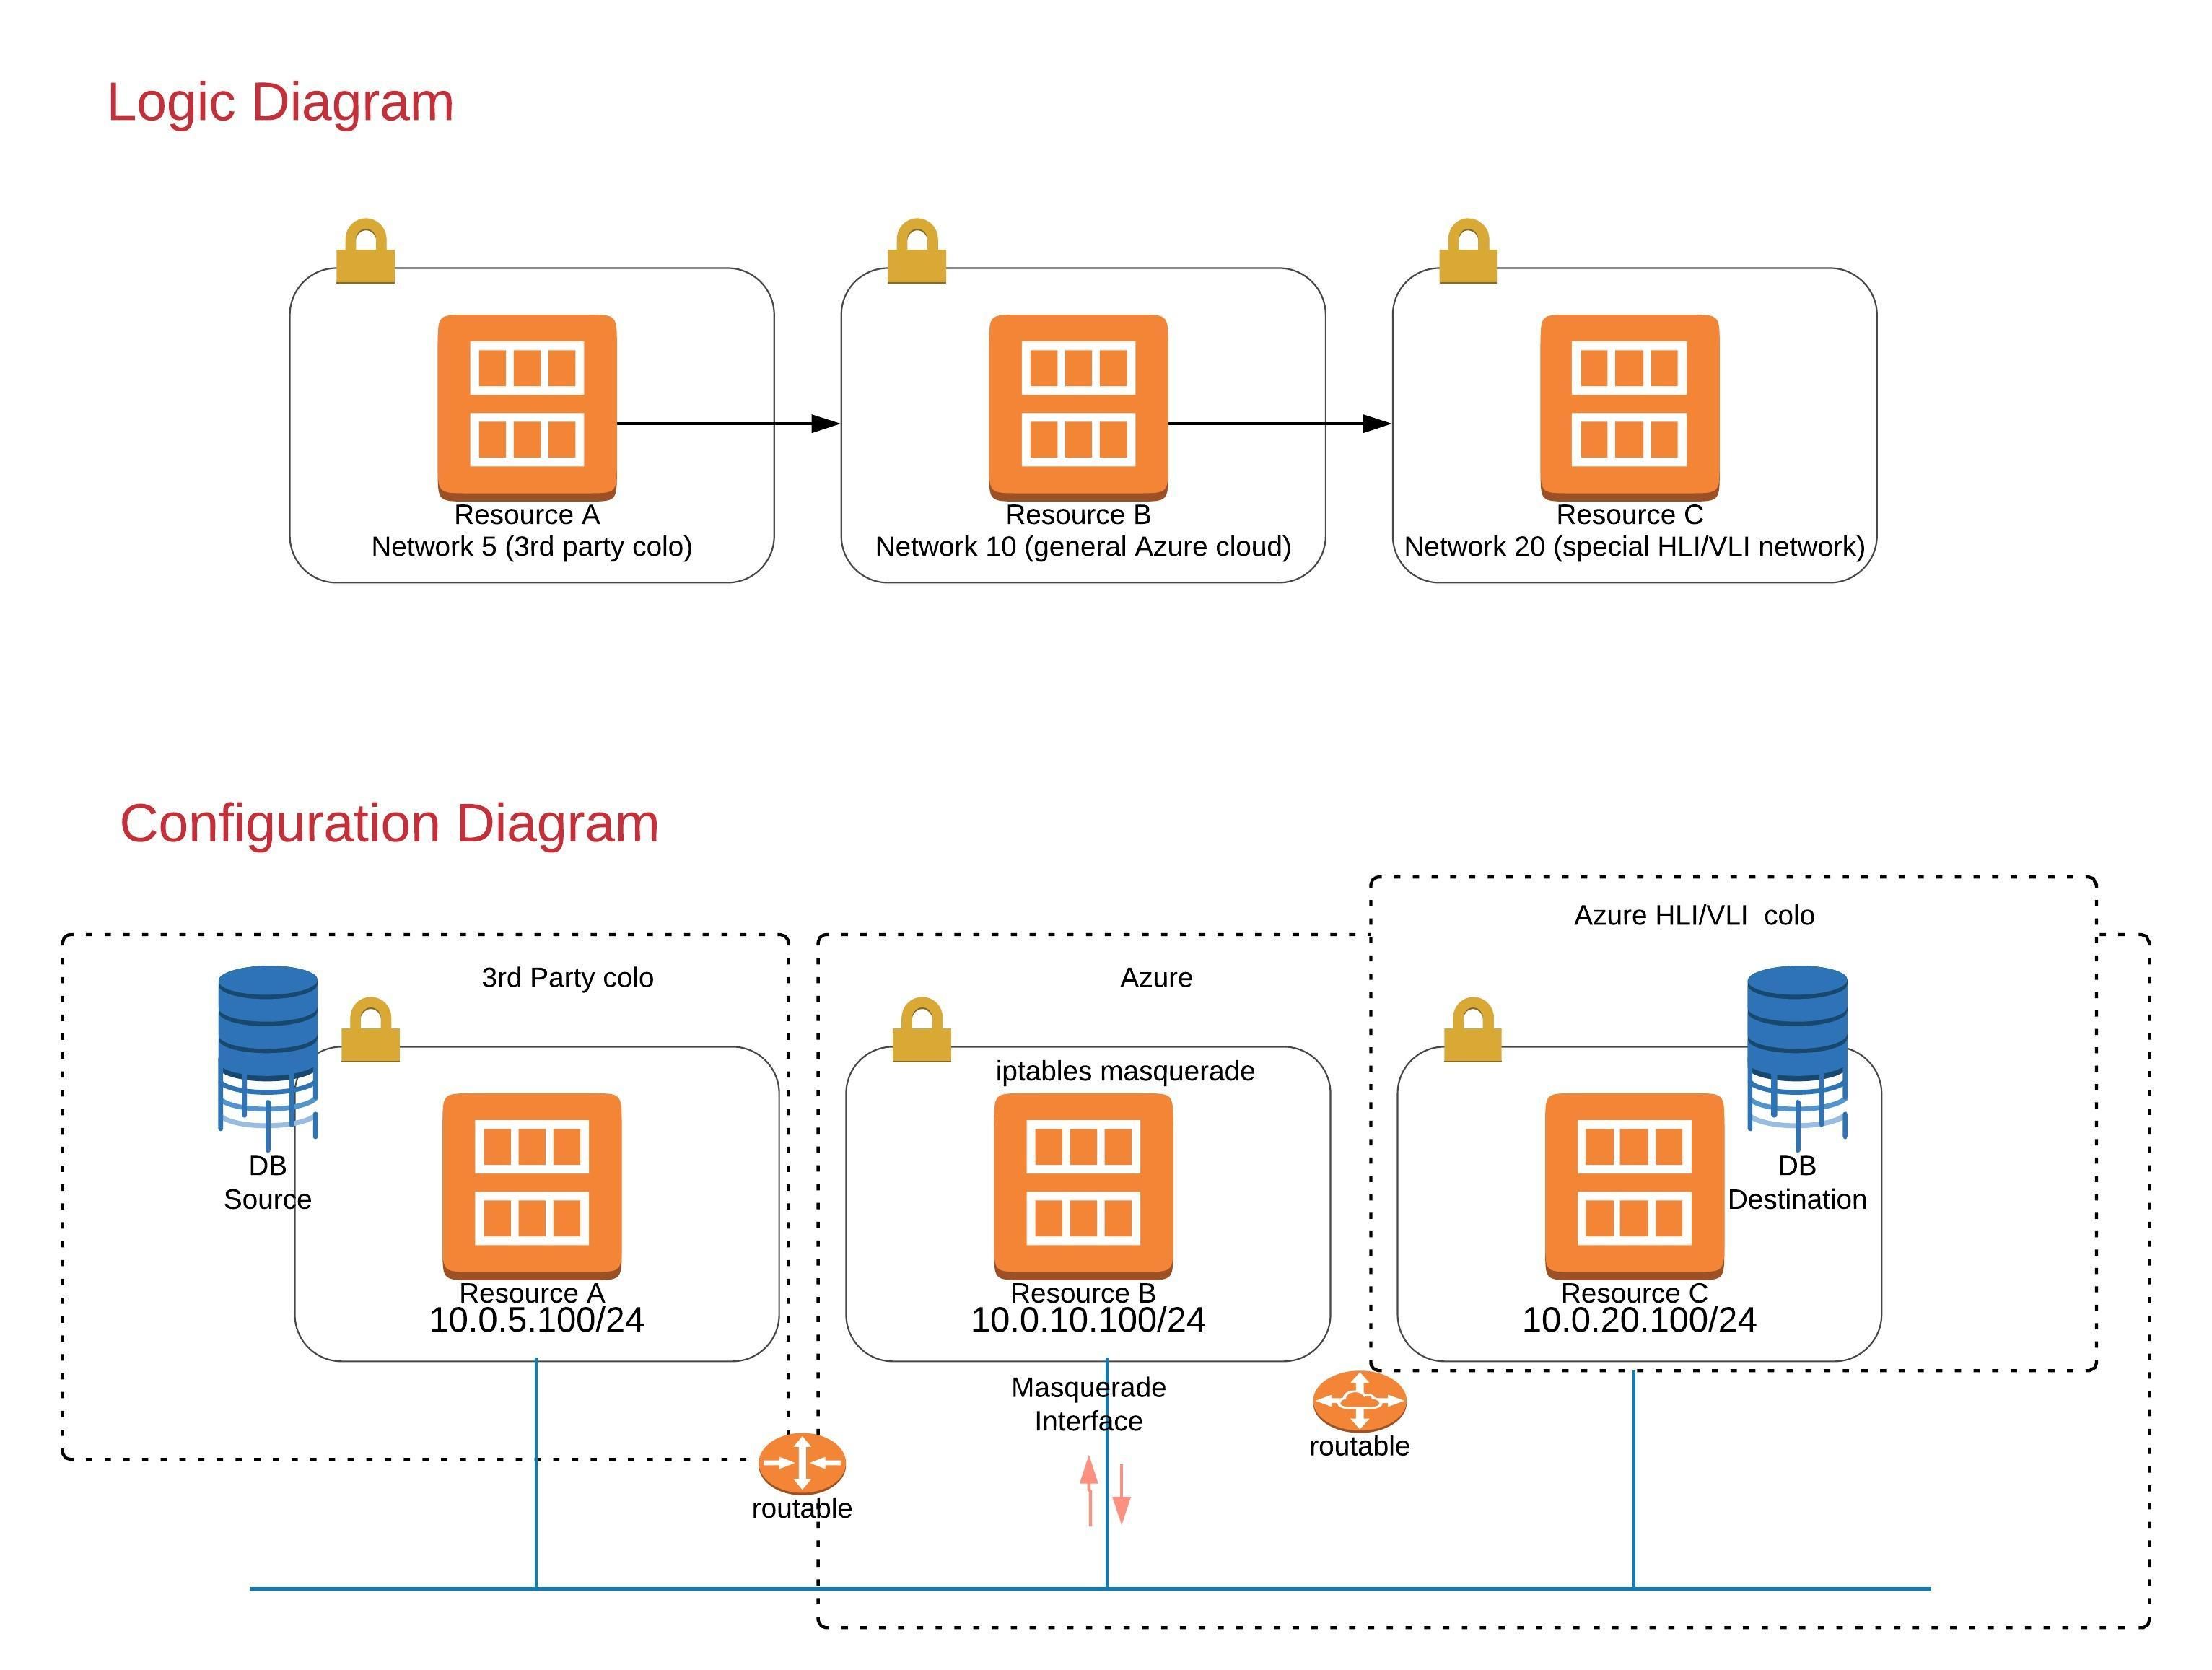
It is sometimes necessary to bridge two security or routing domains with an intermediary system configured to forward, tunnel, or Masquerade traffic between the source and final destination node. This solution was derived from a recent customer request, while moving their SAP Hana DB from a remote datacenter facility to the MS internal Azure Hana Large Instance (HLI) environment. This was a data migration effort.
A solution is needed because there is no direct transit route between the two. It’s possible for the remote facility to reach the common Azure cloud (routes, public NAT IP’s and security ACL’s can be created to allow this), and for the common Azure cloud to reach the internal Azure HANA Large Instance (HLI) or HANA Very Large Instance (VLI) environments via internal routing and security rules, but no transverse routing exists from end-end for the remote facility from the public internet. Therefore, we must use the Azure common cloud as the intermediary destination between the two disparate routing and security domains. This was solved using SUSE Linux Enterprise Server with IPtables Masquerading by placing a Masquerade Virtual Machine instance in the common Azure cloud.
This use-case is similar in principle to “Technique 2” discussed here: https://blogs.msdn.microsoft.com/saponsqlserver/2018/02/10/setting-up-hana-system-replication-on-azure-hana-large-instances/
For our solution however, we will use IP masquerading. A major difference between IP masquerading and IP Proxy is that with masquerading, no configuration change is required on the sending and receiving clients. The masquerade host must be treated as the destination for all traffic. This is fundamentally different from the solution linked above, which binds a second IP address to the interface of the IPtables node in order to mimic the final destination HLI node.
In our real-world example, the main purpose was to migrate data and services to a new location, and not to create a performant environment for bi-directional fault tolerance or disaster recovery. A basic illustration of this scenario is diagramed below. In this document we will test the basic forwarding rule functions by sourcing SSH traffic on a special TCP port 40022, The masquerade rules will interpret and forward using the standard SSH TCP port 22, leaving Node A unaware of Node C and vice-versa.. In this way, we can demonstrate the translation taking place. For actual HANA system replication or other applications, you would need to adjust the prerouting rules accordingly, to accommodate those protocols and sockets.
This configuration represents a simple functional solution designed for one-time data migration, and yet the logic can be applied to bi-directional synchronization for DR or other scenarios. The configuration would need to be modified for bi-directional replication, performance, or even a DR scenario. For the configuration of a production system on Azure Compute or Amazon EC2, for example, bi-directional rules, multiple failure domains and improved networking would be essential.
It’s also important to note that while this solution was leveraged inside MS Azure, it was then duplicated in KVM and finally on AWS. It can be easily replicated on any virtual or physical environment where a single extra SUSE Linux host or instance can be instantiated to solve the forwarding issue.
Problem Statement Pictorial
Cloud configuration
In real life, the hosts would be behind a NAT or firewall and be presented by an outside public interface as the sending source. Let’s simplify it. For lab purposes, let us assume that the following statements are true.
Route Tables, ACL’s, and Security Groups are configured to support the following.
- Node A represents the remote datacenter facility and migration source. An example might be a colocation facility in some public datacenter provider space (a cage.)
- Node A resides in the 10.0.5.0/24 network
- Node A can only reach Host B.
- Node B
- Resides in the 10.0.10.0/24 network.
- Node B can reach Nodes A and C. This becomes our Masquerade node.
- Node C
- Resides in 10.0.20.0/24.
- Can only reach node B.
Considering performance
Environmental requirement for this PoC: Node B has only a single NIC. All ingress and egress traffic between nodes will travers this single virtual 1GBps NIC. This was a condition in our set of requirements from the customer. The goal was an eventual 1-way migration of data.
This solution would have a maximum throughput rate of 125 MBps or less due to the single shared virtual NIC, barring any other QoS limitations against the VM instance or within the shared infrastructure.
Gigabit Ethernet runs up to 125 MBps (1,000 Mbps / 8 = 125 MBps.) Due to the nature of traffic flows on a virtual network device, throughput will likely be closer to half this amount, or 62MBps.
Latency due to localization, the software virtualization stack, congestion on shared infrastructure, or other factors will further affect throughput.
Other configurations are certainly possible, such as multiple bonded NIC’s or Enhanced 10GB or better networking.
All 3 SLES 12 sp3 instances were instantiated with default settings and without a desktop environment. Your installation options may vary depending upon the hardware or hosting environment.
Let’s get it configured!
Verify routes on Node A
# route -n
Kernel IP routing table
Destination Gateway Genmask Flags Metric Ref Use Iface
0.0.0.0 10.0.5.1 0.0.0.0 UG 0 0 0 eth0
10.0.5.0 0.0.0.0 255.255.255.0 U 0 0 0 eth0
Verify routes, iptables version and firewall status on Node B
# route -n
Kernel IP routing table
Destination Gateway Genmask Flags Metric Ref Use Iface
0.0.0.0 10.0.10.1 0.0.0.0 UG 0 0 0 eth0
10.0.10.0 0.0.0.0 255.255.255.0 U 0 0 0 eth0
# iptables -V
iptables v1.4.21
#systemctl is-enabled SuSEfirewall2
disabled
(a future blog may cover the use of the SUSE firewall service as an alternate solution.)
Routes on Node C
# route -n
Kernel IP routing table
Destination Gateway Genmask Flags Metric Ref Use Iface
0.0.0.0 10.0.20.1 0.0.0.0 UG 0 0 0 eth0
10.0.20.0 0.0.0.0 255.255.255.0 U 0 0 0 eth0
Testing will be done from Node A and monitored on Nodes B and C. We recommend configuring password-less SSH logins from node A to node C. Alternatively you could enable username and password connections as illustrated below. It is not necessary to configure this credential on Node B.
Create a user on node C and enable password based authentication
# useradd -m -d /home/TestUser -c “IPtables Test” TestUser
# passwd TestUser
# sed -i ‘s|[#]*PasswordAuthentication no|PasswordAuthentication yes|g’ /etc/ssh/sshd_config
# cat /etc/ssh/sshd_config |grep “PasswordAuthentication yes”
PasswordAuthentication yes
# systemctl restart sshd && systemctl status sshd |tail -5
…
May 11 21:10:52 ip-10-0-20-100 systemd[1]: Started OpenSSH Daemon.
All additional configuration is done on node B
Enable persistent IP forwarding
# echo “net.ipv4.ip_forward=1” >> /etc/sysctl.d/99-sysctl.conf
# sysctl -p
# sysctl net.ipv4.ip_forward
net,ipv4.ip_forward = 1
Verify persistentence
# reboot
# sysctl net.ipv4.ip_forward
net,ipv4.ip_forward = 1
Configure iptables rules to NAT table and PREROUTING Chain to support SSH traffic from node A to Destination NAT of Node C
# iptables -t nat -A PREROUTING -p tcp -s 10.0.5.100 –dport 40022 -j DNAT –to-destination 10.0.20.100:22
Enable the Masquerade function for the nay table on the POSTROUTING chain
# iptables -t nat -A POSTROUTING -j MASQUERADE
Configure Node B to survive reboots.
#iptables-save > /var/iptables.save
File looks similar to this.
# cat /var/iptables.save
# Generated by iptables-save v1.4.21 on Fri May 11 19:13:24 2018
*nat
:PREROUTING ACCEPT [0:0]
:INPUT ACCEPT [0:0]
:OUTPUT ACCEPT [1:76]
:POSTROUTING ACCEPT [0:0]
-A PREROUTING -s 10.0.5.100/32 -p tcp -m tcp –dport 40022 -j DNAT –to-destination 10.0.20.100:22
-A POSTROUTING -j MASQUERADE
COMMIT
# echo “iptables-restore /var/iptables.save” >> /etc/init.d/after.local
# cat /etc/init.d/after.local |grep “iptables-restore /var/iptables.save”
iptables-restore /var/iptables.save
SSH test from Node A to Node B
(forwarded to node C) The “TestUser” only exists on node C
# ssh TestUser@10.0.10.100 -p 40022
Have a lot of fun…
TestUser@ip-10-0-20-100:~>
View rule hits on Node B – Example:
# iptables -t nat -L -n -v
Chain PREROUTING (policy ACCEPT 3 packets, 180 bytes)
pkts bytes target prot opt in out source destination
0 0 DNAT tcp — * * 10.0.5.100 0.0.0.0/0 tcp dpt:40022 to:10.0.20.100:22
…
6 672 MASQUERADE all — * * 0.0.0.0/0 0.0.0.0/0
On Node C, confirm connection source using netstat and tcpdump
We should see the SSH connection as coming from Node B. You may have to refresh your SSH session to see additional output.
# tcpdump -i eth0 src 10.0.10.100 -vv
20:12:18.482889 IP (tos 0x10, ttl 63, id 25893, offset 0, flags [DF], proto TCP (6), length 52)
10.0.10.100.58056 > 10.0.20.100.ssh: Flags [.], cksum 0x2432 (correct), seq 2693, ack 3150, win 272, options [nop,nop,TS val 216308186 ecr 326450094], length 0
# netstat -tan | grep “:22\|ssh” | grep -v “LISTEN” | awk ‘{print ” “$4” -> “$5” “$6}’
10.0.20.100:22 -> 66.235.19.xxx:51180 ESTABLISHED (this is the admin workstation)
10.0.20.100:22 -> 10.0.10.100:58058 ESTABLISHED (this is node B)
Complete and test
Reboot all Nodes and repeat tests to verify configuration.
Next Documentation Steps: Create a more elegant solution with multiple high speed NIC’s or pass through tunneling.
Future Example Use Case: High Speed Bi-directional replication for DR/BC.
Additional references
https://www.debuntu.org/how-to-redirecting-network-traffic-to-a-new-ip-using-iptables/
https://www.suse.com/documentation/sles10/book_sle_reference/data/sec_fire_masq.html
Related Articles
Jul 27th, 2022
No comments yet