手把手教你搭建SUSE HA高可用(内有视频)
本文是手把手教学系列之一:手把手教你搭建SUSE HA,由SUSE技术专家陈希典提供。
SUSE Linux Enterprise High Availability Extension是一个基于开源pacemaker群集技术的集成套件,使您能够实现高度可用的物理和虚拟 Linux 群集,并排除单一故障点。它确保了关键网络资源(包括数据、应用程序和服务)的高可用性和可管理性。因此,它有助于维持业务连续性、保护数据完整性及减少 Linux 关键任务工作负荷的计划外停机时间。
下面手把手演示如何搭建SUSE HA。
1. 环境
1.1. 软件需求
- SUSE Linux Enterprise Server 12 SP4 x86_64
- SUSE Linux Enterprise High Availability Extension 12 SP4
1.2. 系统仓库需求
# zypper lr
# | Alias | Name | Enabled | GPG Check | Refresh
–+———————+———————+———+———–+——–
1 | SLEHA-12SP4-Pool | SLEHA-12SP4-Pool | Yes | (r ) Yes | No
2 | SLEHA-12SP4-Updates | SLEHA-12SP4-Updates | Yes | (r ) Yes | No
3 | SLES12SP4_Pool | SLES12SP4_Pool | Yes | (r ) Yes | No
4 | SLES12SP4_Updates | SLES12SP4_Updates | Yes | (r ) Yes | No
1.3. HA架构
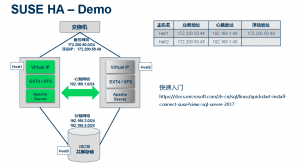
1.4. 网络架构
| 主机名 | 心跳地址 | 业务地址 | 虚拟地址 |
| ha01 | 192.168.2.44 | 172.200.50.44 | 172.200.50.49 |
| ha02 | 192.168.2.45 | 172.200.50.45 |
2. 安装部署 HA
2.1. 安装HA软件
- 命令方式:
# zypper pt
# zypper -n in –auto-agree-with-licenses -t pattern ha_sles
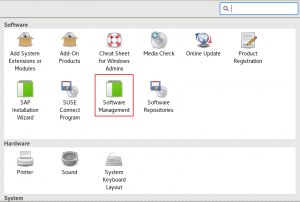
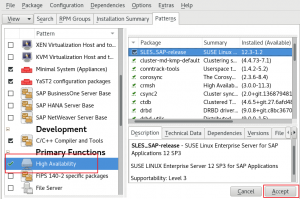
- 图形化方式:

2.2. Hosts文件
配置文件/etc/hosts (ha01 ha02 节点)
# vim /etc/hosts
192.168.1.44 ha01.example.com ha01 # 心跳网络
192.168.1.45 ha02.example.com ha02
2.3. NTP设置
注意:如果客户这里有NTP服务器,直接设置指定,没有按下面配置
ha01主机
# vim /etc/ntp.conf
server 127.127.1.0 # local clock (LCL)
fudge 127.127.1.0 stratum 10 # LCL is unsynchronized
# systemctl start ntpd.service
# systemctl enable ntpd.service
# ntpq -p
remote refid st t when poll reach delay offset jitter
==============================================================================
*LOCAL(0) .LOCL. 10 l 13 64 377 0.000 0.000 0.000
ha02主机
# vim /etc/ntp.conf
server ha01 iburst
# systemctl start ntpd.service
# systemctl enable ntpd.service
2.4. 配置SBD屏蔽磁盘
- 查看两边集群节点是否有相同大小的3块磁盘(设备名按实际情况设置)
# lvmdiskscan
/dev/vg00/lvswap [ 2.00 GiB]
/dev/sda1 [ 1.00 GiB]
/dev/root [ 26.98 GiB]
/dev/sda2 [ 29.00 GiB] LVM physical volume
/dev/mapper/mpathf [ 1.00 GiB]
/dev/mapper/mpathe [ 1.00 GiB]
/dev/mapper/mpathh [ 5.00 GiB]
/dev/mapper/mpathg [ 1.00 GiB]
- 设置检查包 (ha01,ha02)
# echo softdog > /etc/modules-load.d/watchdog.conf
# systemctl restart systemd-modules-load
# echo “modprobe softdog” >> /etc/init.d/boot.local
# modprobe softdog
# lsmod | grep softdog
# ll /dev/watchdog
- 创建SBD分区
# sbd -d /dev/mapper/mpathe -d /dev/mapper/mpathg -d \
/dev/mapper/mpathf -4 180 -1 90 create
- 两个timeout 解释
-4 选项用于指定 msgwait 超时。在以上示例中,超时设置为 60 秒。
-1 选项用于指定 watchdog 超时。在以上示例中,超时设置为 30 秒。模拟检查包的最小允许值为 15 秒。
如果 SBD 设备驻留在多路径组上,则需要调整 SBD 所用的超时,因为 MPIO 的沿路径检测可能导致一些等待时间。msgwait超时后,将假定此消息已传递到节点。对于多路径,这应是MPIO检测路径故障并切换到下一个路径所需的时间。可能需要在您的环境中测试此功能。如果节点上运行的 SBD 守护程序未足够快速地更新检查包计时器,则节点会自行终止。watchdog 超时必须短于 msgwait 超时 – 前者是后者的一半是较好的估计值。
以下“公式”大致表达了这三个值之间的关系:
Timeout (msgwait) = (Timeout (watchdog) * 2)
stonith-timeout = Timeout (msgwait) + 20%
更多信息请man sbd 获取
- 设置 Softdog 检查包 (ha01 ha02)
# sed -i ‘9i SBD_DEVICE=”/dev/mapper/mpathe;/dev/mapper/mpathg;\
/dev/mapper/mpathf”‘ /etc/sysconfig/sbd
- 启动 SBD 守护程序
# systemctl enable sbd
2.5. 配置集群
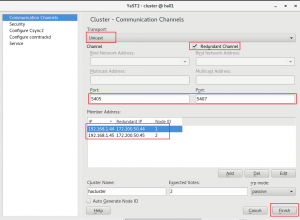
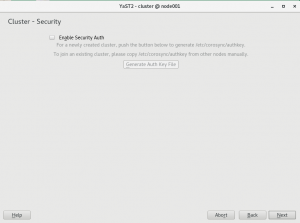
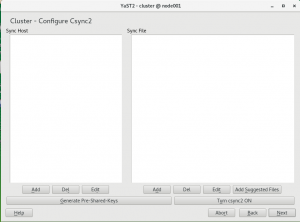
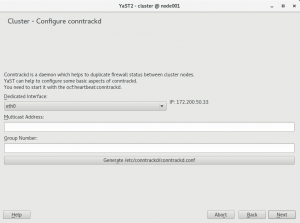
# yast2 cluster
采用Unicast 单播模式,点击选择冗余方式redundant Channet,添加单播地址和端口(左边心跳网络地址,右边冗余public地址)

- 复制ha01配置文件到ha02上
# scp /etc/corosync/corosync.conf ha02:/etc/corosync/corosync.conf
- 2节点集群启动服务
# rcpacemaker start
- 查看集群状态
# crm_mon -1
Stack: corosync
Current DC: ha01 (version 1.1.16-4.8-77ea74d) – partition with quorum
Last updated: Tue Nov 7 23:13:06 2017
Last change: Tue Nov 7 23:13:05 2017 by hacluster via crmd on ha01
2 nodes configured
0 resources configured
Online: [ ha01 ha02 ] # 应该都处于online 状态
No active resources
- 查看集群环状态
# corosync-cfgtool -s
Printing ring status.
Local node ID 2
RING ID 0
id = 192.168.1.45
status = ring 0 active with no faults
RING ID 1
id = 172.200.50.45
status = ring 1 active with no faults
- 配置全局参数
# crm configure
property stonith-enabled=true
property stonith-timeout=220s
property no-quorum-policy=ignore
rsc_defaults resource-stickiness=1000
- 配置 SBD 资源
primitive res_stonith_sbd stonith:external/sbd \
params pcmk_delay_max=30 \
op start interval=0 timeout=20 \
op monitor interval=3600 timeout=60 \
op stop interval=0 timeout=15
- 配置虚拟IP地址,并创建组资源
primitive res_vip_apache ocf:heartbeat:IPaddr2 \
params ip=172.200.50.49 cidr_netmask=24 \
op start timeout=20s interval=0 \
op stop timeout=20s interval=0 \
op monitor timeout=20s interval=10s \
meta target-role=Started
group Grp_apache res_vip_apache
- 创建共享磁盘 VG和 LV
pvcreate create /dev/mapper/mpathh
vgcreate vg01 /dev/mapper/mpathh
lvcreate -l +100%FREE vg01 -n lvtest
- HA02 主机导入 VG信息,并且HA01主机上不激活VG
# vgexport vg01
# vgimport vg01
# lvchange -an /dev/vg01/lvtest
- 创建VG资源
primitive res_lvm_vg01_lvtest LVM \
params volgrpname=vg01 \
op start timeout=30 interval=0 \
op stop timeout=30 interval=0 \
op monitor timeout=30 interval=10 \
meta target-role=Started
modgroup Grp_apache add res_lvm_vg01_lvtest
- 格式化文件系统,安装apache
mkfs.ext4 /dev/mapper/vg01-lvtest
zypper -n in apache2
- 创建文件系统资源
primitive res_filesystem_fsapache Filesystem \
params device=”/dev/mapper/vg01-lvtest” directory=”/srv/www/htdocs/” fstype=ext4 \
op start timeout=60 interval=0 \
op stop timeout=60 interval=0 \
op monitor timeout=40 interval=20 \
meta target-role=Started
modgroup Grp_apache add res_filesystem_fsapache
- 创建apache资源
primitive res-apache-server systemd:apache2 \
op monitor interval=30s \
meta target-role=Started
modgroup Grp_apache add res-apache-server
- HA集群和资源状态
# crm_mon -1
Stack: corosync
Current DC: ha01 (version 1.1.19+20181105.ccd6b5b10-3.16.1-1.1.19+20181105.ccd6b5b10) – partition with quorum
Last updated: Fri Feb 14 11:39:37 2020
Last change: Fri Feb 14 11:02:34 2020 by root via crm_resource on ha01
2 nodes configured
5 resources configured
Online: [ ha01 ha02 ]
Active resources:
res_stonith_sbd (stonith:external/sbd): Started ha01
Resource Group: Grp_apache
res_vip_apache (ocf::heartbeat:IPaddr2): Started ha01
res_lvm_vg01_lvtest (ocf::heartbeat:LVM): Started ha01
res_filesystem_fsapache (ocf::heartbeat:Filesystem): Started ha01
res-apache-server (systemd:apache2): Started ha01
- 测试HA切换
# echo ha02 >> /srv/www/htdocs/index.html
# crm resource migrate Grp_apache ha01
# echo ha01 > /srv/www/htdocs/index.html
手把手教你搭建SUSE HA视频:
https://v.qq.com/x/page/m3067kxp4bo.html
参考资料:
https://documentation.suse.com/sle-ha/12-SP4/
No comments yet